In this post, we will cover my top 10 things you need to know about MySQL in order to begin working with it effectively. We’ll approach these topics using Oracle as a reference point. Hopefully that way you will more readily understand something in MySQL if you already know the Oracle equivalent. Should be fun! We will cover these topics:
In this post, we will cover my top 10 things you need to know about PostgreSQL in order to begin working with it effectively. We’ll approach these topics using Oracle as a reference point. Hopefully that way you will more readily understand something in PostgreSQL if you already know the Oracle equivalent. Should be fun! We will cover these topics:
From here, click the Download button, then click the button corresponding to your OS family. For Linux, click the required distribution. From here, under the PostgreSQL Yum Repository section, select your version , platform and architecture and the website will respond with the yum commands you’ll need to download and install PostgreSQL server.
It really is that simple. No need to setup an account and login like you have to with Oracle Tech Net. Just repo and go!
01.2 PostgreSQL Already Installed?
I started off with a RHEL 7.9 system which already had a version of PostgreSQL installed (9.2). That version is no longer supported and is probably not what you want. The best way forward is to uninstall that version first, before installing a newer version. That way you avoid some interesting looking failure messages. To check if you have a version of PostgreSQL server already installed and to remove it, run these commands as root:
With a clean and PostgreSQL free system, let’s crack on and install version 14. As the root user, download the required rpm:
[root@orasvr04 root]# yum install -y https://download.postgresql.org/pub/repos/yum/reporpms/EL-7-x86_64/pgdg-redhat-repo-latest.noarch.rpm

Loaded plugins: langpacks, product-id, search-disabled-repos
pgdg-redhat-repo-latest.noarch.rpm                                        | 8.1 kB  00:00:00
Examining /var/tmp/yum-root-iTgiZB/pgdg-redhat-repo-latest.noarch.rpm: pgdg-redhat-repo-42.0-23.noarch
/var/tmp/yum-root-iTgiZB/pgdg-redhat-repo-latest.noarch.rpm: does not update installed package.
Error: Nothing to do
[root@orasvr04 root]#
Next, as the root user, install the PostgreSQL server:
[root@orasvr04 root]# yum install -y postgresql14-server

Loaded plugins: langpacks, product-id, search-disabled-repos
file:///cdrom/repodata/repomd.xml: [Errno 14] curl#37 - "Couldn't open file /cdrom/repodata/repomd.xml"
Trying other mirror.
Resolving Dependencies
--> Running transaction check
---> Package postgresql14-server.x86_64 0:14.1-1PGDG.rhel7 will be installed
--> Processing Dependency: postgresql14-libs(x86-64) = 14.1-1PGDG.rhel7 for package: postgresql14-server-14.1-1PGDG.rhel7.x86_64
--> Processing Dependency: postgresql14(x86-64) = 14.1-1PGDG.rhel7 for package: postgresql14-server-14.1-1PGDG.rhel7.x86_64
--> Processing Dependency: libpq.so.5()(64bit) for package: postgresql14-server-14.1-1PGDG.rhel7.x86_64
--> Running transaction check
---> Package postgresql14.x86_64 0:14.1-1PGDG.rhel7 will be installed
---> Package postgresql14-libs.x86_64 0:14.1-1PGDG.rhel7 will be installed
--> Finished Dependency Resolution

Dependencies Resolved

==================================================================================================
 Package                                     Arch                           Version                                    Repository                      Size
==================================================================================================
Installing:
 postgresql14-server                         x86_64                         14.1-1PGDG.rhel7                           pgdg14                         5.5 M
Installing for dependencies:
 postgresql14                                x86_64                         14.1-1PGDG.rhel7                           pgdg14                         1.5 M
 postgresql14-libs                           x86_64                         14.1-1PGDG.rhel7                           pgdg14                         265 k

Transaction Summary
==================================================================================================
Install  1 Package (+2 Dependent packages)

Total download size: 7.3 M
Installed size: 31 M
Downloading packages:
(1/3): postgresql14-libs-14.1-1PGDG.rhel7.x86_64.rpm                                                                                 | 265 kB  00:00:01
(2/3): postgresql14-14.1-1PGDG.rhel7.x86_64.rpm                                                                                      | 1.5 MB  00:00:01
(3/3): postgresql14-server-14.1-1PGDG.rhel7.x86_64.rpm                                                                               | 5.5 MB  00:00:00
--------------------------------------------------------------------------------------------------
Total                                                                                                                       3.7 MB/s | 7.3 MB  00:00:01
Running transaction check
Running transaction test
Transaction test succeeded
Running transaction
  Installing : postgresql14-libs-14.1-1PGDG.rhel7.x86_64             1/3
  Installing : postgresql14-14.1-1PGDG.rhel7.x86_64                  2/3
  Installing : postgresql14-server-14.1-1PGDG.rhel7.x86_64           3/3
  Verifying  : postgresql14-14.1-1PGDG.rhel7.x86_64                  1/3
  Verifying  : postgresql14-server-14.1-1PGDG.rhel7.x86_64           2/3
  Verifying  : postgresql14-libs-14.1-1PGDG.rhel7.x86_64             3/3

Installed:
  postgresql14-server.x86_64 0:14.1-1PGDG.rhel7

Dependency Installed:
  postgresql14.x86_64 0:14.1-1PGDG.rhel7 postgresql14-libs.x86_64 0:14.1-1PGDG.rhel7

Complete!
Next, as the root user, perform the initial setup and configuration, enable PostgreSQL and start the PosgreSQL server service:
[root@orasvr04 root]# /usr/pgsql-14/bin/postgresql-14-setup initdb

Initializing database ... OK

[root@orasvr04 root]# systemctl enable postgresql-14

Created symlink from /etc/systemd/system/multi-user.target.wants/postgresql-14.service to /usr/lib/systemd/system/postgresql-14.service.

[root@orasvr04 root]# systemctl start postgresql-14
(displays no output)
That’s it. PostgreSQL version 14 is up and running. How do we know it’s working?
01.4 PostgreSQL Server Status Check.
As the root user, run the standard Linux service status command for PostgreSQL. Note the minus lower case L option (-l) which gives you slightly more informative output:
[root@orasvr04 ~]# systemctl status -l postgresql-14

● postgresql-14.service - PostgreSQL 14 database server
   Loaded: loaded (/usr/lib/systemd/system/postgresql-14.service; enabled; vendor preset: disabled)
   Active: active (running) since Tue 2022-01-04 16:12:18 CST; 1h 35min ago
     Docs: https://www.postgresql.org/docs/14/static/
  Process: 1138 ExecStartPre=/usr/pgsql-14/bin/postgresql-14-check-db-dir ${PGDATA} (code=exited, status=0/SUCCESS)
 Main PID: 1164 (postmaster)
   CGroup: /system.slice/postgresql-14.service
           ├─1164 /usr/pgsql-14/bin/postmaster -D /var/lib/pgsql/14/data/
           ├─1203 postgres: logger
           ├─1333 postgres: checkpointer
           ├─1334 postgres: background writer
           ├─1335 postgres: walwriter
           ├─1336 postgres: autovacuum launcher
           ├─1339 postgres: stats collector
           └─1340 postgres: logical replication launcher

Jan 04 16:12:18 orasvr04.mynet.com systemd[1]: Starting PostgreSQL 14 database server...
Jan 04 16:12:18 orasvr04.mynet.com postmaster[1164]: 2022-01-04 16:12:18.341 CST [1164] LOG:  redirecting log output to logging collector process
Jan 04 16:12:18 orasvr04.mynet.com postmaster[1164]: 2022-01-04 16:12:18.341 CST [1164] HINT:  Future log output will appear in directory "log".
Jan 04 16:12:18 orasvr04.mynet.com systemd[1]: Started PostgreSQL 14 database server.
So we know the PostgreSQL server is up and running, but is it configured and operational? To find out we’ll need to login to the PostgreSQL server. To do that, we’ll need to use a client tool. The PostgreSQL equivalent of the SQL*Plus CLI is called psql. More information on psql can be found here. Let’s switch to the postgres OS user and log into the PostgreSQL server:
[root@orasvr04 ~]# su - postgres

Last login: Tue Jan  4 18:39:58 CST 2022 on pts/0
First, let’s check the version is correct. It should be version 14.1:
-bash-4.2$ psql -V

psql (PostgreSQL) 14.1
Next, let’s connect to the default ‘system’ database (postgres):
-bash-4.2$ psql

psql (14.1)
Type "help" for help.

postgres=#
It doesn’t tell you you’re connected, but you are. Your prompt defaults to the database you’re connected to. In this case, that’s the postgres database. Let’s generate some output by listing all the databases the PostgreSQL server knows about (\list command):
The output tells us there are currently 3 databases. The default system database (postgres) and two template databases (template0 and template1). To exit out of psql, type exit or backslash q (\q):
postgres=# \q
-bash-4.2$
PostgreSQL version 14 is installed, up and running and ready for action!
Before you get too excited, there are a couple of things you might want to take care of. Changing the password of the postgres OS user and the password of the PostgreSQL server postgres user. Changing the OS password is standard fare via the passwd command. Changing the PostgreSQL server postgres user password requires a SQL command. Here’s how to do both.
As the root user:
[root@orasvr04 ~]# passwd postgres

Changing password for user postgres.
New password: <enter a new password>
Retype new password: <enter a new password again>
passwd: all authentication tokens updated successfully.

[root@orasvr04 ~]#
As the postgres user:
-bash-4.2$ psql
psql (14.1)
Type "help" for help.

postgres=# alter user postgres with password 'postgres';
ALTER ROLE
postgres=# exit
-bash-4.2$
Remember these passwords. You’ll need them later!
03. PostgreSQL Connectivity.
Connecting to a PostgreSQL server can be achieved in a number of different ways. Two clients come packaged with PostgreSQL itself. A CLI called psql and a GUI called pgAdmin. We’ll also take a look at how to connect Oracle SQL Developer to a PostgreSQL server.
A fresh install of PostgreSQL onto a Linux server will, by default, allow local connections but not remote connections. Enabling remote client connections depends upon some parameters being set in two PostgreSQL configuration files. These parameter files are postgresql.conf (postgresql.auto.conf) and pg_hba.conf. By default, both are stored in the PostgreSQL data directory, /var/lib/pgsql/<version_number>/data. For example:
/var/lib/pgsql/14/data
postgresql.conf
The postgresql.conf file is the main configuration file for the PostgreSQL server. It’s the equivalent of Oracle’s text pfile (init.ora). Detailed documentation about the format and content of the postgresql.conf file can be found here.
It is a best practice to not directly edit the postgresql.conf file. Instead you should add your own customizations via its complementary file, postgresql.auto.conf. However, there is a comment in postgresql.auto.conf which says, “Do not edit this file manually! It will be overwritten by the ALTER SYSTEM command.”. It’s OK if you edit it, I won’t tell anyone. Or you could be the hyper disciplined DBA that you are and use ALTER SYSTEM commands to add the relevant entries. Let’s do that. There are two parameters you need to add to postgresql.auto.conf, listener_addresses and port.
The listen_addresses parameter specifies the IP addresses or host on which to listen for incoming connection requests. It defaults to ‘localhost’ (note the single quotes) which is obviously the server on which PostgreSQL is installed. It is common to change this to an asterisk symbol (‘*’) meaning any address (or NIC on the server). Conversely, it can be set explicitly to the hostname or exact IP address of the server. The listen_addresses parameter is kind of the equivalent of the HOSTS parameter in an Oracle listener.ora LISTENER configuration.
The port parameter specifies the port number on which incoming connection requests are listened for. Its default value is 5432.It is the equivalent of the PORT parameter in an Oracle listener.ora LISTENER configuration.
To set these parameters using SQL, use the psql CLI. As the postgres OS user:
-bash-4.2$ id
uid=26(postgres) gid=26(postgres) groups=26(postgres)

-bash-4.2$ psql
psql (14.1)
Type "help" for help.

postgres=# alter system set listen_addresses = 'orasvr04';
ALTER SYSTEM

postgres=# alter system set port='5432';
ALTER SYSTEM

postgres=# exit
-bash-4.2$

-bash-4.2$ cat postgresql.auto.conf
# Do not edit this file manually!
# It will be overwritten by the ALTER SYSTEM command.
listen_addresses = 'orasvr04'
port = '5432'
For changes to the postgresql.auto.conf to take effect, the PostgreSQL service must be restarted. As the root user:
The pg_hba.conf file controls which IP addresses and users are allowed to connect to which databases on the PostgreSQL server and how those connections will be authenticated. It does this through a set of rules. Detailed documentation about the format and contents of the rules can be found here.
A rule has 5 values. They are:
Rule Parameter
Meaning
TYPE
Specifies the type of client and is usually set to the value host. SSL hosts are also supported.
DATABASE
The name of the database the connection rule maps to. It can be the name of an individual database or all databases when the value "all" is specified.
USER
The name of the user the connection rule maps to. It can be the name of an individual user (login role) or all users when the value "all" is specified.
ADDRESS
This specifies the range of IP addresses which are allowed to connect to the PostgreSQL server. It uses CIDR notation and supports both IPv4 and IPv6.
METHOD
This specifies the authentication method the client connection will use when negotiating a connection with the PostgreSQL server. Detailed authentication methods are documented here. Or you could just use the password option to denote the remote user must provide a password.
An interesting thing about the pg_hba.conf file is the contents are scanned top to bottom. As soon as a rule granting or rejecting a connection is found, it is acted upon and no further entries are processed. That means if a rule rejecting access appears before a rule granting access, you’ll never get connected. Order is important.
The pg_hba.conf file contains a ton of useful internal documentation before the actual access control rules. Here is the default pg_hba.conf file, including the rule I added for my system (in green):
# TYPE  DATABASE        USER            ADDRESS                 METHOD

# "local" is for Unix domain socket connections only
local   all             all                                     peer
# IPv4 local connections:
#host    all             all             127.0.0.1/32            scram-sha-256
host    all     	all     	200.200.10.1/24  	password
# IPv6 local connections:
host    all             all             ::1/128                 scram-sha-256
# Allow replication connections from localhost, by a user with the
# replication privilege.
local   replication     all                                     peer
host    replication     all             127.0.0.1/32            scram-sha-256
host    replication     all             ::1/128                 scram-sha-256
Let’s take a look at what my rule actually means:
Rule Parameter
Value
Meaning
TYPE
host
Specifies a connection will be made using TCP/IP.
DATABASE
all
Rule applies to all databases within the PostgreSQL server.
USER
all
Rule applies to all users.
ADDRESS
200.200.10.1/24
Specifies the range of IP addresses the rule allows to connect. The /24 means the first 3 numbers identify the network (200.200.10) and the last number identifies the range of hosts within that network. The range will be 200.200.10.1 through 200.200.10.254. As long as the connecting client has an IP address within that range, the rule will allow it to connect.
METHOD
password
Take a wild guess.
03.1 psql.
The psql CLI is equivalent to the SQL*Plus CLI. With SQL*Plus you can run SQL commands and SQL*Plus commands. Similarly with psql, you can run SQL commands and meta-commands.
03.1.1 psql Local Connection.
To make a local connection to the PostgreSQL server, as the postgres OS user, simply type psql and hit the <ENTER> key. This will connect you to the postgres system database as the postgres user (login role):
-bash-4.2$ id
uid=26(postgres) gid=26(postgres) groups=26(postgres)

-bash-4.2$ psql
psql (14.1)
Type "help" for help.

postgres=#
You can use a psql meta-command to show you details of your current connection:
postgres=# \conninfo
You are connected to database "postgres" as user "postgres" via socket in "/var/run/postgresql" at port "5432".

postgres=#
03.1.2 psql Remote Connection.
To use psql (and pgAdmin) to make remote connections to a PostgreSQL server, you need to install them on your client machine. To install these utilities, run the relevant PostgreSQL download (as Administrator if you are on Windows):
Click Next
Choose your preferred installation directory, then click Next
Check the boxes for pgAdmin and Command Line Tools, then click Next
Click Next
Click Next
Watch the pretty green progress bar
Click Finish
Once the installation is complete, it will have created a PostgreSQL program group containing links to psql, pgAdmin and pgAdmin documentation:
Click on SQL Shell (psql)
Clicking on SQL Shell (psql) opens up a command window which will prompt for 5 values:
Running the \conninfo meta-command displays your connection information
03.2 pgAdmin.
The pgAdmin GUI is similar to Oracle SQL Developer, including SQL Developer’s DBA connections, but is probably closer to SQL Server Management Studio (SSMS) in look, feel and functionality. Like SSMS, it’s a combination of query tool, IDE and DBA console. We saw in the previous section how to install it on Windows. Let’s fire it up and see what it looks like.
Click on pgAdmin4 in the PostgesSQL program group in Windows. The first thing you’ll see is a challenge for the master password. You’ll see this challenge the first time you fire up pgAdmin.Click the Reset Master Password button to initially set one, then remember it. You’ll need it each time you use pgAdmin from that point forward. It can of course, be reset at any time.
A master password is specific to a client installation of pgAdmin. Meaning the master password for pgAdmin on client A can be different from the master password for pgAdmin on client B, even though they might be connecting to the same PostgreSQL server.
Setup a master password, then click OK
From here you can add the PostgreSQL server(s) you want to connect to. Right click on Servers, then select Create ➡️ Server… to add a new connection:
Provide a name for the server (orasvr04), then click the Connection tab
Provide the server hostname or IP and the password for the postgres user, then click the Save button
If the connection information validates correctly, you see this. It’s working!
When you’re ready to exit out of pgAdmin, just click the X in the top right hand corner of the window. The system responds with:
Click the Leave button to exit
Subsequent invocations of pgAdmin will again prompt you for the master password and the password of the postgres user (login role) in the postgres system database. pgAdmin does that because the entry in pg_hba.conf specifies that connection requests coming from this client IP are authenticated via a password:
Enter the password of the postgres user and click OK
From here you can do what you need to do
03.3 Oracle SQL Developer.
You can also use Oracle’s SQL Developer to connect to PostgreSQL servers. Predictably, it’s a case of dealing with that awful virus the world knows as Java. Here’s what you do to make it work.
First, check which version of Java your copy of SQL Developer is using. To find that out, fire up SQL Developer, then click Help ➡️ About, then choose the Version tab:
As you can see, I’m running Java 1.8.0_311, which basically means version 8 (the second number).
Next, go to the PostgreSQL JDBC Driver download website. From here, you should choose the most appropriate PostgreSQL JDBC driver for your needs. Fortunately by using plain English, this website makes it super easy, barely an inconvenience:
Download the PostgreSQL JDBC driver to your local system. Once downloaded, copy it to the jdk\jre\lib\ext directory underneath the directory where you have SQL Developer installed. For example:
If SQL Developer is already up and running, you will need to re-start it for that change to take effect. Otherwise, fire up SQL Developer and create a connection to your PostgreSQL server:
Click to create a new connection
Select PostgreSQL from the Database Type menuProvide values for Name, Username, Password, Hostname, Port and pick a database1 – Click the Test button, 2 – Check the test status (Success), 3 – Check the box to save the password
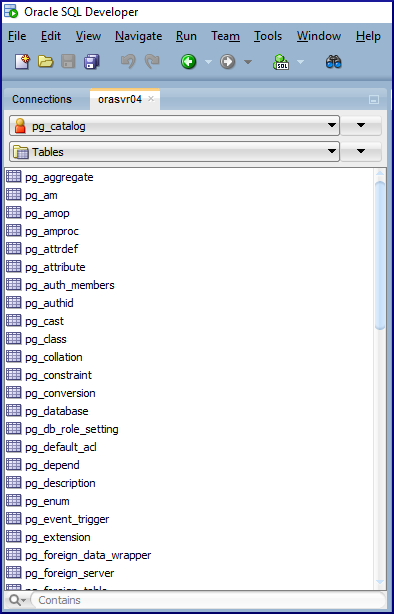
The PostgreSQL connection (orasvr04) is added to the SQL Developer connections and looks like this:
If you right click over postgres, the Schema Browser option appears:
Click Schema Browser
The Schema Browser allows you to, well browse objects. If you want to create any, you’ll need to open a SQL worksheet and type in the SQL commands. So not as feature rich as pgAdmin, but what did you expect? It’s usable familiar interface at least. Enjoy!
In this post, we will cover my top 10 things you need to know about SQL Server in order to begin working with it effectively. We’ll approach these topics using Oracle as a reference point. Hopefully that way you will more readily understand something in SQL Server if you already know the Oracle equivalent. Should be fun! We will cover these topics:
It’s no secret that Oracle is the Rolls Royce of relational database management systems. It is the most popular and feature rich database platform on the planet. It just is. A casual internet search using DuckDuckGo (of course) will tell you that.
It’s also no secret that Oracle is relatively expensive to run and a challenge to manage and maintain. It just is. If that weren’t the case there wouldn’t be so much competition in the database market. That said, not every data storage and retrieval challenge needs a Rolls Royce solution. In this series, we’ll take a look at the next three most popular database management systems after Oracle. They being, in no specific order, SQL Server, PostgreSQL and MySQL.
If you’re an Oracle DBA and are suddenly faced with the prospect of administering these other database platforms, then this series is for you. We’ll cover my top 10 things you’ll likely need to know about these other databases. The table below will hopefully help you find what you need quickly. The links will be added as I find time to post the material:
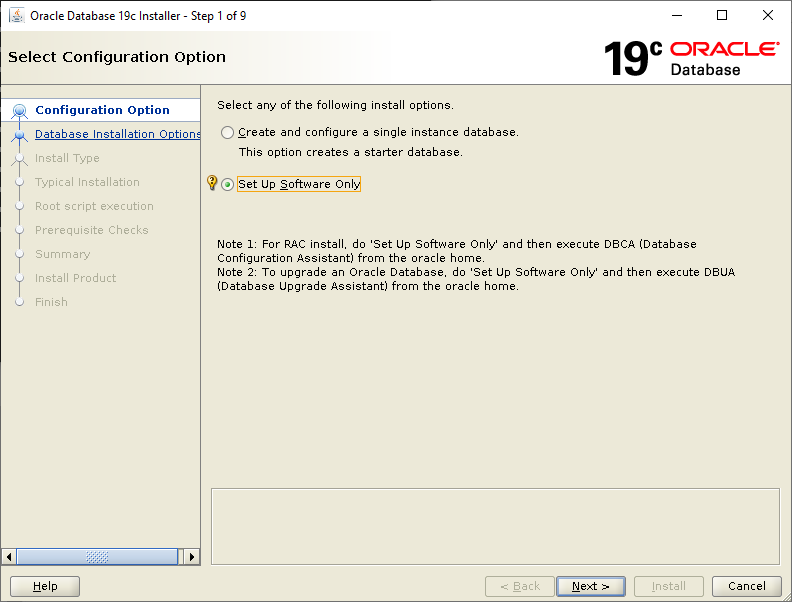
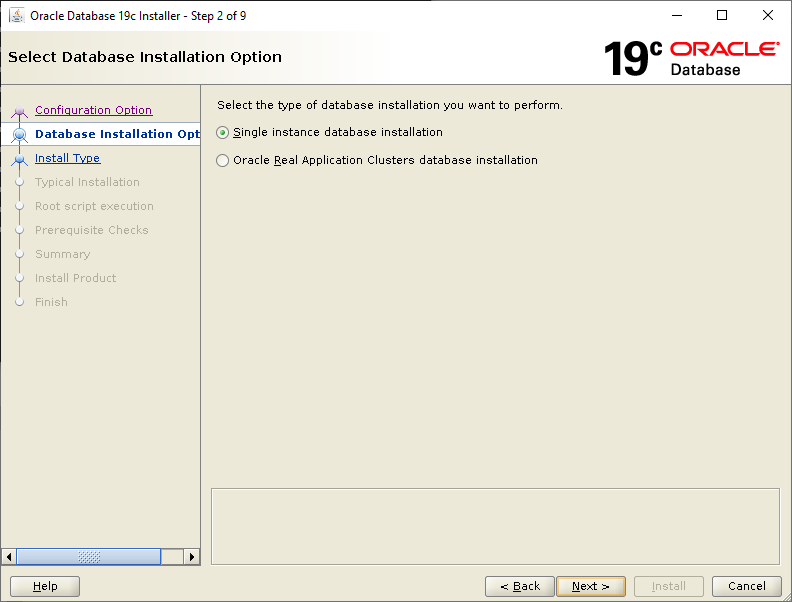
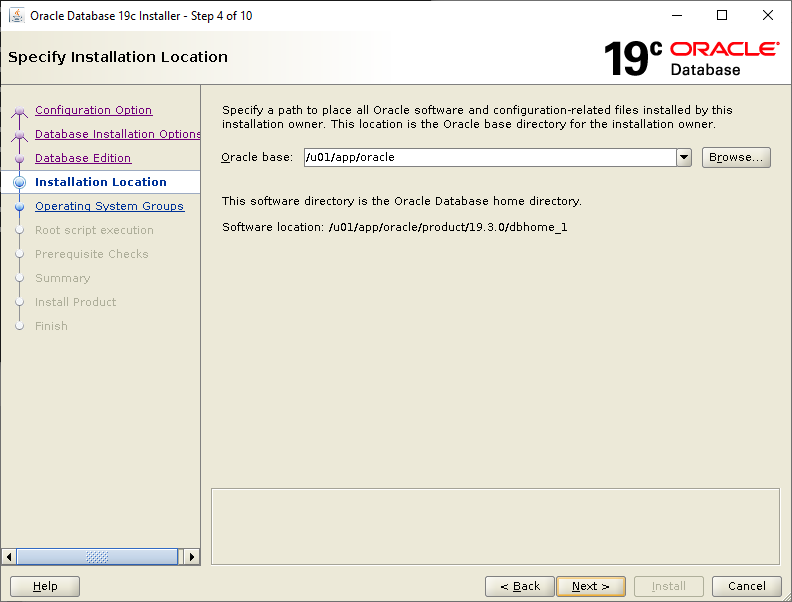
Nothing much has changed since Oracle Database 18c as far as installation of the binaries is concerned. You still have to create your own ORACLE_HOME directory, copy the downloaded zip file to that directory, unzip it then run the installer. Let’s crack on:
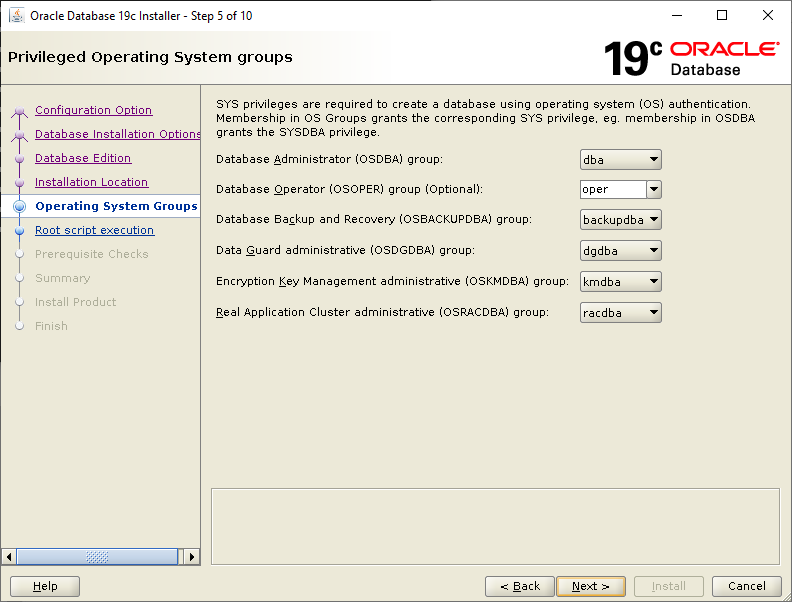
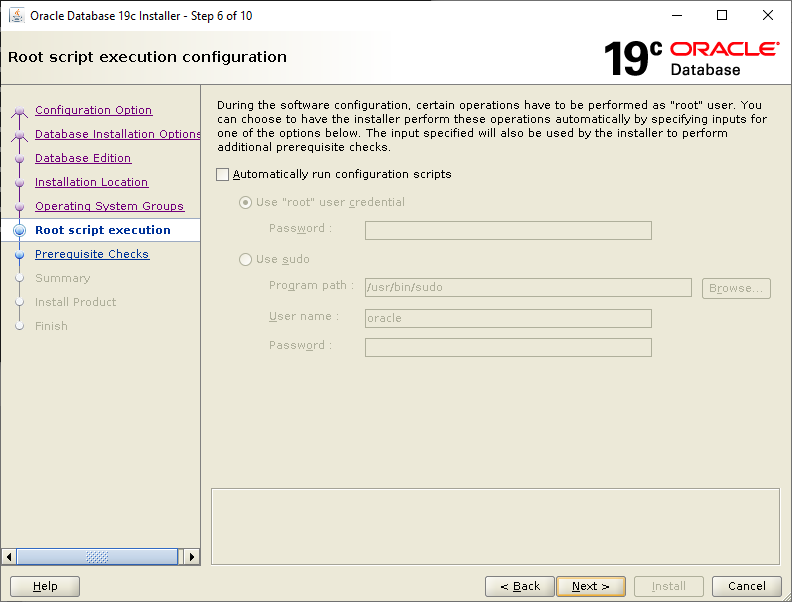
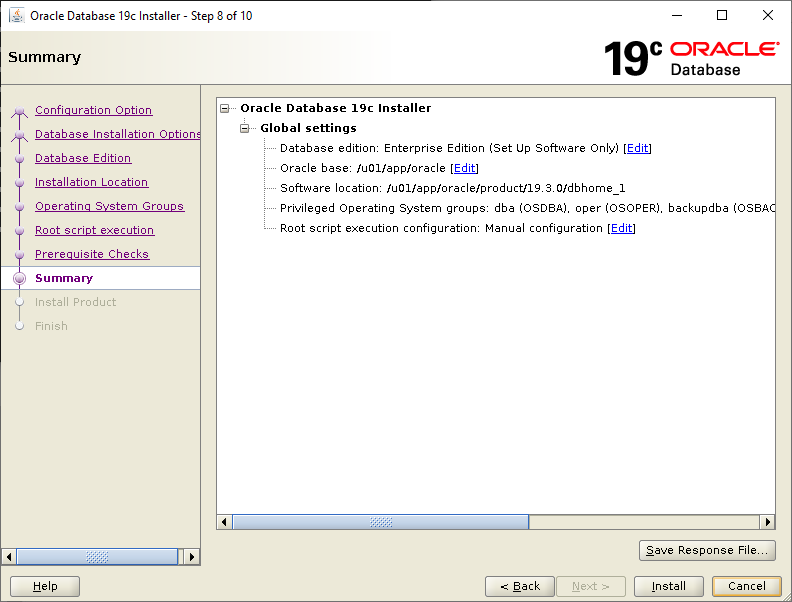
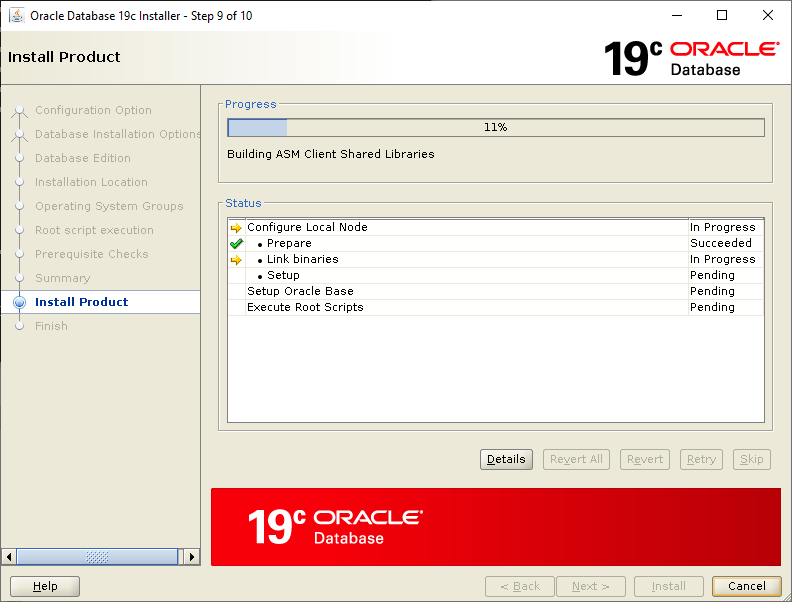
Select Set Up Software Only then click NextSelect Single instance database installation then click NextSelect Enterprise Edition then click NextCheck your ORACLE_BASE and ORACLE_HOME values are what you want then click NextYour Linux group configuration should be picked up, click NextWe will run the root scripts interactively, click NextLet the installer run its prerequisite checks If you followed the configuration of Oracle Linux 7, you should see this screen, click InstallLet the installer do its thing until the root script window pops upIn a separate terminal session, run the root script then return to the pop up and click OK
[root@orasvr01 ~]# /u01/app/oracle/product/19.3.0/dbhome_1/root.sh
Performing root user operation.
The following environment variables are set as:
    ORACLE_OWNER= oracle
    ORACLE_HOME=  /u01/app/oracle/product/19.3.0/dbhome_1

Enter the full pathname of the local bin directory: [/usr/local/bin]:
The contents of "dbhome" have not changed. No need to overwrite.
The contents of "oraenv" have not changed. No need to overwrite.
The contents of "coraenv" have not changed. No need to overwrite.

Entries will be added to the /etc/oratab file as needed by
Database Configuration Assistant when a database is created
Finished running generic part of root script.
Now product-specific root actions will be performed.
Oracle Trace File Analyzer (TFA - Standalone Mode) is available at :
    /u01/app/oracle/product/19.3.0/dbhome_1/bin/tfactl

Note :
1. tfactl will use TFA Service if that service is running and user has been granted access
2. tfactl will configure TFA Standalone Mode only if user has no access to TFA Service or TFA is not installed
Data Guard is the gold standard as far as managing the replication of entire Oracle databases is concerned. It has significant advantages over storage based replication, many of which are documented here.
There are 4 ways to create and manage a Data Guard configuration and we’ll cover those in this installment of the Build Your Own Oracle Infrastructure series. We’ll also cover some basic testing and some more interesting configurations when integrating with Oracle RAC.
For this task we’ll use an Oracle Database 18c Release 3 CDB called D183 as our primary database. It runs on server orasvr01 whose OS is Oracle Linux 7. The database uses regular file systems for database storage and Oracle Managed Files (OMF) for Oracle file management.
Our physical standby database will be called D183DR and will run on server orasvr03. This server also runs Oracle Linux 7 and uses regular file systems for database storage. The file system configuration is slightly (and deliberately) different compared to orasvr01. The standby database will also use OMF.
Setting things up manually is the best way to understand what’s involved and what’s actually happening behind the scenes. With that in mind, it’s absolutely crucial we execute the correct commands on the correct servers and databases. The OS prompt will help identity which server we’re on and by modifying the SQL prompt, we can keep track of which database we’re logged into. To that end, you might want to add this line to your $ORACLE_HOME/sqlplus/admin/glogin.sql file:
set sqlprompt "_CONNECT_IDENTIFIER SQL> "
It’s a good idea to know what you’re starting with and what you plan to configure. So let’s review what the PRIMARY setup looks like:
By default, some database operations are minimally logged while others can practically avoid logging altogether. In a Data Guard configuration, we always want what happens on the primary database to be replicated on the standby database. Hence, FORCE LOGGING needs to be enabled:
D183 SQL> select name, force_logging from v$database;

NAME      FORCE_LOGGING
--------- ---------------------------------------
D183      NO

D183 SQL> alter database force logging;
Database altered.
Step #2: PRIMARY – Add Standby Redo Log Files.
Strictly speaking, this step is only necessary if you expect your primary database to transition to the standby database role at some point. If so, then the primary database needs to have some standby redo log files. It is also an Oracle best practice. The size of the standby redo log files should be at least as large as the largest online redo log file of the source database. You also need to have one more standby redo log group per thread than the number of online redo log file groups. In a single instance database configuration there is only one thread. Multiple threads only pertain to Oracle RAC configurations. We’ll cover that later. Let’s find out how many standby redo log groups we’ll need and what size the members will need to be:
Based upon this information, we know we’re going to need 4 standby redo log groups. This is how you create them and query what you end up with:
D183 SQL> alter database add standby logfile size 200M;
Database altered.
D183 SQL> alter database add standby logfile size 200M;
Database altered.
D183 SQL> alter database add standby logfile size 200M;
Database altered.
D183 SQL> alter database add standby logfile size 200M;
Database altered.
D183 SQL> set linesize 120 col member format a70select sl.group#,lf.type,lf.member,(sl.bytes/1024)/1024 "Size MB"
from v$standby_log sl, v$logfile lf
where sl.group# = lf.group#
order by
sl.group#;
GROUP# TYPE MEMBER Size MB
---------- -------- ---------------------------------------------------------------------- ----------
4 STANDBY /u03/oradata/D183/onlinelog/o1_mf_4_h5lkqz7x_.log 200
4 STANDBY /u07/oradata/fast_recovery_area/D183/onlinelog/o1_mf_4_h5lkr2jw_.log 200
5 STANDBY /u03/oradata/D183/onlinelog/o1_mf_5_h5lkyw06_.log 200
5 STANDBY /u07/oradata/fast_recovery_area/D183/onlinelog/o1_mf_5_h5ll0vkf_.log 200
6 STANDBY /u03/oradata/D183/onlinelog/o1_mf_6_h5ll3x6y_.log 200
6 STANDBY /u07/oradata/fast_recovery_area/D183/onlinelog/o1_mf_6_h5ll4026_.log 200
7 STANDBY /u03/oradata/D183/onlinelog/o1_mf_7_h5ll90qc_.log 200
7 STANDBY /u07/oradata/fast_recovery_area/D183/onlinelog/o1_mf_7_h5ll93cw_.log 200
Step #3: PRIMARY – Set Instance Parameters.
Up to 10 additional instance parameters need to be set for the primary database. They configure the redo transport services for when the primary database has either the primary database role or the standby database role. Additional details can be found in the Oracle documentation.
Step #3a. DB_UNIQUE_NAME.
In a Physical Standby configuration, the primary database and the physical standby database will both have the same DB_NAME. However, we need to differentiate one from the other and that’s done with the DB_UNIQUE_NAME parameter. This should have been set correctly (to the same value as DB_NAME) when the database was created.
D183 SQL> show parameter db_unique_name

NAME                                 TYPE        VALUE
------------------------------------ ----------- ------------------------------
db_unique_name                       string      D183
Step #3b. LOG_ARCHIVE_CONFIG.
This is a comma separated list of all the DB_UNIQUE_NAME values within the Data Guard configuration. In our case, the DB_UNIQUE_NAME of the primary database is D183 and for the physical standby database it will be D183DR.
D183 SQL> show parameter log_archive_config

NAME                                 TYPE        VALUE
------------------------------------ ----------- ------------------------------
log_archive_config                   string

D183 SQL> alter system set log_archive_config='dg_config=(D183,D183DR)' scope=both;
System altered.

D183 SQL> show parameter log_archive_config

NAME                                 TYPE        VALUE
------------------------------------ ----------- ------------------------------
log_archive_config                   string      dg_config=(D183,D183DR)
Step #3c. LOG_ARCHIVE_DEST_1.
This is the location where the primary database’s archived redo log files are written. We already know the archived redo log files are written to the directory specified by the parameter, DB_RECOVERY_FILE_DEST. Hence, the LOG_ARCHIVE_DEST_1 parameter is likely blank, but needs to be set correctly in a Data Guard configuration. All the different elements which make up the LOG_ARCHIVE_DEST_n parameter are specified in the Oracle documentation. Note, when setting this parameter use a single line to do so. Everything between the single quotes must be on a single line, even if it wraps on your screen:
D183 SQL> show parameter db_recovery_file_dest

NAME                                 TYPE        VALUE
------------------------------------ ----------- -------------------------------
db_recovery_file_dest                string      /u07/oradata/fast_recovery_area
db_recovery_file_dest_size           big integer 12918M

D183 SQL> show parameter log_archive_dest_1

NAME                                 TYPE        VALUE
------------------------------------ ----------- ------------------------------
log_archive_dest_1                   string

D183 SQL> alter system set log_archive_dest_1='location=USE_DB_RECOVERY_FILE_DEST valid_for=(ALL_LOGFILES,ALL_ROLES) db_unique_name=D183' scope=both;

System altered.

D183 SQL> show parameter log_archive_dest_1
NAME                                 TYPE        VALUE
------------------------------------ ----------- ------------------------------
log_archive_dest_1                   string      location=USE_DB_RECOVERY_FILE_
                                                 DEST valid_for=(ALL_LOGFILES,A
                                                 LL_ROLES) db_unique_name=D183
The VALID_FOR clause references a redo log type and a database role. The value ALL_LOGFILES means this archive log destination is valid for archiving either online redo log files or standby redo log files. The value ALL_ROLES means this destination is valid when the database has either the primary role or the standby role.
Step #3d. LOG_ARCHIVE_DEST_2.
This parameter tells the primary database where and how to send redo data to the standby database. This is quite a complicated parameter with plenty of options. Before we get to that, create a TNS connect string in the primary database’s tnsnames.ora file which we will use to connect to the standby database (D183DR). You will need to reference that connect string when setting the LOG_ARCHIVE_DEST_2 parameter:
Again, when setting this parameter use a single line to do so. Everything between the single quotes must be on a single line, even if it wraps on your screen:
D183 SQL> show parameter log_archive_dest_2

NAME                                 TYPE        VALUE
------------------------------------ ----------- ------------------------------
log_archive_dest_2                   string

D183 SQL> alter system set log_archive_dest_2 ='service=D183DR ASYNC NOAFFIRM db_unique_name=D183DR valid_for=(ALL_LOGFILES, ALL_ROLES)' scope=both;

System altered.

D183 SQL> show parameter log_archive_dest_2

NAME                                 TYPE        VALUE
------------------------------------ ----------- ------------------------------
log_archive_dest_2                   string      service=D183DR ASYNC NOAFFIRM
                                                  db_unique_name=D183DR valid_fo
                                                  r=(ALL_LOGFILES, ALL_ROLES)
The ASYNC keyword determines if redo transport is synchronized between the primary database and the standby database. ASYNC is the default. The NOAFFIRM keyword determines the primary database will not wait for an acknowledgement that a standby database has received redo data and has written it to its standby redo log files. NOAFFIRM is the default. The SERVICE parameter component is set to the TNS connect string you just created in the primary database’s tnsnames.ora file. The DB_UNIQUE_NAME is set to the unique database name of the standby database (which doesn’t exist quite yet).
Step #3e. REMOTE_LOGIN_PASSWORDFILE.
This must be set to either EXCLUSIVE or SHARED if a password file is used to authenticate redo transport sessions. SHARED means one or more databases can use the password file. There are some limitations with this option and it’s rarely used. More common is EXCLUSIVE and means the password file can only be used by a single database. A couple of things to note. First, from Oracle Database 12c Release 2, any changes to the primary database’s password file are automatically propagated to standby databases (with the exception of far sync). Second, redo transport sessions can also be authenticated using the Secure Sockets Layer (SSL) protocol. To use that mechanism instead of a password file required Oracle Internet Directory and an Oracle Wallet.
D183 SQL> show parameter remote_login_passwordfile

NAME                                 TYPE        VALUE
------------------------------------ ----------- ------------------------------
remote_login_passwordfile            string      EXCLUSIVE
Step #3f. LOG_ARCHIVE_FORMAT.
This should be set anyway since the primary database is running in archivelog mode. If you want/need to change it, be aware it’s not a dynamic parameter. I’ve never had any problems leaving its value as the default:
D183 SQL> show parameter log_archive_format

NAME                                 TYPE        VALUE
------------------------------------ ----------- ------------------------------
log_archive_format                   string      %t_%s_%r.arc
Step #3g. FAL_SERVER.
This needs to be set to the TNS connect string of the standby database and comes into play in the event the primary database becomes the standby database:
D183 SQL> show parameter fal_server

NAME                                 TYPE        VALUE
------------------------------------ ----------- ------------------------------
fal_server                           string

D183 SQL> alter system set fal_server='D183DR' scope=both;
System altered.

D183 SQL> show parameter fal_server
NAME                                 TYPE        VALUE
------------------------------------ ----------- ------------------------------
fal_server                           string      D183DR
Step #3h. STANDBY_FILE_MANAGEMENT.
When set to AUTO, this parameter ensures physical structure changes to the primary database (file creation/deletion) are replicated on the standby database. The default is MANUAL which we don’t want:
D183 SQL> show parameter standby_file_management

NAME                                 TYPE        VALUE
------------------------------------ ----------- ------------------------------
standby_file_management              string      MANUAL

D183 SQL> alter system set standby_file_management=AUTO scope=both;
System altered.

D183 SQL> show parameter standby_file_management

NAME                                 TYPE        VALUE
------------------------------------ ----------- ------------------------------
standby_file_management              string      AUTO
Step #3i. DB_FILE_NAME_CONVERT.
Since we are using OMF, we do not need to set this parameter because the parameter DB_CREATE_FILE_DEST can handle file placement.
If we were not using OMF, we would need to set this parameter. This parameter ties in with STANDBY_FILE_MANAGEMENT in the sense the standby database needs to know where to replicate physical structure changes which occurred on the primary database. This is the method by which you navigate around the issue of the primary database and the standby database having different directory structures. The parameter is made up of directory path pairs. The first directory path is the path to the data files on the primary database and the second directory path is the path to the data files on the standby database. Obviously you can define more than one pair of directory paths if the primary database’s files are stored in more than one location. Which they will be in the case of a CDB. Note, this is not a dynamic parameter and will require an instance bounce for it to take effect:
Step #3j. LOG_FILE_NAME_CONVERT.
Even though we are using OMF, if this parameter is not set correctly, the standby database instantiation runs into some issues. The data files are created in the relevant directories correctly, but the online and standby redo log files do not get created. In addition, the standby database alert log complains bitterly about these missing files and keeps referring to the path they had on the primary database server. This is not a dynamic parameter so we can only update the SPFILE until the instance is re-started. OMF will append <DB_UNIQUE_NAME>/onlinelog to these directory paths:
D183 SQL> alter system set log_file_name_convert=
          '/u03/oradata','/u02/oradata',
          '/u07/oradata/fast_recover_area','/u03/oradata/FRA'
          scope=spfile;

System altered.
Step #4: PRIMARY – Backup the Primary Database.
Literally any full primary database backup would work, but the more recent it is the less roll forward with archived redo logs you’ll need to do. In our environment, the RMAN backup files are written to /nas/backups/D183 which is an NFS share, accessible to both the primary and standby database servers. This eliminates the need to copy backup files from one server to the other. By using a preexisting backup we eliminate the overhead of an active duplication of the primary database. In a production environment, you probably don’t want to touch the primary database more than you have to.
Step #5: PRIMARY – Create a Standby Control File.
To create a standby database you need a standby control file. You generate one using the primary database. This will need to be copied to the standby server in a later step:
D183 SQL> alter database create standby controlfile as '/nas/backups/D183/tmp/D183_standby_ctrlfile.ctl';

Database altered.

[oracle@orasvr01 tmp]$ pwd
/nas/backups/D183/tmp

[oracle@orasvr01 tmp]$ ls -l
-rw-r----- 1 oracle oinstall 18825216 Feb 20 19:22 D183_standby_ctrlfile.ctl
Step #6: PRIMARY – Create a PFILE from the SPFILE.
Before the standby database instance can be started, its parameter file will need to be edited. So we need a text based version first and the easiest way to get that is to generate it from the primary database:
D183 SQL> create pfile='/nas/backups/D183/tmp/initD183DR.ora' from spfile;

File created.

[oracle@orasvr01 tmp]$ pwd
/nas/backups/D183/tmp

[oracle@orasvr01 tmp]$ ls -l init*
-rw-r--r-- 1 oracle oinstall 2588 Feb 20 19:28 initD183DR.ora
Step #7: STANDBY – Copy and Edit the PFILE.
The text based PFILE needs to be copied to $ORACLE_HOME/dbs on the standby database server and edited to make it specific to the directory paths on orasvr03. Here is a list of the parameters I needed to change:
Step #10: STANDBY – Copy the Primary Database Password File.
Since I’m using NFS, I copied this file from the primary database server to a NAS location, then from the NAS location to the standby database server. Using scp to copy the file directly from one server to the other works just as well.
[oracle@orasvr01 ~]$ cd $ORACLE_HOME/dbs
[oracle@orasvr01 dbs]$ cp orapwD183 /nas/backups/D183/tmp

[oracle@orasvr03 ~]$ cd /u01/app/oracle/product/18.3.0/dbhome_1/dbs
[oracle@orasvr03 dbs]$ cp /nas/backups/D183/tmp/orapwD183 ./orapwD183DR
Step #11: STANDBY – Create a Listener for the Standby Instance.
Either edit the listener.ora file in $ORACLE_HOME/network/admin and use lsnrctl to start the listener. Or use the Net Configuration Assistant (netca) to create the listener. When it’s up and running, check its status:
[oracle@orasvr03 ~]$ lsnrctl status LISTENER_D183DR

LSNRCTL for Linux: Version 18.0.0.0.0 - Production on 28-FEB-2020 12:23:23

Copyright (c) 1991, 2018, Oracle.  All rights reserved.

Connecting to (DESCRIPTION=(ADDRESS=(PROTOCOL=TCP)(HOST=orasvr03.mynet.com)(PORT=1522)))
STATUS of the LISTENER
------------------------
Alias                     LISTENER_D183DR
Version                   TNSLSNR for Linux: Version 18.0.0.0.0 - Production
Start Date                28-FEB-2020 12:22:40
Uptime                    0 days 0 hr. 0 min. 42 sec
Trace Level               off
Security                  ON: Local OS Authentication
SNMP                      OFF
Listener Parameter File   /u01/app/oracle/product/18.3.0/dbhome_1/network/admin/listener.ora
Listener Log File         /u01/app/oracle/diag/tnslsnr/orasvr03/listener_d183dr/alert/log.xml
Listening Endpoints Summary…
  (DESCRIPTION=(ADDRESS=(PROTOCOL=tcp)(HOST=orasvr03.mynet.com)(PORT=1522)))
  (DESCRIPTION=(ADDRESS=(PROTOCOL=ipc)(KEY=EXTPROC1522)))
The listener supports no services
The command completed successfully
Step #12: STANDBY/PRIMARY – Check Connectivity.
Add TNS connect strings to the tnsnames.ora file in $ORACLE_HOME/network/admin on both the primary and standby servers:
Next, use tnsping to make sure the connection resolves correctly from primary to standby and from standby to primary:
[oracle@orasvr01 admin]$ tnsping d183dr

TNS Ping Utility for Linux: Version 18.0.0.0.0 - Production on 28-FEB-2020 12:28:38

Copyright (c) 1997, 2018, Oracle.  All rights reserved.

Used parameter files:
/u01/app/oracle/product/18.3.0/dbhome_1/network/admin/sqlnet.ora

Used TNSNAMES adapter to resolve the alias
Attempting to contact (DESCRIPTION = (ADDRESS_LIST = (ADDRESS = (PROTOCOL = TCP)(HOST = orasvr03.mynet.com)(PORT = 1522))) (CONNECT_DATA = (SERVICE_NAME = D183DR.mynet.com)))
OK (0 msec)

[oracle@orasvr03 admin]$ tnsping d183

TNS Ping Utility for Linux: Version 18.0.0.0.0 - Production on 28-FEB-2020 12:28:04

Copyright (c) 1997, 2018, Oracle.  All rights reserved.

Used parameter files:
/u01/app/oracle/product/18.3.0/dbhome_1/network/admin/sqlnet.ora

Used TNSNAMES adapter to resolve the alias
Attempting to contact (DESCRIPTION = (ADDRESS_LIST = (ADDRESS = (PROTOCOL = TCP)(HOST = orasvr01.mynet.com)(PORT = 1522))) (CONNECT_DATA = (SERVICE_NAME = D183.mynet.com)))
OK (0 msec)
Step #13: STANDBY – Edit /etc/oratab.
Add the following entry to the /etc/oratab file on the standby server:
D183DR:/u01/app/oracle/product/18.3.0/dbhome_1:N
Step #14: STANDBY – Create the SPFILE from the PFILE.
[oracle@orasvr03 ~]$ . oraenv
ORACLE_SID = [] ? D183DR
The Oracle base remains unchanged with value /u01/app/oracle

[oracle@orasvr03 ~]$ cd $ORACLE_HOME/dbs

[oracle@orasvr03 dbs]$ sqlplus / as sysdba

SQL*Plus: Release 18.0.0.0.0 - Production on Fri Feb 28 12:34:52 2020
Version 18.3.0.0.0

Copyright (c) 1982, 2018, Oracle.  All rights reserved.

Connected to an idle instance.

SQL> create spfile from pfile='./initD183DR.ora';

File created.
Step #15: STANDBY – Restore the Primary Database Backup.
Log into RMAN, start the instance and mount the (non-existent) database using the standby control files, then restore the database:
[oracle@orasvr03 ~]$ rman target /

Recovery Manager: Release 18.0.0.0.0 - Production on Sat Feb 29 12:12:47 2020
Version 18.3.0.0.0

Copyright (c) 1982, 2018, Oracle and/or its affiliates.  All rights reserved.

connected to target database (not started)

RMAN> startup mount

Oracle instance started
database mounted

Total System Global Area    2147481064 bytes
Fixed Size                     8898024 bytes
Variable Size                603979776 bytes
Database Buffers            1526726656 bytes
Redo Buffers                   7876608 bytes
As a sanity check, you can check to make sure the instance has been started using the standby control files you copied (if you’re paranoid like I am):
RMAN> select * from v$controlfile;

using target database control file instead of recovery catalog

STATUS
-------
NAME
--------------------------------------------------------------------------------
IS_ BLOCK_SIZE FILE_SIZE_BLKS     CON_ID
--- ---------- -------------- ----------
/u02/oradata/D183DR/controlfile/D183DR_ctrl_1.ctl
NO       16384           1148          0

/u03/oradata/FRA/D183DR/controlfile/D183DR_ctrl_2.ctl
 NO       16384           1148          0
All looks good, so proceed with the database restore:
RMAN> restore database;

Starting restore at 29-FEB-20
Starting implicit crosscheck backup at 29-FEB-20
allocated channel: ORA_DISK_1
channel ORA_DISK_1: SID=260 device type=DISK
allocated channel: ORA_DISK_2
channel ORA_DISK_2: SID=26 device type=DISK
allocated channel: ORA_DISK_3
channel ORA_DISK_3: SID=261 device type=DISK
allocated channel: ORA_DISK_4
channel ORA_DISK_4: SID=27 device type=DISK
Crosschecked 42 objects
Crosschecked 6 objects
Finished implicit crosscheck backup at 29-FEB-20

Starting implicit crosscheck copy at 29-FEB-20
using channel ORA_DISK_1
using channel ORA_DISK_2
using channel ORA_DISK_3
using channel ORA_DISK_4
Crosschecked 2 objects
Finished implicit crosscheck copy at 29-FEB-20

searching for all files in the recovery area
cataloging files…
no files cataloged

using channel ORA_DISK_1
using channel ORA_DISK_2
using channel ORA_DISK_3
using channel ORA_DISK_4

channel ORA_DISK_1: starting datafile backup set restore
channel ORA_DISK_1: specifying datafile(s) to restore from backup set
channel ORA_DISK_1: restoring datafile 00010 to /u03/oradata/D183/9F38B30ACC493CC6E0531100A8C0D68A/datafile/o1_mf_sysaux_h5443fg3_.dbf
channel ORA_DISK_1: restoring datafile 00012 to /u03/oradata/D183/9F38B30ACC493CC6E0531100A8C0D68A/datafile/o1_mf_users_h544foyw_.dbf
channel ORA_DISK_1: reading from backup piece /nas/backups/D183/2020-02-29/2020-02-29_11:52/D183_1dupobv9_1_1.bkp
channel ORA_DISK_2: starting datafile backup set restore
channel ORA_DISK_2: specifying datafile(s) to restore from backup set
channel ORA_DISK_2: restoring datafile 00009 to /u03/oradata/D183/9F38B30ACC493CC6E0531100A8C0D68A/datafile/o1_mf_system_h5443ffj_.dbf
channel ORA_DISK_2: restoring datafile 00011 to /u03/oradata/D183/9F38B30ACC493CC6E0531100A8C0D68A/datafile/o1_mf_undotbs1_h5443fg5_.dbf
channel ORA_DISK_2: reading from backup piece /nas/backups/D183/2020-02-29/2020-02-29_11:52/D183_1eupoc25_1_1.bkp
channel ORA_DISK_3: starting datafile backup set restore
channel ORA_DISK_3: specifying datafile(s) to restore from backup set
channel ORA_DISK_3: restoring datafile 00003 to /u03/oradata/D183/datafile/o1_mf_sysaux_h53n98rc_.dbf
channel ORA_DISK_3: reading from backup piece /nas/backups/D183/2020-02-29/2020-02-29_11:52/D183_1bupobv6_1_1.bkp
channel ORA_DISK_4: starting datafile backup set restore
channel ORA_DISK_4: specifying datafile(s) to restore from backup set
channel ORA_DISK_4: restoring datafile 00001 to /u03/oradata/D183/datafile/o1_mf_system_h53myhfo_.dbf
channel ORA_DISK_4: restoring datafile 00007 to /u03/oradata/D183/datafile/o1_mf_users_h53ngx9r_.dbf
channel ORA_DISK_4: reading from backup piece /nas/backups/D183/2020-02-29/2020-02-29_11:52/D183_1cupobv7_1_1.bkp
channel ORA_DISK_1: piece handle=/nas/backups/D183/2020-02-29/2020-02-29_11:52/D183_1dupobv9_1_1.bkp tag=TAG20200229T115411
channel ORA_DISK_1: restored backup piece 1
channel ORA_DISK_1: restore complete, elapsed time: 00:00:47
channel ORA_DISK_1: starting datafile backup set restore
channel ORA_DISK_1: specifying datafile(s) to restore from backup set
channel ORA_DISK_1: restoring datafile 00004 to /u03/oradata/D183/datafile/o1_mf_undotbs1_h53ngg2g_.dbf
channel ORA_DISK_1: restoring datafile 00013 to /u03/oradata/D183/datafile/o1_mf_users_h5m4qttn_.dbf
channel ORA_DISK_1: reading from backup piece /nas/backups/D183/2020-02-29/2020-02-29_11:52/D183_1gupoc42_1_1.bkp
channel ORA_DISK_2: piece handle=/nas/backups/D183/2020-02-29/2020-02-29_11:52/D183_1eupoc25_1_1.bkp tag=TAG20200229T115411
channel ORA_DISK_2: restored backup piece 1
channel ORA_DISK_2: restore complete, elapsed time: 00:00:48
channel ORA_DISK_2: starting datafile backup set restore
channel ORA_DISK_2: specifying datafile(s) to restore from backup set
channel ORA_DISK_2: restoring datafile 00008 to /u03/oradata/D183/datafile/o1_mf_undotbs1_h53ss2rg_.dbf
channel ORA_DISK_2: reading from backup piece /nas/backups/D183/2020-02-29/2020-02-29_11:52/D183_1iupoc4p_1_1.bkp
channel ORA_DISK_3: piece handle=/nas/backups/D183/2020-02-29/2020-02-29_11:52/D183_1bupobv6_1_1.bkp tag=TAG20200229T115411
channel ORA_DISK_3: restored backup piece 1
channel ORA_DISK_3: restore complete, elapsed time: 00:00:54
channel ORA_DISK_3: starting datafile backup set restore
channel ORA_DISK_3: specifying datafile(s) to restore from backup set
channel ORA_DISK_3: restoring datafile 00005 to /u03/oradata/D183/datafile/o1_mf_system_h53ss1r7_.dbf
channel ORA_DISK_3: reading from backup piece /nas/backups/D183/2020-02-29/2020-02-29_11:52/D183_1hupoc46_1_1.bkp
channel ORA_DISK_4: piece handle=/nas/backups/D183/2020-02-29/2020-02-29_11:52/D183_1cupobv7_1_1.bkp tag=TAG20200229T115411
channel ORA_DISK_4: restored backup piece 1
channel ORA_DISK_4: restore complete, elapsed time: 00:00:54
channel ORA_DISK_4: starting datafile backup set restore
channel ORA_DISK_4: specifying datafile(s) to restore from backup set
channel ORA_DISK_4: restoring datafile 00006 to /u03/oradata/D183/datafile/o1_mf_sysaux_h53ss0rr_.dbf
channel ORA_DISK_4: reading from backup piece /nas/backups/D183/2020-02-29/2020-02-29_11:52/D183_1fupoc41_1_1.bkp
channel ORA_DISK_1: piece handle=/nas/backups/D183/2020-02-29/2020-02-29_11:52/D183_1gupoc42_1_1.bkp tag=TAG20200229T115411
channel ORA_DISK_1: restored backup piece 1
channel ORA_DISK_1: restore complete, elapsed time: 00:00:10
channel ORA_DISK_2: piece handle=/nas/backups/D183/2020-02-29/2020-02-29_11:52/D183_1iupoc4p_1_1.bkp tag=TAG20200229T115411
channel ORA_DISK_2: restored backup piece 1
channel ORA_DISK_2: restore complete, elapsed time: 00:00:09
channel ORA_DISK_3: piece handle=/nas/backups/D183/2020-02-29/2020-02-29_11:52/D183_1hupoc46_1_1.bkp tag=TAG20200229T115411
channel ORA_DISK_3: restored backup piece 1
channel ORA_DISK_3: restore complete, elapsed time: 00:00:16
channel ORA_DISK_4: piece handle=/nas/backups/D183/2020-02-29/2020-02-29_11:52/D183_1fupoc41_1_1.bkp tag=TAG20200229T115411
channel ORA_DISK_4: restored backup piece 1
channel ORA_DISK_4: restore complete, elapsed time: 00:00:25
Finished restore at 29-FEB-20
As a final step, recover the new standby database to bring it almost in sync with the primary database:
RMAN> recover database;

Starting recover at 29-FEB-20
using channel ORA_DISK_1
using channel ORA_DISK_2
using channel ORA_DISK_3
using channel ORA_DISK_4

starting media recovery

channel ORA_DISK_1: starting archived log restore to default destination
channel ORA_DISK_1: restoring archived log
archived log thread=1 sequence=39
channel ORA_DISK_1: reading from backup piece /nas/backups/D183/2020-02-29/2020-02-29_11:52/D183_1jupoc6f_1_1.bkp
channel ORA_DISK_1: piece handle=/nas/backups/D183/2020-02-29/2020-02-29_11:52/D183_1jupoc6f_1_1.bkp tag=TAG20200229T115806
channel ORA_DISK_1: restored backup piece 1
channel ORA_DISK_1: restore complete, elapsed time: 00:00:01
archived log file name=/u03/oradata/FRA/D183DR/archivelog/2020_02_29/o1_mf_1_39_h5obrowx_.arc thread=1 sequence=39
channel default: deleting archived log(s)
archived log file name=/u03/oradata/FRA/D183DR/archivelog/2020_02_29/o1_mf_1_39_h5obrowx_.arc RECID=1 STAMP=1033647541
media recovery complete, elapsed time: 00:00:01
Finished recover at 29-FEB-20
Step #16: STANDBY – Enable Managed Recovery.
Everything is now in place, so it just remains to enable managed recovery. This will start the mechanism whereby redo data (in the form on archived redo log files) are transferred from the primary database server to the standby database server. Once there, they are applied to the standby database:
D183DR SQL> alter database recover managed standby database disconnect from session;

Database altered.
Task #1b. Check the Configuration.
Now that the configuration is complete, let’s run through some queries to see what’s going on.
Check #1: Check Recovery Mode.
Let’s ask the primary database what it thinks is going on:
D183 SQL> select DB_UNIQUE_NAME,RECOVERY_MODE,SYNCHRONIZATION_STATUS,SYNCHRONIZED
          from   v$archive_dest_status
          where  DB_UNIQUE_NAME in ('D183','D183DR');

DB_UNIQUE_NAME                 RECOVERY_MODE                      SYNCHRONIZATION_STATUS SYN
------------------------------ ---------------------------------- ---------------------- ---
D183                           IDLE                               CHECK CONFIGURATION    NO
D183DR                         MANAGED REAL TIME APPLY            CHECK CONFIGURATION    NO
For a Maximum Performance Mode configuration (ASYNC redo transport), this looks good.
Check #2: Check Database Roles.
Let’s query each database to see what role it thinks it has in the configuration:
The SWITCHOVER_STATUS of NOT ALLOWED for the standby database is normal.
Check #3: Check Redo Transport and Apply.
Let’s force an online redo log file switch which will generate a new archived redo log file. That file should be copied to the Fast Recovery Area (FRA) on standby server and applied to the standby database.
First, check what’s in the FRA on the standby server (just the archived redo log file sequence #46) :
[oracle@orasvr03 2020_03_02]$ pwd
/u03/oradata/FRA/D183DR/archivelog/2020_03_02

[oracle@orasvr03 2020_03_02]$ ls -l
-rw-r----- 1 oracle oinstall 181873152 Mar  2 00:15 o1_mf_1_46_h5s946f8_.arc
Next, check what is the current online redo log file on the primary database and then force a log switch:
D183 SQL> select GROUP#, THREAD#, SEQUENCE#, STATUS
from v$log
order by 1;GROUP# THREAD# SEQUENCE# STATUS
---------- ---------- ---------- ----------------
1 1 46 INACTIVE
2 1 47 CURRENT
3 1 45 INACTIVE
D183 SQL> alter system switch logfile;
System altered.
Next, check what’s in the FRA on the standby server:
[oracle@orasvr03 2020_03_02]$ pwd
/u03/oradata/FRA/D183DR/archivelog/2020_03_02

[oracle@orasvr03 2020_03_02]$ ls -l
-rw-r----- 1 oracle oinstall 181873152 Mar  2 00:15 o1_mf_1_46_h5s946f8_.arc
-rw-r----- 1 oracle oinstall 108407808 Mar  2 15:01 o1_mf_1_47_h5tx0w94_.arc
Next, check what’s been applied to the standby database:
The Managed Recovery Process (MRP0) has already applied archived redo log file sequence #47 and is waiting for sequence #48. Looks good!
Task #1c. Test the Configuration.
Things seem to be working, but let’s run a few simple tests just to make sure.
Test #1: Primary Database CDB Structure Change.
If we add a data file to the primary database, the corresponding data file should appear on the standby database.
D183 SQL> select t.name,substr(df.name,1,90) filename
          from   v$tablespace t, v$datafile df
          where  t.ts# = df.ts#
          and    t.name = 'USERS'
          order by
                 1,2;

NAME          FILENAME
------------  ---------------------------------------------------------------------------------------
USERS         /u03/oradata/D183/9F38B30ACC493CC6E0531100A8C0D68A/datafile/o1_mf_users_h544foyw_.dbf
USERS         /u03/oradata/D183/datafile/o1_mf_users_h53ngx9r_.dbf


D183DR SQL> select t.name,substr(df.name,1,90) filename
            from   v$tablespace t, v$datafile df
            where  t.ts# = df.ts#
            and    t.name = 'USERS'
            order by
                   1,2;

NAME          FILENAME
------------  ---------------------------------------------------------------------------------------
USERS         /u02/oradata/D183DR/9F38B30ACC493CC6E0531100A8C0D68A/datafile/o1_mf_users_h5obj68f_.dbf
USERS         /u02/oradata/D183DR/datafile/o1_mf_users_h5objbs4_.dbf


D183 SQL> alter tablespace users add datafile;
Tablespace altered.

D183 SQL> alter system switch logfile;
System altered.

D183 SQL> select t.name,substr(df.name,1,90) filename
          from   v$tablespace t, v$datafile df
          where  t.ts# = df.ts#
          and    t.name = 'USERS'
          order by
                 1,2;

NAME          FILENAME
------------  ---------------------------------------------------------------------------------------
USERS         /u03/oradata/D183/9F38B30ACC493CC6E0531100A8C0D68A/datafile/o1_mf_users_h544foyw_.dbf
USERS         /u03/oradata/D183/datafile/o1_mf_users_h53ngx9r_.dbf
USERS         /u03/oradata/D183/datafile/o1_mf_users_h5od6r6z_.dbf

D183DR SQL> select t.name,substr(df.name,1,90) filename
            from   v$tablespace t, v$datafile df
            where  t.ts# = df.ts#
            and    t.name = 'USERS'
            order by
                   1,2;

NAME          FILENAME
------------  ---------------------------------------------------------------------------------------
USERS         /u02/oradata/D183DR/9F38B30ACC493CC6E0531100A8C0D68A/datafile/o1_mf_users_h5obj68f_.dbf
USERS         /u02/oradata/D183DR/datafile/o1_mf_users_h5objbs4_.dbf
USERS         /u02/oradata/D183DR/datafile/o1_mf_users_h5odw0x1_.dbf
As you can see, the new data file was created on the standby server. OMF handled the file placement and naming convention.
Test #2: Primary Database Data Change and Switchover.
We will now add some data to the primary database and verify it has been applied to the standby database by performing a switchover and querying the data. Since this is a CDB, let’s populate the PDB with some data just to make sure it’s joining in with the Data Guard fun.
First, let’s run a Data Pump Import into D183_PDB1 in D183:
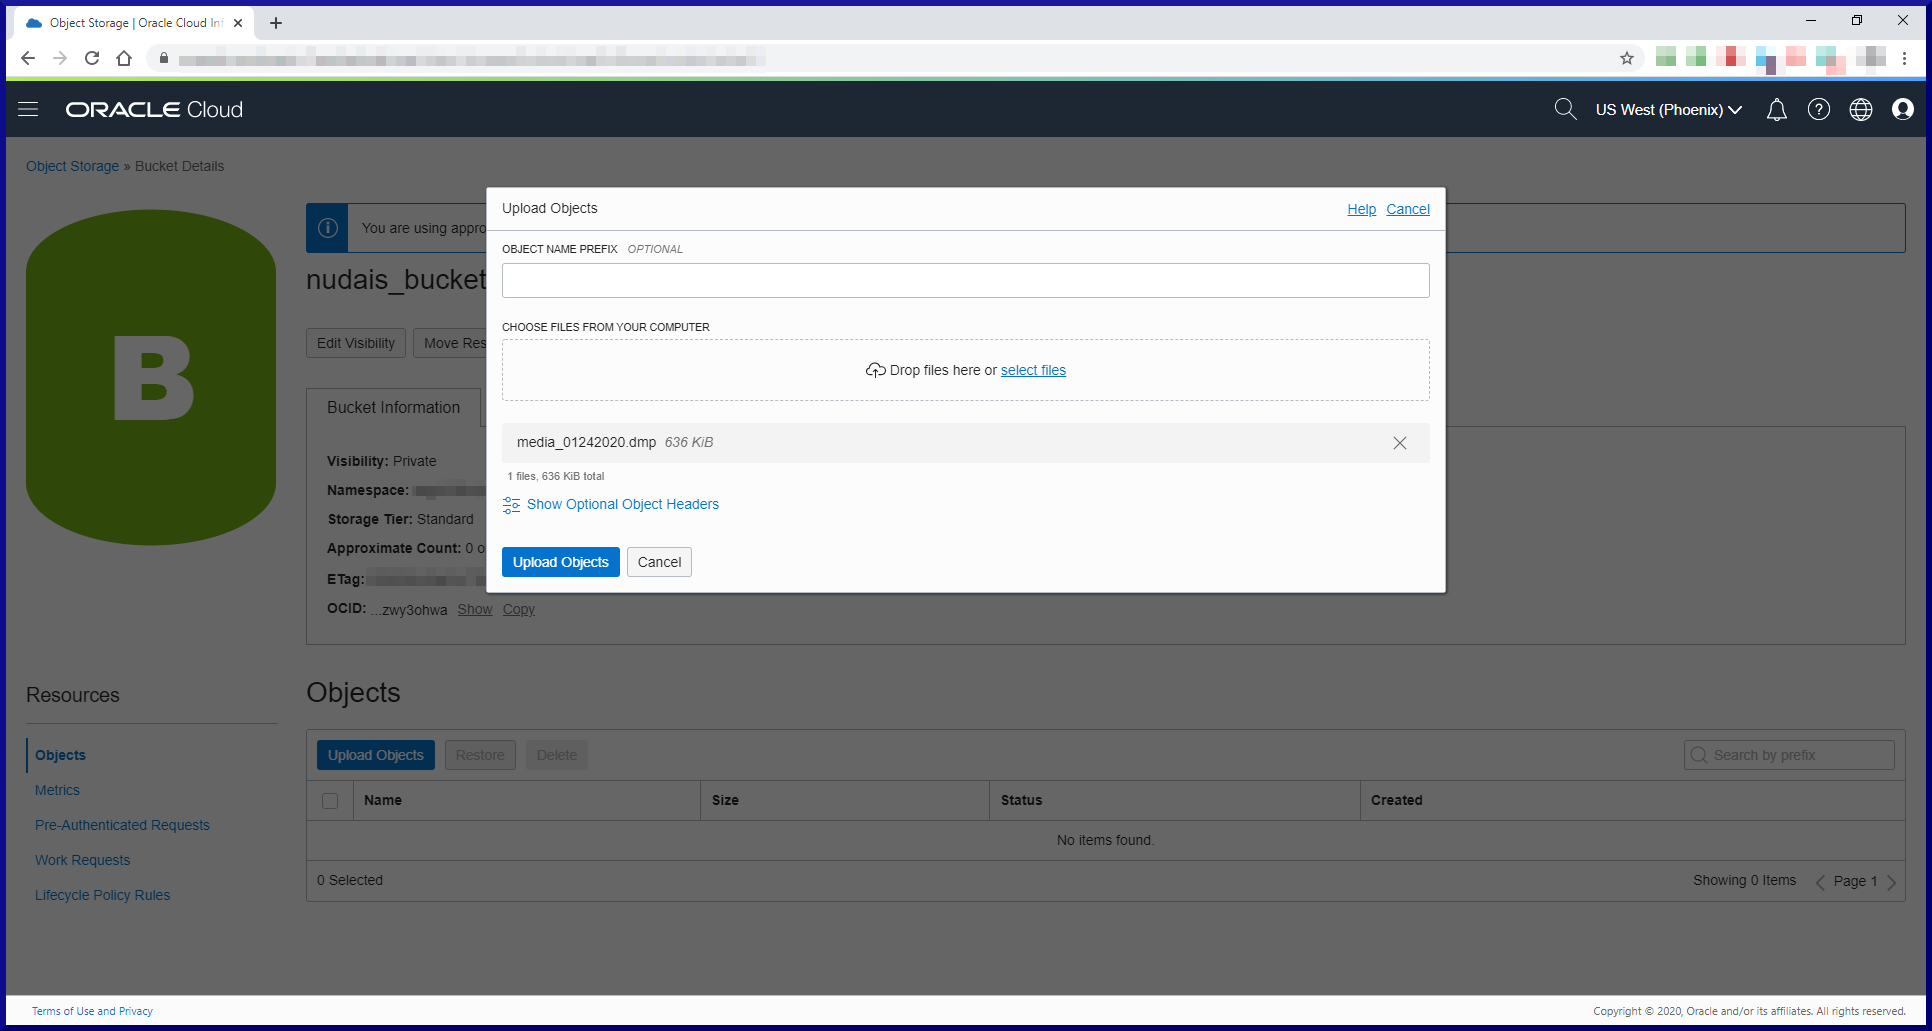
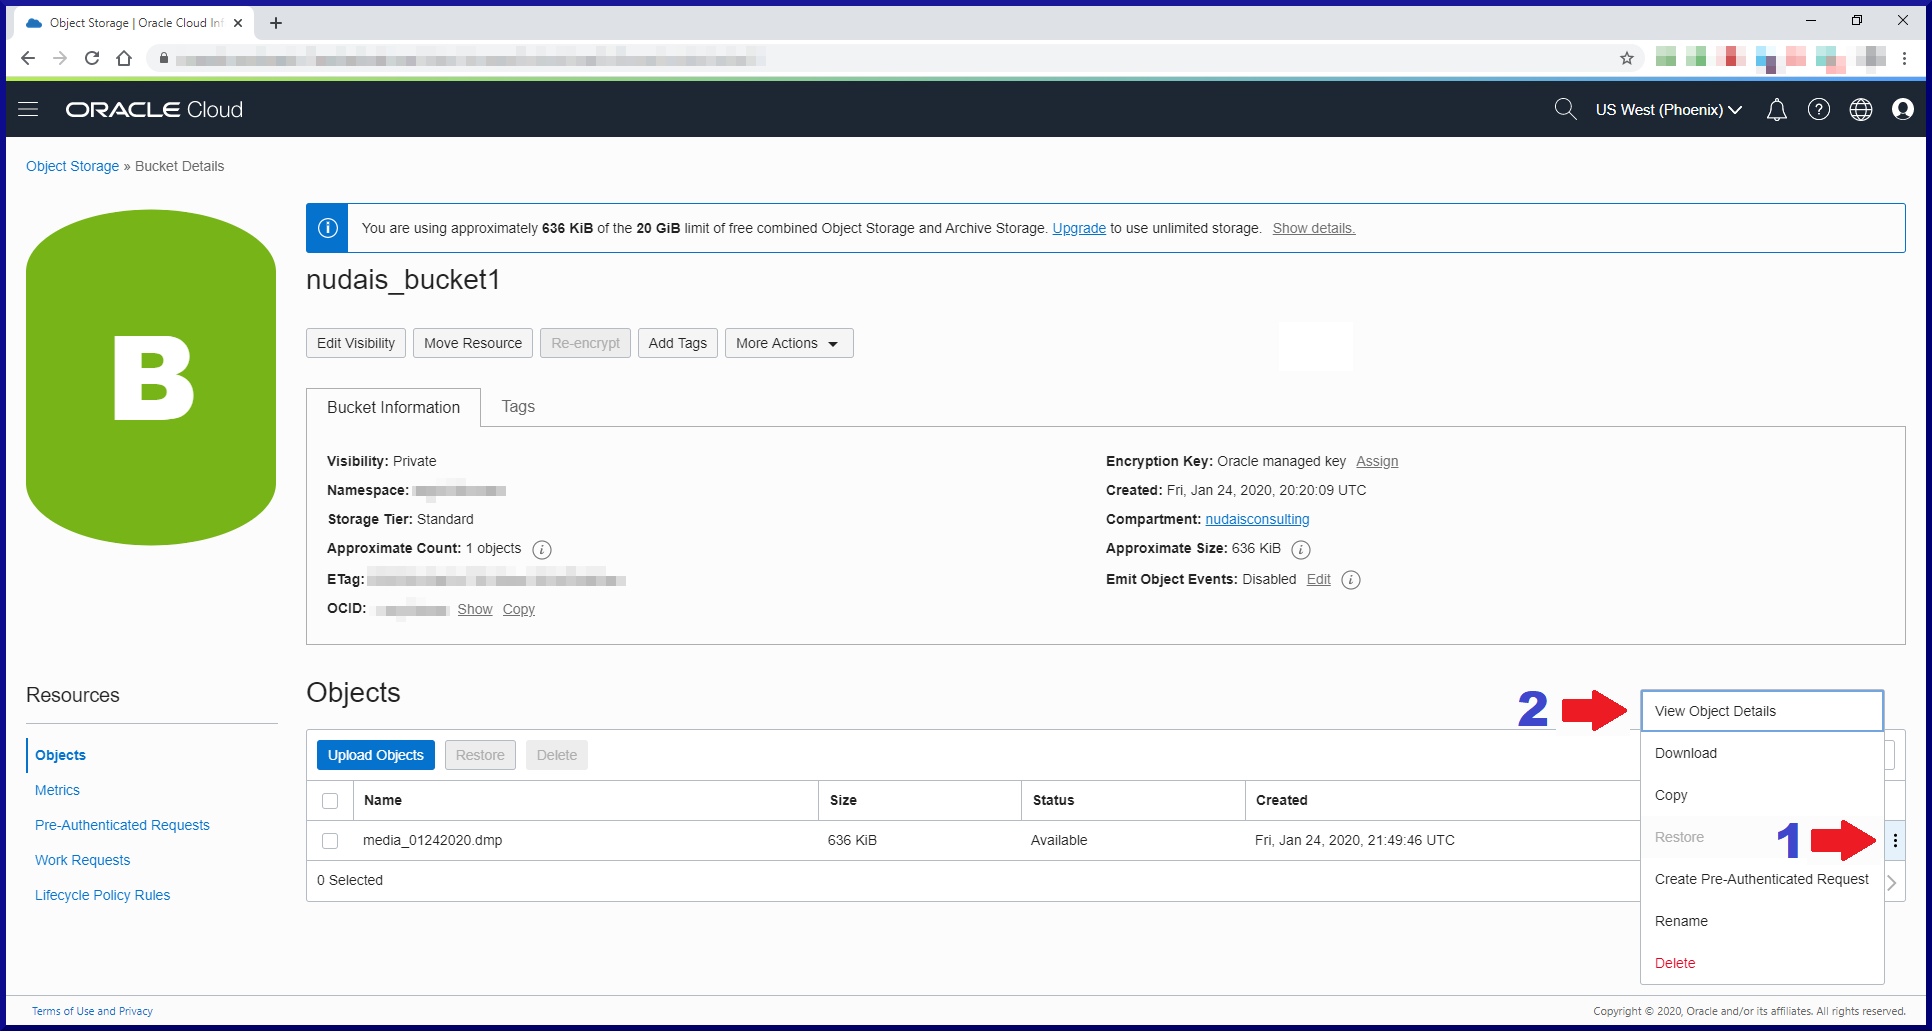
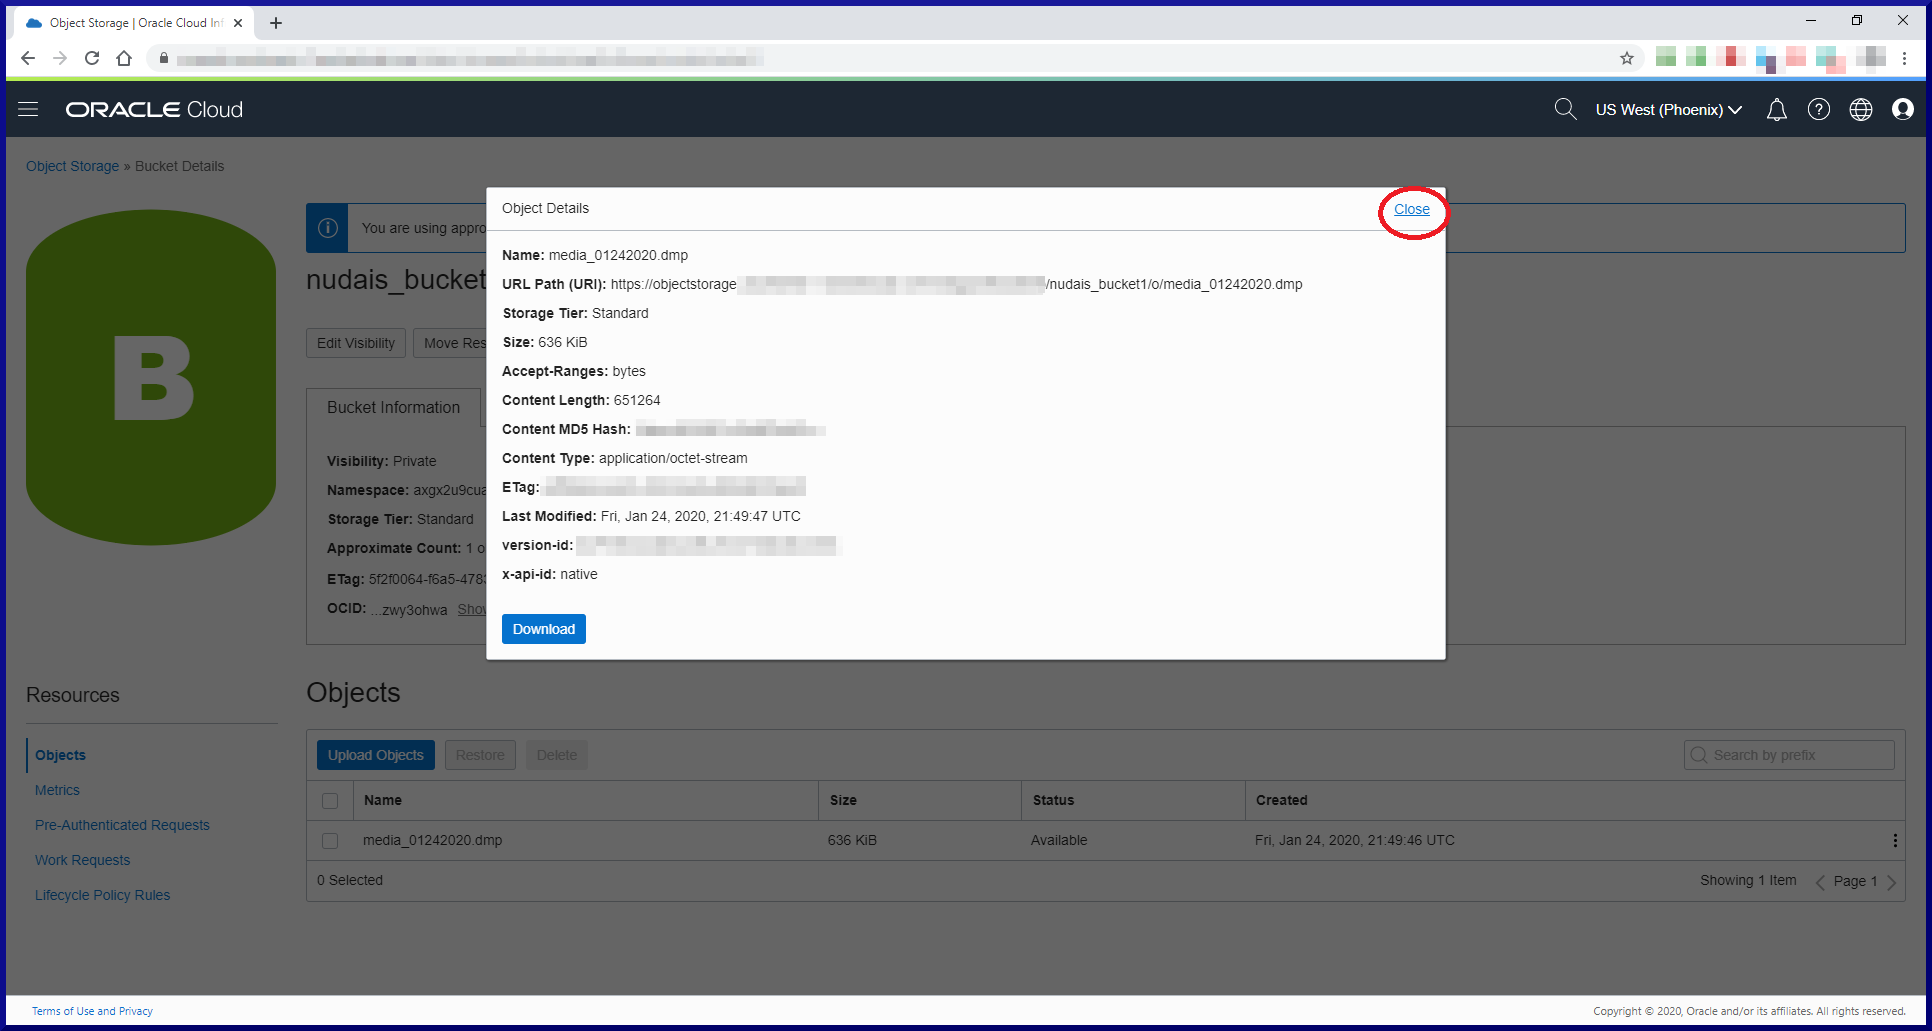
[oracle@orasvr01 dp]$ impdp sfrancis@d183_pdb1 parfile=impdp_media_01242020.parfile

Import: Release 18.0.0.0.0 - Production on Tue Mar 3 10:50:20 2020
Version 18.3.0.0.0

Copyright (c) 1982, 2018, Oracle and/or its affiliates.  All rights reserved.
Password: <password>

Connected to: Oracle Database 18c Enterprise Edition Release 18.0.0.0.0 - Production
Master table "SFRANCIS"."SYS_IMPORT_SCHEMA_01" successfully loaded/unloaded
import done in AL32UTF8 character set and AL16UTF16 NCHAR character set
export done in WE8MSWIN1252 character set and AL16UTF16 NCHAR character set
Warning: possible data loss in character set conversions
Starting "SFRANCIS"."SYS_IMPORT_SCHEMA_01":  sfrancis/@d183_pdb1 parfile=impdp_media_01242020.parfile
Processing object type SCHEMA_EXPORT/USER
Processing object type SCHEMA_EXPORT/SYSTEM_GRANT
Processing object type SCHEMA_EXPORT/ROLE_GRANT
Processing object type SCHEMA_EXPORT/DEFAULT_ROLE
Processing object type SCHEMA_EXPORT/TABLESPACE_QUOTA
Processing object type SCHEMA_EXPORT/PRE_SCHEMA/PROCACT_SCHEMA
Processing object type SCHEMA_EXPORT/SYNONYM/SYNONYM
Processing object type SCHEMA_EXPORT/SEQUENCE/SEQUENCE
Processing object type SCHEMA_EXPORT/TABLE/TABLE
Processing object type SCHEMA_EXPORT/TABLE/TABLE_DATA
. . imported "MEDIA"."TITLES"                            183.6 KB    1896 rows
. . imported "MEDIA"."FORMATS"                           7.585 KB      55 rows
. . imported "MEDIA"."GENRES"                            5.523 KB       4 rows
. . imported "MEDIA"."MEDIA_TYPES"                       6.242 KB      14 rows
. . imported "MEDIA"."RECORDING_ARTISTS"                 19.10 KB     628 rows
. . imported "MEDIA"."RELEASES"                          5.953 KB       3 rows
Processing object type SCHEMA_EXPORT/PROCEDURE/PROCEDURE
Processing object type SCHEMA_EXPORT/PROCEDURE/ALTER_PROCEDURE
Processing object type SCHEMA_EXPORT/TABLE/INDEX/INDEX
Processing object type SCHEMA_EXPORT/TABLE/CONSTRAINT/CONSTRAINT
Processing object type SCHEMA_EXPORT/TABLE/INDEX/STATISTICS/INDEX_STATISTICS
Processing object type SCHEMA_EXPORT/TABLE/CONSTRAINT/REF_CONSTRAINT
Processing object type SCHEMA_EXPORT/TABLE/TRIGGER
Processing object type SCHEMA_EXPORT/TABLE/STATISTICS/TABLE_STATISTICS
Processing object type SCHEMA_EXPORT/STATISTICS/MARKER
Job "SFRANCIS"."SYS_IMPORT_SCHEMA_01" successfully completed at Tue Mar 3 10:51:30 2020 elapsed 0 00:01:05
Next, we’ll login to the MEDIA account and check there’s some data:
[oracle@orasvr01 ~]$ sqlplus media@d183_pdb1

d183_pdb1 SQL> show con_name

CON_NAME
---------
D183_PDB1

d183_pdb1 SQL> show user
USER is "MEDIA"

d183_pdb1 SQL> select count(*) from TITLES;

  COUNT(*)
----------
      1896
Next, we’ll force a log switch on the primary and verify the standby database has caught up:
Archived redo log file sequence #50 has been transferred to the standby server and applied to the standby database. It’s now waiting to apply sequence #51. Looks good. Now it’s time to perform the switch over. This is always initiated from the primary database:
D183 SQL> alter database commit to switchover to physical standby with session shutdown;
Database altered.

D183DR SQL> alter database commit to switchover to primary with session shutdown;
Database altered.

D183DR SQL> alter database open;
Database altered.

D183 SQL> startup mount
ORACLE instance started.

Total System Global Area 3221221872 bytes
Fixed Size                  8901104 bytes
Variable Size             771751936 bytes
Database Buffers         2432696320 bytes
Redo Buffers                7872512 bytes
Database mounted.

D183 SQL> alter database recover managed standby database using current logfile disconnect;
Database altered.
Next we’ll check the database have the roles we expected:
The databases have switched roles, so the new primary is D183DR and the new standby is D183. Next we need to check the data we imported is actually in the PDB in the new primary:
D183DR SQL> alter pluggable database d183_pdb1 open;
Pluggable database altered.

D183DR SQL> alter session set container=d183_pdb1;
Session altered.

D183DR SQL> select table_name from dba_tables where owner = 'MEDIA';

TABLE_NAME
--------------------------------------------------------------------------------
GENRES
MEDIA_TYPES
FORMATS
RECORDING_ARTISTS
RELEASES
TITLES

D183DR SQL> select count(*) from media.titles;

  COUNT(*)
----------
      1896
The data arrived intact, so that test worked as well. Things are looking good.
Test #3: Primary Database PDB Structure Change and Switchover.
As a final test, let’s add a tablespace to the PDB, verify the data file shows up on the standby database and then switch back to the original configuration (D183 as primary, D183DR as standby).
First, let’s check the data files belonging to D183_PDB1 in D183DR (new primary):
D183DR SQL> select name from v$datafile where con_id = 3;

NAME
-------------------------------------------------------------------------------------------
/u02/oradata/D183DR/9F38B30ACC493CC6E0531100A8C0D68A/datafile/o1_mf_system_h5ok0gwq_.dbf
/u02/oradata/D183DR/9F38B30ACC493CC6E0531100A8C0D68A/datafile/o1_mf_sysaux_h5ok0gmb_.dbf
/u02/oradata/D183DR/9F38B30ACC493CC6E0531100A8C0D68A/datafile/o1_mf_undotbs1_h5ok0gz3_.dbf
/u02/oradata/D183DR/9F38B30ACC493CC6E0531100A8C0D68A/datafile/o1_mf_users_h5ok0gok_.dbf
Next, we’ll check the same set of files belonging to D183_PDB1 in D183 (new standby):
D183 SQL> select name from v$datafile where con_id = 3;

NAME
--------------------------------------------------------------------------------------------
/u03/oradata/D183/9F38B30ACC493CC6E0531100A8C0D68A/datafile/o1_mf_system_h5443ffj_.dbf
/u03/oradata/D183/9F38B30ACC493CC6E0531100A8C0D68A/datafile/o1_mf_sysaux_h5443fg3_.dbf
/u03/oradata/D183/9F38B30ACC493CC6E0531100A8C0D68A/datafile/o1_mf_undotbs1_h5443fg5_.dbf
/u03/oradata/D183/9F38B30ACC493CC6E0531100A8C0D68A/datafile/o1_mf_users_h544foyw_.dbf
Next, we’ll add a tablespace to D183_PDB1 in D183DR, check the files then force a log switch (must be done from the CDB$ROOT container):
D183DR SQL> show con_name

CON_NAME
------------------------------
D183_PDB1

D183DR SQL> create tablespace media_data;
Tablespace created.

D183DR SQL> conn / as sysdba
Connected.

D183DR SQL> show con_name

CON_NAME
------------------------------
CDB$ROOT

D183DR SQL> alter system switch logfile;
System altered.

D183DR SQL> select name from v$datafile where con_id = 3;

NAME
----------------------------------------------------------------------------------------------------
/u02/oradata/D183DR/9F38B30ACC493CC6E0531100A8C0D68A/datafile/o1_mf_system_h5ok0gwq_.dbf
/u02/oradata/D183DR/9F38B30ACC493CC6E0531100A8C0D68A/datafile/o1_mf_sysaux_h5ok0gmb_.dbf
/u02/oradata/D183DR/9F38B30ACC493CC6E0531100A8C0D68A/datafile/o1_mf_undotbs1_h5ok0gz3_.dbf
/u02/oradata/D183DR/9F38B30ACC493CC6E0531100A8C0D68A/datafile/o1_mf_users_h5ok0gok_.dbf
/u02/oradata/D183DR/9F38B30ACC493CC6E0531100A8C0D68A/datafile/o1_mf_media_da_h5xf0tk1_.dbf
Next, we’ll check to see if the data file has been added to D183_PDB1 in D183 (new standby):
D183 SQL> select name from v$datafile where con_id = 3;

NAME
----------------------------------------------------------------------------------------------
/u03/oradata/D183/9F38B30ACC493CC6E0531100A8C0D68A/datafile/o1_mf_system_h5443ffj_.dbf
/u03/oradata/D183/9F38B30ACC493CC6E0531100A8C0D68A/datafile/o1_mf_sysaux_h5443fg3_.dbf
/u03/oradata/D183/9F38B30ACC493CC6E0531100A8C0D68A/datafile/o1_mf_undotbs1_h5443fg5_.dbf
/u03/oradata/D183/9F38B30ACC493CC6E0531100A8C0D68A/datafile/o1_mf_users_h544foyw_.dbf
/u03/oradata/D183/9F38B30ACC493CC6E0531100A8C0D68A/datafile/o1_mf_media_da_h5xf109p_.dbf
That worked. I should note that for a few seconds I saw the following file on the standby server before it disappeared and became the OMF file referenced above:
It would be interesting to know what would happen if you added a really big file and the /u01 file system did not have sufficient space to accommodate an UNNAMED file. Answers on a postcard to…
Time to switch roles again and verify everything is back working in the original configuration. As usual, ensure the primary and standby databases are in sync. Force a log switch if you need to:
Archived redo log file sequence #54 has been applied to the standby and it’s now waiting to apply the next sequence to be generated (#55). As always, we initiate the switchover from the primary database:
D183DR SQL> alter database commit to switchover to physical standby with session shutdown;
Database altered.


D183 SQL> alter database commit to switchover to primary with session shutdown;
Database altered.

D183 SQL> alter database open;
Database altered.


D183DR SQL> startup mount

ORACLE instance started.
Total System Global Area 2147481064 bytes
Fixed Size                  8898024 bytes
Variable Size             603979776 bytes
Database Buffers         1526726656 bytes
Redo Buffers                7876608 bytes
Database mounted.

D183DR SQL> alter database recover managed standby database using current logfile disconnect;
Database altered.
Finally, let’s verify the respective database roles and open D183_PDB1 in D183 just to make sure it can verify the data file that was added while D183 was the standby database:
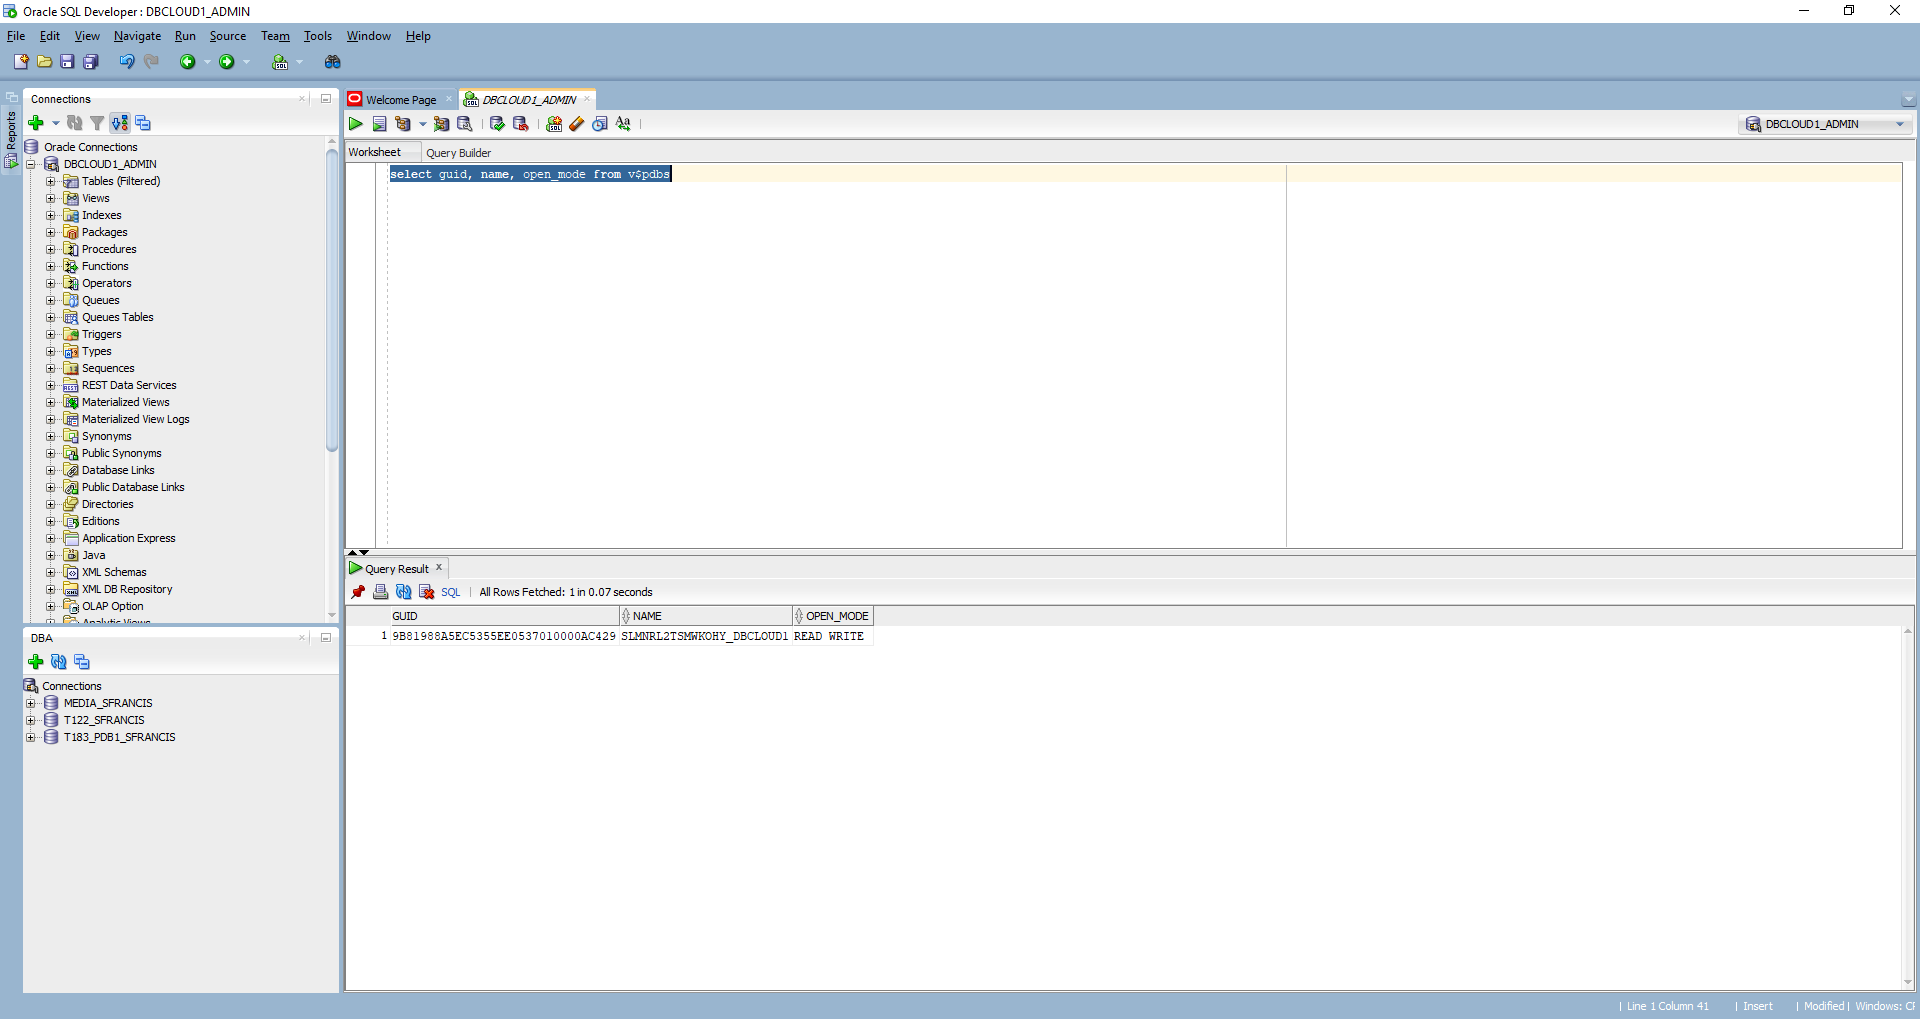
D183 SQL> select db_unique_name, database_role from v$database;

DB_UNIQUE_NAME                 DATABASE_ROLE
------------------------------ ----------------
D183                           PRIMARY


D183DR SQL> select db_unique_name, database_role from v$database;

DB_UNIQUE_NAME                 DATABASE_ROLE
------------------------------ ----------------
D183DR                         PHYSICAL STANDBY


D183 SQL> alter pluggable database d183_pdb1 open;
Pluggable database altered.

D183 SQL> alter session set container=d183_pdb1;
Session altered.

D183 SQL> select file_name from dba_data_files;

FILE_NAME
-------------------------------------------------------------------------------------------
/u03/oradata/D183/9F38B30ACC493CC6E0531100A8C0D68A/datafile/o1_mf_system_h5443ffj_.dbf
/u03/oradata/D183/9F38B30ACC493CC6E0531100A8C0D68A/datafile/o1_mf_sysaux_h5443fg3_.dbf
/u03/oradata/D183/9F38B30ACC493CC6E0531100A8C0D68A/datafile/o1_mf_undotbs1_h5443fg5_.dbf
/u03/oradata/D183/9F38B30ACC493CC6E0531100A8C0D68A/datafile/o1_mf_users_h544foyw_.dbf
/u03/oradata/D183/9F38B30ACC493CC6E0531100A8C0D68A/datafile/o1_mf_media_da_h5xf109p_.dbf
So there you have it. How to configure Data Guard manually using SQL commands, different file system layouts and OMF.
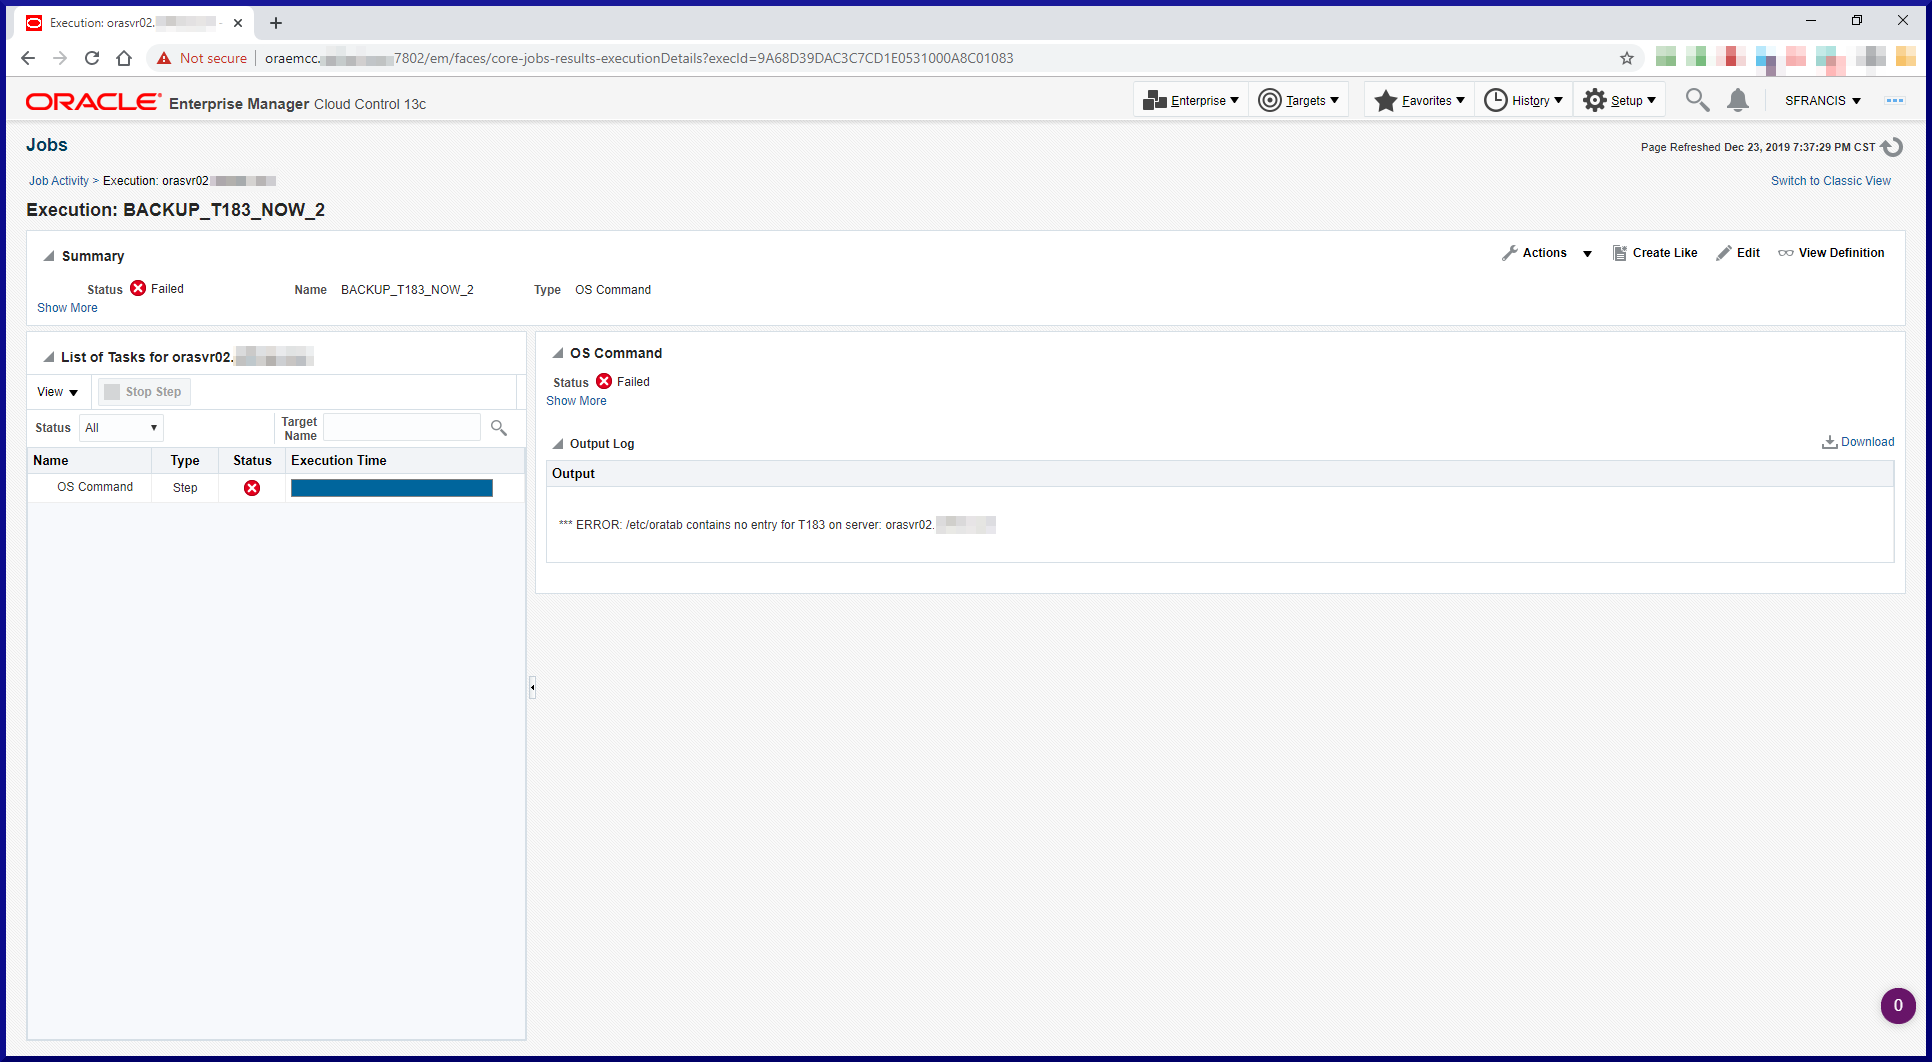
Recovery Manager or RMAN as it is more commonly known, is Oracle’s proprietary backup, restore and recovery solution for Oracle databases.
In Part 12, we’ll setup RMAN and run through some common backup, restore and recovery scenarios. We’ll also have a little fun with some of the more interesting things RMAN can do.
It’s worth pointing out there appears to be a lot of smoke and mirrors associated with RMAN. When Oracle created it, it gave it its own cryptic language and syntax. That didn’t help. Its standard output is very verbose, some of which looks like error messages. That doesn’t help either. It often appears to hang when running a backup or restore, giving no indication that it’s actually doing anything. That can make you nervous especially in a stressful restore/recovery situation. RMAN can do a vast array of very powerful and clever things and that can get in the way of understanding the three things you’re only ever likely to use it for. Namely a full database backup, full database restore and a point-in-time recovery.
Since RMAN can be very confusing, so this section of the Infrastructure series will mainly focus on the essentials to help you backup Oracle databases and restore/recover them should the need arise. Like many things with Oracle, there are multiple layers of detail that include ever increasing levels of functionality and complexity. By all means learn and memorize everything to do with RMAN, but for now let’s keep this simple. Yes, there’s more to it, but here’s my Top 10 RMAN Things To Know:
RMAN has 2 backup formats. COPY is an image copy. BACKUP SET is a set of one or more BACKUP SET PIECE files. A BACKUP SET PIECE file contains the data blocks from one or more files which RMAN can backup.
RMAN can backup database datafiles, control files, archived redo log files and SPFILEs. It can even backup a BACKUP SET (yep, it can backup a backup!).
RMAN backup activity is always recorded in the database control files and optionally in an RMAN Recovery Catalog.
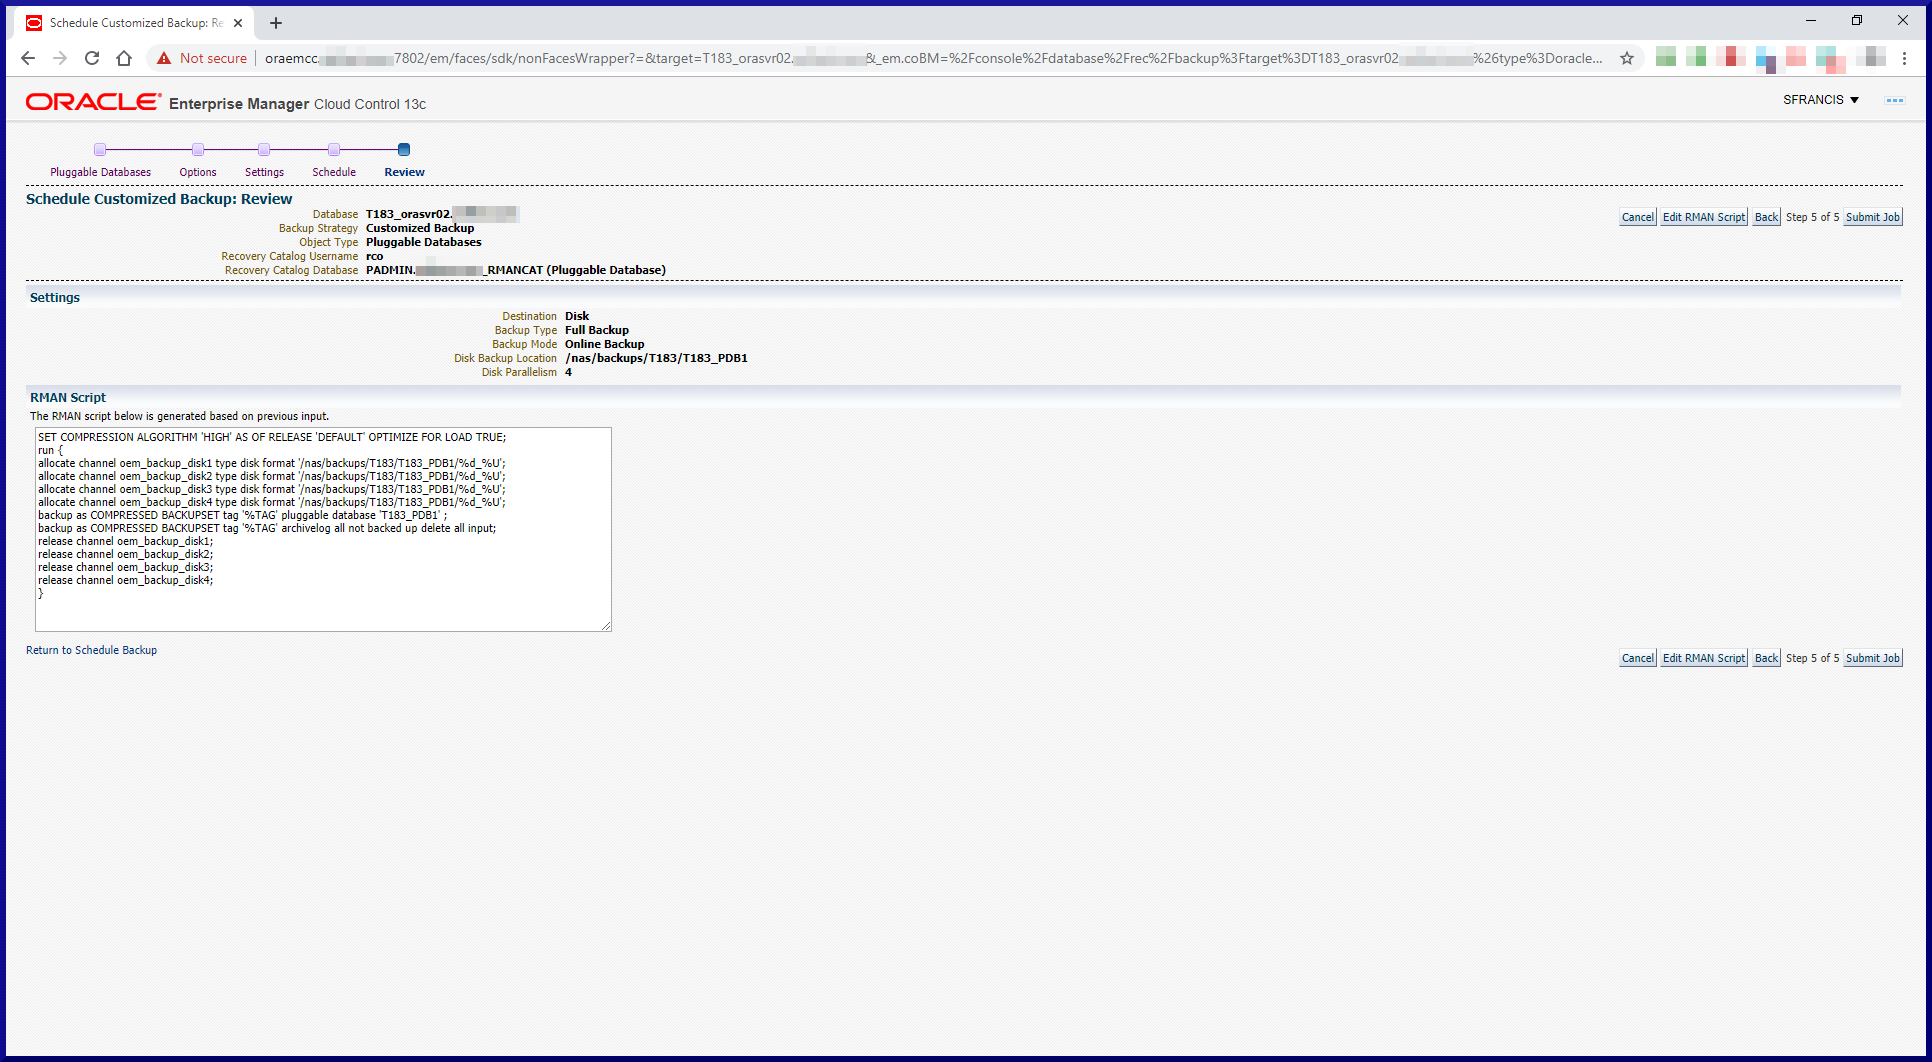
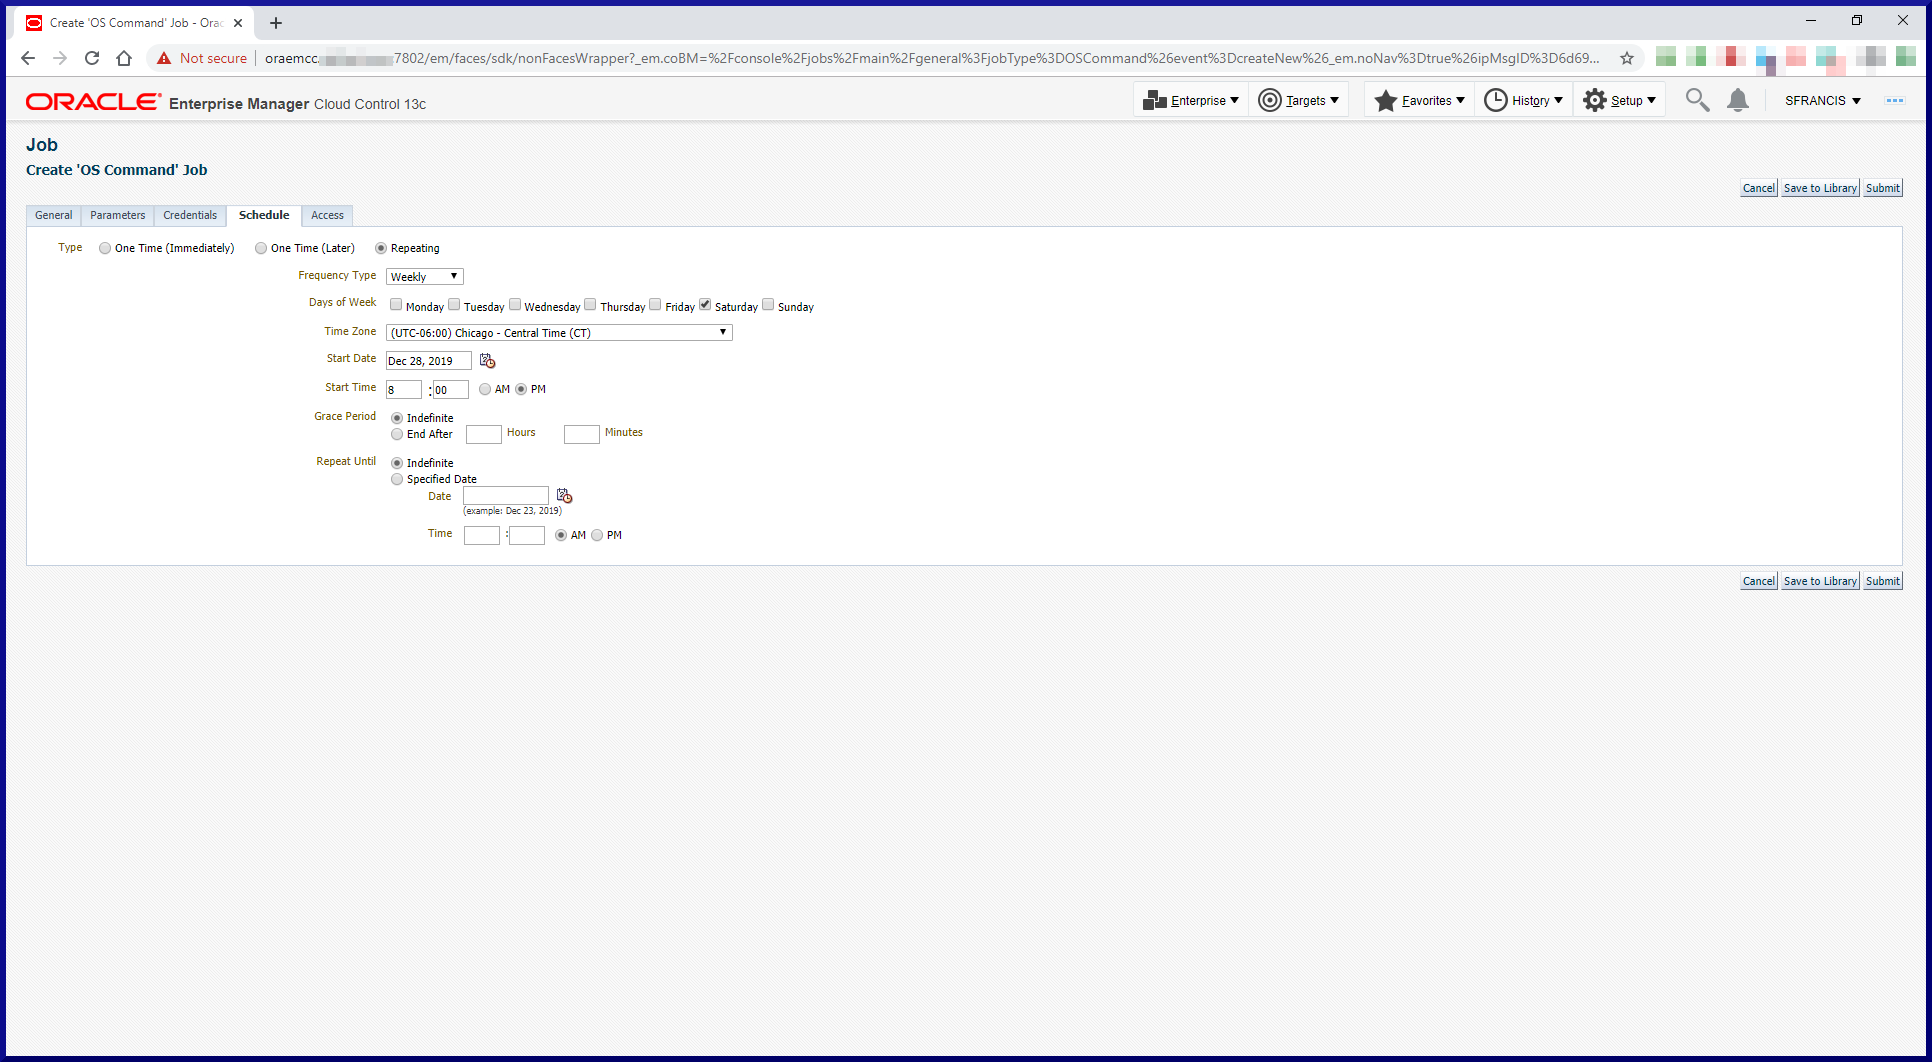
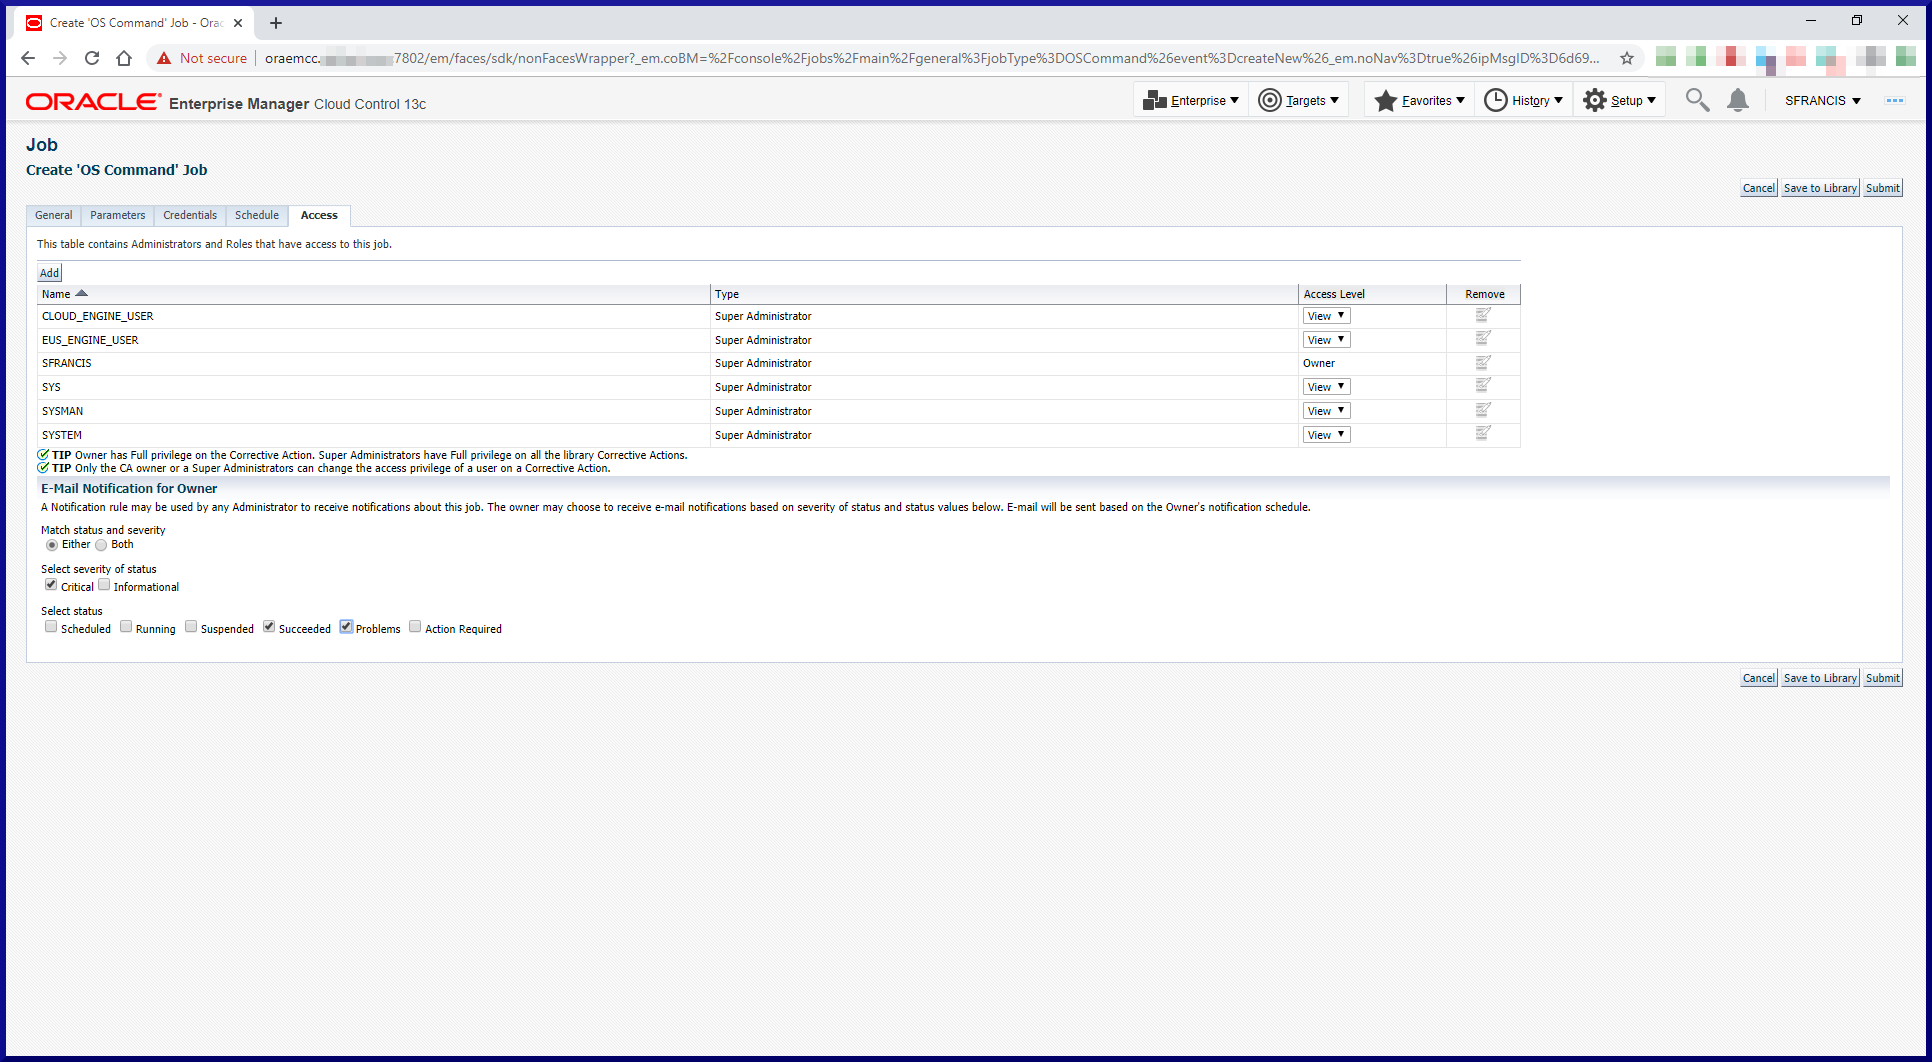
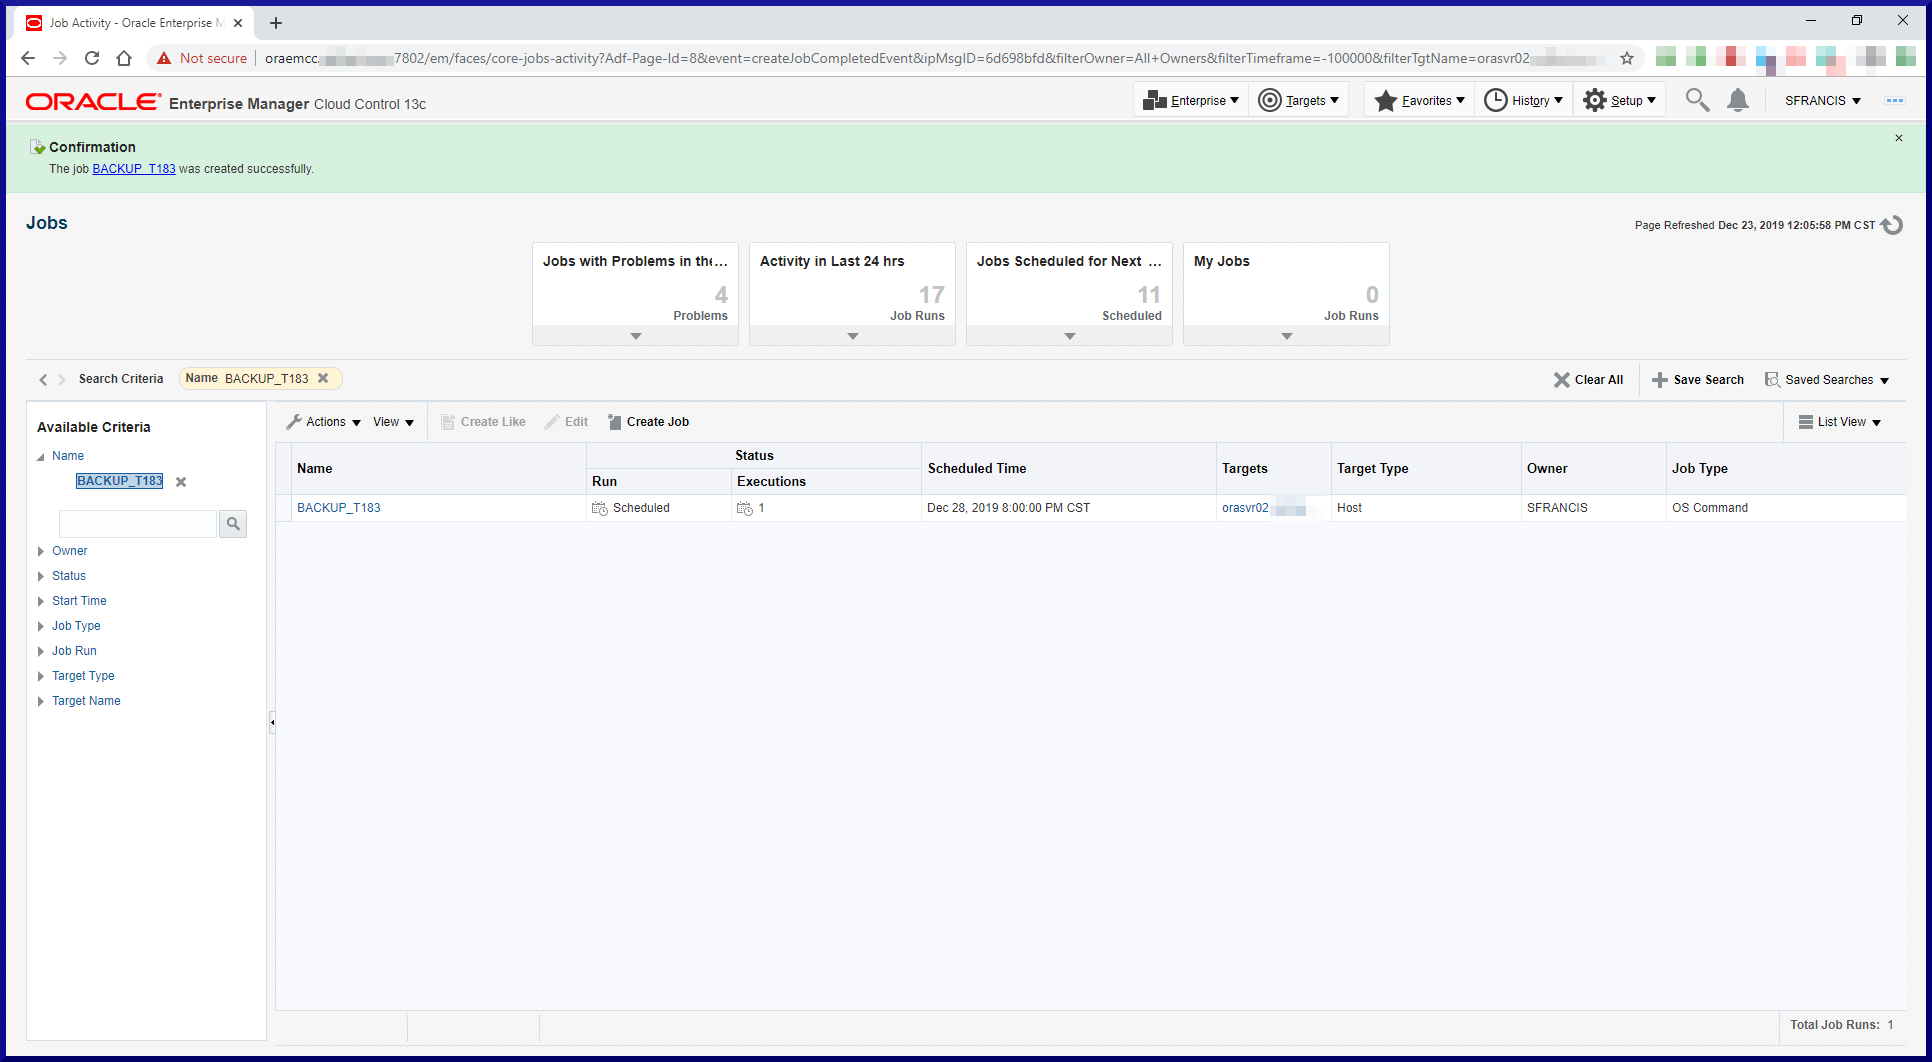
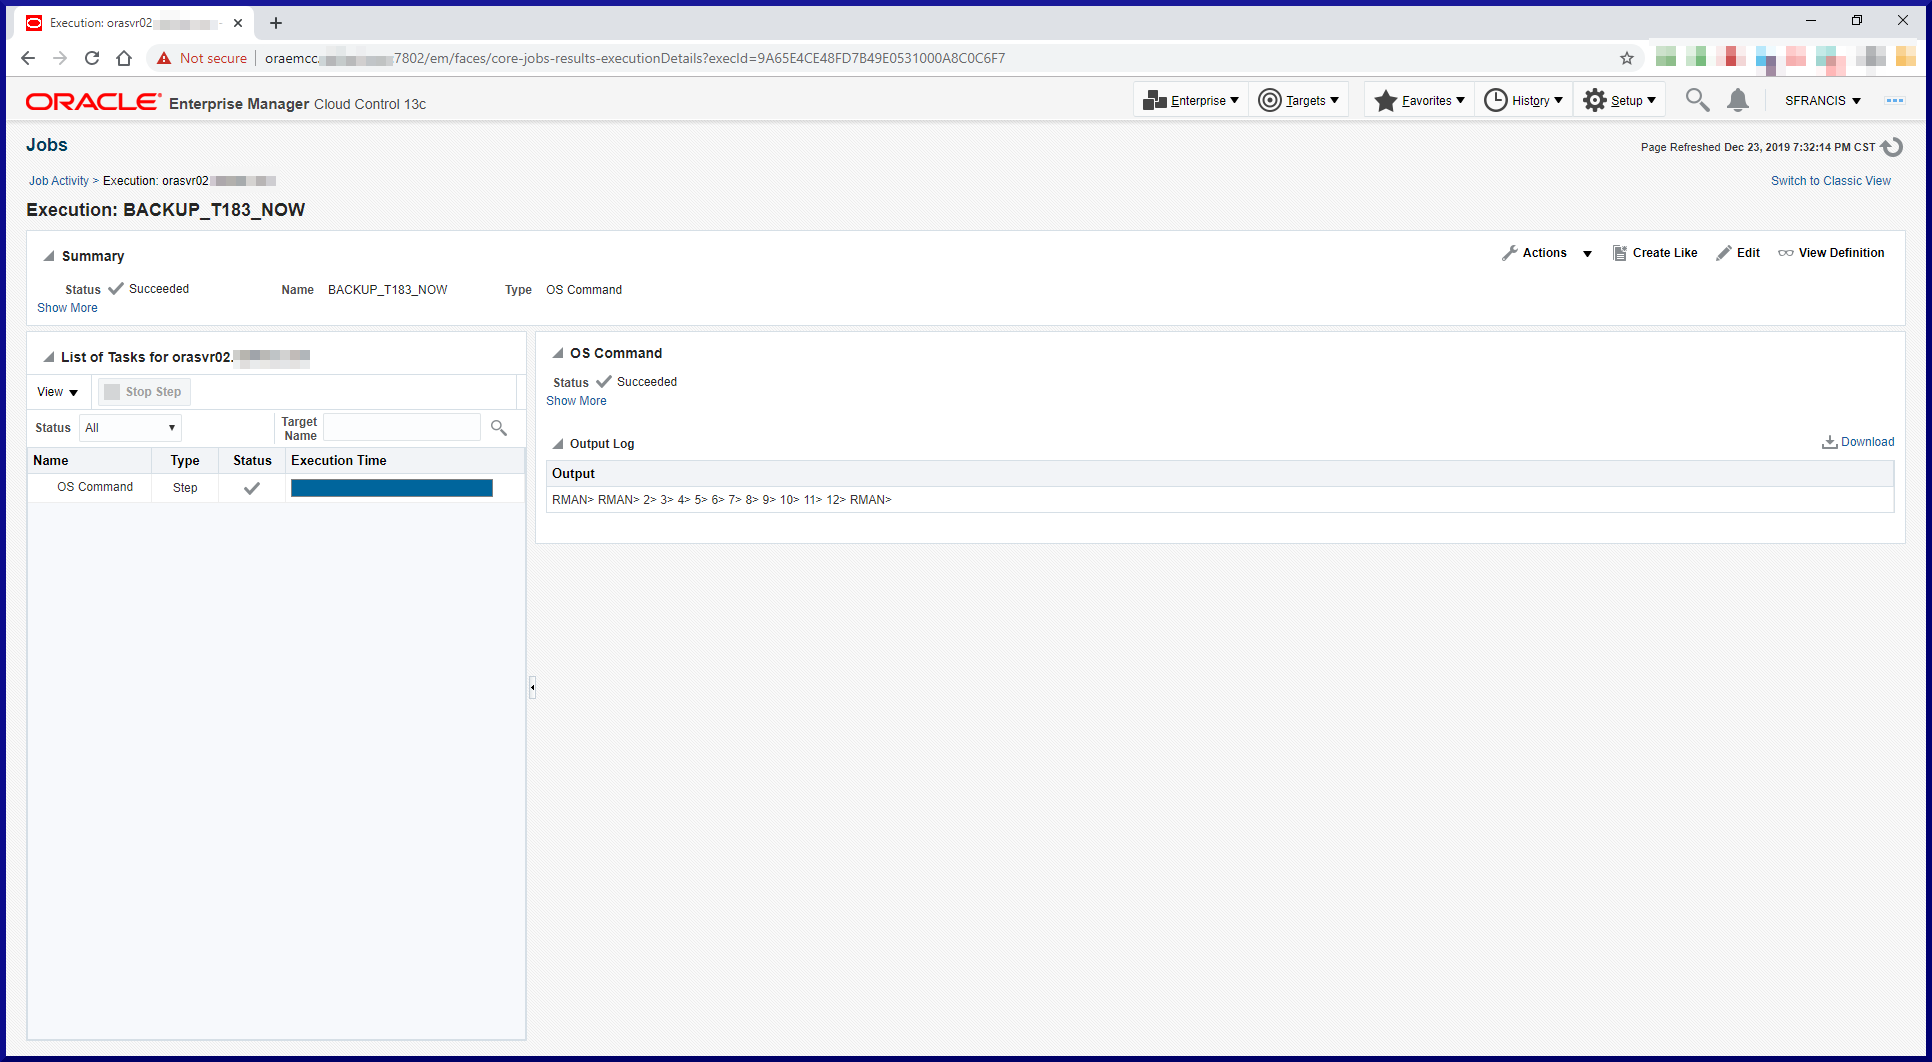
RMAN can be run interactively from the command line, via OS script, via RMAN script (stored in an RMAN Recovery Catalog) or via Enterprise Manager.
RMAN can backup a database either online or offline.
RMAN can backup either the whole database or part of a database (specific datafiles or tablespaces).
RMAN supports full database backups and incremental backups (cumulative or differential).
RMAN supports backup compression, encryption and parallelism.
RMAN’s default persistent configuration settings can be overridden for a given RMAN session.
RMAN supports complete (full) database restore/recovery or incomplete restore/recovery to a point in time, transaction or SCN.
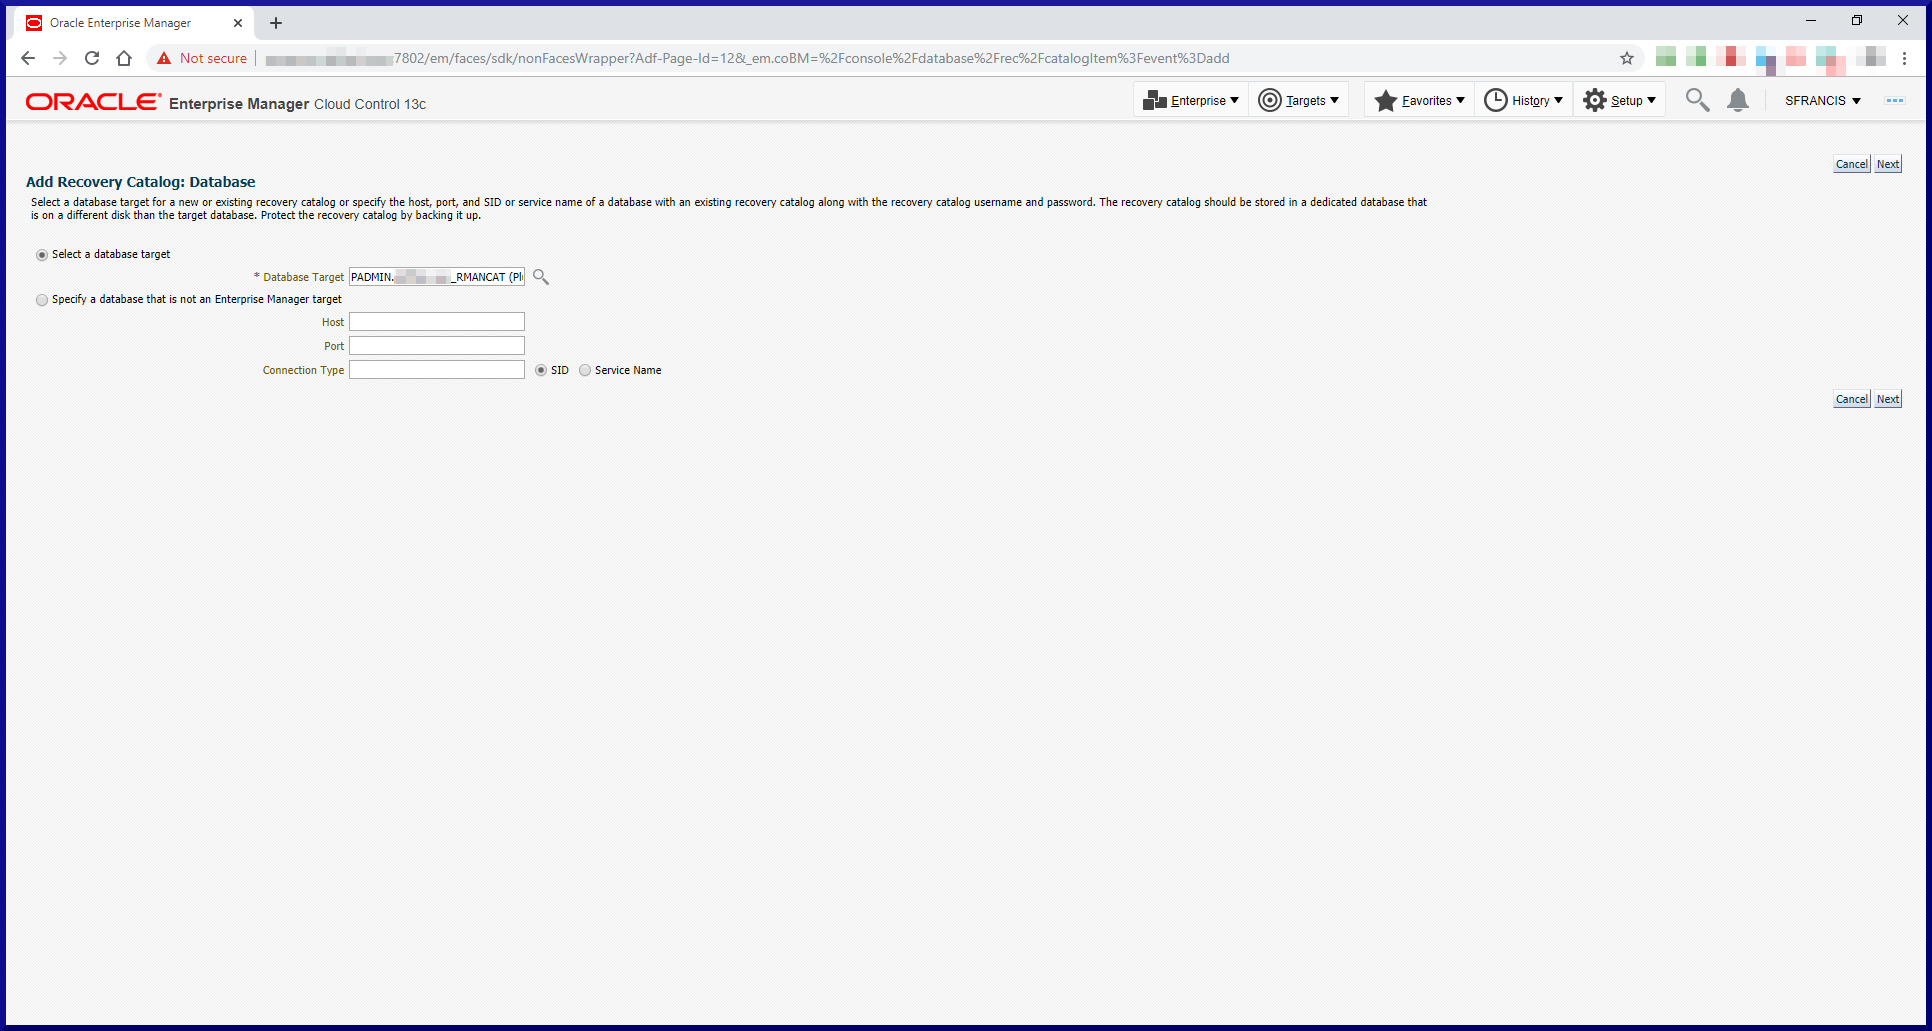
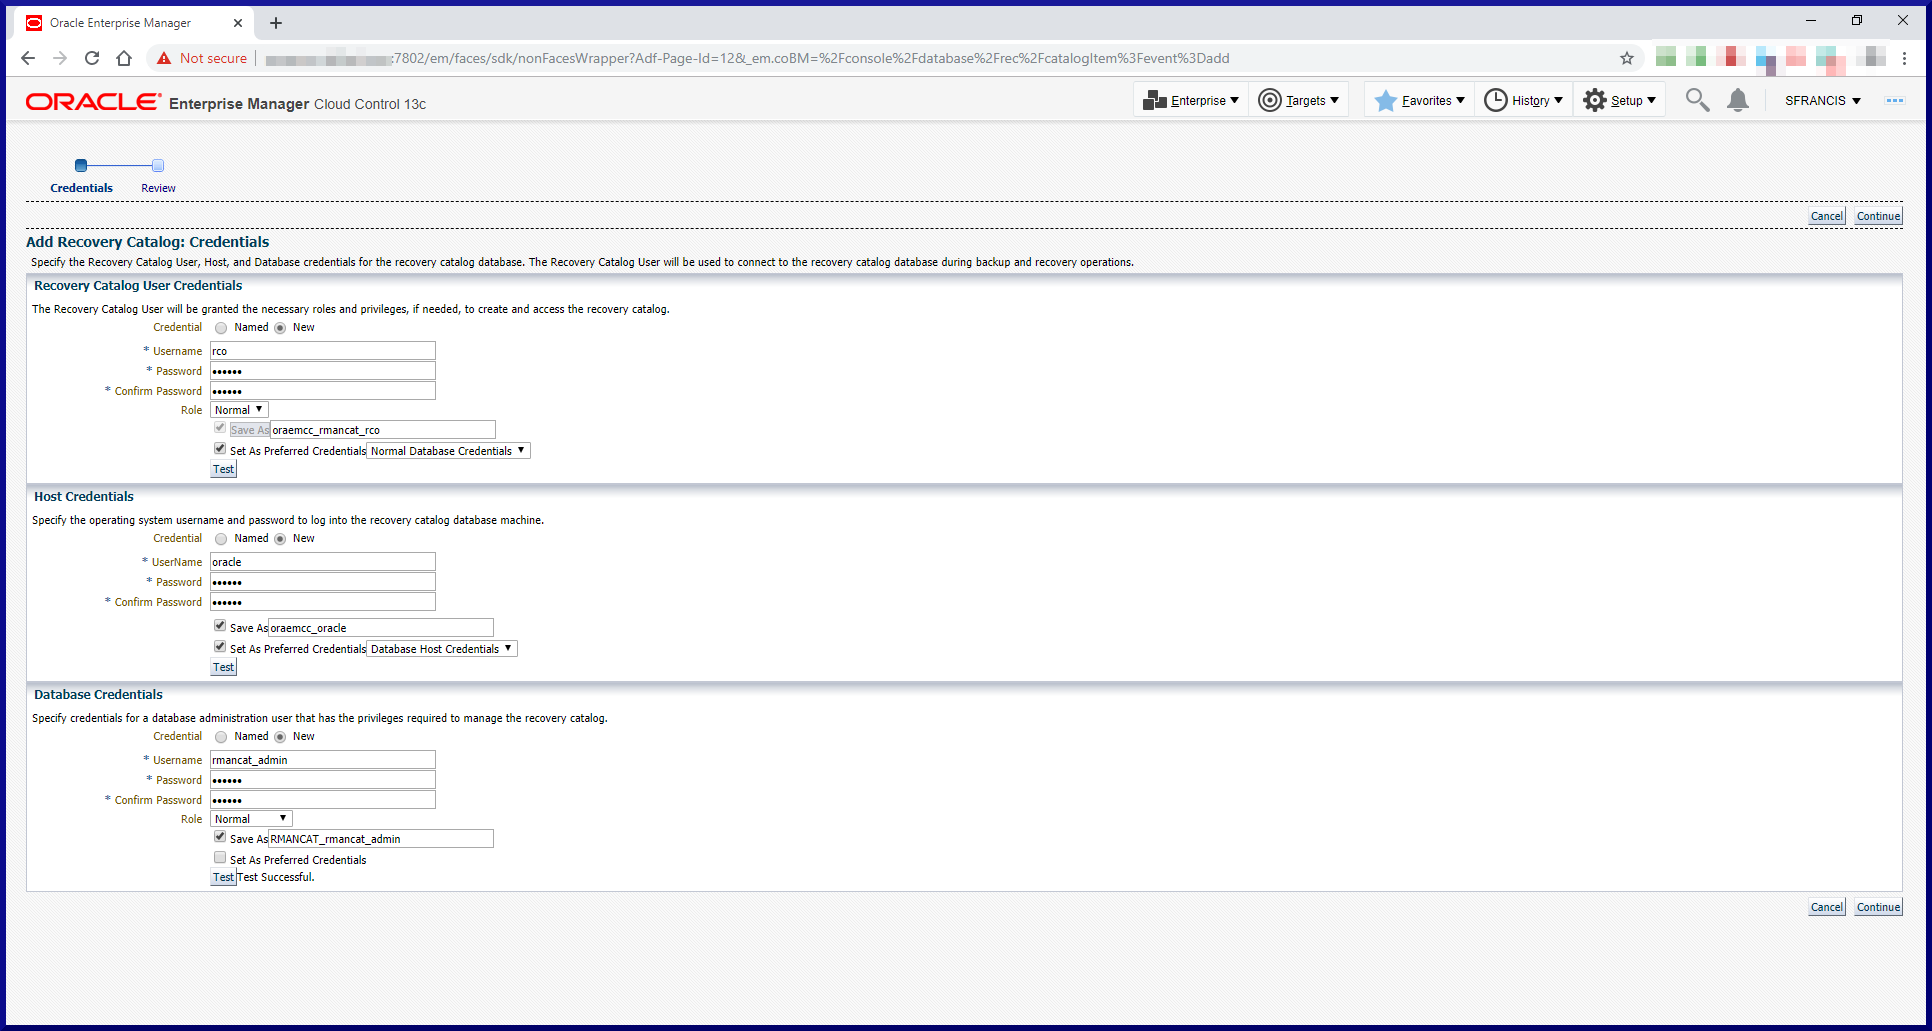
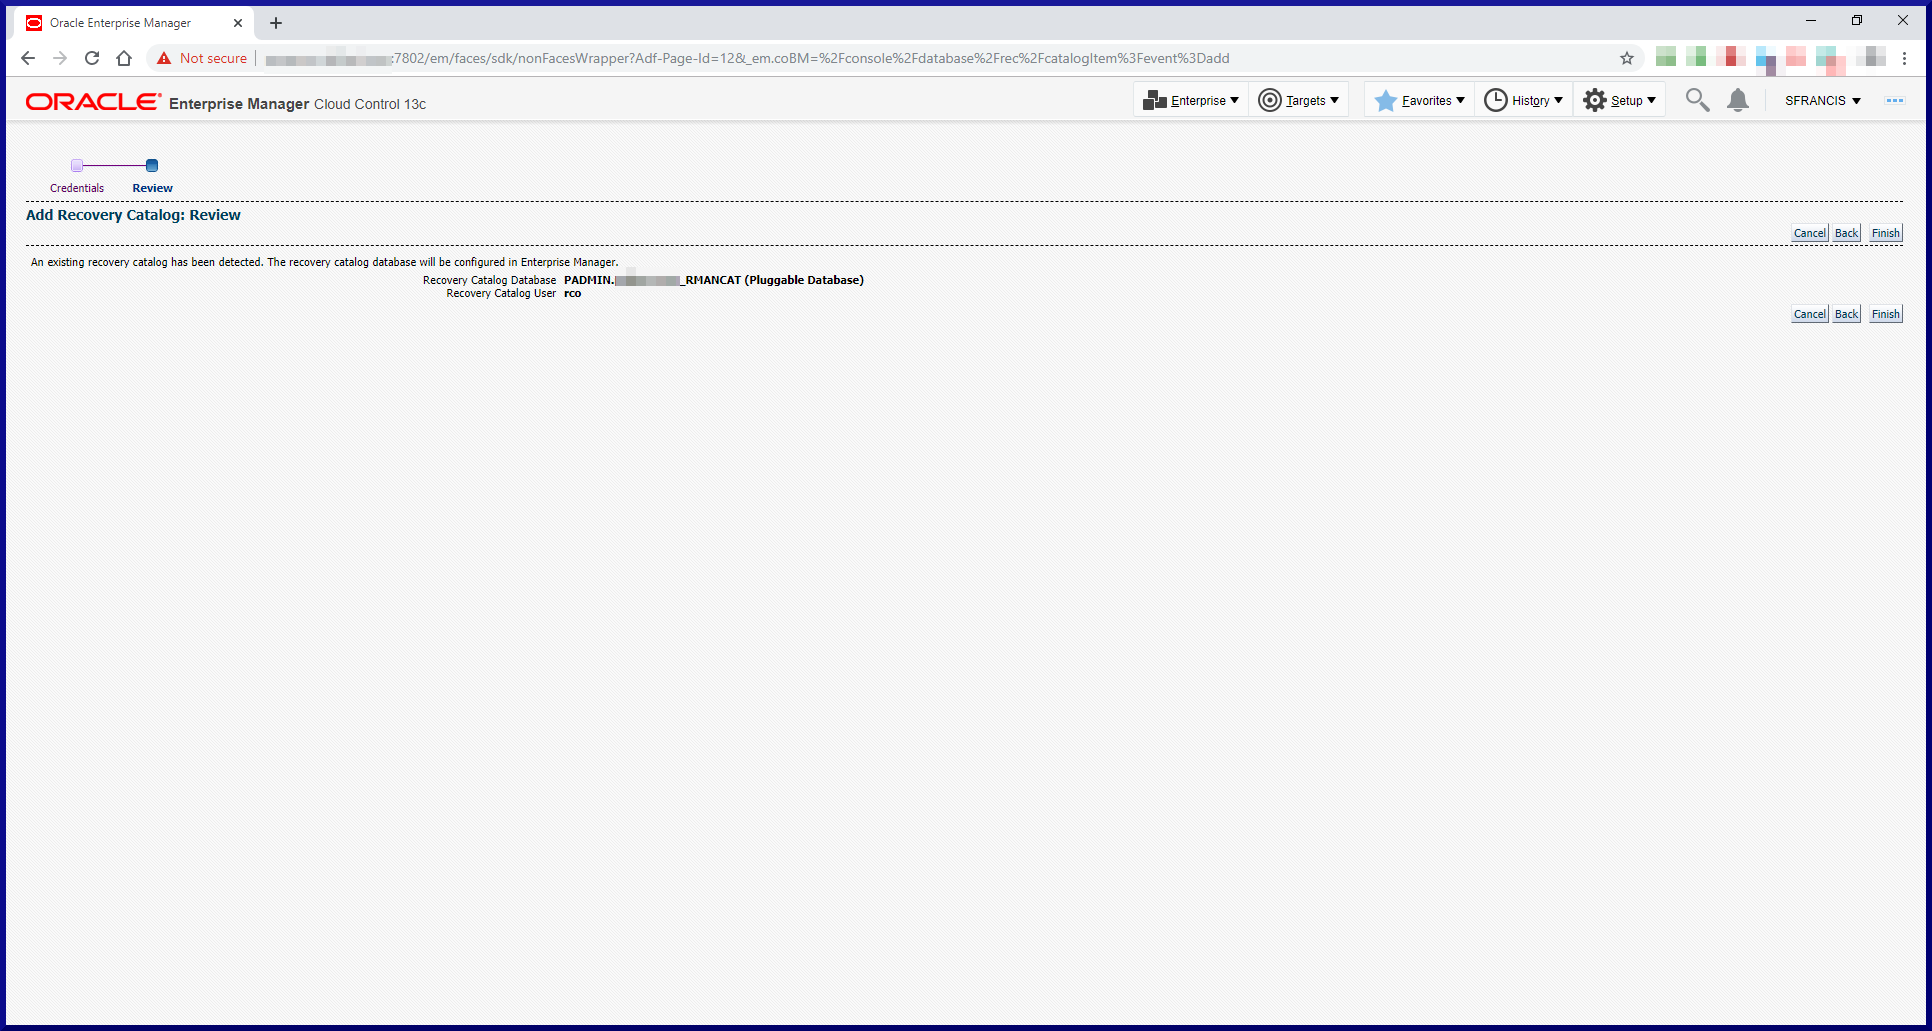
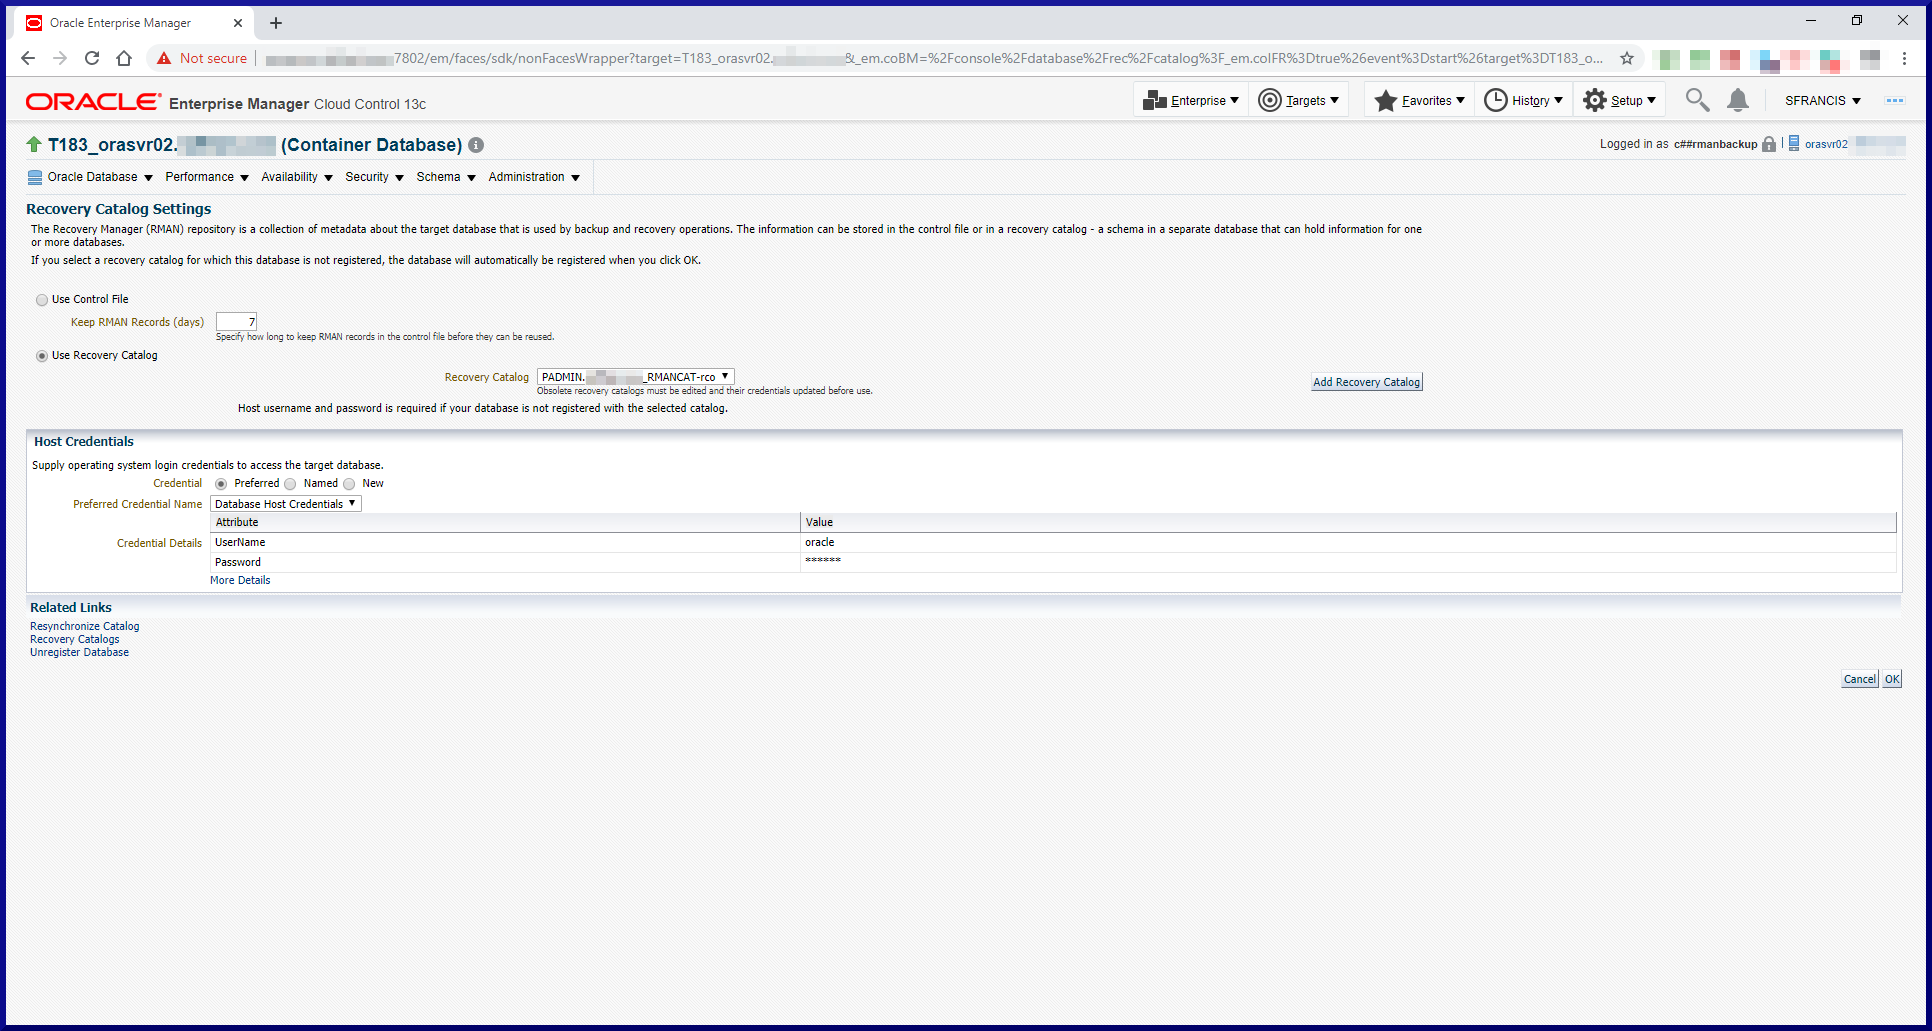
In most cases, using an RMAN recovery catalog is useful. It’s not strictly necessary since RMAN database backup activity will be recorded in the database control files anyway. Like with most things there are pros and cons. For example, if you have more than a few databases, recording backup activity in a central location is more efficient and convenient. Plus, if you ever had to rebuild your control files, you’d lose the backup information stored there. In any event, the backup activity information stored in the controlfiles will get aged out eventually, so it’s better to keep that data elsewhere. On the other hand, if your RMAN catalog database is down then your backups will fail. So you have the added overhead of protecting your RMAN catalog database. In most cases you should treat it like any other production database.
To create an RMAN recovery catalog, just follow these 3 simple steps:
Step #1: Create a Database for the RMAN Catalog.
Since our infrastructure is small there’s no real need to fire up a separate database to host an RMAN catalog. Instead, we’ll create another PDB within the CDB (PADMIN) which is already running the OEM Management Repository PDB (EMPDBREPOS).
Note, running more than one PDB within a CDB requires the Multitenant license. Plus in a production environment, you would more likely choose to have completely separate databases for the OEM Management Repository and the RMAN catalog anyway. What we’re doing here is for demonstration/educational purposes only.
So let’s crack on and create another PDB:
[oracle@oraemcc ~]$ . oraenv
ORACLE_SID = [oracle] ? PADMIN
The Oracle base has been set to /u01/app/oracle

[oracle@oraemcc ~]$ sqlplus / as sysdba
SQL> show con_name
CON_NAME
--------
CDB$ROOT

SQL> create pluggable database rmancat admin user rmancat_admin identified by rmancat_admin;
Pluggable database created.

SQL> select name,open_mode from v$pdbs;
NAME                           OPEN_MODE
------------------------------ ----------
PDB$SEED                       READ ONLY
EMPDBREPOS                     READ WRITE
RMANCAT                        MOUNTED

SQL> alter pluggable database rmancat open;
Pluggable database altered.

SQL> select name,open_mode from v$pdbs;
NAME                           OPEN_MODE
------------------------------ -----------
PDB$SEED                       READ ONLY
EMPDBREPOS                     READ WRITE
RMANCAT                        READ WRITE
Next, we’ll quickly add the relevant TNS connect string to the tnsnames.ora file:
[oracle@oraemcc ~]$ sqlplus system@rmancat

SQL> create tablespace rmancat_data;
Tablespace created.

SQL> create user rco identified by rco default tablespace rmancat_data
     quota unlimited on rmancat_data;
User created.

SQL> grant create session, resource, recovery_catalog_owner to rco;
Grant succeeded.
Step #3: Create the Recovery Catalog.
Time to use the RMAN client to login:
[oracle@oraemcc ~]$ rman

RMAN> connect catalog rco/rco@rmancat
connected to recovery catalog database

RMAN> create catalog tablespace rmancat_data;
recovery catalog created
That’s it! The RMAN recovery catalog is now ready to use.
Task #2: Configure the RMAN Environment.
Before we can start to run backups, we need to complete a few setup steps. First, let’s review the database environment we’ll be using to test out RMAN:
PDB (12.1.0.2) containing the RMAN Recovery Catalog
orasvr01
T122
Non-CDB (12.2.0.1) contains user data
orasvr02
T183
CDB (18.3) containing 1 PDB (T183_PDB1)
orasvr02
T183_PDB1
PDB (18.3) contains user data
Step #1: Add Entries to the tnsnames.ora File.
Copy the TNS connect string for RMANCAT (see Step #1 above) to the tnsnames.ora files for the T122 and T183 databases.
Step #2: Register the Databases with the RMAN Recovery Catalog.
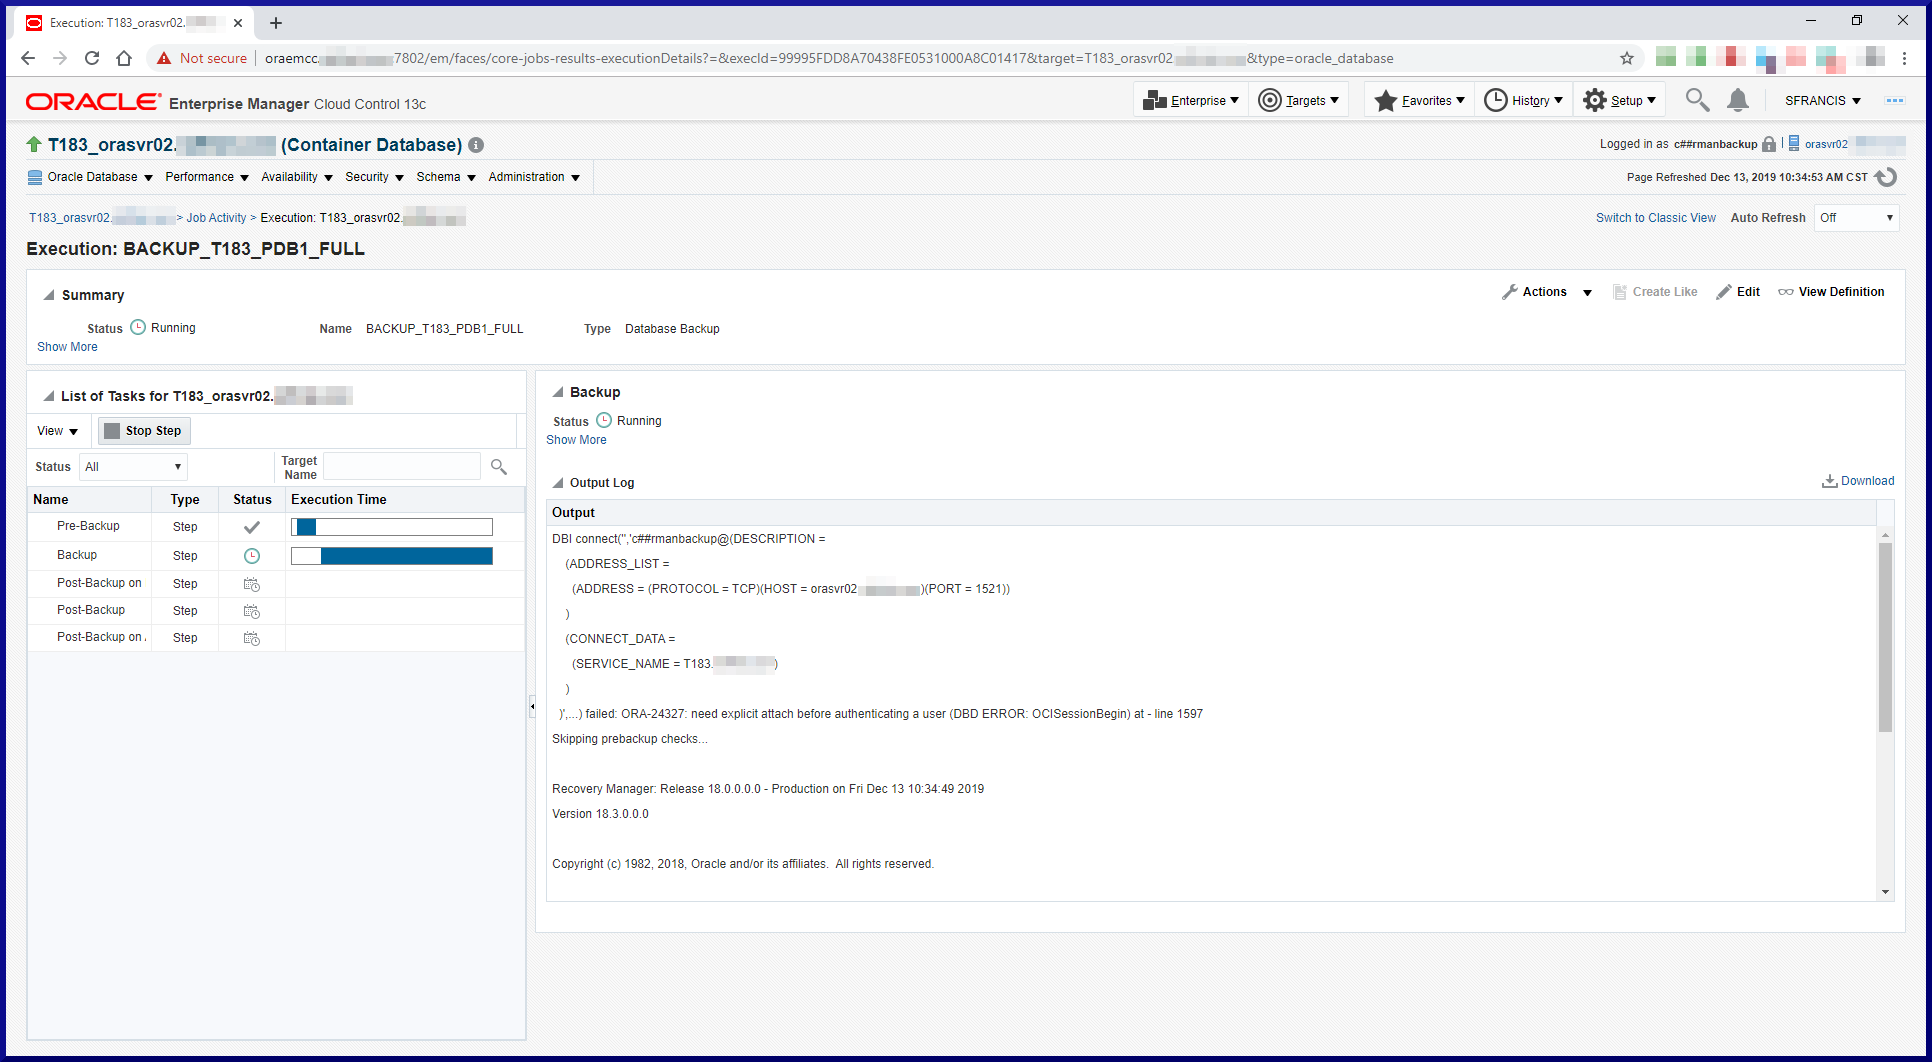
Since we’re using an RMAN catalog, we need to register the target databases in the catalog. When connecting to the target database and the recovery catalog, RMAN reported a problem. Solution to follow. Keep reading:
[oracle@orasvr01 ~]$ rman target=/ catalog=rco/rco@rmancat
Recovery Manager: Release 12.2.0.1.0 - Production on Mon Nov 25 15:17:20 2019

Copyright (c) 1982, 2017, Oracle and/or its affiliates.  All rights reserved.

connected to target database: T122 (DBID=2185934179)
connected to recovery catalog database
PL/SQL package RCO.DBMS_RCVCAT version 12.01.00.02. in RCVCAT database is too old

[oracle@orasvr02 ~]$ rman target=/ catalog=rco/rco@rmancat
Recovery Manager: Release 18.0.0.0.0 - Production on Mon Nov 25 15:18:30 2019
Version 18.3.0.0.0

Copyright (c) 1982, 2018, Oracle and/or its affiliates.  All rights reserved.

connected to target database: T183 (DBID=2832597398)
connected to recovery catalog database
PL/SQL package RCO.DBMS_RCVCAT version 12.01.00.02. in RCVCAT database is too old
The reason this happens is because the RMAN recovery catalog was created in a 12.1.0.2 database and the two databases connecting to it are both higher versions. RMAN does provide an UPGRADE CATALOG command, but running it connected to the catalog from a 12.1.0.2 RMAN client doesn’t actually upgrade it. Which makes sense. So let’s try upgrading the catalog connecting from the 18.3 RMAN client on orasvr02:
[oracle@orasvr02 ~]$ rman catalog=rco/rco@rmancat
Recovery Manager: Release 18.0.0.0.0 - Production on Mon Nov 25 15:44:33 2019
Version 18.3.0.0.0

Copyright (c) 1982, 2018, Oracle and/or its affiliates.  All rights reserved.

connected to recovery catalog database

PL/SQL package RCO.DBMS_RCVCAT version 12.01.00.02. in RCVCAT database is too old

RMAN> upgrade catalog;

recovery catalog owner is RCO
enter UPGRADE CATALOG command again to confirm catalog upgrade

RMAN> upgrade catalog;
recovery catalog upgraded to version 18.03.00.00.00
DBMS_RCVMAN package upgraded to version 18.03.00.00
DBMS_RCVCAT package upgraded to version 18.03.00.00.
Now let’s try connecting to the catalog from the 12.2.0.1 RMAN client on orasvr01:
[oracle@orasvr01 ~]$ rman target=/ catalog=rco/rco@rmancat

Recovery Manager: Release 12.2.0.1.0 - Production on Mon Nov 25 15:46:22 2019
Copyright (c) 1982, 2017, Oracle and/or its affiliates.  All rights reserved.

connected to target database: T122 (DBID=2185934179)
connected to recovery catalog database
recovery catalog schema release 18.03.00.00. is newer than RMAN release
Note the message about the schema release being newer than the RMAN release. This message is informational only and no further action is required. See MOS doc ID 73431.1 for the RMAN certification matrix. Now we know there’s no issue, let’s go ahead and register the databases:
connected to target database: T122 (DBID=2185934179)
connected to recovery catalog database
recovery catalog schema release 18.03.00.00. is newer than RMAN release

RMAN> register database;

database registered in recovery catalog
starting full resync of recovery catalog
full resync complete

[oracle@orasvr02 ~]$ rman target=/ catalog=rco/rco@rmancat
Recovery Manager: Release 18.0.0.0.0 - Production on Mon Nov 25 16:10:31 2019
Version 18.3.0.0.0

Copyright (c) 1982, 2018, Oracle and/or its affiliates.  All rights reserved.
connected to target database: T183 (DBID=2832597398)
connected to recovery catalog database

RMAN> register database;

database registered in recovery catalog
starting full resync of recovery catalog
full resync complete
Step #3: Create Database Backup Users.
You can do everything you need to do with RMAN as the Oracle Database software owner (usually oracle). However, least privilege and separation of duty security measures suggest using dedicated backup users. Follow these steps on both orasvr01 and orasvr02:
[oracle@orasvr01 ~]$ sqlplus / as sysdba

SQL> create user rmanbackup identified by rmanbackup
     default tablespace users
     temporary tablespace temp
     quota unlimited on users;

User created.

SQL> grant sysbackup to rmanbackup;
Grant succeeded.

SQL> select username,SYSDBA,SYSOPER,SYSASM,SYSBACKUP,SYSDG,SYSKM
     from   v$pwfile_users;

USERNAME             SYSDB SYSOP SYSAS SYSBA SYSDG SYSKM
-------------------- ----- ----- ----- ----- ----- -----
SYS                  TRUE  TRUE  FALSE FALSE FALSE FALSE
SYSDG                FALSE FALSE FALSE FALSE TRUE  FALSE
SYSBACKUP            FALSE FALSE FALSE TRUE  FALSE FALSE
SYSKM                FALSE FALSE FALSE FALSE FALSE TRUE
RMANBACKUP           FALSE FALSE FALSE TRUE  FALSE FALSE

[oracle@orasvr01 ~]$ rman target rmanbackup/rmanbackup using sysbackup
connected to target database: T122 (DBID=2185934179)

RMAN> connect catalog rco/rco@rmancat
connected to recovery catalog database


For a CDB, create a common user and assign the database backup privilege for all PDBs:

[oracle@orasvr02 ~]$ sqlplus / as sysdba

SQL> create user c##rmanbackup identified by rmanbackup
     default tablespace users
     temporary tablespace temp
     quota unlimited on users;

User created.

SQL> grant sysbackup to c##rmanbackup container=all;
Grant succeeded.

SQL> select username,SYSDBA,SYSOPER,SYSASM,SYSBACKUP,SYSDG,SYSKM
     from   v$pwfile_users;

USERNAME             SYSDB SYSOP SYSAS SYSBA SYSDG SYSKM
-------------------- ----- ----- ----- ----- ----- -----
SYS                  TRUE  TRUE  FALSE FALSE FALSE FALSE
SYSDG                FALSE FALSE FALSE FALSE TRUE  FALSE
SYSBACKUP            FALSE FALSE FALSE TRUE  FALSE FALSE
SYSKM                FALSE FALSE FALSE FALSE FALSE TRUE
C##RMANBACKUP        FALSE FALSE FALSE TRUE  FALSE FALSE

[oracle@orasvr02 ~]$ rman target rmanbackup/rmanbackup using sysbackup
connected to target database: T183 (DBID=2832597398)

RMAN> connect catalog rco/rco@rmancat
connected to recovery catalog database
Step #4: Review the RMAN Defaults.
Once RMAN is connected to the target database and to the catalog, you can review and change the persistent configuration settings:
RMAN> show all;

RMAN configuration parameters for database with db_unique_name T122 are:
CONFIGURE RETENTION POLICY TO REDUNDANCY 1; # default
CONFIGURE BACKUP OPTIMIZATION OFF; # default
CONFIGURE DEFAULT DEVICE TYPE TO DISK; # default
CONFIGURE CONTROLFILE AUTOBACKUP ON; # default
CONFIGURE CONTROLFILE AUTOBACKUP FORMAT FOR DEVICE TYPE DISK TO '%F'; # default
CONFIGURE DEVICE TYPE DISK PARALLELISM 1 BACKUP TYPE TO BACKUPSET; # default
CONFIGURE DATAFILE BACKUP COPIES FOR DEVICE TYPE DISK TO 1; # default
CONFIGURE ARCHIVELOG BACKUP COPIES FOR DEVICE TYPE DISK TO 1; # default
CONFIGURE MAXSETSIZE TO UNLIMITED; # default
CONFIGURE ENCRYPTION FOR DATABASE OFF; # default
CONFIGURE ENCRYPTION ALGORITHM 'AES128'; # default
CONFIGURE COMPRESSION ALGORITHM 'BASIC' AS OF RELEASE 'DEFAULT' OPTIMIZE FOR LOAD TRUE ; # default
CONFIGURE RMAN OUTPUT TO KEEP FOR 7 DAYS; # default
CONFIGURE ARCHIVELOG DELETION POLICY TO NONE; # default
CONFIGURE SNAPSHOT CONTROLFILE NAME TO '/u01/app/oracle/product/12.2.0/dbhome_1/dbs/snapcf_T122.f'; # default
These default configuration settings are the same in 12.2 as they are in 18.3. Let’s take a quick look at what they mean:
RETENTION POLICY
Determines how long Oracle will keep your backups around. If you’re using a FRA, Oracle will automatically remove expired backups. If you’re not, Oracle marks expired backups as obsolete and you have to delete them. Retention comes in two flavors. Window based is set to a number of days. Redundancy based is set to the number of level 0 or full backups to keep. You can also have no retention. Strange but true. Backup retention granularity is at the backupset or image copy level.
BACKUP OPTIMIZATION
Determines if RMAN should backup a file if there’s already an identical file in an existing backup on the same device type. If set to YES, RMAN skips backing up another identical copy.
DEFAULT DEVICE TYPE
Backup/restore operations happen via channels. A channel is a server process which connects the target database to the backup device. Channels are opened to a specific type of device, usually either DISK or SBT (System Backup Tape). This sets the device type default.
CONTROLFILE AUTOBACKUP
Determines if the database controlfile is backed up automatically.
CONTROLFILE AUTOBACKUP FORMAT
Determines the naming convention of the backed up control file. Usually set to %F which combines the DBID, date (YYYYMMDD) and a 2 digit hexadecimal number. All the different format strings are documented here.
DEVICE TYPE PARALLELISM n BACKUP TYPE TO BACKUPSET
Determines the number of channels (n) RMAN will open to the specified device type. Then specifies the type of backup to create by default (BACKUPSET), the other type being COPY (an image copy).
DATAFILE BACKUP COPIES
Determines the number of copies of each backupset to be created when backing up.
ARCHIVELOG BACKUP COPIES
Determines the number of copies of archived redo log files to be created when backing up.
MAXSETSIZE
Specifies the maximum size of a backupset created on a channel.
ENCRYPTION FOR DATABASE
Determines if the backups will be encrypted. To use encryption, the ASO must be licensed.
ENCRYPTION ALGORITHM
The algorithm to use if you’re using backup encryption.
COMPRESSION ALGORITHM
Determines the level of compression to use when backing up. The default (BASIC) does not require a license for the ACO. The OPTIMIZE FOR LOAD TRUE clause ensures RMAN optimizes CPU usage and disables precompression block processing. Conversely, setting OPTIMIZE FOR LOAD FALSE enables precompression block processing whereby block free space is consolidated and set to binary zeros. This leads to improved backup compression at the expense of additional CPU overhead. It works best for blocks with high insert and delete DML activity.
RMAN OUTPUT TO KEEP
Determines the number of days RMAN logging information is kept in the RMAN catalog. Logging information is stored in RC_RMAN_OUTPUT. The output can also be queried via V$RMAN_OUTPUT.
ARCHIVELOG DELETION POLICY
Determines when archived redo logs should be deleted. The policy applies to all multiplexed archived redo log file destinations. Only archived redo logs in the FRA are automatically deleted. To delete archived redo logs as they are backed up, you can use additional syntax in the backup command, BACKUP …DELETE INPUT.
SNAPSHOT CONTROLFILE NAME
The database control file(s) contain the latest SCN and a map of where all the database datafiles are located. This data is constantly being updated as a part of normal database operations. When RMAN starts a backup, it needs a read consistent view of that data and that’s what the snapshot control file is. This setting simply specifies the name and path of the snapshot control file.
Task #3: Execute RMAN Backups.
The next several tasks will cover the following topics (click the link you need):
Task #3a. Non-CDB Database Backup using a Default RMAN Configuration.
To get the ball rolling, let’s run a full backup of the T122 database using the RMAN configuration default settings. Before we do, let’s review the database datafile and fast recover area configuration:
SQL> select file_id, file_name from dba_data_files order by 1;
FILE_ID FILE_NAME
------- ------------------------------------------------------
      1 /u02/oradata/T122/datafile/o1_mf_system_gwykl8n7_.dbf
      3 /u02/oradata/T122/datafile/o1_mf_sysaux_gwykmzwz_.dbf
      4 /u02/oradata/T122/datafile/o1_mf_undotbs1_gwyko31q_.dbf
      7 /u02/oradata/T122/datafile/o1_mf_users_gwyko450_.dbf

SQL> show parameter db_recovery
NAME                                 TYPE        VALUE
------------------------------------ ----------- --------------------------------
db_recovery_file_dest                string      /u07/oradata/fast_recovery_area
db_recovery_file_dest_size           big integer 15G
Use RMAN to connect to the target database (T122) and the RMAN recovery catalog:
[oracle@orasvr01 ~]$ rman target rmanbackup/rmanbackup using sysbackup
connected to target database: T122 (DBID=2185934179)

RMAN> connect catalog rco/rco@rmancat
connected to recovery catalog database
Run a full backup of the database (backup database) and all archived redo logs (plus archivelog) and delete the archived redo logs once they’ve been backed up (delete input):
RMAN> backup database plus archivelog delete input;
Here’s the output and what it means.
Start the backup and force a log switch so the very latest archived redo log will be available for backup:
Starting backup at 02-DEC-19
current log archived
The default backup device type is disk (DEFAULT DEVICE TYPE TO DISK), only one channel will be autoallocated and the default backup type will be a backupset (DEVICE TYPE DISK PARALLELISM 1 BACKUP TYPE TO BACKUPSET):
Next, back up these archived redo logs to the first backup piece of the first backup set. Without specifying an alternative location (using the FORMAT option), RMAN will write its backups to the FRA:
Finally, backup the database control file and SPFILE (CONTROLFILE AUTOBACKUP ON) to the first backup piece of a new backup set:
Starting Control File and SPFILE Autobackup at 02-DEC-19
piece handle=/u07/oradata/fast_recovery_area/T122/autobackup/2019_12_02/o1_mf_s_1025951085_gybgphgj_.bkp comment=NONE
Finished Control File and SPFILE Autobackup at 02-DEC-19
So we should end up with 3 backup set piece files in …/T122/backupset/2019_12_02:
[oracle@orasvr01 2019_12_02]$ pwd
/u07/oradata/fast_recovery_area/T122/backupset/2019_12_02

[oracle@orasvr01 2019_12_02]$ ls -l
-rw-r----- 1 oracle oinstall 6836020224 Dec  2 10:23 o1_mf_annnn_TAG20191202T102106_gybghlmv_.bkp
-rw-r----- 1 oracle oinstall      32256 Dec  2 10:24 o1_mf_annnn_TAG20191202T102443_gybgpcog_.bkp
-rw-r----- 1 oracle oinstall 1887117312 Dec  2 10:24 o1_mf_nnndf_TAG20191202T102345_gybgnm0b_.bkp
And a backup set piece file in …/T122/autobackup/2019_12_02
[oracle@orasvr01 2019_12_02]$ pwd
/u07/oradata/fast_recovery_area/T122/autobackup/2019_12_02

[oracle@orasvr01 2019_12_02]$ ls -l
-rw-r----- 1 oracle oinstall 10731520 Dec  2 10:24 o1_mf_s_1025951085_gybgphgj_.bkp
Task #3b. Non-CDB Database Backup using a Modified RMAN Configuration.
As we saw in Task #3a, a single RMAN command leveraging the default RMAN configuration settings can create a perfectly usable backup in a pre-configured FRA. However, you’re likely to want to modify your backup strategy. There are two ways to do this. The first is to change the RMAN configuration defaults. The second way is to run a customized RMAN script which we’ll get to in Step #3.
Sticking with the T122 database, log into RMAN and the catalog then change some RMAN configuration defaults. We’ll change the retention policy to 3 days, up the parallelism to 2, change the location of the snapshot control file away from being underneath ORACLE_HOME and turn on optimization. These are all changes you’d likely want to make in a production environment. Not perhaps these exact values, but certainly changes to these defaults. Finally, we’ll switch to high compression. This would require a license for the Advanced Compression Option, but I don’t have huge amounts of spare disk so it seemed like a good idea.
[oracle@orasvr01 ~]$ rman target rmanbackup/rmanbackup using sysbackup
connected to target database: T122 (DBID=2185934179)

RMAN> connect catalog rco/rco@rmancat
connected to recovery catalog database

RMAN> CONFIGURE RETENTION POLICY TO RECOVERY WINDOW OF 3 DAYS;

new RMAN configuration parameters:
CONFIGURE RETENTION POLICY TO RECOVERY WINDOW OF 3 DAYS;
new RMAN configuration parameters are successfully stored
starting full resync of recovery catalog
full resync complete

RMAN> CONFIGURE DEVICE TYPE DISK PARALLELISM 2 BACKUP TYPE TO BACKUPSET;

new RMAN configuration parameters:
CONFIGURE DEVICE TYPE DISK PARALLELISM 2 BACKUP TYPE TO BACKUPSET;
new RMAN configuration parameters are successfully stored
starting full resync of recovery catalog
full resync complete

RMAN> CONFIGURE SNAPSHOT CONTROLFILE NAME TO '/nas/backups/T122/snapcf_T122.f';

new RMAN configuration parameters:
CONFIGURE SNAPSHOT CONTROLFILE NAME TO '/nas/backups/T122/snapcf_T122.f';
new RMAN configuration parameters are successfully stored
starting full resync of recovery catalog
full resync complete

RMAN> CONFIGURE BACKUP OPTIMIZATION ON;

new RMAN configuration parameters:
CONFIGURE BACKUP OPTIMIZATION ON;
new RMAN configuration parameters are successfully stored
starting full resync of recovery catalog
full resync complete

RMAN> CONFIGURE COMPRESSION ALGORITHM 'HIGH';

new RMAN configuration parameters:
CONFIGURE COMPRESSION ALGORITHM 'HIGH' AS OF RELEASE 'DEFAULT' OPTIMIZE FOR LOAD TRUE;
new RMAN configuration parameters are successfully stored
starting full resync of recovery catalog
full resync complete

RMAN> show all;
RMAN configuration parameters for database with db_unique_name T122 are:
CONFIGURE RETENTION POLICY TO RECOVERY WINDOW OF 3 DAYS;
CONFIGURE BACKUP OPTIMIZATION ON;
CONFIGURE DEFAULT DEVICE TYPE TO DISK; # default
CONFIGURE CONTROLFILE AUTOBACKUP ON; # default
CONFIGURE CONTROLFILE AUTOBACKUP FORMAT FOR DEVICE TYPE DISK TO '%F'; # default
CONFIGURE DEVICE TYPE DISK PARALLELISM 2 BACKUP TYPE TO BACKUPSET;
CONFIGURE DATAFILE BACKUP COPIES FOR DEVICE TYPE DISK TO 1; # default
CONFIGURE ARCHIVELOG BACKUP COPIES FOR DEVICE TYPE DISK TO 1; # default
CONFIGURE MAXSETSIZE TO UNLIMITED; # default
CONFIGURE ENCRYPTION FOR DATABASE OFF; # default
CONFIGURE ENCRYPTION ALGORITHM 'AES128'; # default
CONFIGURE COMPRESSION ALGORITHM 'HIGH' AS OF RELEASE 'DEFAULT' OPTIMIZE FOR LOAD TRUE;
CONFIGURE RMAN OUTPUT TO KEEP FOR 7 DAYS; # default
CONFIGURE ARCHIVELOG DELETION POLICY TO NONE; # default
CONFIGURE SNAPSHOT CONTROLFILE NAME TO '/nas/backups/T122/snapcf_T122.f';
Now check what the catalog has recorded by logging into the recovery catalog database as the recovery catalog owner:
[oracle@oraemcc ~]$ . oraenv
ORACLE_SID = [oracle] ? PADMIN
[oracle@oraemcc ~]$ sqlplus rco/rco@rmancat
SQL> col c_name format a30 heading 'RMAN Config Parameter'
SQL> col d_name format a10 heading 'DB Name'
SQL> col c_value format a55 heading 'RMAN Config Value'
SQL> select d.name d_name, c.name c_name, c.value c_valuefrom rc_database d, rc_rman_configuration c
where d.db_key = c.db_key
order by d.name, c.name;
DB Name RMAN Config Parameter RMAN Config Value
---------- ------------------------------ -----------------------------------------------------
T122 BACKUP OPTIMIZATION ON
T122 COMPRESSION ALGORITHM 'HIGH' AS OF RELEASE 'DEFAULT' OPTIMIZE FOR LOAD TRUE
T122 DEVICE TYPE DISK PARALLELISM 2 BACKUP TYPE TO BACKUPSET
T122 RETENTION POLICY TO RECOVERY WINDOW OF 3 DAYS
T122 SNAPSHOT CONTROLFILE NAME TO '/nas/backups/T122/snapcf_T122.f'
Now run the same backup as in Step #1. This time the output should be much less and hopefully more understandable:
[oracle@orasvr01 ~]$ rman target rmanbackup/rmanbackup using sysbackup
connected to target database: T122 (DBID=2185934179)

RMAN> connect catalog rco/rco@rmancat
connected to recovery catalog database

RMAN> backup database plus archivelog delete input;

Starting backup at 04-DEC-19
current log archived
allocated channel: ORA_DISK_1
channel ORA_DISK_1: SID=285 device type=DISK
allocated channel: ORA_DISK_2
channel ORA_DISK_2: SID=39 device type=DISK
channel ORA_DISK_1: starting archived log backup set
channel ORA_DISK_1: specifying archived log(s) in backup set
input archived log thread=1 sequence=43 RECID=43 STAMP=1026000005
input archived log thread=1 sequence=44 RECID=44 STAMP=1026079251
channel ORA_DISK_1: starting piece 1 at 04-DEC-19
channel ORA_DISK_2: starting archived log backup set
channel ORA_DISK_2: specifying archived log(s) in backup set
input archived log thread=1 sequence=45 RECID=45 STAMP=1026147982
channel ORA_DISK_2: starting piece 1 at 04-DEC-19
channel ORA_DISK_1: finished piece 1 at 04-DEC-19
piece handle=/u07/oradata/fast_recovery_area/T122/backupset/2019_12_04/o1_mf_annnn_TAG20191204T170624_gyjgzjtf_.bkp tag=TAG20191204T170624 comment=NONE
channel ORA_DISK_1: backup set complete, elapsed time: 00:00:07
channel ORA_DISK_1: deleting archived log(s)
archived log file name=/u07/oradata/fast_recovery_area/T122/archivelog/2019_12_03/o1_mf_1_43_gycyh3fw_.arc RECID=43 STAMP=1026000005
archived log file name=/u07/oradata/fast_recovery_area/T122/archivelog/2019_12_03/o1_mf_1_44_gygcvk6l_.arc RECID=44 STAMP=1026079251
channel ORA_DISK_2: finished piece 1 at 04-DEC-19
piece handle=/u07/oradata/fast_recovery_area/T122/backupset/2019_12_04/o1_mf_annnn_TAG20191204T170624_gyjgzjvj_.bkp tag=TAG20191204T170624 comment=NONE
channel ORA_DISK_2: backup set complete, elapsed time: 00:00:08
channel ORA_DISK_1: deleting archived log(s)
archived log file name=/u07/oradata/fast_recovery_area/T122/archivelog/2019_12_04/o1_mf_1_45_gyjgzdks_.arc RECID=45 STAMP=1026147982
Finished backup at 04-DEC-19

Starting backup at 04-DEC-19
using channel ORA_DISK_1
using channel ORA_DISK_2
channel ORA_DISK_1: starting full datafile backup set
channel ORA_DISK_1: specifying datafile(s) in backup set
input datafile file number=00003 name=/u02/oradata/T122/datafile/o1_mf_sysaux_gwykmzwz_.dbf
input datafile file number=00007 name=/u02/oradata/T122/datafile/o1_mf_users_gwyko450_.dbf
channel ORA_DISK_1: starting piece 1 at 04-DEC-19
channel ORA_DISK_2: starting full datafile backup set
channel ORA_DISK_2: specifying datafile(s) in backup set
input datafile file number=00001 name=/u02/oradata/T122/datafile/o1_mf_system_gwykl8n7_.dbf
input datafile file number=00004 name=/u02/oradata/T122/datafile/o1_mf_undotbs1_gwyko31q_.dbf
channel ORA_DISK_2: starting piece 1 at 04-DEC-19
channel ORA_DISK_1: finished piece 1 at 04-DEC-19
piece handle=/u07/oradata/fast_recovery_area/T122/backupset/2019_12_04/o1_mf_nnndf_TAG20191204T170632_gyjgzthp_.bkp tag=TAG20191204T170632 comment=NONE
channel ORA_DISK_1: backup set complete, elapsed time: 00:00:25
channel ORA_DISK_2: finished piece 1 at 04-DEC-19
piece handle=/u07/oradata/fast_recovery_area/T122/backupset/2019_12_04/o1_mf_nnndf_TAG20191204T170632_gyjgztjw_.bkp tag=TAG20191204T170632 comment=NONE
channel ORA_DISK_2: backup set complete, elapsed time: 00:00:25
Finished backup at 04-DEC-19

Starting backup at 04-DEC-19
current log archived
using channel ORA_DISK_1
using channel ORA_DISK_2
channel ORA_DISK_1: starting archived log backup set
channel ORA_DISK_1: specifying archived log(s) in backup set
input archived log thread=1 sequence=46 RECID=46 STAMP=1026148019
channel ORA_DISK_1: starting piece 1 at 04-DEC-19
channel ORA_DISK_1: finished piece 1 at 04-DEC-19
piece handle=/u07/oradata/fast_recovery_area/T122/backupset/2019_12_04/o1_mf_annnn_TAG20191204T170700_gyjh0ns3_.bkp tag=
TAG20191204T170700 comment=NONE
channel ORA_DISK_1: backup set complete, elapsed time: 00:00:01
channel ORA_DISK_1: deleting archived log(s)
archived log file name=/u07/oradata/fast_recovery_area/T122/archivelog/2019_12_04/o1_mf_1_46_gyjh0mlt_.arc RECID=46 STAMP=1026148019
Finished backup at 04-DEC-19

Starting Control File and SPFILE Autobackup at 04-DEC-19
piece handle=/u07/oradata/fast_recovery_area/T122/autobackup/2019_12_04/o1_mf_s_1026148022_gyjh0rng_.bkp comment=NONE
Finished Control File and SPFILE Autobackup at 04-DEC-19
Notice RMAN utilized two channels (ORA_DISK_1 and ORA_DISK_2) because parallelism was set to 2. Consequently, more backup set piece files were created, but much smaller than before. Fewer archived redo logs were backed up, but compression was also in play. Speaking of archived redo logs, notice how the backup started (sequence 43) where the previous backup had left off (sequence 42). These were the files created:
[oracle@orasvr01 2019_12_04]$ pwd
/u07/oradata/fast_recovery_area/T122/backupset/2019_12_04

[oracle@orasvr01 2019_12_04]$ ls -l
-rw-r----- 1 oracle oinstall  358109696 Dec  4 17:06 o1_mf_annnn_TAG20191204T170624_gyjgzjtf_.bkp
-rw-r----- 1 oracle oinstall  162172416 Dec  4 17:06 o1_mf_annnn_TAG20191204T170624_gyjgzjvj_.bkp
-rw-r----- 1 oracle oinstall       7168 Dec  4 17:07 o1_mf_annnn_TAG20191204T170700_gyjh0ns3_.bkp
-rw-r----- 1 oracle oinstall 1166360576 Dec  4 17:06 o1_mf_nnndf_TAG20191204T170632_gyjgzthp_.bkp
-rw-r----- 1 oracle oinstall  745152512 Dec  4 17:06 o1_mf_nnndf_TAG20191204T170632_gyjgztjw_.bkp

[oracle@orasvr01 2019_12_04]$ pwd
/u07/oradata/fast_recovery_area/T122/autobackup/2019_12_04

[oracle@orasvr01 2019_12_04]$ ls -l
-rw-r----- 1 oracle oinstall 10731520 Dec  4 17:07 o1_mf_s_1026148022_gyjh0rng_.bkp
Task #3c. CDB Database Backup using a Customized OS RMAN Backup Script.
It’s becoming increasingly popular to not just backup to disk, but to backup to a backup appliance or even to the Cloud. Oracle has their own appliance of course (Oracle ZFS Storage Appliance), but there are others including the Dell EMC Avamar system. Third party backup storage appliances follow a similar approch when interfacing with RMAN. Some standard RMAN library files are replaced by third party library files and the RMAN commands think they’re accessing SBT devices, when in fact they’re accessing a sophisticated disk storage array. These devices often come with high end functionality including compression, deduplication and even encryption. These features can be completely transparent to RMAN/Oracle and they save you having to purchase additional Oracle Database option licenses. Result!
If you configure a FRA, then RMAN will use it for backups by default. However, if you’re writing to one of these disk storage arrays, you need a way to specify an alternative path to where you want to write your backups. In addition, by not using a FRA for backups, you often need to worry about managing directory hierarchies and backup retention. It’s also very common to use shell scripts to run database backups. So for this next example backup, we’ll use a simple script to demonstrate how to override the previous DEVICE TYPE DISK PARALLELISM 2 configuration setting and how to capture the RMAN output in a log file.
Note, this simple script would work for a non-CDB or a CDB. If the target were a CDB (which in our case it is), it will backup all the PDBs by default. The backup of an individual PDB is a little different and we’ll cover that in Step #4. Here’s the simple script:
#!/usr/bin/ksh
# Program : backup_db_arl.sh
# Date    : 01-DEC-19
# Author  : Sean Francis
# Purpose : Run an RMAN full DB backup plus archived redo logs then delete the backed up
#           archived redo logs.
#
# input parameters
export ORACLE_SID=${1}
# local variables
ORACLE_BASE=/u01/app/oracle
LOCAL_BIN_DIR=/usr/local/bin
BACKUP_ROOT_DIR=/nas/backups
DATE_MASK=date +%F_%H:%M
LOG_FILE=${BACKUP_ROOT_DIR}/RMAN_LOGS/${ORACLE_SID}/${DATE_MASK}/backup_db_arl_${DATE_MASK}.log

# set environment
ORAENV_ASK=NO
. ${LOCAL_BIN_DIR}/oraenv
TNS_ADMIN=${ORACLE_HOME}/network/admin

# create log and backup directories
mkdir -p ${BACKUP_ROOT_DIR}/RMAN_LOGS/${ORACLE_SID}/${DATE_MASK}
mkdir -p ${BACKUP_ROOT_DIR}/${ORACLE_SID}/${DATE_MASK}

# run the backup
${ORACLE_HOME}/bin/rman target rmanbackup/rmanbackup using sysbackup log=${LOG_FILE} <<EOF
connect catalog rco/rco@rmancat
run
{
allocate channel D1 type disk format '${BACKUP_ROOT_DIR}/${ORACLE_SID}/${DATE_MASK}/%d_%U.bkp';
allocate channel D2 type disk format '${BACKUP_ROOT_DIR}/${ORACLE_SID}/${DATE_MASK}/%d_%U.bkp';
allocate channel D3 type disk format '${BACKUP_ROOT_DIR}/${ORACLE_SID}/${DATE_MASK}/%d_%U.bkp';
backup as compressed backupset database plus archivelog delete input;
release channel D1;
release channel D2;
release channel D3;
}
exit;
EOF

# eof backup_db_arl.sh
Run (or schedule via cron) the backup script for the T183 CDB:
[oracle@orasvr02 scripts]$ ./backup_db_arl.sh T183
The Oracle base remains unchanged with value /u01/app/oracle
RMAN> RMAN> 2> 3> 4> 5> 6> 7> 8> 9> 10> RMAN>
[oracle@orasvr02 scripts]$
Let’s check what we end up with in NAS file system storage. These are the backup set piece files:
[oracle@orasvr02 2019-12-09_13:24]$ pwd
/nas/backups/T183/2019-12-09_13:24

[oracle@orasvr02 2019-12-09_13:24]$ ls -l
-rw-r----- 1 oracle asmadmin 499011072 Dec  9 13:32 T183_03uj0agq_1_1.bkp
-rw-r----- 1 oracle asmadmin 489146880 Dec  9 13:32 T183_04uj0agq_1_1.bkp
-rw-r----- 1 oracle asmadmin 431110656 Dec  9 13:31 T183_05uj0ags_1_1.bkp
-rw-r----- 1 oracle asmadmin 220266496 Dec  9 13:36 T183_06uj0avu_1_1.bkp
-rw-r----- 1 oracle asmadmin 183091200 Dec  9 13:35 T183_07uj0avu_1_1.bkp
-rw-r----- 1 oracle asmadmin 122044416 Dec  9 13:34 T183_08uj0avv_1_1.bkp
-rw-r----- 1 oracle asmadmin  56844288 Dec  9 13:35 T183_09uj0b38_1_1.bkp
-rw-r----- 1 oracle asmadmin 104628224 Dec  9 13:36 T183_0auj0b50_1_1.bkp
-rw-r----- 1 oracle asmadmin  54976512 Dec  9 13:36 T183_0buj0b50_1_1.bkp
-rw-r----- 1 oracle asmadmin   6676480 Dec  9 13:36 T183_0cuj0b6n_1_1.bkp
-rw-r----- 1 oracle asmadmin    465408 Dec  9 13:36 T183_0duj0b7k_1_1.bkp
This is the auto-backup of the control file and SPFILE in ASM:
ASMCMD> pwd
+RECO/T183/autobackup/2019_12_09

ASMCMD> ls -l
Type        Redund  Striped  Time             Sys  Name
AUTOBACKUP  UNPROT  COARSE   DEC 09 13:00:00  Y    s_1026567417.275.1026567419
Task #3d. PDB Database Backup using Oracle Enterprise Manager.
So far we’ve been explicitly connecting to the target database and the recovery catalog before running the backup. For an Oracle Enterprise Manager (OEM) based backup to take advantage of the recovery catalog, two things need to happen. First, you have to declare the presence of the catalog so OEM knows about it. Second, you have to tell OEM to use it when you backup a specific database.
To tell OEM about an existing catalog, navigate to the databases home page, then choose Availability ➡️ Recovery Catalogs. Click the Add button, then use the magnifying glass to choose the RMAN catalog database (PADMIN.mynet.com_RMANCAT):
Select the RMAN catalog database then click Next
On the next screen you need to provide 3 sets of login credentials. The recovery catalog owner (RCO), the recovery catalog database server host (oracle) and a DBA user in the recovery catalog database (RMANCAT_ADMIN). Note, the admin user of a PDB does not have DBA privileges by default. It needs to be granted DBA in order to become a true administrator database account:
Enter all the required credentials then click ContinueThe catalog is detected. Click Finish.The catalog is configured for OEM.
Now that OEM knows about the RMAN recovery catalog, we need to tell it to use it when backing up a given database. From a given database home page (we’ll use T183_PDB1), choose Availability ➡️ Backup & Recovery ➡️ Recovery Catalog Settings. This will actually take you to a database login page for the PDB’s container database (T183):
Use the common user to connect to the database (c##rmanbackup) then click LoginClick the Use Recovery Catalog radio button then click OK
Clicking OK on the screen above takes you back to the database home page of the CDB (T183). Before we get to run an actual backup, we need to go through some RMAN setup for the benefit of OEM. Again, from the database home page choose Availability ➡️ Backup & Recovery ➡️ Backup Settings:
Set Parallelism to 4, choose Compressed Backup Set then click the Backup Set tabChoose HIGH for Compression Algorithm Name and ensure the host credentials are set, then click the Policy tabCheck the box to automatically backup the control file, ensure retention is 3 days then click ApplyThe RMAN configuration is now set
Now it’s time to navigate the actual database backup screens. Choose Availability ➡️ Backup & Recovery ➡️ Schedule Backup. That will display the Database Login screen for the CDB (T183):
Login using the common user backup account (c##rmanbackup)Click the Pluggable Databases radio button then click Schedule Customized BackupClick the Add button to include the T183_PDB1 pluggable database in the backup then click NextClick Full Backup and choose to backup archived redo logs and to delete them afterwards then click Next Set Parallelism to 4, add T183_PDB1 to the backup location path and choose Compressed Backup Set then click OKMake any necessary changes to the Job Name then click Next
On the next screen you can review and make changes to the RMAN script which OEM has generated based upon your inputs. If you need to make changes you may as well just write your own script to begin with. We’ll get to that later.
Click Submit Job to start the backupClick View Job to see how things are going
As the job executes its output can be viewed via the next screen. Every time I tested this I saw the ORA-24327 error, but the backup always completed successfully. I tried various things to make the error go away without success. Just another reason to code the backup script yourself.
By refreshing this screen you can track the job’s progressFinally the job completes successfully
Let’s check to see what happened on disk (not that I’m paranoid or anything):
ASMCMD> pwd
+RECO/T183/AUTOBACKUP/2019_12_13

ASMCMD> ls -l
Type        Redund  Striped  Time             Sys  Name
AUTOBACKUP  UNPROT  COARSE   DEC 13 10:00:00  Y    s_1026902242.262.1026902245

[grid@orasvr02 T183_PDB1]$ pwd
/nas/backups/T183/T183_PDB1

[grid@orasvr02 T183_PDB1]$ ls -lrt
-rw-r----- 1 oracle asmadmin   1105920 Dec 13 10:35 T183_0tujai36_1_1
-rw-r----- 1 oracle asmadmin   1286144 Dec 13 10:35 T183_0uujai36_1_1
-rw-r----- 1 oracle asmadmin  56901632 Dec 13 10:35 T183_0sujai36_1_1
-rw-r----- 1 oracle asmadmin 123133952 Dec 13 10:36 T183_0rujai36_1_1
-rw-r----- 1 oracle asmadmin  30549504 Dec 13 10:37 T183_10ujai61_1_1
-rw-r----- 1 oracle asmadmin  34191872 Dec 13 10:37 T183_0vujai61_1_1
Looks good. We wrap up RMAN backups using our own customized script and schedule it via Enterprise Manager.
Task #3e. Customized OS RMAN Backup Script Scheduled Via OEM.
Using OEM to generate an RMAN script is all well and good, but what you end up with might not be exactly what you want. Often because it does not take into account all the idiosyncrasies of your particular environment. You can edit the generated script via OEM, but then you can’t go back and change any of the settings you selected to help OEM generate the script you now want to change. Also, if you’re going to edit the script anyway, why not just write your own and have complete control over what it does from the start? This is what many DBAs tend to do and that’s what we’ll do next.
Apart from being a bit flaky (thanks to Java) the other major obstacle to using OEM is its steep learning curve. It is probably this reason why many DBAs still prefer to use the operating system (e.g. cron) to schedule database related jobs, including backups. The job scheduling and notification mechanism built into the database and accessed via OEM is simpler and more friendly than you might expect. Surprisingly. Scheduling backups via OEM makes sense for a couple of important reasons. First, anything which touches the database should be controlled by the database (IMO). That way you only have one place to look for all scheduled job activity which impacts the database infrastructure. Second, by using OEM you can leverage the ‘black out’ functionality so you can guarantee no database job activity during periods of maintenance.
What you backup, how you backup and when you backup has everything to do with two important concepts. They are Recovery Time Objective (RTO) and Recovery Point Objective (RPO). RTO establishes how much time is allowed for database recovery in the event of a failure. RPO establishes how much data loss is tolerable in the event of a failure. Both these values are determined by the business, not by the IT Department or the DBA. If you ever get these answers from the business, chances are they’ll be zero down time and zero data loss. That’s fine, but building an infrastracture to achieve that is spendy and that’s when you find out they don’t have the budget for it. ? Enter the art of the compromise. A common backup schedule is a weekly full database backup with daily archived redo log backups. That’s what we’ll run through here.
First, you’ll need a backup script. This is one I wrote which can handle single instance non-CDBs, CDBs, PDBs and archived redo log backups. Here’s the script’s help output to show how we’ll use the script:
[oracle@orasvr01 backup]$ pwd
/nas/scripts/backup

[oracle@orasvr01 backup]$ ./rman_online_backup.sh -help
rman_backup.sh: Usage (must be run as the oracle user)
  rman_online_backup.sh -help                              Displays this help message
  rman_online_backup.sh -NONCDB <NON_CDB_NAME>             Runs a full non-CDB backup
  rman_online_backup.sh -CDB <CDB_NAME>                    Runs a full CDB backup plus all PDBs
  rman_online_backup.sh -CDB <CDB_NAME> -PDB <PDB_NAME>    Runs a full PDB backup
  rman_online_backup.sh -LOGS <NON_CDB_NAME> | <CDB_NAME>  Runs an archived redo log backup
A few points to note:
This script is accessible from all my servers via NFS, so there’s only one copy to maintain in a single location.
Running a backup of a CDB and a non-CDB is pretty much the same operation, so the script could be simplified even further.
Running a backup of a PDB can be done at the CDB level or at the PDB level. Backing up at the CDB level does change the syntax a little, but you can backup multiple PDBs at the same time (this script backs up single PDBs). Backing up at the PDB level keeps the backup command syntax consistent, but you cannot connect to a recovery catalog from a PDB and you cannot backup the CDB’s archived redo logs.
For email notifications to work, you need to do two things. First, setup the Outgoing Mail (SMTP) Server by going here: Setup ➡️ Notifications ➡️ Mail Servers. Second, setup your email address by going here: Setup ➡️ Security ➡️ Administrators.
The method to create a job to run the backup script is the same whether the backup is a non-CDB, CDB, PDB or archived redo logs. Only the script parameters and schedule will be different. That being the case, we’ll run through setting up a backup of the T183 CDB running on orasvr02, to occur each Saturday at 8PM. From the host (orasvr02) home page, navigate to Host ➡️ Job Activity:
Click on Create JobClick on OS Command then click SelectEnter a job name (BACKUP_T183) and add orasvr02 as a Target, then click the Parameters tabEnter the script plus parameters (/nas/scripts/backup/rman_online_backup.sh -CDB T183), then click CredentialsSelect the named credential for the oracle user on orasvr02, then click Schedule Select Repeating, Weekly and choose 8:00 PM on a Saturday, then click AccessChoose Either, Critical, Succeeded and Problems, then click SubmitThe job has been created and will run on the next Saturday.
I tested the script at the OS command line before I scheduled it via OEM. However, I wanted to test OEM’s ability to run the job for me. I could not find an option to run it immediately, so instead I created a copy of the job and changed its schedule to One Time (Immediately) on the Schedule tab. This is the screen which you can use to monitor the script’s progress:
The job succeeded!
Notice how the script’s output is written to the Output section. The actual RMAN output is written to the log file defined in the script itself (log=${LOG_FILE}). The script’s output is also included in the email notification. Before we end this section, let’s test OEM when the script detects something is wrong and errors out. A simple test case was to comment out the T183 entry in /etc/oratab, so it looks to the script like that database is not defined on the orasvr02 server. Here’s the same screen dealing with that error condition:
The error is handled gracefully.
The error message from the script is also included in the email notification. There you have it. How to setup a backup schedule in OEM using your own customized script which emails you when it works and when it doesn’t. Next we will be leveraging the whole point of backing up – database restore and recovery.
Task #4: Execute RMAN Restores & Recoveries.
Now comes the fun part. Actually using your backups to restore and recover databases. In this section, we’ll cover the 4 most common restore and recovery scenarios you’re likeky to encounter. Before we get to those, let’s quickly re-cap our database environment so we know what we’re dealing with:
• T122 is a non-CDB Oracle Database 12c Release 2 database using standard file system storage. • T122 uses a Fast Recovery Area, /u07/oradata/fast_recovery_area/T122. • T122’s full database and archived redo log backups are written to /nas/backups/T122. • T183 is a CDB Oracle Database 18c Release 3 database using ASM storage. • T183 contains 1 PDB called either T183_PDB1 or T183_PDB2. • T183 uses a Fast Recovery Area, +RECO. • T183’s full database and archived redo log backups are written to /nas/backups/T183. • T122 runs on server orasvr01 and T183 runs on server orasvr02. • All databases are backed up once a week at 8PM on Saturdays. • All database archive redo log files are backed up daily at 11PM.
In this task we will cover these restore and recovery scenarios (click the link you need):
Task 4a. Point of Failure (Complete) Restore/Recovery of a CDB/non-CDB.
For this task I’ll use the non-CDB database, T122. To simulate a database failure I will shutdown the instance, rename the instance parameter file, the database control files and all the data files, then attempt to restart the instance which will, of course, fail.These are the files I will rename:
SQL> show parameter pfile

NAME                   TYPE        VALUE
---------------------- ----------- ----------------------------------------------------------
spfile                 string      /u01/app/oracle/product/12.2.0/dbhome_1/dbs/spfileT122.ora

SQL> show parameter control_files

NAME               TYPE        VALUE
------------------ ----------  --------------------------------------------------------------------
control_files      string      /u02/oradata/T122/controlfile/o1_mf_gwykp3gt_.ctl
                               /u07/oradata/fast_recovery_area/T122/controlfile/o1_mf_gwykp3ob_.ctl

SQL> select file_name from dba_data_files;

FILE_NAME
--------------------------------------------------------
/u02/oradata/T122/datafile/o1_mf_system_gwykl8n7_.dbf
/u02/oradata/T122/datafile/o1_mf_sysaux_gwykmzwz_.dbf
/u02/oradata/T122/datafile/o1_mf_users_gwyko450_.dbf
/u02/oradata/T122/datafile/o1_mf_undotbs1_gwyko31q_.dbf
Step #1: Assess The Situation.
Before you do anything, find out what’s broken/missing and what’s still left of the database. This will help determine your approach to restoring and recovering the database using the least resource in the fastest time. It will also help prime you for what to expect from RMAN’s output:
We know the online redo log files are present so we know all unarchived transactions are intact. That means we know we’ll be able to perform a complete restore and recovery up to the point of failure. Let’s try to start the instance just for a laugh:
[oracle@orasvr01 ~]$ sqlplus / as sysdba

SQL*Plus: Release 12.2.0.1.0 Production on Fri Jan 31 12:27:42 2020
Copyright (c) 1982, 2016, Oracle.  All rights reserved.
Connected to an idle instance.

SQL> startup
ORA-01078: failure in processing system parameters
LRM-00109: could not open parameter file '/u01/app/oracle/product/12.2.0/dbhome_1/dbs/initT122.ora'
Step #2: Restore the SPFILE.
We know the controlfile is set to autobackup which has the effect of also backing up the SPFILE. Since we’re using a FRA, the control file backup should be in a standard place since Oracle manages the content and structure of the FRA. Therefore, the latest control file backup should be in the most recent directory within /u07/oradata/fast_recovery_area/T122/autobackup/2020_01_30:
[oracle@orasvr01 2020_01_30]$ pwd
/u07/oradata/fast_recovery_area/T122/autobackup/2020_01_30

[oracle@orasvr01 2020_01_30]$ ls -l
-rw-r----- 1 oracle oinstall 10731520 Jan 30 23:02 o1_mf_s_1031094118_h37f6l7j_.bkp
We can verify this backup piece file does contain the SPFILE by scanning it for text:
[oracle@orasvr01 2020_01_30]$ strings o1_mf_s_1031094118_h37f6l7j_.bkp | more

}|{z
T122
e?u=
TAG20200130T230155
f?u=
T122
T122.__data_transfer_cache_size=0
T122.__db_cache_size=1509949440
T122.__inmemory_ext_roarea=0
T122.__inmemory_ext_rwarea=0
T122.__java_pool_size=16777216
T122.__large_pool_size=33554432
T122.__oracle_base='/u01/app/oracle'#ORACLE_BASE set from environment
T122.__pga_aggregate_target=1694498816
T122.__sga_target=2147483648
T122.__shared_io_pool_size=117440512
T122.__shared_pool_size=436207616
T122.__streams_pool_size=16777216
*.audit_file_dest='/u01/app/oracle/admin/T122/adump'
*.audit_trail='db'
*.compatible='12.2.0'
Yep, that looks like what you’d expect to see in an SPFILE. Let’s start an RMAN session and restore the SPFILE. If you’re using a Recovery Catalog (which we are), you must explicitly set the DBID of the target database otherwise the catalog won’t know what database you’re talking about. You also need to run a startup command to get the instance to start with no parameter file before you can restore the parameter file:
[oracle@orasvr01 T122]$ rman target rmanbackup/rmanbackup using sysbackup

Recovery Manager: Release 12.2.0.1.0 - Production on Fri Jan 31 13:45:12 2020
Copyright (c) 1982, 2017, Oracle and/or its affiliates.  All rights reserved.
connected to target database (not started)

RMAN> set DBID = 2185934179;
executing command: SET DBID

RMAN> connect catalog rco/rco@rmancat
connected to recovery catalog database
recovery catalog schema release 18.03.00.00. is newer than RMAN release

RMAN> startup;
startup failed: ORA-01078: failure in processing system parameters
LRM-00109: could not open parameter file '/u01/app/oracle/product/12.2.0/dbhome_1/dbs/initT122.ora'
starting Oracle instance without parameter file for retrieval of spfile
Oracle instance started
RMAN-00571: ===========================================================
RMAN-00569: =============== ERROR MESSAGE STACK FOLLOWS ===============
RMAN-00571: ===========================================================
RMAN-03002: failure of startup command at 01/31/2020 13:45:31
ORA-00205: error in identifying control file, check alert log for more info

RMAN> restore spfile;
Starting restore at 31-JAN-20
allocated channel: ORA_DISK_1
channel ORA_DISK_1: SID=175 device type=DISK
allocated channel: ORA_DISK_2
channel ORA_DISK_2: SID=176 device type=DISK
channel ORA_DISK_1: starting datafile backup set restore
channel ORA_DISK_1: restoring SPFILE
output file name=/u01/app/oracle/product/12.2.0/dbhome_1/dbs/spfileT122.ora
channel ORA_DISK_1: reading from backup piece /u07/oradata/fast_recovery_area/T122/autobackup/2020_01_30/o1_mf_s_1031094118_h37f6l7j_.bkp
channel ORA_DISK_1: piece handle=/u07/oradata/fast_recovery_area/T122/autobackup/2020_01_30/o1_mf_s_1031094118_h37f6l7j_.bkp tag=TAG20200130T230155
channel ORA_DISK_1: restored backup piece 1
channel ORA_DISK_1: restore complete, elapsed time: 00:00:01
Finished restore at 31-JAN-20
Let’s check to make sure it’s back:
[oracle@orasvr01 ~]$ cd $ORACLE_HOME/dbs

[oracle@orasvr01 dbs]$ ls -l
-rw-rw---- 1 oracle oinstall     1544 Jan 31 13:45 hc_T122.dat
-rw-r--r-- 1 oracle oinstall     3079 May 15  2015 init.ora
-rw-r----- 1 oracle oinstall       24 Jan 31 13:45 lkDUMMY
-rw-r----- 1 oracle oinstall       24 Nov 15 18:43 lkT122
-rw-r----- 1 oracle oinstall     4608 Dec  3 08:40 orapwT122
-rw-r----- 1 oracle oinstall 10633216 Dec  4 09:47 snapcf_T122.f
-rw-r----- 1 oracle oinstall     3584 Jan 31 15:35 spfileT122.ora
-rw-r----- 1 oracle oinstall     3584 Jan 31 13:28 spfileT122.ora.ORIG
Step #3: Restore the Control Files.
Now the SPFILE has been restored, we need to re-start the instance using it, but not mount the database (because the data files are still missing). Then we can restore the control files:
RMAN> startup force nomount;

Oracle instance started
Total System Global Area    2147483648 bytes
Fixed Size                     8622776 bytes
Variable Size                603983176 bytes
Database Buffers            1526726656 bytes
Redo Buffers                   8151040 bytes

RMAN> restore controlfile;
Starting restore at 31-JAN-20
allocated channel: ORA_DISK_1
channel ORA_DISK_1: SID=237 device type=DISK
allocated channel: ORA_DISK_2
channel ORA_DISK_2: SID=19 device type=DISK
channel ORA_DISK_1: starting datafile backup set restore
channel ORA_DISK_1: restoring control file
channel ORA_DISK_1: reading from backup piece /u07/oradata/fast_recovery_area/T122/autobackup/2020_01_30/o1_mf_s_1031094118_h37f6l7j_.bkp
channel ORA_DISK_1: piece handle=/u07/oradata/fast_recovery_area/T122/autobackup/2020_01_30/o1_mf_s_1031094118_h37f6l7j_.bkp tag=TAG20200130T230155
channel ORA_DISK_1: restored backup piece 1
channel ORA_DISK_1: restore complete, elapsed time: 00:00:15
output file name=/u02/oradata/T122/controlfile/o1_mf_gwykp3gt_.ctl
output file name=/u07/oradata/fast_recovery_area/T122/controlfile/o1_mf_gwykp3ob_.ctl
Finished restore at 31-JAN-20
Let’s check to make sure they’re back:
[oracle@orasvr01 dbs]$ ls -l /u02/oradata/T122/controlfile/
-rw-r----- 1 oracle oinstall 10633216 Jan 31 15:43 o1_mf_gwykp3gt_.ctl
-rw-r----- 1 oracle oinstall 10633216 Jan 31 13:31 o1_mf_gwykp3gt_.ctl.ORIG

[oracle@orasvr01 dbs]$ ls -l /u07/oradata/fast_recovery_area/T122/controlfile/
-rw-r----- 1 oracle oinstall 10633216 Jan 31 15:43 o1_mf_gwykp3ob_.ctl
-rw-r----- 1 oracle oinstall 10633216 Jan 31 13:31 o1_mf_gwykp3ob_.ctl.ORIG
Step #4: Restore the Database.
Next, we’ll mount the database and restore the data files:
RMAN> alter database mount;
Statement processed

RMAN> restore database;
Starting restore at 31-JAN-20
Starting implicit crosscheck backup at 31-JAN-20
allocated channel: ORA_DISK_1
channel ORA_DISK_1: SID=258 device type=DISK
allocated channel: ORA_DISK_2
channel ORA_DISK_2: SID=23 device type=DISK
Crosschecked 44 objects
Finished implicit crosscheck backup at 31-JAN-20
Starting implicit crosscheck copy at 31-JAN-20
using channel ORA_DISK_1
using channel ORA_DISK_2
Finished implicit crosscheck copy at 31-JAN-20
searching for all files in the recovery area
cataloging files…
cataloging done
List of Cataloged Files
File Name: /u07/oradata/fast_recovery_area/T122/archivelog/2020_01_31/o1_mf_1_194_h37o4s6f_.arc
File Name: /u07/oradata/fast_recovery_area/T122/autobackup/2020_01_30/o1_mf_s_1031094118_h37f6l7j_.bkp
using channel ORA_DISK_1
using channel ORA_DISK_2
channel ORA_DISK_1: starting datafile backup set restore
channel ORA_DISK_1: specifying datafile(s) to restore from backup set
channel ORA_DISK_1: restoring datafile 00001 to /u02/oradata/T122/datafile/o1_mf_system_gwykl8n7_.dbf
channel ORA_DISK_1: restoring datafile 00004 to /u02/oradata/T122/datafile/o1_mf_undotbs1_gwyko31q_.dbf
channel ORA_DISK_1: reading from backup piece /nas/backups/T122/2020-01-25/2020-01-25_20:00/T122_3iumsvdk_1_1.bkp
channel ORA_DISK_2: starting datafile backup set restore
channel ORA_DISK_2: specifying datafile(s) to restore from backup set
channel ORA_DISK_2: restoring datafile 00003 to /u02/oradata/T122/datafile/o1_mf_sysaux_gwykmzwz_.dbf
channel ORA_DISK_2: restoring datafile 00007 to /u02/oradata/T122/datafile/o1_mf_users_gwyko450_.dbf
channel ORA_DISK_2: reading from backup piece /nas/backups/T122/2020-01-25/2020-01-25_20:00/T122_3humsvdj_1_1.bkp
channel ORA_DISK_1: piece handle=/nas/backups/T122/2020-01-25/2020-01-25_20:00/T122_3iumsvdk_1_1.bkp tag=TAG20200125T200151
channel ORA_DISK_1: restored backup piece 1
channel ORA_DISK_1: restore complete, elapsed time: 00:15:16
channel ORA_DISK_2: piece handle=/nas/backups/T122/2020-01-25/2020-01-25_20:00/T122_3humsvdj_1_1.bkp tag=TAG20200125T200151
channel ORA_DISK_2: restored backup piece 1
channel ORA_DISK_2: restore complete, elapsed time: 00:15:16
Finished restore at 31-JAN-20
Let’s check to make sure the data files are back. Notice how the restore gives the data files different names from the originals. This is OMF at work:
[oracle@orasvr01 datafile]$ pwd
/u02/oradata/T122/datafile

[oracle@orasvr01 datafile]$ ls -l
-rw-r----- 1 oracle oinstall 1761615872 Jan 31 13:31 o1_mf_sysaux_gwykmzwz_.dbf.ORIG
-rw-r----- 1 oracle oinstall 1761615872 Jan 31 15:54 o1_mf_sysaux_h398czd6_.dbf
-rw-r----- 1 oracle oinstall  880812032 Jan 31 13:31 o1_mf_system_gwykl8n7_.dbf.ORIG
-rw-r----- 1 oracle oinstall  880812032 Jan 31 15:53 o1_mf_system_h398cz46_.dbf
-rw-r----- 1 oracle oinstall   33562624 Jan 31 01:17 o1_mf_temp_gwykpsn3_.tmp
-rw-r----- 1 oracle oinstall  136323072 Jan 31 13:31 o1_mf_undotbs1_gwyko31q_.dbf.ORIG
-rw-r----- 1 oracle oinstall  136323072 Jan 31 15:52 o1_mf_undotbs1_h398d01w_.dbf
-rw-r----- 1 oracle oinstall    6561792 Jan 31 13:31 o1_mf_users_gwyko450_.dbf.ORIG
-rw-r----- 1 oracle oinstall    6561792 Jan 31 15:52 o1_mf_users_h398d0dl_.dbf
Step #5: Recover the Database.
The data files have been restored to the state of the most recent backup almost a week ago. The next step will apply all the (backed up) archived redo log files to effectively roll the database forward up to (almost) the present time. Then the unbacked up archived redo log files will be applied. Finally, any unarchived transactions held in the online redo log files will be applied and the recovery will be complete.
The following output is quite long and verbose, but a big part of getting comfortable with RMAN is getting used to its output.
Once the recovery has been completed, it just remains to open the database:
RMAN> alter database open resetlogs;

Statement processed
new incarnation of database registered in recovery catalog
starting full resync of recovery catalog
full resync complete
Note, the RESETLOGS option was needed since the control file was restored from backup. If we had not needed a restored control file, we would not have needed to open the database with the RESETLOGS option. Whenever RESETLOGS is used, Oracle creates a new incarnation or version of the database which is simply identified by a number starting with 1. When a RESETLOGS operation is executed by the database, a number of things happen including the archive of the online redo log, after which their contents are erased and the log sequence number is reset to 1.
Oracle does this so it can keep track of the SCN ranges within a given database incarnation in the event a database restore is required. Different incarnations of the database can have the same range of SCNs, so it’s important to know which incarnation you want to restore from. For example:
Incarnation #1 contains SCNs from 1 to 100. An incomplete/point-in-time database restore and recovery takes the database back to SCN 50. This activity requires a RESETLOGS operation to open the database and that creates a new incarnation. Transactions continue and the new incarnation’s SCN increases from 50 to 200. So now we have incarnation #1 which contained SCNs 1 to 100 and current incarnation #2 which contains SCNs 50 to 200. What happens if you subsequently wanted to restore/recover the database back to SCN 75? Which SCN 75? The original SCN 75 contained within incarnation #1 or SCN 75 contained within the currect incarnation #2? By default, RMAN would use the current incarnation (#2) and take the database back from SCN 200 to SCN 75. However, suppose you discovered the original restore/recovery which took the database back to SCN 50 actually went back too far and you needed to only go back to SCN 75. That SCN 75 is within incarnation #1. So how do we go back to that SCN rather than SCN 75 within the current incarnation? Easy. Within RMAN, simply issue a RESET DATABASE TO INCARNATION N command, where N is the number of the incarnation you need:
RMAN> reset database to incarnation 1;
RMAN> recover database to scn 75;
This does assume you still have access to all the backups and archived redo log files needed to take the database back to incarnation 1’s SCN 75. ? You can get information about database incarnations from the data dictionary view V$DATABASE_INCARNATION or ask RMAN:
RMAN> list incarnation;
List of Database Incarnations
DB Key  Inc Key DB Name  DB ID            STATUS  Reset SCN  Reset Time
------- ------- -------- ---------------- ------- ---------  -----------
1       16      T122     2185934179       PARENT  1          26-JAN-17
1       2       T122     2185934179       PARENT  1408558    15-NOV-19
1       5899    T122     2185934179       CURRENT 6761449    31-JAN-20
Task #4b. Point of Failure (Complete) Restore/Recovery of a PDB.
For this example we’ll use the PDB, T183_PDB2 within the CDB T183. This server runs an ASM instance which won’t allow me to delete the datafiles while the PDB is open. Therefore, to simulate a problem with the PDB, I will close the PDB, delete all 4 datafiles, then attempt to re-open the PDB. Here are the datafiles:
ASMCMD> pwd
+data/T183/9DA0CE150DED43F7E0531200A8C0ECEC/datafile

ASMCMD> ls -l
Type      Redund  Striped  Time             Sys  Name
DATAFILE  UNPROT  COARSE   FEB 03 08:00:00  Y    SYSAUX.266.1031338697
DATAFILE  UNPROT  COARSE   FEB 03 08:00:00  Y    SYSTEM.257.1031331865
DATAFILE  UNPROT  COARSE   FEB 03 08:00:00  Y    UNDOTBS1.258.1031331863
DATAFILE  UNPROT  COARSE   FEB 03 08:00:00  Y    USERS.259.1031338701
Let’s re-start the PDB and see what it does:
SQL> alter pluggable database t183_pdb2 open;

alter pluggable database t183_pdb2 open
*
ERROR at line 1:
ORA-01157: cannot identify/lock data file 15 - see DBWR trace file
ORA-01110: data file 15:
'+DATA/T183/9DA0CE150DED43F7E0531200A8C0ECEC/DATAFILE/undotbs1.258.1031331863'
Step #1: Assess the Situation.
Always figure out what’s broken and what you still have. Since this is a CDB we know the instance is up and running and all other database operations are functioning normally. If we check the relevant ASM directory we see the PDB datafiles are missing:
ASMCMD> pwd
+data/T183/9DA0CE150DED43F7E0531200A8C0ECEC/datafile

ASMCMD> ls -l
ASMCMD-8002: entry 'datafile' does not exist in directory '+data/T183/9DA0CE150DED43F7E0531200A8C0ECEC/'
We need to restore and recover the whole PDB up to the point of failure. The key to this recovery is to use RMAN to connect to the CDB, but not connect to the Recovery Catalog. If you do, the PDB restore and recovery won’t work. The PDB needs to be closed for the datafile restore and recovery. Since we could not open the PDB, we know it’s closed.
Step #2: Restore the PDB.
[oracle@orasvr02 2020-02-02]$ rman target rmanbackup/rmanbackup using sysbackup

Recovery Manager: Release 18.0.0.0.0 - Production on Mon Feb 3 08:56:16 2020
Version 18.3.0.0.0

Copyright (c) 1982, 2018, Oracle and/or its affiliates.  All rights reserved.

connected to target database: T183 (DBID=2832597398)

RMAN> restore pluggable database t183_pdb2;
Starting restore at 03-FEB-20
using target database control file instead of recovery catalog
allocated channel: ORA_DISK_1
channel ORA_DISK_1: SID=72 device type=DISK
allocated channel: ORA_DISK_2
channel ORA_DISK_2: SID=268 device type=DISK
allocated channel: ORA_DISK_3
hannel ORA_DISK_3: SID=58 device type=DISK
allocated channel: ORA_DISK_4
channel ORA_DISK_4: SID=272 device type=DISK
channel ORA_DISK_1: starting datafile backup set restore
channel ORA_DISK_1: specifying datafile(s) to restore from backup set
channel ORA_DISK_1: restoring datafile 00014 to +DATA/T183/9DA0CE150DED43F7E0531200A8C0ECEC/DATAFILE/sysaux.266.1031338697
channel ORA_DISK_1: restoring datafile 00016 to +DATA/T183/9DA0CE150DED43F7E0531200A8C0ECEC/DATAFILE/users.259.1031338701
channel ORA_DISK_1: reading from backup piece /nas/backups/T183/2020-02-02/2020-02-02_20:44/T183_83uni5n7_1_1.bkp
channel ORA_DISK_2: starting datafile backup set restore
channel ORA_DISK_2: specifying datafile(s) to restore from backup set
channel ORA_DISK_2: restoring datafile 00013 to +DATA/T183/9DA0CE150DED43F7E0531200A8C0ECEC/DATAFILE/system.257.1031331865
channel ORA_DISK_2: restoring datafile 00015 to +DATA/T183/9DA0CE150DED43F7E0531200A8C0ECEC/DATAFILE/undotbs1.258.1031331863
channel ORA_DISK_2: reading from backup piece /nas/backups/T183/2020-02-02/2020-02-02_20:44/T183_84uni68c_1_1.bkp
channel ORA_DISK_1: piece handle=/nas/backups/T183/2020-02-02/2020-02-02_20:44/T183_83uni5n7_1_1.bkp tag=TAG20200202T205625
channel ORA_DISK_1: restored backup piece 1
channel ORA_DISK_1: restore complete, elapsed time: 00:04:52
channel ORA_DISK_2: piece handle=/nas/backups/T183/2020-02-02/2020-02-02_20:44/T183_84uni68c_1_1.bkp tag=TAG20200202T205625
channel ORA_DISK_2: restored backup piece 1
channel ORA_DISK_2: restore complete, elapsed time: 00:04:49
Finished restore at 03-FEB-20
Step #3: Recover the PDB.
The datafiles are back in ASM, so let’s move onto recovering them up to the point of failure:
RMAN> recover pluggable database t183_pdb2;

Starting recover at 03-FEB-20
using channel ORA_DISK_1
using channel ORA_DISK_2
using channel ORA_DISK_3
using channel ORA_DISK_4
starting media recovery
archived log for thread 1 with sequence 247 is already on disk as file +RECO/T183/ARCHIVELOG/2020_02_03/thread_1_seq_247.265.1031362673
channel ORA_DISK_1: starting archived log restore to default destination
channel ORA_DISK_1: restoring archived log
archived log thread=1 sequence=245
channel ORA_DISK_1: reading from backup piece /nas/backups/T183/2020-02-02/2020-02-02_20:44/T183_88uni6ol_1_1.bkp
channel ORA_DISK_2: starting archived log restore to default destination
channel ORA_DISK_2: restoring archived log
archived log thread=1 sequence=246
channel ORA_DISK_2: reading from backup piece /nas/backups/T183/2020-02-02/2020-02-02_23:00/T183_8aunid8g_1_1.bkp
channel ORA_DISK_1: piece handle=/nas/backups/T183/2020-02-02/2020-02-02_20:44/T183_88uni6ol_1_1.bkp tag=TAG20200202T211542
channel ORA_DISK_1: restored backup piece 1
channel ORA_DISK_1: restore complete, elapsed time: 00:00:46
archived log file name=+RECO/T183/ARCHIVELOG/2020_02_03/thread_1_seq_245.280.1031389841 thread=1 sequence=245
channel default: deleting archived log(s)
archived log file name=+RECO/T183/ARCHIVELOG/2020_02_03/thread_1_seq_245.280.1031389841 RECID=248 STAMP=1031389881
media recovery complete, elapsed time: 00:05:49
channel ORA_DISK_2: piece handle=/nas/backups/T183/2020-02-02/2020-02-02_23:00/T183_8aunid8g_1_1.bkp tag=TAG20200202T230642
channel ORA_DISK_2: restored backup piece 1
channel ORA_DISK_2: restore complete, elapsed time: 00:06:37
channel default: deleting archived log(s)
archived log file name=+RECO/T183/ARCHIVELOG/2020_02_03/thread_1_seq_246.282.1031389851 RECID=249 STAMP=1031389890
Finished recover at 03-FEB-20
Step #4: Open the PDB.
RMAN> alter pluggable database t183_pdb2 open;
Statement processed
Step #5: Resync the Recovery Catalog.
Operations have occurred which did not involve the Recovery catalog. So let’s go ahead and resync just for safety’s sake. Note, RMAN backups or typical RMAN commands like “show all;” perform a resync anyway. To perform a resync here, log out of RMAN then log back in again, connecting to the Recovery Catalog:
[oracle@orasvr02 2020-02-02]$ rman target rmanbackup/rmanbackup using sysbackup

Recovery Manager: Release 18.0.0.0.0 - Production on Mon Feb 3 09:32:49 2020
Version 18.3.0.0.0

Copyright (c) 1982, 2018, Oracle and/or its affiliates.  All rights reserved.

connected to target database: T183 (DBID=2832597398)

RMAN> connect catalog rco/rco@rmancat

connected to recovery catalog database

RMAN> resync catalog;

starting full resync of recovery catalog
full resync complete
Task #4c. Point In Time (Incomplete) Restore/Recovery of a CDB/non-CDB.
For this example, I’ll use the non-CDB T122 database. To ensure we’re taking the database back in time, let’s create a new table, perform the Point-In-Time (PIT) restore/recovery to before the table existed, then check to see if the table is still there. As the MEDIA user, let’s check the list of tables we own and create a new one, making a note of the date and time we did that:
SQL> select table_name from user_tables;

TABLE_NAME
----------------------
GENRES
MEDIA_TYPES
FORMATS
RECORDING_ARTISTS
RELEASES
TITLES
COMPANIES
COMMUNICATION_TYPES
COMMUNICATIONS
COMPANIES_EXT

10 rows selected.

SQL> select to_char(sysdate,'DD-MON-YY HH24:MI:SS') "Time Right Now" from dual;

Time Right Now
------------------
03-FEB-20 15:01:14

SQL> create table TEST_TABLE (col1 number);
Table created.

SQL> select table_name from user_tables;

TABLE_NAME
----------------------
GENRES
MEDIA_TYPES
FORMATS
RECORDING_ARTISTS
RELEASES
TITLES
COMPANIES
COMMUNICATION_TYPES
COMMUNICATIONS
COMPANIES_EXT
TEST_TABLE

11 rows selected.
Step #1: Assess the Situation.
In any PIT restore/recovery scenario, the most important issue is deciding the point to which you want to restore and recover the database. Incomplete restore and recoveries mean there will be data loss, so getting the restore and recovery point locked down is crucial. There are 4 options when defining the restore and recovery point:
Option
Usage Details
Time Based
UNTIL TIME "TO_DATE('your-date-&-time','MM/DD/YY HH24:MI:SS')"
Time based recovery is not exact because Oracle resolves the time to a given SCN.
SCN Based
UNTIL SCN your-scn
SCN based is more precise but remember to add 1 to your-scn to include that SCN in your recovery.
Change Based
UNTIL SEQUENCE your-sequence THREAD your-thread
Changed based will recover up to the given archived redo log file sequence. Remember to add 1 to your-sequence to include that archived redo log file in your recovery.
Restore Point Based
UNTIL RESTORE POINT your-restore-point
A restore point is really just a name given to a point in time. Often used with Flashback Database. Normal restore points will eventually be aged out of the database. Guaranteed restore points won't be, but Oracle will create Flashback Logs to support guaranteed restore points. Think tons of storage on busy systems!
We know the new table was created around 3PM on February 3rd 2020, so let’s restore and recover the database back to 2:30PM on February 2nd 2020.
Step #2: Shutdown and Mount the Database.
[oracle@orasvr01 ~]$ rman target rmanbackup/rmanbackup using sysbackup

Recovery Manager: Release 12.2.0.1.0 - Production on Mon Feb 3 15:33:20 2020

Copyright (c) 1982, 2017, Oracle and/or its affiliates.  All rights reserved.

connected to target database: T122 (DBID=2185934179)

RMAN> connect catalog rco/rco@rmancat

connected to recovery catalog database

recovery catalog schema release 18.03.00.00. is newer than RMAN release

RMAN> shutdown immediate;
database closed
database dismounted
Oracle instance shut down

RMAN> startup mount;

connected to target database (not started)
Oracle instance started
database mounted

Total System Global Area    2147483648 bytes
Fixed Size                     8622776 bytes
Variable Size                603983176 bytes
Database Buffers            1526726656 bytes
Redo Buffers                   8151040 bytes
Step #3: Restore the Database to a Given Point In Time.
We want to restore and recover the database to February 2nd at 2:30PM. RMAN will use the database backup closest to and before that point in time. In our case, it will be the backup taken on Saturday February 1st at 8PM:
RMAN> restore database until time "to_date('02/02/20 14:30:00','MM/DD/YY HH24:MI:SS')";

Starting restore at 03-FEB-20
allocated channel: ORA_DISK_1
channel ORA_DISK_1: SID=258 device type=DISK
allocated channel: ORA_DISK_2
channel ORA_DISK_2: SID=22 device type=DISK
channel ORA_DISK_1: starting datafile backup set restore
channel ORA_DISK_1: specifying datafile(s) to restore from backup set
channel ORA_DISK_1: restoring datafile 00001 to /u02/oradata/T122/datafile/o1_mf_system_h398cz46_.dbf
channel ORA_DISK_1: restoring datafile 00004 to /u02/oradata/T122/datafile/o1_mf_undotbs1_h398d01w_.dbf
channel ORA_DISK_1: reading from backup piece /nas/backups/T122/2020-02-01/2020-02-01_20:00/T122_4hunfe1t_1_1.bkp
channel ORA_DISK_2: starting datafile backup set restore
channel ORA_DISK_2: specifying datafile(s) to restore from backup set
channel ORA_DISK_2: restoring datafile 00003 to /u02/oradata/T122/datafile/o1_mf_sysaux_h398czd6_.dbf
channel ORA_DISK_2: restoring datafile 00007 to /u02/oradata/T122/datafile/o1_mf_users_h398d0dl_.dbf
channel ORA_DISK_2: reading from backup piece /nas/backups/T122/2020-02-01/2020-02-01_20:00/T122_4gunfe1s_1_1.bkp
channel ORA_DISK_1: piece handle=/nas/backups/T122/2020-02-01/2020-02-01_20:00/T122_4hunfe1t_1_1.bkp tag=TAG20200201T200200
channel ORA_DISK_1: restored backup piece 1
channel ORA_DISK_1: restore complete, elapsed time: 00:09:45
channel ORA_DISK_2: piece handle=/nas/backups/T122/2020-02-01/2020-02-01_20:00/T122_4gunfe1s_1_1.bkp tag=TAG20200201T200200
channel ORA_DISK_2: restored backup piece 1
channel ORA_DISK_2: restore complete, elapsed time: 00:14:55
Finished restore at 03-FEB-20
Step #4: Recover the Database to a Given Point In Time.
This will use cause RMAN to restore and use archived redo log files to roll the database forward from the restored point (02/01/20 @ 8PM) to the required recovery point (02/02/20 @ 2:30PM):
RMAN> alter database open resetlogs;

Statement processed
new incarnation of database registered in recovery catalog
starting full resync of recovery catalog
full resync complete
Finally, login as the MEDIA user and check the list of tables:
TEST_TABLE is no longer present in the database. Yes!
Task #4d. Point In Time (Incomplete) Restore/Recovery of a PDB.
For this example we’ll use the PDB, T183_PDB1 within the CDB T183. This time we’ll restore and recover to a given SCN. To help with this task, I have created a table in my own account in T183_PDB1, containing rows created at different times and hence different SCNs. The pseudo column ORA_ROWSCN gives us the SCN associated with each row:
SQL> show con_name

CON_NAME
---------
T183_PDB1

SQL> show user
USER is "SFRANCIS"

SQL> select ORA_ROWSCN,RANK,TITLE,YEAR from best_numan_albums order by ORA_ROWSCN;

ORA_ROWSCN       RANK TITLE                          YEAR
---------- ---------- ------------------------------ ----
  10134233          1 The Pleasure Principle         1979
  10134311          2 Telekon                        1980
  10134770          3 Exile                          1997
  10134965          4 Pure                           2000
  10135391          5 Dance                          1981

5 rows selected.
Step #1: Assess the Situation.
In any PIT restore/recovery scenario, the most important issue is to assess the point to which you wish to recover. An SCN PIT recovery will recover up to, but not including, the SCN you specify. So in our case, if we only want to recover the first 3 rows of this table, we need to specify an SCN of 10134770+1.
Step #2: Close the PDB.
[oracle@orasvr02 ~]$ rman target rmanbackup/rmanbackup using sysbackup

Recovery Manager: Release 18.0.0.0.0 - Production on Tue Feb 4 13:03:51 2020
Version 18.3.0.0.0

Copyright (c) 1982, 2018, Oracle and/or its affiliates.  All rights reserved.

connected to target database: T183 (DBID=2832597398)

RMAN> alter pluggable database T183_PDB1 close;

using target database control file instead of recovery catalog
Statement processed
Step #3: Restore the PDB to the Given SCN.
RMAN> restore pluggable database T183_PDB1 until SCN 10134771;

Starting restore at 04-FEB-20
allocated channel: ORA_DISK_1
channel ORA_DISK_1: SID=38 device type=DISK
allocated channel: ORA_DISK_2
channel ORA_DISK_2: SID=295 device type=DISK
allocated channel: ORA_DISK_3
channel ORA_DISK_3: SID=292 device type=DISK
allocated channel: ORA_DISK_4
channel ORA_DISK_4: SID=288 device type=DISK

channel ORA_DISK_1: starting datafile backup set restore
channel ORA_DISK_1: specifying datafile(s) to restore from backup set
channel ORA_DISK_1: restoring datafile 00018 to +DATA/T183/9DC2AE83F20B40ACE0531200A8C05C14/DATAFILE/sysaux.266.1031477343
channel ORA_DISK_1: restoring datafile 00020 to +DATA/T183/9DC2AE83F20B40ACE0531200A8C05C14/DATAFILE/users.258.1031478153
channel ORA_DISK_1: reading from backup piece /nas/backups/T183/2020-02-04/2020-02-04_09:51/T183_8lunm7vb_1_1.bkp
channel ORA_DISK_2: starting datafile backup set restore
channel ORA_DISK_2: specifying datafile(s) to restore from backup set
channel ORA_DISK_2: restoring datafile 00017 to +DATA/T183/9DC2AE83F20B40ACE0531200A8C05C14/DATAFILE/system.259.1031477337
channel ORA_DISK_2: restoring datafile 00019 to +DATA/T183/9DC2AE83F20B40ACE0531200A8C05C14/DATAFILE/undotbs1.257.1031477335
channel ORA_DISK_2: reading from backup piece /nas/backups/T183/2020-02-04/2020-02-04_09:51/T183_8nunm8fi_1_1.bkp
channel ORA_DISK_2: piece handle=/nas/backups/T183/2020-02-04/2020-02-04_09:51/T183_8nunm8fi_1_1.bkp tag=TAG20200204T095900
channel ORA_DISK_2: restored backup piece 1
channel ORA_DISK_2: restore complete, elapsed time: 00:04:18
channel ORA_DISK_1: piece handle=/nas/backups/T183/2020-02-04/2020-02-04_09:51/T183_8lunm7vb_1_1.bkp tag=TAG20200204T095900
channel ORA_DISK_1: restored backup piece 1
channel ORA_DISK_1: restore complete, elapsed time: 00:04:35
Finished restore at 04-FEB-20
Step #4: Recover the PDB to the Given SCN.
RMAN> recover pluggable database T183_PDB1 until SCN 10134771;

Starting recover at 04-FEB-20
using channel ORA_DISK_1
using channel ORA_DISK_2
using channel ORA_DISK_3
using channel ORA_DISK_4

starting media recovery

archived log for thread 1 with sequence 253 is already on disk as file +RECO/T183/ARCHIVELOG/2020_02_04/thread_1_seq_253.283.1031480207
archived log for thread 1 with sequence 254 is already on disk as file +RECO/T183/ARCHIVELOG/2020_02_04/thread_1_seq_254.289.1031486659
archived log for thread 1 with sequence 255 is already on disk as file +RECO/T183/ARCHIVELOG/2020_02_04/thread_1_seq_255.285.1031487353
archived log for thread 1 with sequence 256 is already on disk as file +RECO/T183/ARCHIVELOG/2020_02_04/thread_1_seq_256.287.1031489371
media recovery complete, elapsed time: 00:01:51
Finished recover at 04-FEB-20
Step #5: Open the PDB.
RMAN> alter pluggable database T183_PDB1 open resetlogs;

Statement processed
Let’s check to see if the result is what we expected:
SQL> select ORA_ROWSCN,RANK,TITLE,YEAR from best_numan_albums order by ORA_ROWSCN;

ORA_ROWSCN       RANK TITLE                          YEAR
---------- ---------- ------------------------------ ----
  10134233          1 The Pleasure Principle         1979
  10134311          2 Telekon                        1980
  10134770          3 Exile                          1997

3 rows selected.
Albums 3 and 4 are now gone which is a pity becasue they’re both excellent. ?
Step #6: Resync the Recovery Catalog.
Operations have occurred which did not involve the Recovery catalog. So let’s go ahead and resync just for safety’s sake. Note, RMAN backups or typical RMAN commands like “show all;” perform a resync anyway. To perform a resync here, log out of RMAN then log back in again, connecting to the Recovery Catalog:
[oracle@orasvr02 ~]$ rman target rmanbackup/rmanbackup using sysbackup

Recovery Manager: Release 18.0.0.0.0 - Production on Tue Feb 4 13:42:20 2020
Version 18.3.0.0.0

Copyright (c) 1982, 2018, Oracle and/or its affiliates.  All rights reserved.

connected to target database: T183 (DBID=2832597398)

RMAN> connect catalog rco/rco@rmancat

connected to recovery catalog database

RMAN> resync catalog;

starting full resync of recovery catalog
full resync complete
Task #5: More Advanced Uses of RMAN.
For this section, we’ll cover some more complicated RMAN recovery scenarios which will really help demonstrate how RMAN works. This is what we’ll be doing (click the link you need):
Task #5a. Point of Failure (Complete) PDB Data File Restore/Recovery.
For this example we’ll use the T183_PDB1 PDB within the T183 CDB running on orasvr02. This server runs an ASM instance which won’t allow me to delete a datafile while the PDB is open. Therefore, to simulate a problem with the PDB, I will close the PDB, delete the USERS tablespace datafile, then attempt to re-open the PDB. Bad things will happen as a result.
Let’s just check the location of the FRA and the backup files:
SQL> show parameter recovery
NAME                                 TYPE        VALUE
------------------------------------ ----------- ------
db_recovery_file_dest                string      +RECO
db_recovery_file_dest_size           big integer 10G
recovery_parallelism                 integer     0
remote_recovery_file_dest            string

[oracle@orasvr02 2020-02-01]$ pwd
/nas/backups/T183/2020-02-01

[oracle@orasvr02 2020-02-01]$ ls -l
drwxrwxrwx 2 oracle oinstall 4096 Feb  1 20:38 2020-02-01_20:00    <-- Full CDB Backup Files
drwxrwxrwx 2 oracle oinstall 4096 Feb  1 23:10 2020-02-01_23:00    <-- Archived Redo Log Backup Files
Step #1: Assess the Situation.
Before you do anything, find out what’s broken and what’s still left of the database. This will determine your approach to restoring and recovering the database and will prime you for what to expect from RMAN’s output.
SQL> alter pluggable database t183_pdb1 open;

alter pluggable database t183_pdb1 open
*
ERROR at line 1:
ORA-01157: cannot identify/lock data file 12 - see DBWR trace file
ORA-01110: data file 12:
'+DATA/T183/9796845BE029589CE0531200A8C01B41/DATAFILE/users.257.1025001295'
It looks like only a single datafile is missing, but let’s check. The PDB should have these datafiles:
ASMCMD> pwd
+DATA/T183/9796845BE029589CE0531200A8C01B41/DATAFILE

ASMCMD> ls -l
Type      Redund  Striped  Time             Sys  Name
DATAFILE  UNPROT  COARSE   FEB 02 13:00:00  Y    SYSAUX.259.1024604111
DATAFILE  UNPROT  COARSE   FEB 02 13:00:00  Y    SYSTEM.267.1024604111
DATAFILE  UNPROT  COARSE   FEB 02 13:00:00  Y    UNDOTBS1.266.1024604111
We know the CDB instance is still up and running and not reporting any further errors, so the problem does appear to be a single missing PDB datafile. At this point we have a choice concerning how to restore and recover the PDB. The end result will be the same (PDB back up and running), but the potential time it takes could be very different depending on how many datafiles are impacted. The choices are:
Restore/Recovery Option
Details
Full PDB Restore/Recovery
Choose this option if all or most of the database datafiles are impacted
Tablespace Restore/Recovery
Choose this option if all or most of a tablespace(s) datafiles are impacted
Datafile Restore/Recovery
Choose this option if relatively few database datafiles are impacted
In other words, if the database had 100 data files and only one was impacted, it would be better to perform a data file restore/recovery. Similarly, if a database had 100 data files and a tablespace was impacted which had 10 data files, a tablespace restore/recovery would be the way to go. In our case, a datafile or tablespace restore/recovery are equivalent because the tablespace (USERS) only has one datafile (users.257.1025001295). Let’s perform a data file restore and recovery.
Step #2: Close the PDB.
[oracle@orasvr02 ~]$ rman target rmanbackup/rmanbackup using sysbackup

Recovery Manager: Release 18.0.0.0.0 - Production on Sun Feb 2 13:55:59 2020
Version 18.3.0.0.0

Copyright (c) 1982, 2018, Oracle and/or its affiliates.  All rights reserved.

connected to target database: T183 (DBID=2832597398)

RMAN> connect catalog rco/rco@rmancat

connected to recovery catalog database

RMAN> alter pluggable database t183_pdb1 close;

starting full resync of recovery catalog
full resync complete
RMAN-00571: ===========================================================
RMAN-00569: =============== ERROR MESSAGE STACK FOLLOWS ===============
RMAN-00571: ===========================================================
RMAN-03002: failure of sql statement command at 02/02/2020 14:16:38
ORA-65020: pluggable database T183_PDB1 already closed
We already knew the PDB was closed, so RMAN at least confirms this. No foul.
Step #3: Restore the Missing Data File.
Oddly enough, I did attempt to restore the whole PDB which failed consistently. RMAN didn’t bother to explain why (typical RMAN), so I stuck with Plan A and restored just the missing data file:
RMAN> restore datafile 12;

Starting restore at 02-FEB-20
using channel ORA_DISK_1
using channel ORA_DISK_2
using channel ORA_DISK_3
using channel ORA_DISK_4
channel ORA_DISK_1: starting datafile backup set restore
channel ORA_DISK_1: specifying datafile(s) to restore from backup set
channel ORA_DISK_1: restoring datafile 00012 to +DATA/T183/9796845BE029589CE0531200A8C01B41/DATAFILE/users.257.1025001295
channel ORA_DISK_1: reading from backup piece /nas/backups/T183/2020-02-01/2020-02-01_20:00/T183_74unfet8_1_1.bkp
channel ORA_DISK_1: piece handle=/nas/backups/T183/2020-02-01/2020-02-01_20:00/T183_74unfet8_1_1.bkp tag=TAG20200201T201458
channel ORA_DISK_1: restored backup piece 1
channel ORA_DISK_1: restore complete, elapsed time: 00:00:49
Finished restore at 02-FEB-20
starting full resync of recovery catalog
full resync complete
Step #4: Recover the Restored Data File.
With the missing data file back in play, time to recover it so it’s consistent with the rest of the database:
RMAN> recover datafile 12;

Starting recover at 02-FEB-20
using channel ORA_DISK_1
using channel ORA_DISK_2
using channel ORA_DISK_3
using channel ORA_DISK_4
starting media recovery
archived log for thread 1 with sequence 232 is already on disk as file +RECO/T183/ARCHIVELOG/2020_02_02/thread_1_seq_232.272.1031271249
archived log for thread 1 with sequence 233 is already on disk as file +RECO/T183/ARCHIVELOG/2020_02_02/thread_1_seq_233.271.1031275935
archived log for thread 1 with sequence 234 is already on disk as file +RECO/T183/ARCHIVELOG/2020_02_02/thread_1_seq_234.273.1031294207
archived log for thread 1 with sequence 235 is already on disk as file +RECO/T183/ARCHIVELOG/2020_02_02/thread_1_seq_235.274.1031300027
archived log for thread 1 with sequence 236 is already on disk as file +RECO/T183/ARCHIVELOG/2020_02_02/thread_1_seq_236.263.1031305429
archived log for thread 1 with sequence 237 is already on disk as file +RECO/T183/ARCHIVELOG/2020_02_02/thread_1_seq_237.262.1031310847
archived log for thread 1 with sequence 238 is already on disk as file +RECO/T183/ARCHIVELOG/2020_02_02/thread_1_seq_238.287.1031316259
archived log for thread 1 with sequence 239 is already on disk as file +RECO/T183/ARCHIVELOG/2020_02_02/thread_1_seq_239.286.1031322865
channel ORA_DISK_1: starting archived log restore to default destination
channel ORA_DISK_1: restoring archived log
archived log thread=1 sequence=229
channel ORA_DISK_1: reading from backup piece /nas/backups/T183/2020-02-01/2020-02-01_20:00/T183_7aunfg6b_1_1.bkp
channel ORA_DISK_2: starting archived log restore to default destination
channel ORA_DISK_2: restoring archived log
archived log thread=1 sequence=230
channel ORA_DISK_2: reading from backup piece /nas/backups/T183/2020-02-01/2020-02-01_23:00/T183_7cunfp1o_1_1.bkp
channel ORA_DISK_3: starting archived log restore to default destination
channel ORA_DISK_3: restoring archived log
archived log thread=1 sequence=231
channel ORA_DISK_3: reading from backup piece /nas/backups/T183/2020-02-01/2020-02-01_23:00/T183_7dunfp1t_1_1.bkp
channel ORA_DISK_1: piece handle=/nas/backups/T183/2020-02-01/2020-02-01_20:00/T183_7aunfg6b_1_1.bkp tag=TAG20200201T203819
channel ORA_DISK_1: restored backup piece 1
channel ORA_DISK_1: restore complete, elapsed time: 00:01:46
archived log file name=+RECO/T183/ARCHIVELOG/2020_02_02/thread_1_seq_229.279.1031326419 thread=1 sequence=229
channel default: deleting archived log(s)
archived log file name=+RECO/T183/ARCHIVELOG/2020_02_02/thread_1_seq_229.279.1031326419 RECID=237 STAMP=1031326467
channel ORA_DISK_2: piece handle=/nas/backups/T183/2020-02-01/2020-02-01_23:00/T183_7cunfp1o_1_1.bkp tag=TAG20200201T230902
channel ORA_DISK_2: restored backup piece 1
channel ORA_DISK_2: restore complete, elapsed time: 00:02:46
archived log file name=+RECO/T183/ARCHIVELOG/2020_02_02/thread_1_seq_230.259.1031326437 thread=1 sequence=230
channel default: deleting archived log(s)
archived log file name=+RECO/T183/ARCHIVELOG/2020_02_02/thread_1_seq_230.259.1031326437 RECID=239 STAMP=1031326549
channel ORA_DISK_3: piece handle=/nas/backups/T183/2020-02-01/2020-02-01_23:00/T183_7dunfp1t_1_1.bkp tag=TAG20200201T230902
channel ORA_DISK_3: restored backup piece 1
channel ORA_DISK_3: restore complete, elapsed time: 00:04:14
archived log file name=+RECO/T183/ARCHIVELOG/2020_02_02/thread_1_seq_231.283.1031326451 thread=1 sequence=231
channel default: deleting archived log(s)
archived log file name=+RECO/T183/ARCHIVELOG/2020_02_02/thread_1_seq_231.283.1031326451 RECID=238 STAMP=1031326544
archived log file name=+RECO/T183/ARCHIVELOG/2020_02_02/thread_1_seq_232.272.1031271249 thread=1 sequence=232
archived log file name=+RECO/T183/ARCHIVELOG/2020_02_02/thread_1_seq_233.271.1031275935 thread=1 sequence=233
archived log file name=+RECO/T183/ARCHIVELOG/2020_02_02/thread_1_seq_234.273.1031294207 thread=1 sequence=234
archived log file name=+RECO/T183/ARCHIVELOG/2020_02_02/thread_1_seq_235.274.1031300027 thread=1 sequence=235
archived log file name=+RECO/T183/ARCHIVELOG/2020_02_02/thread_1_seq_236.263.1031305429 thread=1 sequence=236
archived log file name=+RECO/T183/ARCHIVELOG/2020_02_02/thread_1_seq_237.262.1031310847 thread=1 sequence=237
media recovery complete, elapsed time: 00:10:00
Finished recover at 02-FEB-20
Step #5: Open the PDB.
RMAN> alter pluggable database t183_pdb1 open;

Statement processed
starting full resync of recovery catalog
full resync complete
Let’s just check everything looks OK – not that I’m paranoid of course:
SQL> select name, open_mode from v$pdbs;

NAME            OPEN_MODE
--------------- ----------
PDB$SEED        READ ONLY
T183_PDB1       READ WRITE

SQL> select name, status from v$datafile
     where con_id = (select con_id from v$pdbs where name = 'T183_PDB1');

NAME                                                                             STATUS
-------------------------------------------------------------------------------- ------
+DATA/T183/9796845BE029589CE0531200A8C01B41/DATAFILE/system.267.1024604111       SYSTEM
+DATA/T183/9796845BE029589CE0531200A8C01B41/DATAFILE/sysaux.259.1024604111       ONLINE
+DATA/T183/9796845BE029589CE0531200A8C01B41/DATAFILE/undotbs1.266.1024604111     ONLINE
+DATA/T183/9796845BE029589CE0531200A8C01B41/DATAFILE/users.257.1031324843        ONLINE
Task #5b. Point In Time Database Restore/Recovery to a New Server (ASM to File System).
Restoring a database backup to a different server and recovering it to a previous point in time is something which happens quite frequently. Developers often want to develop or test against a copy of production data. As we all know, once you restore a backup of a production database, the data magically becomes non-production and any attempt the DBA makes to scramble, mask or encrypt it is just wasting everyone’s time. ? Moving on. The real interest in this task though is changing the storage mechanism from the source database’s ASM to the destination database’s use of regular Linux file system storage. Not a simple as you might think. Here’s a summary of what we’ll be doing:
Target
Server
Database
Storage
Source
orasvr02
T183 (18c R3 CDB)
ASM
(Incl. PDB$SEED, T183_PDB1)
(+DATA, +RECO, +REDO)
Destination
orasvr01
D183 (18c R3 CDB)
File System
(Incl. PDB$SEED, T183_PDB1)
(/u03/oradata, /u07/oradata)
A full database backup of T183 was taken around midday on 02/12/20 with archived redo log file backups occurring daily at 11PM. We will restore and recover this database to 02/13/20 at 3:00AM. For extra fun and intrigue, let’s not cheat by copying the SPFILE and control file from the source database server. By not doing that we actually run into a couple of problems, the solution to which is a neat trick that’s well worth knowing. All the necessary database and archived redo log file backups are stored in NFS storage, mounted to both servers. There are 12 steps, so let’s crack on.
Step #1: Restore the SPFILE.
We know we’re using control file autobackup, so checking the log file of the full database backup which occurred at 12PM on 02/12/20 we see this:
...
Starting Control File and SPFILE Autobackup at 12-FEB-20
piece handle=+RECO/T183/AUTOBACKUP/2020_02_12/s_1032179709.272.1032179735 comment=NONE
Finished Control File and SPFILE Autobackup at 12-FEB-20
...
So we need to get hold of the file, s_1032179709.272.1032179735.
On orasvr02, we log into the ASM instance using ASMCMD and copy the autobackup file containing the SPFILE (and control file) to NFS storage:
ASMCMD> cd +RECO/T183/AUTOBACKUP/2020_02_12/

ASMCMD> ls -l
Type        Redund  Striped  Time             Sys  Name
AUTOBACKUP  UNPROT  COARSE   FEB 12 12:00:00  Y    s_1032179709.272.1032179735
AUTOBACKUP  UNPROT  COARSE   FEB 12 23:00:00  Y    s_1032217930.256.1032217959

ASMCMD> cp s_1032179709.272.1032179735 /nas/backups/T183/tmp
copying +RECO/T183/AUTOBACKUP/2020_02_12/s_1032179709.272.1032179735 -> /nas/backups/T183/tmp/s_1032179709.272.1032179735
From orasvr01, let’s check the file is there:
[oracle@orasvr01 tmp]$ pwd
/nas/backups/T183/tmp

[oracle@orasvr01 tmp]$ ls -l
-rw-r----- 1 grid oinstall 1146880 Feb 13 10:15 s_1032179709.272.1032179735
We have 2 problems. First, the file has the wrong ownership for our purposes and second, the file name is in the wrong format. Using the root account fixes the first issue, but we need to address the file naming convention so RMAN will be able to read it. RMAN autobackups are written using the %F format specification. From the Oracle Documentation:
Syntax Element
Description
%F
Combines the DBID, day, month, year, and sequence into a unique and repeatable generated name. This variable translates into c-IIIIIIIIII-YYYYMMDD-QQ, where:
IIIIIIIIII stands for the DBID. The DBID is printed in decimal so that it can be easily associated with the target database.
YYYYMMDD is a time stamp in the Gregorian calendar of the day the backup is generated
QQ is the sequence in hexadecimal number that starts with 00 and has a maximum of 'FF' (256)
Note: %F is valid only in the CONFIGURE CONTROLFILE AUTOBACKUP FORMAT command.
We know from using RMAN the DBID of T183 is 2832597398. The date element is obviously 20200212. We’ll just use 00 for the QQ component:
[root@orasvr01 ~]# cd /nas/backups/T183/tmp

[root@orasvr01 tmp]# ls -l
-rw-r----- 1 grid oinstall 1146880 Feb 13 10:15 s_1032179709.272.1032179735

[root@orasvr01 tmp]# chown oracle:oinstall *

[root@orasvr01 tmp]# mv s_1032179709.272.1032179735 c-2832597398-20200212-00

[root@orasvr01 tmp]# ls -l
-rw-r----- 1 oracle oinstall 1146880 Feb 13 10:15 c-2832597398-20200212-00
Next, add an entry for T183 in the /etc/oratab file on orasvr01:
T183:/u01/app/oracle/product/18.3.0/dbhome_1:N
Set your Oracle environment on orasvr01 then use RMAN to restore the SPFILE to a PFILE (you will need to edit it later):
[oracle@orasvr01 ~]$ rman target rmanbackup/rmanbackup using sysbackup

Recovery Manager: Release 18.0.0.0.0 - Production on Thu Feb 13 10:19:58 2020
Version 18.3.0.0.0

Copyright (c) 1982, 2018, Oracle and/or its affiliates.  All rights reserved.

connected to target database (not started)

RMAN> set DBID = 2832597398;

executing command: SET DBID

RMAN> startup nomount;

startup failed: ORA-01078: failure in processing system parameters
LRM-00109: could not open parameter file '/u01/app/oracle/product/18.3.0/dbhome_1/dbs/initT183.ora'

starting Oracle instance without parameter file for retrieval of spfile
Oracle instance started

Total System Global Area    1073740616 bytes
Fixed Size                     8665928 bytes
Variable Size                281018368 bytes
Database Buffers             775946240 bytes
Redo Buffers                   8110080 bytes

RMAN> set controlfile autobackup format for device type disk to '/nas/backups/T183/tmp/%F';

executing command: SET CONTROLFILE AUTOBACKUP FORMAT

RMAN> restore spfile to pfile '?/dbs/initT183.ora' from autobackup;

Starting restore at 13-FEB-20
using target database control file instead of recovery catalog
allocated channel: ORA_DISK_1
channel ORA_DISK_1: SID=20 device type=DISK

channel ORA_DISK_1: looking for AUTOBACKUP on day: 20200213
channel ORA_DISK_1: looking for AUTOBACKUP on day: 20200212
channel ORA_DISK_1: AUTOBACKUP found: /nas/backups/T183/tmp/c-2832597398-20200212-00
channel ORA_DISK_1: restoring spfile from AUTOBACKUP /nas/backups/T183/tmp/c-2832597398-20200212-00
channel ORA_DISK_1: SPFILE restore from AUTOBACKUP complete
Finished restore at 13-FEB-20

RMAN> shutdown abort

Oracle instance shut down
Let’s check to see if we have the PFILE in $ORACLE_HOME/dbs:
[oracle@orasvr01 dbs]$ pwd
/u01/app/oracle/product/18.3.0/dbhome_1/dbs

[oracle@orasvr01 dbs]$ ls -l
-rw-rw---- 1 oracle oinstall 1544 Feb 13 10:21 hc_T183.dat
-rw-r--r-- 1 oracle oinstall 1174 Feb 13 10:21 initT183.ora
Next, edit the PFILE to reference orasvr01 directory paths and make any necessary changes to the memory parameters. At a minimum, check these entries:
Re-start the instance using the editing PFILE and restore the control file from autobackup:
RMAN> startup force nomount pfile='?/dbs/initT183.ora'

Oracle instance started

Total System Global Area    2147481064 bytes

Fixed Size                     8898024 bytes
Variable Size                603979776 bytes
Database Buffers            1526726656 bytes
Redo Buffers                   7876608 bytes

RMAN> restore controlfile from autobackup;

Starting restore at 13-FEB-20
allocated channel: ORA_DISK_1
channel ORA_DISK_1: SID=20 device type=DISK

recovery area destination: /u07/oradata/fast_recovery_area
database name (or database unique name) used for search: T183
channel ORA_DISK_1: no AUTOBACKUPS found in the recovery area
channel ORA_DISK_1: looking for AUTOBACKUP on day: 20200213
channel ORA_DISK_1: looking for AUTOBACKUP on day: 20200212
channel ORA_DISK_1: AUTOBACKUP found: /nas/backups/T183/tmp/c-2832597398-20200212-00
channel ORA_DISK_1: restoring control file from AUTOBACKUP /nas/backups/T183/tmp/c-2832597398-20200212-00
channel ORA_DISK_1: control file restore from AUTOBACKUP complete
output file name=/u03/oradata/T183/controlfile/T183_ctrl_1.ctl
output file name=/u07/oradata/fast_recovery_area/T183/controlfile/T183_ctrl_2.ctl
Finished restore at 13-FEB-20
Step #3: Mount the Database.
The control files should have been restored to the locations specified in the PFILE. Let’s check:
[oracle@orasvr01 dbs]$ ls -l /u03/oradata/T183/controlfile/T183_ctrl_1.ctl
-rw-r----- 1 oracle oinstall 18825216 Feb 13 10:27 /u03/oradata/T183/controlfile/T183_ctrl_1.ctl

[oracle@orasvr01 dbs]$ ls -l /u07/oradata/fast_recovery_area/T183/controlfile/T183_ctrl_2.ctl
-rw-r----- 1 oracle oinstall 18825216 Feb 13 10:27 /u07/oradata/fast_recovery_area/T183/controlfile/T183_ctrl_2.ctl
Now that the control files are restored, we can mount the database and find out the names of all the other files we will need to restore:
RMAN> alter database mount;

RMAN> report schema;

Starting implicit crosscheck backup at 13-FEB-20
allocated channel: ORA_DISK_1
channel ORA_DISK_1: SID=24 device type=DISK
allocated channel: ORA_DISK_2
channel ORA_DISK_2: SID=260 device type=DISK
allocated channel: ORA_DISK_3
channel ORA_DISK_3: SID=25 device type=DISK
allocated channel: ORA_DISK_4
channel ORA_DISK_4: SID=261 device type=DISK
Crosschecked 96 objects
Crosschecked 26 objects
Finished implicit crosscheck backup at 13-FEB-20

Starting implicit crosscheck copy at 13-FEB-20
using channel ORA_DISK_1
using channel ORA_DISK_2
using channel ORA_DISK_3
using channel ORA_DISK_4
Finished implicit crosscheck copy at 13-FEB-20

searching for all files in the recovery area
cataloging files…
no files cataloged

RMAN-06139: warning: control file is not current for REPORT SCHEMA
Report of database schema for database with db_unique_name T183
List of Permanent Datafiles
===========================
File Size(MB) Tablespace           RB segs Datafile Name
---- -------- -------------------- -- ---- -------------------------------------------------------------
1    0        SYSTEM               ***     +DATA/T183/DATAFILE/system.270.1024601039
3    0        SYSAUX               ***     +DATA/T183/DATAFILE/sysaux.261.1024601085
4    0        UNDOTBS1             ***     +DATA/T183/DATAFILE/undotbs1.274.1024601109
5    0        PDB$SEED:SYSTEM      ***     +DATA/T183/64A52F53A7693286E053CDA9E80AED76/DATAFILE/system.271.1024601571
6    0        PDB$SEED:SYSAUX      ***     +DATA/T183/64A52F53A7693286E053CDA9E80AED76/DATAFILE/sysaux.272.1024601571
7    0        USERS                ***     +DATA/T183/DATAFILE/users.269.1024601111
8    0        PDB$SEED:UNDOTBS1    ***     +DATA/T183/64A52F53A7693286E053CDA9E80AED76/DATAFILE/undotbs1.273.1024601571
17   0        T183_PDB1:SYSTEM     ***     +DATA/T183/9DC2AE83F20B40ACE0531200A8C05C14/DATAFILE/system.259.1031477337
18   0        T183_PDB1:SYSAUX     ***     +DATA/T183/9DC2AE83F20B40ACE0531200A8C05C14/DATAFILE/sysaux.266.1031477343
19   0        T183_PDB1:UNDOTBS1   ***     +DATA/T183/9DC2AE83F20B40ACE0531200A8C05C14/DATAFILE/undotbs1.257.1031477335
20   0        T183_PDB1:USERS      ***     +DATA/T183/9DC2AE83F20B40ACE0531200A8C05C14/DATAFILE/users.258.1031478153

List of Temporary Files
=======================
File Size(MB) Tablespace           Maxsize(MB) Tempfile Name
---- -------- -------------------- ----------- ---------------------------------------------------------
1    20       TEMP                 32767       +DATA/T183/TEMPFILE/temp.275.1024601211
2    62       PDB$SEED:TEMP        32767       +DATA/T183/9795EEED00203DFFE0531200A8C06D7B/TEMPFILE/temp.268.1024601603
3    62       T183_PDB1:TEMP       32767       +DATA/T183/9DC2AE83F20B40ACE0531200A8C05C14/TEMPFILE/temp.267.1031477735

RMAN> select member from v$logfile;

MEMBER
-------------------------------------------
+DATA/T183/ONLINELOG/group_3.262.1024601181
+RECO/T183/ONLINELOG/group_3.266.1024601187
+DATA/T183/ONLINELOG/group_2.263.1024601181
+RECO/T183/ONLINELOG/group_2.261.1024601187
+DATA/T183/ONLINELOG/group_1.264.1024601181
+RECO/T183/ONLINELOG/group_1.267.1024601187
Note, the TEMP file for PDB$SEED is listed in a different GUID directory from its other 3 files.
Using this data, we need to do a couple of things. First, pre-create some additional directories to separate out the files belonging to the SEED and T183_PDB1 PDBs. Second, create a script which will restore all the data files and create the online redo log files in the correct locations.
Here’s the RMAN script (called restore_recover.rman) which will rename all the files to their new locations. The UNTIL TIME clause is set for the block, then the restore will happen (except for the online redo log files), then the database will switch to using the files in their new locations. Finally, the recovery will roll the database forward from the backup time of 02/12/20 at 12:00PM to the recovery time of 02/13/20 at 3:00AM:
run
 {
 set newname for datafile 1 to '/u03/oradata/T183/datafile/%U.dbf';
 set newname for datafile 3 to '/u03/oradata/T183/datafile/%U.dbf';
 set newname for datafile 4 to '/u03/oradata/T183/datafile/%U.dbf';
 set newname for datafile 7 to '/u03/oradata/T183/datafile/%U.dbf';
 set newname for datafile 5 to '/u03/oradata/T183/64A52F53A7693286E053CDA9E80AED76/datafile/%U.dbf';
 set newname for datafile 6 to '/u03/oradata/T183/64A52F53A7693286E053CDA9E80AED76/datafile/%U.dbf';
 set newname for datafile 8 to '/u03/oradata/T183/64A52F53A7693286E053CDA9E80AED76/datafile/%U.dbf';
 set newname for datafile 17 to '/u03/oradata/T183/9DC2AE83F20B40ACE0531200A8C05C14/datafile/%U.dbf';
 set newname for datafile 18 to '/u03/oradata/T183/9DC2AE83F20B40ACE0531200A8C05C14/datafile/%U.dbf';
 set newname for datafile 19 to '/u03/oradata/T183/9DC2AE83F20B40ACE0531200A8C05C14/datafile/%U.dbf';
 set newname for datafile 20 to '/u03/oradata/T183/9DC2AE83F20B40ACE0531200A8C05C14/datafile/%U.dbf';
 alter database rename file '+DATA/T183/ONLINELOG/group_1.264.1024601181' to
 '/u03/oradata/T183/onlinelog/redo_g1m1.log';
 alter database rename file '+RECO/T183/ONLINELOG/group_1.267.1024601187' to
 '/u07/oradata/fast_recovery_area/T183/onlinelog/redo_g1m2.log';
 alter database rename file '+DATA/T183/ONLINELOG/group_2.263.1024601181' to
 '/u03/oradata/T183/onlinelog/redo_g2m1.log';
 alter database rename file '+RECO/T183/ONLINELOG/group_2.261.1024601187' to
 '/u07/oradata/fast_recovery_area/T183/onlinelog/redo_g2m2.log';
 alter database rename file '+DATA/T183/ONLINELOG/group_3.262.1024601181' to
 '/u03/oradata/T183/onlinelog/redo_g3m1.log';
 alter database rename file '+RECO/T183/ONLINELOG/group_3.266.1024601187' to
 '/u07/oradata/fast_recovery_area/T183/onlinelog/redo_g3m2.log';
 set until time "to_date('02/13/20 03:00:00','MM/DD/YY HH24:MI:SS')";
 restore database;
 switch datafile all;
 recover database;
 }
Step #4: Restore and Recover the Database.
Let’s run the RMAN script and see how far we get (spoiler alert – it will croak – pop quiz – do you know why yet?) ?:
RMAN> @restore_recover.rman

executing command: SET NEWNAME
executing command: SET NEWNAME
executing command: SET NEWNAME
executing command: SET NEWNAME
executing command: SET NEWNAME
executing command: SET NEWNAME
executing command: SET NEWNAME
executing command: SET NEWNAME
executing command: SET NEWNAME
executing command: SET NEWNAME
executing command: SET NEWNAME
Statement processed
Statement processed
Statement processed
Statement processed
Statement processed
Statement processed

executing command: SET until clause

Starting restore at 13-FEB-20
using channel ORA_DISK_1
using channel ORA_DISK_2
using channel ORA_DISK_3
using channel ORA_DISK_4

channel ORA_DISK_1: starting datafile backup set restore
channel ORA_DISK_1: specifying datafile(s) to restore from backup set
channel ORA_DISK_1: restoring datafile 00017 to /u03/oradata/T183/9DC2AE83F20B40ACE0531200A8C05C14/datafile/data_D-T183_TS-SYSTEM_FNO-17.dbf
channel ORA_DISK_1: restoring datafile 00018 to /u03/oradata/T183/9DC2AE83F20B40ACE0531200A8C05C14/datafile/data_D-T183_TS-SYSAUX_FNO-18.dbf
channel ORA_DISK_1: reading from backup piece /nas/backups/T183/2020-02-12/2020-02-12_12:02/T183_a9uobipk_1_1.bkp
channel ORA_DISK_2: starting datafile backup set restore
channel ORA_DISK_2: specifying datafile(s) to restore from backup set
channel ORA_DISK_2: restoring datafile 00001 to /u03/oradata/T183/datafile/data_D-T183_TS-SYSTEM_FNO-1.dbf
channel ORA_DISK_2: restoring datafile 00004 to /u03/oradata/T183/datafile/data_D-T183_TS-UNDOTBS1_FNO-4.dbf
channel ORA_DISK_2: reading from backup piece /nas/backups/T183/2020-02-12/2020-02-12_12:02/T183_a8uobip7_1_1.bkp
channel ORA_DISK_3: starting datafile backup set restore
channel ORA_DISK_3: specifying datafile(s) to restore from backup set
channel ORA_DISK_3: restoring datafile 00003 to /u03/oradata/T183/datafile/data_D-T183_TS-SYSAUX_FNO-3.dbf
channel ORA_DISK_3: restoring datafile 00007 to /u03/oradata/T183/datafile/data_D-T183_TS-USERS_FNO-7.dbf
channel ORA_DISK_3: reading from backup piece /nas/backups/T183/2020-02-12/2020-02-12_12:02/T183_a7uobior_1_1.bkp
channel ORA_DISK_4: starting datafile backup set restore
channel ORA_DISK_4: specifying datafile(s) to restore from backup set
channel ORA_DISK_4: restoring datafile 00006 to /u03/oradata/T183/64A52F53A7693286E053CDA9E80AED76/datafile/data_D-T183_TS-SYSAUX_FNO-6.dbf
channel ORA_DISK_4: reading from backup piece /nas/backups/T183/2020-02-12/2020-02-12_12:02/T183_abuobjdi_1_1.bkp
channel ORA_DISK_2: piece handle=/nas/backups/T183/2020-02-12/2020-02-12_12:02/T183_a8uobip7_1_1.bkp tag=TAG20200212T121249
channel ORA_DISK_2: restored backup piece 1
channel ORA_DISK_2: restore complete, elapsed time: 00:22:17
channel ORA_DISK_2: starting datafile backup set restore
channel ORA_DISK_2: specifying datafile(s) to restore from backup set
channel ORA_DISK_2: restoring datafile 00019 to /u03/oradata/T183/9DC2AE83F20B40ACE0531200A8C05C14/datafile/data_D-T183_TS-UNDOTBS1_FNO-19.dbf
channel ORA_DISK_2: restoring datafile 00020 to /u03/oradata/T183/9DC2AE83F20B40ACE0531200A8C05C14/datafile/data_D-T183_TS-USERS_FNO-20.dbf
channel ORA_DISK_2: reading from backup piece /nas/backups/T183/2020-02-12/2020-02-12_12:02/T183_aauobjc2_1_1.bkp
channel ORA_DISK_3: piece handle=/nas/backups/T183/2020-02-12/2020-02-12_12:02/T183_a7uobior_1_1.bkp tag=TAG20200212T121249
channel ORA_DISK_3: restored backup piece 1
channel ORA_DISK_3: restore complete, elapsed time: 00:22:17
channel ORA_DISK_3: starting datafile backup set restore
channel ORA_DISK_3: specifying datafile(s) to restore from backup set
channel ORA_DISK_3: restoring datafile 00005 to /u03/oradata/T183/64A52F53A7693286E053CDA9E80AED76/datafile/data_D-T183_TS-SYSTEM_FNO-5.dbf
channel ORA_DISK_3: reading from backup piece /nas/backups/T183/2020-02-12/2020-02-12_12:02/T183_acuobjir_1_1.bkp
channel ORA_DISK_4: piece handle=/nas/backups/T183/2020-02-12/2020-02-12_12:02/T183_abuobjdi_1_1.bkp tag=TAG20200212T121249
channel ORA_DISK_4: restored backup piece 1
channel ORA_DISK_4: restore complete, elapsed time: 00:22:17
channel ORA_DISK_4: starting datafile backup set restore
channel ORA_DISK_4: specifying datafile(s) to restore from backup set
channel ORA_DISK_4: restoring datafile 00008 to /u03/oradata/T183/64A52F53A7693286E053CDA9E80AED76/datafile/data_D-T183_TS-UNDOTBS1_FNO-8.dbf
channel ORA_DISK_4: reading from backup piece /nas/backups/T183/2020-02-12/2020-02-12_12:02/T183_aduobjkq_1_1.bkp
channel ORA_DISK_1: piece handle=/nas/backups/T183/2020-02-12/2020-02-12_12:02/T183_a9uobipk_1_1.bkp tag=TAG20200212T121249
channel ORA_DISK_1: restored backup piece 1
channel ORA_DISK_1: restore complete, elapsed time: 00:28:04
channel ORA_DISK_2: piece handle=/nas/backups/T183/2020-02-12/2020-02-12_12:02/T183_aauobjc2_1_1.bkp tag=TAG20200212T121249
channel ORA_DISK_2: restored backup piece 1
channel ORA_DISK_2: restore complete, elapsed time: 00:05:47
channel ORA_DISK_3: piece handle=/nas/backups/T183/2020-02-12/2020-02-12_12:02/T183_acuobjir_1_1.bkp tag=TAG20200212T121249
channel ORA_DISK_3: restored backup piece 1
channel ORA_DISK_3: restore complete, elapsed time: 00:05:46
channel ORA_DISK_4: piece handle=/nas/backups/T183/2020-02-12/2020-02-12_12:02/T183_aduobjkq_1_1.bkp tag=TAG20200212T121249
channel ORA_DISK_4: restored backup piece 1
channel ORA_DISK_4: restore complete, elapsed time: 00:05:46
Finished restore at 13-FEB-20

datafile 1 switched to datafile copy
input datafile copy RECID=15 STAMP=1032261425 file name=/u03/oradata/T183/datafile/data_D-T183_TS-SYSTEM_FNO-1.dbf
datafile 3 switched to datafile copy
input datafile copy RECID=16 STAMP=1032261429 file name=/u03/oradata/T183/datafile/data_D-T183_TS-SYSAUX_FNO-3.dbf
datafile 4 switched to datafile copy
input datafile copy RECID=17 STAMP=1032261433 file name=/u03/oradata/T183/datafile/data_D-T183_TS-UNDOTBS1_FNO-4.dbf
datafile 5 switched to datafile copy
input datafile copy RECID=18 STAMP=1032261437 file name=/u03/oradata/T183/64A52F53A7693286E053CDA9E80AED76/datafile/data_D-T183_TS-SYSTEM_FNO-5.dbf
datafile 6 switched to datafile copy
input datafile copy RECID=19 STAMP=1032261441 file name=/u03/oradata/T183/64A52F53A7693286E053CDA9E80AED76/datafile/data_D-T183_TS-SYSAUX_FNO-6.dbf
datafile 7 switched to datafile copy
input datafile copy RECID=20 STAMP=1032261444 file name=/u03/oradata/T183/datafile/data_D-T183_TS-USERS_FNO-7.dbf
datafile 8 switched to datafile copy
input datafile copy RECID=21 STAMP=1032261448 file name=/u03/oradata/T183/64A52F53A7693286E053CDA9E80AED76/datafile/data_D-T183_TS-UNDOTBS1_FNO-8.dbf
datafile 17 switched to datafile copy
input datafile copy RECID=22 STAMP=1032261452 file name=/u03/oradata/T183/9DC2AE83F20B40ACE0531200A8C05C14/datafile/data_D-T183_TS-SYSTEM_FNO-17.dbf
datafile 18 switched to datafile copy
input datafile copy RECID=23 STAMP=1032261455 file name=/u03/oradata/T183/9DC2AE83F20B40ACE0531200A8C05C14/datafile/data_D-T183_TS-SYSAUX_FNO-18.dbf
datafile 19 switched to datafile copy
input datafile copy RECID=24 STAMP=1032261460 file name=/u03/oradata/T183/9DC2AE83F20B40ACE0531200A8C05C14/datafile/data_D-T183_TS-UNDOTBS1_FNO-19.dbf
datafile 20 switched to datafile copy
input datafile copy RECID=25 STAMP=1032261463 file name=/u03/oradata/T183/9DC2AE83F20B40ACE0531200A8C05C14/datafile/data_D-T183_TS-USERS_FNO-20.dbf

Starting recover at 13-FEB-20
using channel ORA_DISK_1
using channel ORA_DISK_2
using channel ORA_DISK_3
using channel ORA_DISK_4

starting media recovery

channel ORA_DISK_1: starting archived log restore to default destination
channel ORA_DISK_1: restoring archived log
archived log thread=1 sequence=297
channel ORA_DISK_1: reading from backup piece /nas/backups/T183/2020-02-12/2020-02-12_12:02/T183_aeuobjsb_1_1.bkp
channel ORA_DISK_1: piece handle=/nas/backups/T183/2020-02-12/2020-02-12_12:02/T183_aeuobjsb_1_1.bkp tag=TAG20200212T123236
channel ORA_DISK_1: restored backup piece 1
channel ORA_DISK_1: restore complete, elapsed time: 00:00:07
archived log file name=/u07/oradata/fast_recovery_area/T183/archivelog/2020_02_13/o1_mf_1_297_h4c17cw5_.arc thread=1 sequence=297
channel default: deleting archived log(s)
archived log file name=/u07/oradata/fast_recovery_area/T183/archivelog/2020_02_13/o1_mf_1_297_h4c17cw5_.arc RECID=300 STAMP=1032261517
unable to find archived log
archived log thread=1 sequence=298
RMAN-00571: ===========================================================
RMAN-00569: =============== ERROR MESSAGE STACK FOLLOWS ===============
RMAN-00571: ===========================================================
RMAN-03002: failure of recover command at 02/13/2020 11:19:16
RMAN-06054: media recovery requesting unknown archived log for thread 1 with sequence 298 and starting SCN of 11183920
RMAN> **end-of-file**
The restore was completed successfully, but the roll forward recovery failed because RMAN could not find archived redo log file sequence 298. It’s not present in any of the backup piece files the control file knows about, neither is it in the database’s FRA. The reason is the control file we used to mount the database was autobacked up on 02/12/20 at around midday and the next archived redo log file backup didn’t happen until 11:00PM the same day. Hence the control file doesn’t know about this backup.The neat trick here is to simply tell the control file about those backup piece files using the CATALOG command. First, let’s grab the names of the backup piece files from the log file of the archived redo log file backup:
Now we can re-start the recovery process which rather cleverly picks up where it failed:
RMAN> run
2> {
3> set until time "to_date('02/13/20 03:00:00','MM/DD/YY HH24:MI:SS')";
4> recover database;
5> }

executing command: SET until clause

Starting recover at 13-FEB-20
using channel ORA_DISK_1
using channel ORA_DISK_2
using channel ORA_DISK_3
using channel ORA_DISK_4

starting media recovery

channel ORA_DISK_1: starting archived log restore to default destination
channel ORA_DISK_1: restoring archived log
archived log thread=1 sequence=298
channel ORA_DISK_1: reading from backup piece /nas/backups/T183/2020-02-12/2020-02-12_23:00/T183_aguocp3d_1_1.bkp
channel ORA_DISK_2: starting archived log restore to default destination
channel ORA_DISK_2: restoring archived log
archived log thread=1 sequence=299
channel ORA_DISK_2: reading from backup piece /nas/backups/T183/2020-02-12/2020-02-12_23:00/T183_ahuocp3i_1_1.bkp
channel ORA_DISK_2: piece handle=/nas/backups/T183/2020-02-12/2020-02-12_23:00/T183_ahuocp3i_1_1.bkp tag=TAG20200212T230804
channel ORA_DISK_2: restored backup piece 1
channel ORA_DISK_2: restore complete, elapsed time: 00:00:26
channel ORA_DISK_1: piece handle=/nas/backups/T183/2020-02-12/2020-02-12_23:00/T183_aguocp3d_1_1.bkp tag=TAG20200212T230804
channel ORA_DISK_1: restored backup piece 1
channel ORA_DISK_1: restore complete, elapsed time: 00:01:34
archived log file name=/u07/oradata/fast_recovery_area/T183/archivelog/2020_02_13/o1_mf_1_298_h4cdz7sb_.arc thread=1 sequence=298
channel default: deleting archived log(s)
archived log file name=/u07/oradata/fast_recovery_area/T183/archivelog/2020_02_13/o1_mf_1_298_h4cdz7sb_.arc RECID=302 STAMP=1032273625
archived log file name=/u07/oradata/fast_recovery_area/T183/archivelog/2020_02_13/o1_mf_1_299_h4cdz9mb_.arc thread=1 sequence=299
channel default: deleting archived log(s)
archived log file name=/u07/oradata/fast_recovery_area/T183/archivelog/2020_02_13/o1_mf_1_299_h4cdz9mb_.arc RECID=301 STAMP=1032273556
unable to find archived log
archived log thread=1 sequence=300
RMAN-00571: ===========================================================
RMAN-00569: =============== ERROR MESSAGE STACK FOLLOWS ===============
RMAN-00571: ===========================================================
RMAN-03002: failure of recover command at 02/13/2020 15:06:12
RMAN-06054: media recovery requesting unknown archived log for thread 1 with sequence 300 and starting SCN of 11240718
Oh no! What now? RMAN is now complaining about not having archived redo log file sequence #300. Why couldn’t RMAN tell us all the backups it would need up front? Well, there’s actually a way to do that. See the next section, Task #6 Additional RMAN Features. Let’s run a quick archived redo log backup of T183, then catalog the backup piece files that creates.
Now RMAN should have everything it needs and the restore should run to completion. Again, notice how RMAN is smart enough to pick up from where it failed:
RMAN> run
2> {
3> set until time "to_date('02/13/20 03:00:00','MM/DD/YY HH24:MI:SS')";
4> recover database;
5> }

executing command: SET until clause

Starting recover at 13-FEB-20
using channel ORA_DISK_1
using channel ORA_DISK_2
using channel ORA_DISK_3
using channel ORA_DISK_4

starting media recovery

channel ORA_DISK_1: starting archived log restore to default destination
channel ORA_DISK_1: restoring archived log
archived log thread=1 sequence=300
channel ORA_DISK_1: reading from backup piece /nas/backups/T183/2020-02-13/2020-02-13_15:11/T183_ajuoehsm_1_1.bkp
channel ORA_DISK_2: starting archived log restore to default destination
channel ORA_DISK_2: restoring archived log
archived log thread=1 sequence=301
channel ORA_DISK_2: reading from backup piece /nas/backups/T183/2020-02-13/2020-02-13_15:11/T183_akuoehsr_1_1.bkp
channel ORA_DISK_1: piece handle=/nas/backups/T183/2020-02-13/2020-02-13_15:11/T183_ajuoehsm_1_1.bkp tag=TAG20200213T151726
channel ORA_DISK_1: restored backup piece 1
channel ORA_DISK_1: restore complete, elapsed time: 00:02:06
archived log file name=/u07/oradata/fast_recovery_area/T183/archivelog/2020_02_13/o1_mf_1_300_h4cj5wyw_.arc thread=1 sequence=300
channel default: deleting archived log(s)
archived log file name=/u07/oradata/fast_recovery_area/T183/archivelog/2020_02_13/o1_mf_1_300_h4cj5wyw_.arc RECID=304 STAMP=1032276949
channel ORA_DISK_2: piece handle=/nas/backups/T183/2020-02-13/2020-02-13_15:11/T183_akuoehsr_1_1.bkp tag=TAG20200213T151726
channel ORA_DISK_2: restored backup piece 1
channel ORA_DISK_2: restore complete, elapsed time: 00:12:06
archived log file name=/u07/oradata/fast_recovery_area/T183/archivelog/2020_02_13/o1_mf_1_301_h4cj5yln_.arc thread=1 sequence=301
channel default: deleting archived log(s)
archived log file name=/u07/oradata/fast_recovery_area/T183/archivelog/2020_02_13/o1_mf_1_301_h4cj5yln_.arc RECID=303 STAMP=1032276947
media recovery complete, elapsed time: 00:10:33
Finished recover at 13-FEB-20
Step #5: Open the Database.
The final step to get the database up and running is to open it. This step also creates the online redo log files in the locations specified by ALTER DATABASE RENAME FILE commands in the RMAN script:
RMAN> alter database open resetlogs;

Statement processed
Step #6: Assess the Results.
SQL> select name, dbid, cdb from v$database;

NAME            DBID CDB
--------- ---------- ---
T183      2832597398 YES
As expected, a backup of the T183 CDB database running on orasvr02 has been restored to orasvr01 with the same name and same DBID. If we want to register this database in RMAN’s Recovery Catalog, we will need to rename it and give it a new DBID.
SQL> select name, open_mode from v$pdbs;

NAME                 OPEN_MODE
-------------------- ----------
PDB$SEED             READ ONLY
T183_PDB1            MOUNTED

SQL> alter pluggable database T183_PDB1 open;

Pluggable database altered.

SQL> select name, open_mode from v$pdbs;
NAME                 OPEN_MODE
-------------------- ----------
PDB$SEED             READ ONLY
T183_PDB1            READ WRITE
The T183_PDB1 PDB looks OK. Let’s check the archive log mode:
SQL> archive log list

Database log mode              Archive Mode
Automatic archival             Enabled
Archive destination            USE_DB_RECOVERY_FILE_DEST
Oldest online log sequence     1
Next log sequence to archive   1
Current log sequence           1

SQL> show parameter db_recovery_file

NAME                                 TYPE        VALUE
------------------------------------ ----------- -------------------------------
db_recovery_file_dest                string      /u07/oradata/fast_recovery_area
db_recovery_file_dest_size           big integer 10G
So the database gets restored in the same archive log mode as the source database. Cool. Let’s find out where the rest of the files are:
SQL> select file_name from cdb_data_files;

FILE_NAME
-----------------------------------------------------------------------------------------------
/u03/oradata/T183/9DC2AE83F20B40ACE0531200A8C05C14/datafile/data_D-T183_TS-SYSTEM_FNO-17.dbf
/u03/oradata/T183/9DC2AE83F20B40ACE0531200A8C05C14/datafile/data_D-T183_TS-SYSAUX_FNO-18.dbf
/u03/oradata/T183/9DC2AE83F20B40ACE0531200A8C05C14/datafile/data_D-T183_TS-UNDOTBS1_FNO-19.dbf
/u03/oradata/T183/9DC2AE83F20B40ACE0531200A8C05C14/datafile/data_D-T183_TS-USERS_FNO-20.dbf
/u03/oradata/T183/datafile/data_D-T183_TS-USERS_FNO-7.dbf
/u03/oradata/T183/datafile/data_D-T183_TS-UNDOTBS1_FNO-4.dbf
/u03/oradata/T183/datafile/data_D-T183_TS-SYSTEM_FNO-1.dbf
/u03/oradata/T183/datafile/data_D-T183_TS-SYSAUX_FNO-3.dbf

SQL> select file_name from cdb_temp_files;

FILE_NAME
------------------------------------------------------------------------------------
/u03/oradata/T183/datafile/o1_mf_temp_h4cl7b6k_.tmp
/u03/oradata/T183/9DC2AE83F20B40ACE0531200A8C05C14/datafile/o1_mf_temp_h4clb50m_.tmp

SQL> select member from v$logfile;

MEMBER
--------------------------------------------------------------
/u03/oradata/T183/onlinelog/redo_g3m1.log
/u07/oradata/fast_recovery_area/T183/onlinelog/redo_g3m2.log
/u03/oradata/T183/onlinelog/redo_g2m1.log
/u07/oradata/fast_recovery_area/T183/onlinelog/redo_g2m2.log
/u03/oradata/T183/onlinelog/redo_g1m1.log
/u07/oradata/fast_recovery_area/T183/onlinelog/redo_g1m2.log

SQL> show parameter control_files

NAME                                 TYPE        VALUE
------------------------------------ ----------- ------------------------------
control_files                        string      /u03/oradata/T183/controlfile/
                                                  T183_ctrl_1.ctl, /u07/oradata/
                                                  fast_recovery_area/T183/contro
                                                  lfile/T183_ctrl_2.ctl
SQL> show parameter spfile

NAME                                 TYPE        VALUE
------------------------------------ ----------- ------------------------------
Finally, check to see if the instance has registered with any available listeners. There’s one listener on this server called LISTENER_T122:
LSNRCTL for Linux: Version 19.0.0.0.0 - Production on 13-FEB-2020 19:56:17
Copyright (c) 1991, 2019, Oracle.  All rights reserved.
Connecting to (DESCRIPTION=(ADDRESS=(PROTOCOL=TCP)(HOST=orasvr01.mynet.com)(PORT=1521)))
STATUS of the LISTENER
Alias                     LISTENER_T122
Version                   TNSLSNR for Linux: Version 19.0.0.0.0 - Production
Start Date                03-FEB-2020 22:26:34
Uptime                    9 days 21 hr. 29 min. 43 sec
Trace Level               off
Security                  ON: Local OS Authentication
SNMP                      OFF
Listener Parameter File   /u01/app/oracle/product/19.3.0/dbhome_1/network/admin/listener.ora
Listener Log File         /u01/app/oracle/diag/tnslsnr/orasvr01/listener_t122/alert/log.xml
Listening Endpoints Summary…
  (DESCRIPTION=(ADDRESS=(PROTOCOL=tcp)(HOST=orasvr01.mynet.com)(PORT=1521)))
  (DESCRIPTION=(ADDRESS=(PROTOCOL=ipc)(KEY=EXTPROC1521)))
  (DESCRIPTION=(ADDRESS=(PROTOCOL=tcps)(HOST=orasvr01.mynet.com)(PORT=5500))
   (Security=(my_wallet_directory=/u01/app/oracle/admin/T122/xdb_wallet))
   (Presentation=HTTP)(Session=RAW))
Services Summary…
Service "9dc2ae83f20b40ace0531200a8c05c14.mynet.com" has 1 instance(s).
   Instance "T183", status READY, has 1 handler(s) for this service…
Service "T122.mynet.com" has 1 instance(s).
   Instance "T122", status READY, has 1 handler(s) for this service…
Service "T122XDB.mynet.com" has 1 instance(s).
   Instance "T122", status READY, has 1 handler(s) for this service…
Service "T183.mynet.com" has 1 instance(s).
   Instance "T183", status READY, has 1 handler(s) for this service…
Service "T183XDB.mynet.com" has 1 instance(s).
   Instance "T183", status READY, has 1 handler(s) for this service…
Service "t183_pdb1.mynet.com" has 1 instance(s).
   Instance "T183", status READY, has 1 handler(s) for this service…
The command completed successfully
Everything looks good. Here’s a short list of things we can change to make this database ready for prime time:
• Create a password file. • Change the database name and DBID. • Change the file name paths. • Create an SPFILE. • Register the database in the RMAN Recovery Catalog. • Backup the database.
Step #7: Create a Password File.
Let’s check to see what we’re starting with:
SQL> select * from v$pwfile_users;

no rows selected

[oracle@orasvr01 ~]$ which orapwd
/u01/app/oracle/product/18.3.0/dbhome_1/bin/orapwd

[oracle@orasvr01 ~]$ orapwd FILE='/u01/app/oracle/product/18.3.0/dbhome_1/dbs/orapwT183' FORMAT=12.2
Enter password for SYS: <your-sys-password>

[oracle@orasvr01 ~]$ ls -l /u01/app/oracle/product/18.3.0/dbhome_1/dbs/ora*
-rw-r----- 1 oracle oinstall 6144 Feb 13 20:05 /u01/app/oracle/product/18.3.0/dbhome_1/dbs/orapwT183

SQL> col USERNAME    format a30
     col SYSDBA      format a10      heading 'SYSDBA'
     col SYSOPER     format a10      heading 'SYSOPER'
     col SYSASM      format a10      heading 'SYSASM'
     col SYSBACKUP   format a10      heading 'SYSBACKUP'
     col SYSDG       format a10      heading 'SYSDG'
     col SYSKM       format a10      heading 'SYSKM'
     select  USERNAME,
             SYSDBA,
             SYSOPER,
             SYSASM,
             SYSBACKUP,
             SYSDG,
             SYSKM
    from    V$PWFILE_USERS
    order by
            1;

USERNAME                       SYSDBA     SYSOPER    SYSASM     SYSBACKUP  SYSDG      SYSKM
------------------------------ ---------- ---------- ---------- ---------- ---------- ----------
SYS                            TRUE       TRUE       FALSE      FALSE      FALSE      FALSE

SQL> grant sysbackup to C##RMANBACKUP;
Grant succeeded.

USERNAME                       SYSDBA     SYSOPER    SYSASM     SYSBACKUP  SYSDG      SYSKM
------------------------------ ---------- ---------- ---------- ---------- ---------- ----------
C##RMANBACKUP                  FALSE      FALSE      FALSE      TRUE       FALSE      FALSE
SYS                            TRUE       TRUE       FALSE      FALSE      FALSE      FALSE
Step #8: Change the Database Name and DBID.
Oracle provides a nifty little utility called NID to
change the name and DBID of a database. NID can be used to change just the
database name, just the DBID or both. If you change the database name, but not
the DBID you don’t have to open the database with RESETLOGS. Also, NID does not
update the database’s GLOBAL_NAME. You have to do that yourself with the SQL
command, ALTER DATABASE RENAME GLOBAL_NAME TO <newname>.domain.
We’ll use NID to change T183 with DBID 2832597398 to D183
with a new DBID the utility will generate for us. Once that’s done, the output
will direct us to make some additional changes. First, the instance needs to be
shutdown and re-started with the database mounted:
SQL> select name, dbid, cdb from v$database;

NAME            DBID CDB
--------- ---------- ---
T183      2832597398 YES

SQL> shutdown immediate

Database closed.
Database dismounted.
ORACLE instance shut down.

SQL> startup mount

[oracle@orasvr01 ~]$ which nid
/u01/app/oracle/product/18.3.0/dbhome_1/bin/nid

[oracle@orasvr01 ~]$ nid TARGET=SYS DBNAME=D183

DBNEWID: Release 18.0.0.0.0 - Production on Fri Feb 14 10:07:16 2020

Copyright (c) 1982, 2018, Oracle and/or its affiliates.  All rights reserved.

Password: <your-sys-password>
Connected to database T183 (DBID=2832597398)

Connected to server version 18.3.0

Control Files in database:
    /u03/oradata/T183/controlfile/T183_ctrl_1.ctl
    /u07/oradata/fast_recovery_area/T183/controlfile/T183_ctrl_2.ctl

Change database ID and database name T183 to D183? (Y/[N]) => Y

Proceeding with operation
Changing database ID from 2832597398 to 614983068
Changing database name from T183 to D183
    Control File /u03/oradata/T183/controlfile/T183_ctrl_1.ctl - modified
    Control File /u07/oradata/fast_recovery_area/T183/controlfile/T183_ctrl_2.ctl - modified
    Datafile /u03/oradata/T183/datafile/data_D-T183_TS-SYSTEM_FNO-1.db - dbid changed, wrote new name
    Datafile /u03/oradata/T183/datafile/data_D-T183_TS-SYSAUX_FNO-3.db - dbid changed, wrote new name
    Datafile /u03/oradata/T183/datafile/data_D-T183_TS-UNDOTBS1_FNO-4.db - dbid changed, wrote new name
    Datafile /u03/oradata/T183/64A52F53A7693286E053CDA9E80AED76/datafile/data_D-T183_TS-SYSTEM_FNO-5.db - dbid changed, wrote new name
    Datafile /u03/oradata/T183/64A52F53A7693286E053CDA9E80AED76/datafile/data_D-T183_TS-SYSAUX_FNO-6.db - dbid changed, wrote new name
    Datafile /u03/oradata/T183/datafile/data_D-T183_TS-USERS_FNO-7.db - dbid changed, wrote new name
    Datafile /u03/oradata/T183/64A52F53A7693286E053CDA9E80AED76/datafile/data_D-T183_TS-UNDOTBS1_FNO-8.db - dbid changed, wrote new name
    Datafile /u03/oradata/T183/9DC2AE83F20B40ACE0531200A8C05C14/datafile/data_D-T183_TS-SYSTEM_FNO-17.db - dbid changed, wrote new name
    Datafile /u03/oradata/T183/9DC2AE83F20B40ACE0531200A8C05C14/datafile/data_D-T183_TS-SYSAUX_FNO-18.db - dbid changed, wrote new name
    Datafile /u03/oradata/T183/9DC2AE83F20B40ACE0531200A8C05C14/datafile/data_D-T183_TS-UNDOTBS1_FNO-19.db - dbid changed, wrote new name
    Datafile /u03/oradata/T183/9DC2AE83F20B40ACE0531200A8C05C14/datafile/data_D-T183_TS-USERS_FNO-20.db - dbid changed, wrote new name
    Datafile /u03/oradata/T183/datafile/o1_mf_temp_h4cl7b6k_.tm - dbid changed, wrote new name
    Datafile /u03/oradata/T183/9795EEED00203DFFE0531200A8C06D7B/datafile/o1_mf_temp_h4cl8zxl_.tm - dbid changed, wrote new name
    Datafile /u03/oradata/T183/9DC2AE83F20B40ACE0531200A8C05C14/datafile/o1_mf_temp_h4clb50m_.tm - dbid changed, wrote new name
    Control File /u03/oradata/T183/controlfile/T183_ctrl_1.ctl - dbid changed, wrote new name
    Control File /u07/oradata/fast_recovery_area/T183/controlfile/T183_ctrl_2.ctl - dbid changed, wrote new name
    Instance shut down

Database name changed to D183.
Modify parameter file and generate a new password file before restarting.
Database ID for database D183 changed to 614983068.
All previous backups and archived redo logs for this database are unusable.
Database is not aware of previous backups and archived logs in Recovery Area.
Database has been shutdown, open database with RESETLOGS option.
Succesfully changed database name and ID.
DBNEWID - Completed succesfully.
The “wrote new file” output is a little misleading. The paths to the data files are exactly the same as they were before. Hence, T183 is still part of the directory path even though the database is now called D183. We’ll fix that. The first thing to do is to add an entry to the /etc/oratab file so we can set our environment appropriately:
D183:/u01/app/oracle/product/18.3.0/dbhome_1:N
[oracle@orasvr01 ~]$ . oraenv
ORACLE_SID = [T183] ? D183
The Oracle base remains unchanged with value /u01/app/oracle

[oracle@orasvr01 ~]$ env | grep ORA
ORACLE_SID=D183
ORACLE_BASE=/u01/app/oracle
ORACLE_HOME=/u01/app/oracle/product/18.3.0/dbhome_1
Next, we’ll update the PFILE by making 3 changes to these parameters:
Lastly, we need to change a couple of files names:
[oracle@orasvr01 ~]$ cd $ORACLE_HOME/dbs

[oracle@orasvr01 dbs]$ mv initT183.ora initD183.ora
[oracle@orasvr01 dbs]$ mv orapwT183 orapwD183

[oracle@orasvr01 dbs]$ ls -l
-rw-rw---- 1 oracle oinstall  1544 Feb 14 10:07 hc_T183.dat
-rw-r--r-- 1 oracle oinstall  1327 Feb 14 11:13 initD183.ora
-rw-r----- 1 oracle oinstall    24 Feb 13 10:29 lkT183
-rw-r----- 1 oracle oinstall 11264 Feb 13 20:52 orapwD183
The final proof that we’ve changed everything we need to is to startup the instance and open the database. Note, we’re using a FRA and OMF so Oracle will create the archivelog directory in the FRA for us. If we weren’t using those configuration settings, we’d need to pre-create the directory containing the archived redo logs.
[oracle@orasvr01 dbs]$ sqlplus / as sysdba

Connected to an idle instance.

SQL> startup mount pfile=/u01/app/oracle/product/18.3.0/dbhome_1/dbs/initD183.ora

ORACLE instance started.
Total System Global Area 2147481064 bytes
Fixed Size                  8898024 bytes
Variable Size             603979776 bytes
Database Buffers         1526726656 bytes
Redo Buffers                7876608 bytes
Database mounted.

SQL> alter database open resetlogs;

Database altered.
Step #9: Change the File Name Directory Paths.
Before we change anything else, let’s assess what we have:
SQL> col USERNAME    format a30
     col SYSDBA      format a10      heading 'SYSDBA'
     col SYSOPER     format a10      heading 'SYSOPER'
     col SYSASM      format a10      heading 'SYSASM'
     col SYSBACKUP   format a10      heading 'SYSBACKUP'
     col SYSDG       format a10      heading 'SYSDG'
     col SYSKM       format a10      heading 'SYSKM'
     set linesize 120
     select  USERNAME,
             SYSDBA,
             SYSOPER,
             SYSASM,
             SYSBACKUP,
             SYSDG,
             SYSKM
     from    V$PWFILE_USERS
     order by
             1;

USERNAME                       SYSDBA     SYSOPER    SYSASM     SYSBACKUP  SYSDG      SYSKM
------------------------------ ---------- ---------- ---------- ---------- ---------- ----------
C##RMANBACKUP                  FALSE      FALSE      FALSE      TRUE       FALSE      FALSE
SYS                            TRUE       TRUE       FALSE      FALSE      FALSE      FALSE
SQL> select name, dbid, cdb from v$database;

NAME            DBID CDB
--------- ---------- ---
D183       614983068 YES

SQL> select name, open_mode from v$pdbs;

NAME                           OPEN_MODE
------------------------------ ----------
PDB$SEED                       READ ONLY
T183_PDB1                      MOUNTED

SQL> alter pluggable database T183_PDB1 open;

Pluggable database altered.

SQL> select name, open_mode from v$pdbs;

NAME                           OPEN_MODE
------------------------------ ----------
PDB$SEED                       READ ONLY
T183_PDB1                      READ WRITE
SQL> select file_name from cdb_data_files;

FILE_NAME
----------------------------------------------------------------------------------------------
/u03/oradata/T183/datafile/data_D-T183_TS-USERS_FNO-7.dbf
/u03/oradata/T183/datafile/data_D-T183_TS-UNDOTBS1_FNO-4.dbf
/u03/oradata/T183/datafile/data_D-T183_TS-SYSTEM_FNO-1.dbf
/u03/oradata/T183/datafile/data_D-T183_TS-SYSAUX_FNO-3.dbf
/u03/oradata/T183/9DC2AE83F20B40ACE0531200A8C05C14/datafile/data_D-T183_TS-SYSTEM_FNO-17.dbf
/u03/oradata/T183/9DC2AE83F20B40ACE0531200A8C05C14/datafile/data_D-T183_TS-SYSAUX_FNO-18.dbf
/u03/oradata/T183/9DC2AE83F20B40ACE0531200A8C05C14/datafile/data_D-T183_TS-UNDOTBS1_FNO-19.dbf
/u03/oradata/T183/9DC2AE83F20B40ACE0531200A8C05C14/datafile/data_D-T183_TS-USERS_FNO-20.dbf

SQL> select file_name from cdb_temp_files;

FILE_NAME
------------------------------------------------------------------------------------
/u03/oradata/T183/datafile/o1_mf_temp_h4cl7b6k_.tmp
/u03/oradata/T183/9DC2AE83F20B40ACE0531200A8C05C14/datafile/o1_mf_temp_h4clb50m_.tmp

SQL> select member from v$logfile;

MEMBER
------------------------------------------------------------
/u03/oradata/T183/onlinelog/redo_g3m1.log
/u07/oradata/fast_recovery_area/T183/onlinelog/redo_g3m2.log
/u03/oradata/T183/onlinelog/redo_g2m1.log
/u07/oradata/fast_recovery_area/T183/onlinelog/redo_g2m2.log
/u03/oradata/T183/onlinelog/redo_g1m1.log
/u07/oradata/fast_recovery_area/T183/onlinelog/redo_g1m2.log

SQL> show parameter control_files

NAME                                 TYPE        VALUE
------------------------------------ ----------- ------------------------------
control_files                        string      /u03/oradata/D183/controlfile/
                                                  D183_ctrl_1.ctl, /u07/oradata/
                                                  fast_recovery_area/D183/contro
                                                  lfile/D183_ctrl_2.ctl
The password file is OK and the control files are in the right place. The data files, temp files and online redo log files all need to be moved to a directory path containg D183 rather than T183. Easy! First, pre-create all the necessary directories:
[oracle@orasvr01 D183]$ cd /u03/oradata/D183

[oracle@orasvr01 D183]$ ls -l
drwxr-x--- 2 oracle oinstall 4096 Feb 14 11:07 controlfile
drwxr-x--- 2 oracle oinstall 4096 Feb 14 11:28 onlinelog

[oracle@orasvr01 D183]$ mkdir datafile;chmod 750 datafile
[oracle@orasvr01 D183]$ mkdir -p ./9DC2AE83F20B40ACE0531200A8C05C14/datafile
[oracle@orasvr01 D183]$ chmod 750 ./9DC2AE83F20B40ACE0531200A8C05C14
[oracle@orasvr01 D183]$ chmod 750 ./9DC2AE83F20B40ACE0531200A8C05C14/datafile

[oracle@orasvr01 ~]$ cd /u07/oradata/fast_recovery_area/D183

[oracle@orasvr01 D183]$ ls -l
drwxr-x--- 3 oracle oinstall 4096 Feb 14 11:27 archivelog
drwxr-x--- 3 oracle oinstall 4096 Feb 14 11:37 autobackup
drwxr-x--- 2 oracle oinstall 4096 Feb 14 11:09 controlfile
drwxr-x--- 2 oracle oinstall 4096 Feb 14 11:28 onlinelog
Looks good. Let’s deal with the online redo logs first. The simplest way to achive the desired result is to just create additional online redo log file groups and members in the correct locations, then drop the original online redo log groups. This avoids having to take the database offline, copy the online redo log files manually, then use a series of ALTER DATABASE RENAME DATAFILE commands. I mean, that’s hard work! Let’s get the group numbers and file sizes before we start to add new groups and members:
SQL> set linesize 120
col member format a70
select l.group#,lf.member,((l.bytes/1024)/1024) "MB"
from v$log l, v$logfile lf
where l.group# = lf.group#
order by
l.group#;GROUP# MEMBER MB
----------- ----------------------------------------------------------------- ----------
1 /u03/oradata/T183/onlinelog/redo_g1m1.log 200
1 /u07/oradata/fast_recovery_area/T183/onlinelog/redo_g1m2.log 200
2 /u03/oradata/T183/onlinelog/redo_g2m1.log 200
2 /u07/oradata/fast_recovery_area/T183/onlinelog/redo_g2m2.log 200
3 /u03/oradata/T183/onlinelog/redo_g3m1.log 200
3 /u07/oradata/fast_recovery_area/T183/onlinelog/redo_g3m2.log 200
We also need to check our OMF online redo log parameter settings. Two defined destinations will ensure when we create a new group, Oracle will create 2 members:
SQL> show parameter db_create_online_log

NAME                                 TYPE        VALUE
------------------------------------ ----------- -------------------------------
db_create_online_log_dest_1          string      /u03/oradata
db_create_online_log_dest_2          string      /u07/oradata/fast_recovery_area
db_create_online_log_dest_3          string
db_create_online_log_dest_4          string
db_create_online_log_dest_5          string
SQL> alter database add logfile group 4 size 200M;
Database altered.

SQL> alter database add logfile group 5 size 200M;
Database altered.

SQL> alter database add logfile group 6 size 200M;
Database altered.
Re-query the online redo log file configuration to check we have achieved the desired result:
Now we can proceed to drop groups 1, 2 and 3 making sure activity has been switched away from these groups before we drop them:
SQL> set linesize 120
col member format a70
select l.group#,lf.member,l.status,l.archived
from v$log l, v$logfile lf
where l.group# = lf.group#
order by
l.group# ,lf.member;GROUP# MEMBER STATUS ARC
---------- ---------------------------------------------------------------------- ---------------- ---
1 /u03/oradata/T183/onlinelog/redo_g1m1.log CURRENT NO
1 /u07/oradata/fast_recovery_area/T183/onlinelog/redo_g1m2.log CURRENT NO
2 /u03/oradata/T183/onlinelog/redo_g2m1.log UNUSED YES
2 /u07/oradata/fast_recovery_area/T183/onlinelog/redo_g2m2.log UNUSED YES
3 /u03/oradata/T183/onlinelog/redo_g3m1.log UNUSED YES
3 /u07/oradata/fast_recovery_area/T183/onlinelog/redo_g3m2.log UNUSED YES
4 /u03/oradata/D183/onlinelog/o1_mf_4_h4fvqhnr_.log UNUSED YES
4 /u07/oradata/fast_recovery_area/D183/onlinelog/o1_mf_4_h4fvqjqp_.log UNUSED YES
5 /u03/oradata/D183/onlinelog/o1_mf_5_h4fvxvg2_.log UNUSED YES
5 /u07/oradata/fast_recovery_area/D183/onlinelog/o1_mf_5_h4fvxwl1_.log UNUSED YES
6 /u03/oradata/D183/onlinelog/o1_mf_6_h4fw2jjr_.log UNUSED YES
6 /u07/oradata/fast_recovery_area/D183/onlinelog/o1_mf_6_h4fw2kgg_.log UNUSED YES
We can drop groups 2 and 3 straight away, then switch away from group 1:
SQL> alter database drop logfile group 2;
Database altered.

SQL> alter database drop logfile group 3;
Database altered.

SQL> alter system switch logfile;
System altered.
OK, I cheated by bouncing the instance to get the status of group 1 to go INACTIVE quicker. I didn’t want to wait. Then I dropped group 1. Here’s the new online redo log file configuration:
   GROUP# MEMBER                                                                 STATUS           ARC
---------- ---------------------------------------------------------------------- ---------------- ---
         4 /u03/oradata/D183/onlinelog/o1_mf_4_h4fvqhnr_.log                      INACTIVE         YES
         4 /u07/oradata/fast_recovery_area/D183/onlinelog/o1_mf_4_h4fvqjqp_.log   INACTIVE         YES
         5 /u03/oradata/D183/onlinelog/o1_mf_5_h4fvxvg2_.log                      CURRENT          NO
         5 /u07/oradata/fast_recovery_area/D183/onlinelog/o1_mf_5_h4fvxwl1_.log   CURRENT          NO
         6 /u03/oradata/D183/onlinelog/o1_mf_6_h4fw2jjr_.log                      UNUSED           YES
         6 /u07/oradata/fast_recovery_area/D183/onlinelog/o1_mf_6_h4fw2kgg_.log   UNUSED           YES
The previous online redo log files are still on disk despite being in an OMF location. Technically they’re not OMF files because we named them explicitly. Removing them will be part of clean up which comes later. Next, we can move the CDB’s data files which are currently here:
Since we’re using OMF, we can take advantage of that to move and rename the files to OMF standards:
SQL> show parameter db_create_file_dest

NAME                                 TYPE        VALUE
------------------------------------ ----------- ------------------------------
db_create_file_dest                  string      /u03/oradata

SQL> alter database move datafile '/u03/oradata/T183/datafile/data_D-T183_TS-USERS_FNO-7.dbf';
Database altered.

SQL> alter database move datafile '/u03/oradata/T183/datafile/data_D-T183_TS-UNDOTBS1_FNO-4.dbf';
Database altered.

SQL> alter database move datafile '/u03/oradata/T183/datafile/data_D-T183_TS-SYSTEM_FNO-1.dbf';
Database altered.

SQL> alter database move datafile '/u03/oradata/T183/datafile/data_D-T183_TS-SYSAUX_FNO-3.dbf';
Database altered.

SQL> select file_name from dba_data_files;

FILE_NAME
---------------------------------------------------------------------------------------------------
/u03/oradata/D183/datafile/o1_mf_users_h4fxqg6p_.dbf
/u03/oradata/D183/datafile/o1_mf_undotbs1_h4fxrv3o_.dbf
/u03/oradata/D183/datafile/o1_mf_system_h4fy7gbp_.dbf
/u03/oradata/D183/datafile/o1_mf_sysaux_h4fzd43b_.dbf
Next, we move onto relocating the data files belonging to the PDB, T183_PDB1:
SQL> alter session set container=T183_PDB1;
Session altered.

SQL> select file_name from dba_data_files;

FILE_NAME
----------------------------------------------------------------------------------------------
/u03/oradata/T183/9DC2AE83F20B40ACE0531200A8C05C14/datafile/data_D-T183_TS-SYSTEM_FNO-17.dbf
/u03/oradata/T183/9DC2AE83F20B40ACE0531200A8C05C14/datafile/data_D-T183_TS-SYSAUX_FNO-18.dbf
/u03/oradata/T183/9DC2AE83F20B40ACE0531200A8C05C14/datafile/data_D-T183_TS-UNDOTBS1_FNO-19.dbf
/u03/oradata/T183/9DC2AE83F20B40ACE0531200A8C05C14/datafile/data_D-T183_TS-USERS_FNO-20.dbf

SQL> alter database move datafile '/u03/oradata/T183/9DC2AE83F20B40ACE0531200A8C05C14/datafile/data_D-T183_TS-SYSTEM_FNO-17.dbf';
Database altered.

SQL> alter database move datafile '/u03/oradata/T183/9DC2AE83F20B40ACE0531200A8C05C14/datafile/data_D-T183_TS-SYSAUX_FNO-18.dbf';
Database altered.

SQL> alter database move datafile '/u03/oradata/T183/9DC2AE83F20B40ACE0531200A8C05C14/datafile/data_D-T183_TS-UNDOTBS1_FNO-19.dbf';
Database altered.

SQL> alter database move datafile '/u03/oradata/T183/9DC2AE83F20B40ACE0531200A8C05C14/datafile/data_D-T183_TS-USERS_FNO-20.dbf';
Database altered.

SQL> select file_name from dba_data_files;

FILE_NAME
---------------------------------------------------------------------------------------------------
/u03/oradata/D183/9DC2AE83F20B40ACE0531200A8C05C14/datafile/o1_mf_system_h4g2b8yb_.dbf
/u03/oradata/D183/9DC2AE83F20B40ACE0531200A8C05C14/datafile/o1_mf_sysaux_h4g3z387_.dbf
/u03/oradata/D183/9DC2AE83F20B40ACE0531200A8C05C14/datafile/o1_mf_undotbs1_h4g4tvj7_.dbf
/u03/oradata/D183/9DC2AE83F20B40ACE0531200A8C05C14/datafile/o1_mf_users_h4g5v123_.dbf
Next, let’s deal with the temp files. Staying in the PDB T183_PDB1:
SQL> select file_name, ((bytes/1024)/1024) "MB" from dba_temp_files;

FILE_NAME                                                                                     MB
------------------------------------------------------------------------------------- ----------
/u03/oradata/T183/9DC2AE83F20B40ACE0531200A8C05C14/datafile/o1_mf_temp_h4clb50m_.tmp          62

SQL> alter tablespace temp add tempfile size 62M;
Tablespace altered.

SQL> alter database tempfile '/u03/oradata/T183/9DC2AE83F20B40ACE0531200A8C05C14/datafile/o1_mf_temp_h4clb50m_.tmp' offline;
Database altered.

SQL> alter database tempfile '/u03/oradata/T183/9DC2AE83F20B40ACE0531200A8C05C14/datafile/o1_mf_temp_h4clb50m_.tmp' drop including datafiles;
Database altered.

SQL> select file_name, ((bytes/1024)/1024) "MB" from dba_temp_files;

FILE_NAME                                                                                     MB
------------------------------------------------------------------------------------- ----------
/u03/oradata/D183/9DC2AE83F20B40ACE0531200A8C05C14/datafile/o1_mf_temp_h4g6ch8f_.tmp          62
Now perform a similar operation in CDB$ROOT:
SQL> alter tablespace temp add tempfile size 20M;
Tablespace altered.

SQL> alter database tempfile '/u03/oradata/T183/datafile/o1_mf_temp_h4cl7b6k_.tmp' offline;
Database altered.

SQL> alter database tempfile '/u03/oradata/T183/datafile/o1_mf_temp_h4cl7b6k_.tmp' drop including datafiles;

alter database tempfile '/u03/oradata/T183/datafile/o1_mf_temp_h4cl7b6k_.tmp'
*
ERROR at line 1:
ORA-25152: TEMPFILE cannot be dropped at this time
I got no time for this, so I bounced the instance to move things along:
SQL> alter database tempfile '/u03/oradata/T183/datafile/o1_mf_temp_h4cl7b6k_.tmp' drop including datafiles;
Database altered.

SQL> select file_name, ((bytes/1024)/1024) "MB" from dba_temp_files;

FILE_NAME                                                    MB
---------------------------------------------------- ----------
/u03/oradata/D183/datafile/o1_mf_temp_h4g6tl71_.tmp          20
Next we need to relocate the files belonging to PDB$SEED:
SQL> alter session set container=PDB$SEED;
Session altered.

SQL> alter database move datafile
     '/u03/oradata/T183/9795EEED00203DFFE0531200A8C06D7B/datafile/data_D-T183_TS-SYSTEM_FNO-5.dbf';
Database altered.

SQL> alter database move datafile
     '/u03/oradata/T183/9795EEED00203DFFE0531200A8C06D7B/datafile/data_D-T183_TS-SYSAUX_FNO-6.dbf';
Database altered.

SQL> alter database move datafile
     '/u03/oradata/T183/9795EEED00203DFFE0531200A8C06D7B/datafile/data_D-T183_TS-UNDOTBS1_FNO-8.dbf';
Database altered.

SQL> alter tablespace temp add tempfile;
Tablespace altered.
A broken SEED PDB won’t interrupt operations of CDB$ROOT or any user PDBs, but we should test that the PDB$SEED can be used to create additional PDBs, just in case:
SQL> create pluggable database TESTPDB admin user admin identified by
     default tablespace users;

Pluggable database created.

SQL> alter pluggable database TESTPDB open;

Pluggable database altered.
If you don’t see any errors or warnings, then PDB$SEED is happy. Go ahead and drop the TESTPDB and remove its GUID directory:
SQL> select name, guid from v$pdbs;
NAME GUID
------------ --------------------------------
PDB$SEED 9795EEED00203DFFE0531200A8C06D7B
T183_PDB1 9DC2AE83F20B40ACE0531200A8C05C14
TESTPDB 9E933404CC507261E0531100A8C001D5
SQL> alter pluggable database TESTPDB close;
Pluggable database altered.
SQL> drop pluggable database TESTPDB including datafiles;
[oracle@orasvr01 D183]$ pwd
/u03/oradata/D183
[oracle@orasvr01 D183]$ ls -l
drwxr-x--- 3 oracle oinstall 4096 Feb 14 17:15 9795EEED00203DFFE0531200A8C06D7B
drwxr-x--- 3 oracle oinstall 4096 Feb 14 12:22 9DC2AE83F20B40ACE0531200A8C05C14
drwxr-x--- 3 oracle oinstall 4096 Feb 14 18:16 9E933404CC507261E0531100A8C001D5
drwxr-x--- 2 oracle oinstall 4096 Feb 14 11:07 controlfile
drwxr-x--- 2 oracle oinstall 4096 Feb 14 16:12 datafile
drwxr-x--- 2 oracle oinstall 4096 Feb 14 13:09 onlinelog
[oracle@orasvr01 D183]$ rm -r ./9E933404CC507261E0531100A8C001D5
Step #10: Create an SPFILE and Re-start the Instance.
SQL> create spfile from pfile;
File created.
(re-start the instance)
SQL> show parameter spfile
NAME TYPE VALUE
------------------------------------ ----------- ------------------------------
spfile string /u01/app/oracle/product/18.3.0
Step #11: Update the RMAN Configuration.
The new D183 database will have the same RMAN configuration as the database whose backup we used to create it. Let’s check what that looks like:
[oracle@orasvr01 ~]$ rman target rmanbackup/rmanbackup using sysbackup
Recovery Manager: Release 18.0.0.0.0 - Production on Sat Feb 15 11:21:45 2020
Version 18.3.0.0.0
Copyright (c) 1982, 2018, Oracle and/or its affiliates. All rights reserved.
connected to target database: D183 (DBID=614983068)
RMAN> show all;
using target database control file instead of recovery catalog
RMAN configuration parameters for database with db_unique_name D183 are:
CONFIGURE RETENTION POLICY TO RECOVERY WINDOW OF 14 DAYS;
CONFIGURE BACKUP OPTIMIZATION OFF;
CONFIGURE DEFAULT DEVICE TYPE TO DISK; # default
CONFIGURE CONTROLFILE AUTOBACKUP ON;
CONFIGURE CONTROLFILE AUTOBACKUP FORMAT FOR DEVICE TYPE DISK TO '%F'; # default
CONFIGURE DEVICE TYPE DISK BACKUP TYPE TO COMPRESSED BACKUPSET PARALLELISM 4;
CONFIGURE DATAFILE BACKUP COPIES FOR DEVICE TYPE DISK TO 1; # default
CONFIGURE ARCHIVELOG BACKUP COPIES FOR DEVICE TYPE DISK TO 1; # default
CONFIGURE CHANNEL DEVICE TYPE DISK FORMAT '/nas/backups/T183/%d_%U';
CONFIGURE MAXSETSIZE TO UNLIMITED; # default
CONFIGURE ENCRYPTION FOR DATABASE OFF; # default
CONFIGURE ENCRYPTION ALGORITHM 'AES128'; # default
CONFIGURE COMPRESSION ALGORITHM 'HIGH' AS OF RELEASE 'DEFAULT' OPTIMIZE FOR LOAD TRUE;
CONFIGURE RMAN OUTPUT TO KEEP FOR 7 DAYS; # default
CONFIGURE ARCHIVELOG DELETION POLICY TO BACKED UP 1 TIMES TO 'SBT_TAPE';
CONFIGURE SNAPSHOT CONTROLFILE NAME TO '/u01/app/oracle/product/18.3.0/dbhome_1/dbs/snapcf_D183.f'; # default
Looks like the only thing we need to change is CHANNEL DEVICE TYPE DISK to /nas/backups/D183/%d_%U. We also need to create the directory /nas/backups/D183. Simple enough:
RMAN> CONFIGURE CHANNEL DEVICE TYPE DISK FORMAT '/nas/backups/D183/%d_%U';
old RMAN configuration parameters:
CONFIGURE CHANNEL DEVICE TYPE DISK FORMAT '/nas/backups/T183/%d_%U';
new RMAN configuration parameters:
CONFIGURE CHANNEL DEVICE TYPE DISK FORMAT '/nas/backups/D183/%d_%U';
new RMAN configuration parameters are successfully stored
RMAN> exit
Recovery Manager complete.
[oracle@orasvr01 ~]$ mkdir /nas/backups/D183
To register the database we need to log back into RMAN and connect to the Recovery Catalog:
[oracle@orasvr01 ~]$ rman target rmanbackup/rmanbackup using sysbackup
Recovery Manager: Release 18.0.0.0.0 - Production on Sat Feb 15 11:34:32 2020
Version 18.3.0.0.0
Copyright (c) 1982, 2018, Oracle and/or its affiliates. All rights reserved.
connected to target database: D183 (DBID=614983068)
RMAN> connect catalog rco/rco@rmancat
connected to recovery catalog database
RMAN> register database;
database registered in recovery catalog
starting full resync of recovery catalog
full resync complete
A REPORT SCHEMA command followed by a query against V$LOGFILE should display the structure of all the database’s files and confirm no reference to T183:
RMAN> report schema;
Report of database schema for database with db_unique_name D183
List of Permanent Datafiles
===========================
File Size(MB) Tablespace RB segs Datafile Name
---- -------- -------------------- ------- ------------------------
1 880 SYSTEM YES /u03/oradata/D183/datafile/o1_mf_system_h4fy7gbp_.dbf
3 1970 SYSAUX NO /u03/oradata/D183/datafile/o1_mf_sysaux_h4fzd43b_.dbf
4 315 UNDOTBS1 YES /u03/oradata/D183/datafile/o1_mf_undotbs1_h4fxrv3o_.dbf
5 270 PDB$SEED:SYSTEM NO /u03/oradata/D183/9795EEED00203DFFE0531200A8C06D7B/datafile/o1_mf_system_h4gbmcyl_.dbf
6 350 PDB$SEED:SYSAUX NO /u03/oradata/D183/9795EEED00203DFFE0531200A8C06D7B/datafile/o1_mf_sysaux_h4gbzq9d_.dbf
7 5 USERS NO /u03/oradata/D183/datafile/o1_mf_users_h4fxqg6p_.dbf
8 100 PDB$SEED:UNDOTBS1 NO /u03/oradata/D183/9795EEED00203DFFE0531200A8C06D7B/datafile/o1_mf_undotbs1_h4gchdb7_.dbf
17 280 T183_PDB1:SYSTEM YES /u03/oradata/D183/9DC2AE83F20B40ACE0531200A8C05C14/datafile/o1_mf_system_h4g2b8yb_.dbf
18 480 T183_PDB1:SYSAUX NO /u03/oradata/D183/9DC2AE83F20B40ACE0531200A8C05C14/datafile/o1_mf_sysaux_h4g3z387_.dbf
19 420 T183_PDB1:UNDOTBS1 YES /u03/oradata/D183/9DC2AE83F20B40ACE0531200A8C05C14/datafile/o1_mf_undotbs1_h4g4tvj7_.dbf
20 100 T183_PDB1:USERS NO /u03/oradata/D183/9DC2AE83F20B40ACE0531200A8C05C14/datafile/o1_mf_users_h4g5v123_.dbf
List of Temporary Files
=======================
File Size(MB) Tablespace Maxsize(MB) Tempfile Name
---- -------- -------------------- ----------- --------------------
2 100 PDB$SEED:TEMP 32767 /u03/oradata/D183/9795EEED00203DFFE0531200A8C06D7B/datafile/o1_mf_temp_h4gftd8b_.tmp
4 62 T183_PDB1:TEMP 62 /u03/oradata/D183/9DC2AE83F20B40ACE0531200A8C05C14/datafile/o1_mf_temp_h4g6ch8f_.tmp
5 20 TEMP 20 /u03/oradata/D183/datafile/o1_mf_temp_h4g6tl71_.tmp
RMAN> select member from v$logfile;
MEMBER
--------------------------------------------------------------------------------
/u03/oradata/D183/onlinelog/o1_mf_4_h4fvqhnr_.log
/u07/oradata/fast_recovery_area/D183/onlinelog/o1_mf_4_h4fvqjqp_.log
/u03/oradata/D183/onlinelog/o1_mf_5_h4fvxvg2_.log
/u07/oradata/fast_recovery_area/D183/onlinelog/o1_mf_5_h4fvxwl1_.log
/u03/oradata/D183/onlinelog/o1_mf_6_h4fw2jjr_.log
/u07/oradata/fast_recovery_area/D183/onlinelog/o1_mf_6_h4fw2kgg_.log
An RMAN LIST BACKUP command should only display details of autobackups written to the FRA. To protect the work we’ve done up to this point, you should take a full database backup.
Step #12: Cleanup.
Over the previous 11 steps we have restored a database called T183 then renamed it D183. There will still be fragments of T183 hanging around on the server and should be cleaned up. Specifically, check these directories and delete what shouldn’t be there:
[oracle@orasvr01 ~]$ cd $ORACLE_BASE/audit
[oracle@orasvr01 audit]$ ls -l
drwxr-x--- 6 oracle oinstall 4096 Feb 14 18:23 D183
drwxr-x--- 2 oracle oinstall 4096 Nov 15 18:46 T122
drwxr-x--- 3 oracle oinstall 4096 Feb 6 12:46 T183
[oracle@orasvr01 audit]$ cd /u03/oradata
[oracle@orasvr01 oradata]$ ls -l
drwxr-x--- 7 oracle oinstall 4096 Feb 14 18:37 D183
drwxr-x--- 8 oracle oinstall 4096 Feb 13 16:09 T183
[oracle@orasvr01 oradata]$ cd /u07/oradata/fast_recovery_area
[oracle@orasvr01 fast_recovery_area]$ ls -l
drwxr-x--- 6 oracle oinstall 4096 Feb 14 11:37 D183
drwxr-x--- 7 oracle oinstall 4096 Dec 2 10:24 T122
drwxr-x--- 7 oracle oinstall 4096 Feb 12 18:14 T183
[oracle@orasvr01 fast_recovery_area]$ cd $ORACLE_HOME/dbs
[oracle@orasvr01 dbs]$ ls -l
-rw-rw---- 1 oracle oinstall 1544 Feb 14 16:28 hc_D183.dat
-rw-rw---- 1 oracle oinstall 1544 Feb 14 10:07 hc_T183.dat
-rw-r----- 1 oracle oinstall 24 Feb 14 11:27 lkD183
-rw-r----- 1 oracle oinstall 24 Feb 13 10:29 lkT183
-rw-r----- 1 oracle oinstall 11264 Feb 14 11:35 orapwD183
-rw-r----- 1 oracle oinstall 18825216 Feb 15 12:04 snapcf_D183.f
-rw-r----- 1 oracle oinstall 4608 Feb 15 12:04 spfileD183.ora
And that’s how you can restore a database backup to a different server, recover it to a previous point in time while switching from ASM storage to file system storage. There are little short cuts you can make to this approach which would eliminate or reduce some of the steps, but this is essentially what you would need to do. Phew! ?
After Larry Ellison performed his famous U-turn on all things cloud (he does make some great points but it’s still funny ?), Oracle Cloud became a thing. So let’s learn a little about how you use it. To do that you need to sign up for an Oracle Cloud account here. To sign up you will need a valid email address and an electronic form of payment. Don’t worry, Oracle won’t charge you anything unless you upgrade to a paid account at the end of the 30 day trial. If you don’t upgrade, you are not charged and you’re automatically switched to Oracle’s Always Free offering. Which is still decent and definitely worth having. Plus you get access to My Oracle Support in a query only capacity. Not bad!
There are many things you can do in Oracle Cloud. In this post we’ll focus on the things you’ll most likely want to do with Autonomous Database.
Once you’ve signed up and successfully logged into your Oracle Cloud account, you’ll see the Oracle Cloud console screen:
Click on the Create an ATP database tile.
The Create Autonomous Database screen is a scrolling screen which will require you to enter a few pieces of information:
Field
Value
Compartment
You will have created this when you initially signed up, so use that name whatever it was.
From the Oracle Cloud documentation:
Compartments allow you to organize and control access to your cloud resources. A compartment is a collection of related resources (such as instances, virtual cloud networks, block volumes) that can be accessed only by certain groups that have been given permission by an administrator. A compartment should be thought of as a logical group and not a physical container. When you begin working with resources in the Console, the compartment acts as a filter for what you are viewing. When you sign up for Oracle Cloud Infrastructure, Oracle creates your tenancy, which is the root compartment that holds all your cloud resources. You then create additional compartments within the tenancy (root compartment) and corresponding policies to control access to the resources in each compartment. When you create a cloud resource such as an instance, block volume, or cloud network, you must specify to which compartment you want the resource to belong. Ultimately, the goal is to ensure that each person has access to only the resources they need.
Display Name
DBCLOUD1
Database Name
DBCLOUD1
Workload Type
Transaction Processing (already checked by default)
Deployment Type
Shared Infrastructure (already checked by default)
Always Free
Move slider to the right
OCPU Count
1 (default for Always Free)
Storage (TB)
0.02 (default for Always Free)
Administrator Username
ADMIN (default)
Administrator Password
Choose a password. Do yourself a favor and don't include an @ sign in your password. You'll see why later on.
Configure access control rules
I didn't bother with this.
Choose a license type
License Included (already checked by default)
Fill in the necessary fields then scroll downFill in the necessary fields then scroll downFill in the necessary fields then click Create Autonomous DatabaseWait while your database is provisioned…
The provisioning process only takes a few minutes, then you’ll see this screen:
Your database is now ready to use (Available).
Click Oracle Cloud in the top left corner of the screen to return to the main Oracle Cloud Console screen. From there you can click View all my resources to see what resources you have created:
And there’s DBCLOUD1 in your list!
Now that we have a database created, how do we connect to it?
Task #2: Connect To An Autonomous Database.
Connecting to an autonomous database is similar to connecting to a local database. You need the correct entries for your local sqlnet.ora and tnsnames.ora files. You also have to use an Oracle Wallet. All the relevant files can be downloaded from the database page within your Oracle Cloud account.
As mentioned previously, avoid using an @ sign in your password for the ADMIN account. I had all kinds of problems trying to login using SQL*Plus (but not with SQL Developer). As we know, the @ sign is significant on the command line and no combination of quoting allowed SQL*Plus to login. There’s a MOS document which addresses client connection issues to Autonomous Database (MOS Doc ID 2436725.1), but none of the workarounds worked for me until I removed the @ sign from my ADMIN password. YMMV.
Task 2a: Configure Oracle Net.
Navigate to the database page for DBCLOUD1:
Click DB Connection
On the next screen you’ll need to choose which type of Wallet you want. The choices are Instance Wallet or Regional Wallet. An Instance Wallet contains the credentials for a single Autonomous Database (ADB). A Regional Wallet contains the credentials for all the ADBs within a region. I use a Regional Wallet.
Select the type of Wallet you want then click Download WalletEnter a Wallet password (you might want to write that down) then click Download
After clicking the Download button you’re prompted to save a .zip file. I saved mine here:
Directory of E:\ORACLE\REGIONAL_WALLET
01/08/2020 01:07 PM 19,922 Wallet_DBCLOUD1.zip
Copy these 2 lines to your own sqlnet.ora file located in the directory usually pointed to by the TNS_ADMIN environment variable. Change the DIRECTORY value to the directory where you extracted the .zip file. This is what my sqlnet.ora file looks like with the appropriate edits:
Next, copy any relevant lines from the downloaded tnsnames.ora file to your own tnsnames.ora file. Note, the entries in the downloaded tnsnames.ora file are one long line, so you might want to re-format them for readability. My tnsnames.ora file looks like this (apart from the * obviously):
We’ll continue to use Windows by opening up a Command window and entering these commands:
C:\> set TNS_ADMIN=E:\app\oracle\product\client\network\admin
C:\> sqlplus admin@dbcloud1_tp
SQL*Plus: Release 19.0.0.0.0 - Production on Tue Jan 21 12:15:44 2020
Version 19.3.0.0.0
Copyright (c) 1982, 2019, Oracle. All rights reserved.
Enter password: <your-ADMIN-password>
Last Successful login time: Tue Jan 21 2020 11:52:01 -06:00
Connected to:
Oracle Database 18c Enterprise Edition Release 18.0.0.0.0 - Production
Version 18.4.0.0.0
SQL> select name from v$database;
NAME
--------
FEB61POD
SQL> select instance_name from v$instance;
INSTANCE_NAME
-------------
feb61pod1
SQL> select banner_full from v$version;
BANNER_FULL
----------------------------------------------------------------------
Oracle Database 18c Enterprise Edition Release 18.0.0.0.0 - Production
Version 18.4.0.0.0
SQL> show parameter service
NAME TYPE VALUE
------------------------------------ ------- --------
service_names string feb61pod
SQL> select guid, name, open_mode from v$pdbs;
GUID NAME OPEN_MODE
-------------------------------- --------------------------- ---------
9B81988A5EC5355EE0537010000AC429 SLMNRL2TSMWKOHY_DBCLOUD1 READ WRITE
SQL> select file_name,((bytes/1024)/1024) "MB" from dba_data_files;
FILE_NAME MB
--------------------------------------------------------------------------------------- --------
+DATA/FEB61POD/9B81988A5EC5355EE0537010000AC429/DATAFILE/system.571.1029020303 951
+DATA/FEB61POD/9B81988A5EC5355EE0537010000AC429/DATAFILE/sysaux.574.1029020303 2161
+DATA/FEB61POD/9B81988A5EC5355EE0537010000AC429/DATAFILE/undotbs1.741.1029020303 465
+DATA/FEB61POD/9B81988A5EC5355EE0537010000AC429/DATAFILE/data.575.1029020303 100
+DATA/FEB61POD/9B81988A5EC5355EE0537010000AC429/DATAFILE/dbfs_data.569.1029020303 100
+DATA/sampleschema_dbf 204800
+DATA/FEB61POD/9B81988A5EC5355EE0537010000AC429/DATAFILE/undo_2.678.1029020371 465
7 rows selected.
Based upon these queries, we now know the database is called FEB61POD, the instance is called feb61pod1 and the service is called feb61pod. No reference to DBCLOUD1 at all! However, our database is actually a PDB called SLMNRL2TSMWKOHY_DBCLOUD1. We also know we’re running Oracle Database 18c Release 4. Not sure why the sampleschema_dbf file is where it is, but I’m not going to complain.
Task 2c: Connect Via SQL Developer.
Fire up SQL Developer:
Click the green plus sign to create a new database connection
The next screen requires some input:
Field
Value
Name
DBCLOUD1_ADMIN
Username
admin
Password
The ADMIN password you created
Save Password
Click the checkbox
Connection Type
Cloud Wallet
Configuration File
Browse to where you downloaded the Wallet .zip file and select it.
Mine was E:\ORACLE_REGIONAL_WALLET\DBCLOUD1.zip
Service
Pick any of the listed connection strings displayed. I chose dbcloud1_tp.
Complete the required fields then click the Test button. You should see a Status of Success.
Save the connection, login and run a query:
We get the same output as the SQL*Plus query. It works!
Task #3: Migrate Data To An Autonomous Database.
Moving data into an Autonomous Database (ADB) can be done using Data Pump Import. For this section, I’ve moved my operations to a Linux server since that is where I had a compatible version of Data Pump Import installed. At the time of writing, the Oracle documentation which describes this process is both incomplete and inaccurate. Seems some changes Oracle has made to ADB are ahead of the documentation which supports it. The method described here has been verified by Oracle as being complete and correct.
Task #3a: Data Pump Export (On Premises).
So, let’s start off by exporting some data from an on premises database (T183_PDB1, Oracle Database 18c Release 3). These are the 6 tables which sit behind my APEX music catalog application. Here is my Data Pump Export parameter file:
As we can see, the Data Pump Export should produce a dump file called media_01242020.dmp in the directory pointed to by DATA_PUMP_DIR_PDB1 (/u01/oradata/datapump/T183_PDB1). The dump file should contain 6 tables owned by the user MEDIA and the Data Pump Export process should prompt us for an encryption password (Oracle recommends this). Let’s run the export:
[oracle@orasvr02 dp]$ expdp sfrancis@T183_PDB1 parfile=expdp_parfile.txt
Export: Release 18.0.0.0.0 - Production on Fri Jan 24 15:36:09 2020
Version 18.3.0.0.0
Copyright (c) 1982, 2018, Oracle and/or its affiliates. All rights reserved.
Password: <enter-password>
Connected to: Oracle Database 18c Enterprise Edition Release 18.0.0.0.0 - Production
Encryption Password: <your-encryption-password>
Starting "SFRANCIS"."SYS_EXPORT_TABLE_01": sfrancis/@T183_PDB1 parfile=expdp_parfile.txt
Processing object type TABLE_EXPORT/TABLE/TABLE_DATA
Processing object type TABLE_EXPORT/TABLE/INDEX/STATISTICS/INDEX_STATISTICS
Processing object type TABLE_EXPORT/TABLE/STATISTICS/TABLE_STATISTICS
Processing object type TABLE_EXPORT/TABLE/STATISTICS/MARKER
Processing object type TABLE_EXPORT/TABLE/TABLE
Processing object type TABLE_EXPORT/TABLE/CONSTRAINT/CONSTRAINT
Processing object type TABLE_EXPORT/TABLE/CONSTRAINT/REF_CONSTRAINT
. . exported "MEDIA"."TITLES" 227.8 KB 2347 rows
. . exported "MEDIA"."RECORDING_ARTISTS" 21.80 KB 755 rows
. . exported "MEDIA"."FORMATS" 7.625 KB 56 rows
. . exported "MEDIA"."MEDIA_TYPES" 6.25 KB 14 rows
. . exported "MEDIA"."RELEASES" 5.960 KB 3 rows
. . exported "MEDIA"."GENRES" 5.531 KB 4 rows
Master table "SFRANCIS"."SYS_EXPORT_TABLE_01" successfully loaded/unloaded
******************************************************************************
Dump file set for SFRANCIS.SYS_EXPORT_TABLE_01 is:
/u01/oradata/datapump/T183_PDB1/media_01242020.dmp
Job "SFRANCIS"."SYS_EXPORT_TABLE_01" successfully completed at Fri Jan 24 15:41:47 2020 elapsed 0 00:05:33
Now we have a local on premises dump file, it’s time to do some work in Oracle Cloud. Login to your account and navigate to the Oracle Cloud console:
Click on the OBJECT STORAGE Store Data tile.Enter a name for your bucket (nudais_bucket1) then click Create Bucket.Click on the name of your bucket (nudais_bucket1).Click Upload Objects.Select the file(s) you want to upload (media_01242020.dmp) then click Upload Objects.When the file transfer shows Finished click Close.1 – Click the 3 vertical dot menu. 2 – Click Create Pre-Authenticated Request.
Creating a Pre-Authenticated Request grants permission(s) on the uploaded file for a period of time. Without this step the Data Pump Import process would not be able to read the dump file.
Choose OBJECT, PERMIT READ ON THE OBJECT then click Create Pre-Authenticated Request.Ignore the warning about not seeing the URL ever again. You will. Click Close.1 – Click the 3 vertical dot menu. 2 – Click View Object Details.Et voila! Here’s the URI to your uploaded dump file which Data Pump Import will need to reference.
Task #3c: Data Pump Import (Oracle Cloud).
Now that the dump file is in Oracle Cloud with the necessary read permission set, we need to create a security credential in the ADB which Data Pump Import will also need to reference. Login as ADMIN and run this piece of PL/SQL:
The directory object (DATA_PUMP_DIR) is not where the dump file exists, so it’s really only used as the destination to write the log file (impdp_media_01242020.log). The dump file is accessed via its URI (https://objectstorage……/media_01242020.dmp). In my case I needed to remap where the tables owned by the MEDIA user reside since the ADB does not have a USERS tablespace. Before we launch the Data Pump Import process, we need to check access to the ADB using the Wallet credentials and create the MEDIA user:
[oracle@orasvr02 dp]$ export TNS_ADMIN=/u01/app/oracle/product/cloud_regional_wallet
[oracle@orasvr02 dp]$ echo $TNS_ADMIN
/u01/app/oracle/product/cloud_regional_wallet
[oracle@orasvr02 dp]$ ls -l $TNS_ADMIN
-rw-r--r-- 1 oracle oinstall 6661 Jan 8 19:07 cwallet.sso
-rw-r--r-- 1 oracle oinstall 6616 Jan 8 19:07 ewallet.p12
-rw-r--r-- 1 oracle oinstall 3243 Jan 8 19:07 keystore.jks
-rw-r--r-- 1 oracle oinstall 301 Jan 8 19:07 ojdbc.properties
-rw-r--r-- 1 oracle oinstall 197 Jan 23 17:09 sqlnet.ora
-rw-r--r-- 1 oracle oinstall 3662 Jan 8 19:07 tnsnames.ora
-rw-r--r-- 1 oracle oinstall 3336 Jan 8 19:07 truststore.jks
-rw-r--r-- 1 oracle oinstall 19922 Jan 23 16:58 Wallet_DBCLOUD1.zip
[oracle@orasvr02 dp]$ cat $TNS_ADMIN/sqlnet.ora
NAMES.DIRECTORY_PATH= (TNSNAMES, ONAMES, HOSTNAME)
WALLET_LOCATION = (SOURCE = (METHOD = file) (METHOD_DATA = (DIRECTORY="/u01/app/oracle/product/cloud_regional_wallet")))
SSL_SERVER_DN_MATCH=yes
[oracle@orasvr02 dp]$ cat $TNS_ADMIN/tnsnames.ora | cut -d'=' -f1 | grep dbcloud1
dbcloud1_high
dbcloud1_low
dbcloud1_medium
dbcloud1_tp
dbcloud1_tpurgent
[oracle@orasvr02 dp]$ which sqlplus
/u01/app/oracle/product/18.3.0/dbhome_1/bin/sqlplus
[oracle@orasvr02 dp]$ sqlplus admin@dbcloud1_tp
SQL*Plus: Release 18.0.0.0.0 - Production on Sat Jan 25 13:26:21 2020
Version 18.3.0.0.0
Copyright (c) 1982, 2018, Oracle. All rights reserved.
Enter password: <your-ADMIN-password>
Last Successful login time: Thu Jan 23 2020 20:29:42 -06:00
Connected to:
Oracle Database 18c Enterprise Edition Release 18.0.0.0.0 - Production
Version 18.4.0.0.0
SQL> select name from v$database;
NAME
--------
FEB61POD
SQL> create user media identified by<your-new_password>
2 default tablespace data temporary tablespace temp
3 quota unlimited on data;
User created.
SQL> grant connect, resource to media;
Grant succeeded.
We’ve tested connectivity to the ADB and pre-created the MEDIA user ready for Data Pump Import:
[oracle@orasvr02 dp]$ impdp admin@dbcloud1_tp parfile=impdp_parfile.txt
Import: Release 18.0.0.0.0 - Production on Sat Jan 25 13:41:16 2020
Version 18.3.0.0.0
Copyright (c) 1982, 2018, Oracle and/or its affiliates. All rights reserved.
Password: <your-ADMIN-password>
Connected to: Oracle Database 18c Enterprise Edition Release 18.0.0.0.0 - Production
Encryption Password: <your-encryption-password>
Master table "ADMIN"."SYS_IMPORT_TABLE_01" successfully loaded/unloaded
Starting "ADMIN"."SYS_IMPORT_TABLE_01": admin/@dbcloud1_tp parfile=impdp_parfile.txt
Processing object type TABLE_EXPORT/TABLE/TABLE
Processing object type TABLE_EXPORT/TABLE/TABLE_DATA
. . imported "MEDIA"."TITLES" 227.8 KB 2347 rows
. . imported "MEDIA"."RECORDING_ARTISTS" 21.80 KB 755 rows
. . imported "MEDIA"."FORMATS" 7.625 KB 56 rows
. . imported "MEDIA"."MEDIA_TYPES" 6.25 KB 14 rows
. . imported "MEDIA"."RELEASES" 5.960 KB 3 rows
. . imported "MEDIA"."GENRES" 5.531 KB 4 rows
Processing object type TABLE_EXPORT/TABLE/CONSTRAINT/CONSTRAINT
Processing object type TABLE_EXPORT/TABLE/INDEX/STATISTICS/INDEX_STATISTICS
Processing object type TABLE_EXPORT/TABLE/CONSTRAINT/REF_CONSTRAINT
Processing object type TABLE_EXPORT/TABLE/STATISTICS/TABLE_STATISTICS
Processing object type TABLE_EXPORT/TABLE/STATISTICS/MARKER
Job "ADMIN"."SYS_IMPORT_TABLE_01" successfully completed at Sat Jan 25 19:42:29 2020 elapsed 0 00:01:04
Success! Let’s login as the MEDIA user and check to see if we really have those 6 tables:
[oracle@orasvr02 T183_PDB1]$ sqlplus media@dbcloud1_tp
SQL*Plus: Release 18.0.0.0.0 - Production on Sat Jan 25 15:09:19 2020
Version 18.3.0.0.0
Copyright (c) 1982, 2018, Oracle. All rights reserved.
Enter password: <enter-MEDIA-password>
Last Successful login time: Sat Jan 25 2020 13:52:24 -06:00
Connected to:
Oracle Database 18c Enterprise Edition Release 18.0.0.0.0 - Production
Version 18.4.0.0.0
SQL> select table_name from user_tables;
TABLE_NAME
----------------------------------------
FORMATS
GENRES
RELEASES
RECORDING_ARTISTS
TITLES
MEDIA_TYPES
6 rows selected.
Much has been written recently about machine learning and artificial intelligence. Let’s put that to the test with a simple query:
SQL> SELECT t.title album_title,
ra.first_name||' '||ra.last_or_group_name artist
FROM titles t,
recording_artists ra
WHERE t.recording_artist_id = ra.recording_artist_id
AND title_id = 96;
The Best Album Ever Recorded By The Patron Saint of Music
---------------------------- ----------------------------
The Pleasure Principle Gary Numan
WOW! That’s amazing! Oracle Autonomous Database really is super intelligent and has great taste in music! ? ?
Creating content for a website is one thing. Formatting and adding content to a WordPress website is something else. WordPress themes and plug-ins do a lot of the heavy lifting for you, but you still have to figure out how to drive these things in order to achieve your desired result. When that doesn’t work, you sometimes have to resort to raw coding using HTML and CSS. That’s not as easy or intuitive as it could be. WordPress, themes and plug-ins also change over time and upgrading any one of these things can seriously mess with your website. That translates into spending hours and hours trying to figure out how to correct something which was working perfectly fine before you were forced to upgrade it. It gets worse when trying to find or remember an infrequently used trick or technique that got you out of trouble the last time. The joys of website maintenance!
It seemed like the smart thing to do to collect those tricks, tips and techniques into one location where I can find them when I really need them. What better place than the website itself? This is my little repository of things I find useful when adding or changing content. Maybe you’ll find something useful here too. Enjoy!
To create an anchor switch to Edit as HTML, then add this code adjacent to the text you want to be able to jump to:
<a name="Your-Anchor-label"></a>
Colors.
Using colors involves using the span tag plus the color code of the color you want to use. Switch to Edit as HTML, then add this code around the text you want to color, ending the coloring with </span>:
NAVY (SPURS) BLUE: <span style=”color: #000080;”> STANDARD BLUE: <span style=”color: #0000FF;”> BLACK: <span style=”color: #080808;”> RED: <span style=”color: #FF0000;”> DARK GREEN: <span style=”color: #088A08;”>
Images.
Image Editing & Redaction.
Having copied and pasted the image into Word: 1. Save the image as a .png file. 2. Open the .png file in GIMP (GNU Image Manipulation Program). 3. View ➡️ Zoom ➡️ Other, then set Zoom to 90%. 4. Click OK. 5. Tools ➡️ Selection Tools ➡️ Rectangle Select. 6. Select the area to redact, then right click, Filters ➡️ Blur ➡️ Pixelize. 7. Click OK. 8. To repeat the redaction, select the area to redact, then right click, Filters ➡️ Repeat Pixelize.
If the image needs a border, add it after redacting but before saving it: 1. Filters ➡️ Decor ➡️ Add Border. 2. Set Border X size to 6. 3. Set Border Y size to 6. 4. Click the border color block, then enter 000080 in the HTML notation box. 5. Click OK. 6. Click OK.
To save the redacted file: 1. File ➡️ Export As. 2. Select PNG image (*.png). 3. Add an “E” to the file name to retain the original unedited file and help identify the edited version. 4. Click the Export button. 5. Click the Export button in the pop-up. 6. File ➡️ Quit, then click Discard Changes in the pop-up.
The case to upgrade to OEM 13c R3 is that it supports Oracle Database 19c.
The MOS Certifications tab knows all. Check out the following screen shots.
For Product, choose Enterprise Manager Base Platform – OMS and for Release, choose 13.2.0.0.0. Then click the Search button:
Click the screen shot to open a larger image
Run the same query, but this time for Release 13.3.0.0.0:
Click the screen shot to open a larger image
Long story short. I’m not even going to attempt upgrading from OEM 13.2 to OEM 13.3 in place. A fresh install seems the easiest way to get to where we need to be. Using Oracle’s deinstall scripts quickly reminded me why it’s best not to trust Oracle’s scripted method to do anything. Here’s what happened:
[oracle@oraemcc ~]$ cd /tmp
[oracle@oraemcc tmp]$ mkdir OEM
[oracle@oraemcc install]$ cd /u01/app/oracle/product/middleware/sysman/install
[oracle@oraemcc install]$ cp ./EMDeinstall.pl /tmp/OEM
[oracle@oraemcc oracle]$ /u01/app/oracle/product/middleware/perl/bin/perl /tmp/OEM/EMDeinstall.pl -mwHome /u01/app/oracle/product/middleware -stageLoc /tmp/OEM
OMSCA-ERR:Administration server is downrd:
return value is : 256
The OMS delete of EMGC_OMS1 has failed. Rectify the error and try again
What the heck does “downrd” mean? I wasn’t going to spend my valuable time finding out and debugging an obviously flawed procedure. So instead, I rebuilt the ORAEMCC_VM virtual machine. When it came back to life, this is how it was configured:
Component
Value
Server Name
oraemcc.mynet.com
RAM
16 GB
CPU
2
Operating System
Oracle Linux 6 Update 6
Operating System Disk
40 GB (incl. 16 GB swap)
/u01 Disk
50 GB (Oracle software)
/u02 Disk
30 GB (Oracle Database files)
/u03 Disk
30 GB (Fast Recover Area)
Step #1: Create the OEM Repository Database.
For the sake of speed and simplicity, I used the CDB/PDB template for Oracle Database 12c Release 1 (12.1.0.2). I would have preferred to use either an 18c or 19c template, but there is (currently) no 19c template and the 18c template is for 18.1 which you cannot download from OTN. So 12.1.0.2 it is then. The procedure is simple enough, with just a couple of gotchas (as usual).
Second, download the OEM template for 12.1.0.2 from here.
Third, unzip and install the database software.
Fourth, unzip the template file in ORACLE_HOME/assistants/dbca/templates.
Fifth, set your environment and run dbca to create the database.
A few notes about creating the OEM repository database:
Remember to choose the appropriate template when navigating the dbca screens (Create Database ➡️ Advanced Mode ➡️ Select a template for your database).
Make sure you deselect the option, Configure Enterprise Manager (EM) Database Express:
Note the huge red arrow.
The template documentation warns you to retain the selection of running the shpool.sql script on the Database Content screen. Trouble is, there is no Database Content screen and the script’s not called shpool.sql. I ran the appropriate script after the database had been created:
[oracle@oraemcc ~]$ cd /u01/app/oracle/product/12.1.0/dbhome_1/assistants/dbca/templates
[oracle@oraemcc templates]$ . oraenv
ORACLE_SID = [oracle] ? PADMIN
[oracle@oraemcc templates]$ sqlplus / as sysdba
SQL> @shpool_12.1.0.2.0_Database_SQL_for_EM13_3_0_0_0.sql
System altered.
System altered.
System altered.
However, in 12.1.0.2, this doesn’t work either in SQL or by putting it in an instance startup parameter file:
SQL> alter system set "_allow_insert_with_update_check" = true;
alter system set "_allow_insert_with_update_check" = true
*
ERROR at line 1:
ORA-02065: illegal option for ALTER SYSTEM
SQL> startup pfile='/u01/app/oracle/pfile_padmin.ora'
LRM-00101: unknown parameter name '_allow_insert_with_update_check'
ORA-01078: failure in processing system parameters
Oh well. Let’s just move on. What we ended up with was a CDB called PADMIN, containing a PDB called EMPDBREPOS. That’s where the pre-configured Enterprise Manager repository lives. I also created a listener called LISTENER_PADMIN and configured TNS connection strings in tnsnames.ora for both the CDB and the PDB. Next we need to install the OEM 13c R2 software.
Step #2: Run the Enterprise Manager Installer.
The installation of OEM 13cR3 is practically identical to OEM 13cR2. Simple enough if you’re doing a small/basic installation:
First, download the Enterprise Manager software from here.
Second, add execute permission to the files:
[oracle@oraemcc oem13.3]$ pwd
/u02/oradata/oem13.3
[oracle@oraemcc oem13.3]$ ls -l
-r--r--r-- 1 oracle oinstall 1742204641 Nov 16 16:43 em13300_linux64-2.zip
-r--r--r-- 1 oracle oinstall 2090882426 Nov 16 16:44 em13300_linux64-3.zip
-r--r--r-- 1 oracle oinstall 2117436260 Nov 16 16:46 em13300_linux64-4.zip
-r--r--r-- 1 oracle oinstall 694002559 Nov 16 16:47 em13300_linux64-5.zip
-r--r--r-- 1 oracle oinstall 1801995711 Nov 16 16:48 em13300_linux64-6.zip
-r--r--r-- 1 oracle oinstall 1278491093 Nov 16 16:41 em13300_linux64.bin
[oracle@oraemcc oem13.3]$ chmod 754 *
[oracle@oraemcc oem13.3]$ ls -l
-rwxr-xr-- 1 oracle oinstall 1742204641 Nov 16 16:43 em13300_linux64-2.zip
-rwxr-xr-- 1 oracle oinstall 2090882426 Nov 16 16:44 em13300_linux64-3.zip
-rwxr-xr-- 1 oracle oinstall 2117436260 Nov 16 16:46 em13300_linux64-4.zip
-rwxr-xr-- 1 oracle oinstall 694002559 Nov 16 16:47 em13300_linux64-5.zip
-rwxr-xr-- 1 oracle oinstall 1801995711 Nov 16 16:48 em13300_linux64-6.zip
-rwxr-xr-- 1 oracle oinstall 1278491093 Nov 16 16:41 em13300_linux64.bin
Third, set your environment then run em13300_linux64.bin.Once the automatic unzip operation hits 100%, you’re off to the races:
Select Skip then click NextIf you’ve followed the prerequisites in the installation documentation click NextSelect a Simple new Enterprise Manager system then click NextType in the relevant information then click NextType in the relevant information then click NextLeave Configure Oracle Software Library checked then click NextReview your selections then click InstallMy installation took a long time (2 – 3 hours) – be patient
Eventually you’ll need to run the root script in another session:
[root@oraemcc ~]# /u01/app/oracle/product/middleware/allroot.sh
Starting to execute allroot.sh ....
Starting to execute /u01/app/oracle/product/middleware/root.sh ....
/etc exist
Creating /etc/oragchomelist file…
/u01/app/oracle/product/middleware
Finished product-specific root actions.
/etc exist
Finished execution of /u01/app/oracle/product/middleware/root.sh ....
Starting to execute /u01/app/oracle/product/agent/agent_13.3.0.0.0/root.sh ....
Finished product-specific root actions.
/etc exist
Finished execution of /u01/app/oracle/product/agent/agent_13.3.0.0.0/root.sh ..
After which the completion screen is displayed which contains this information:
This information is also available at:
/u01/app/oracle/product/middleware/install/setupinfo.txt
See the following for information pertaining to your Enterprise Manager installation:
Use the following URL to access:
1. Enterprise Manager Cloud Control URL: https://oraemcc.mynet.com:7802/em 2. Admin Server URL: https://oraemcc.mynet.com:7102/console 3. BI Publisher URL: https://oraemcc.mynet.com:9803/xmlpserver/servlet/home
The following details need to be provided while installing an additional OMS:
1. Admin Server Host Name: oraemcc.mynet.com 2. Admin Server Port: 7102
You can find the details on ports used by this deployment at :
/u01/app/oracle/product/middleware/install/portlist.ini
NOTE:
An encryption key has been generated to encrypt sensitive data in the Management Repository.
If this key is lost, all encrypted data in the Repository becomes unusable.
A backup of the OMS configuration is available in
/u01/app/oracle/product/gc_inst/em/EMGC_OMS1/sysman/backup on host oraemcc.mynet.com.
See Cloud Control Administrators Guide for details on how to back up and recover an OMS.
NOTE: This backup is valid only for the initial OMS configuration. For example, it will not reflect
plug-ins installed later, topology changes like the addition of a load balancer, or changes to other
properties made using emctl or emcli. Backups should be created on a regular basis to ensure they
capture the current OMS configuration.
Use the following command to backup the OMS configuration:
/u01/app/oracle/product/middleware/bin/emctl exportconfig oms -dir
Click Close and you’re done. OEM 13cR3 is installed!


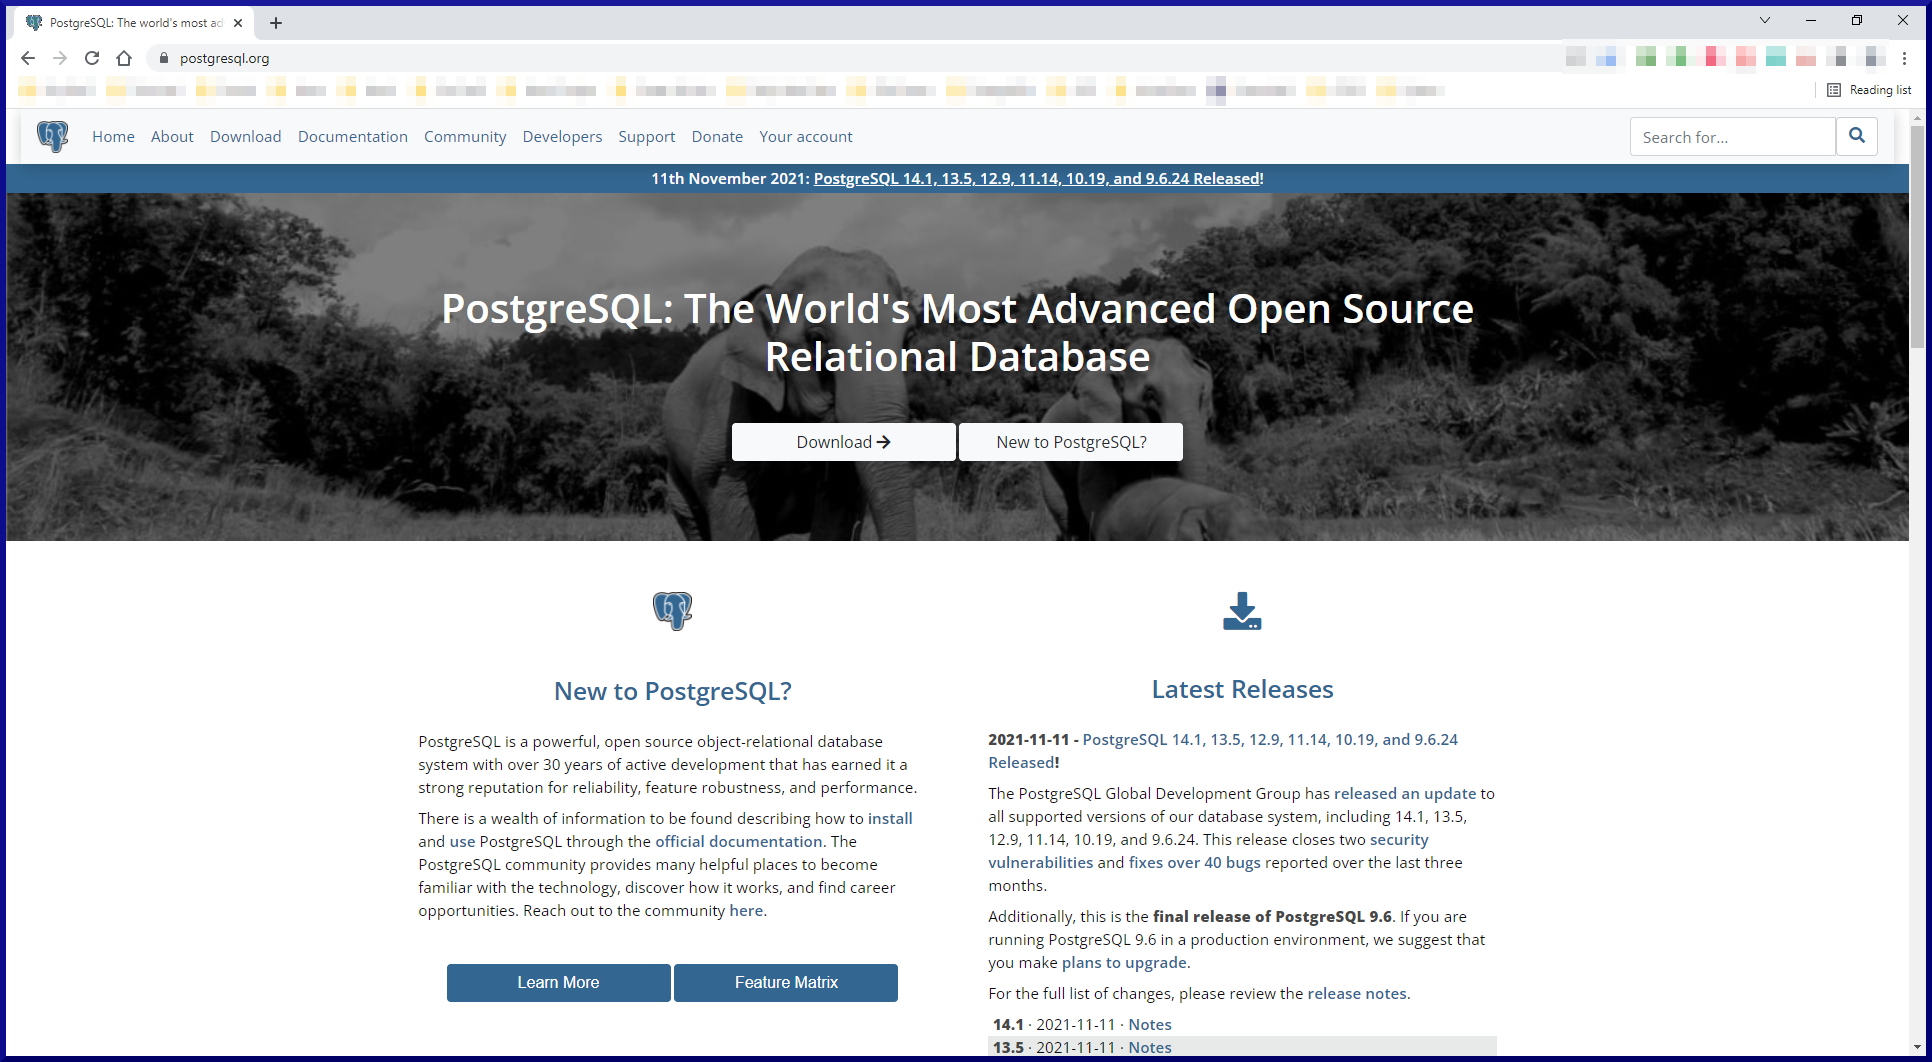

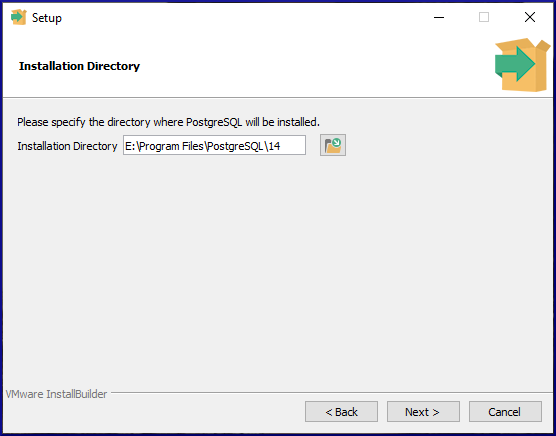
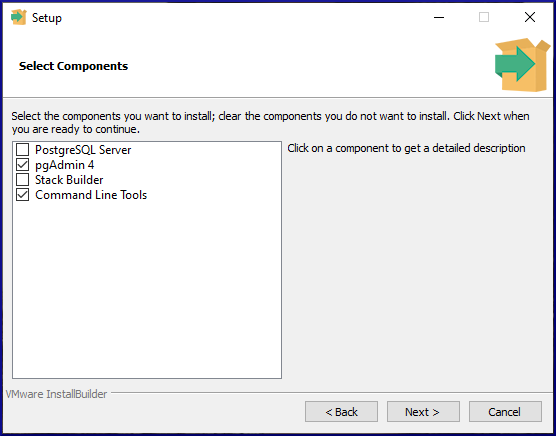
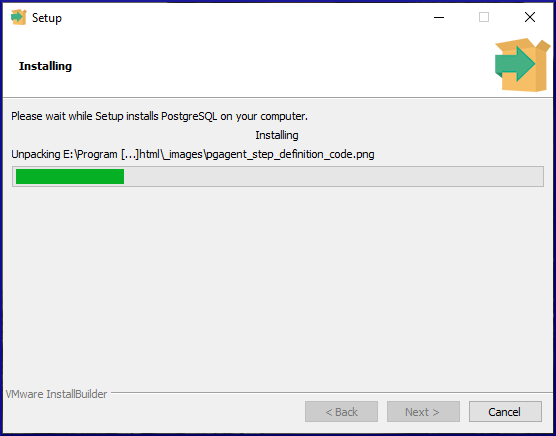


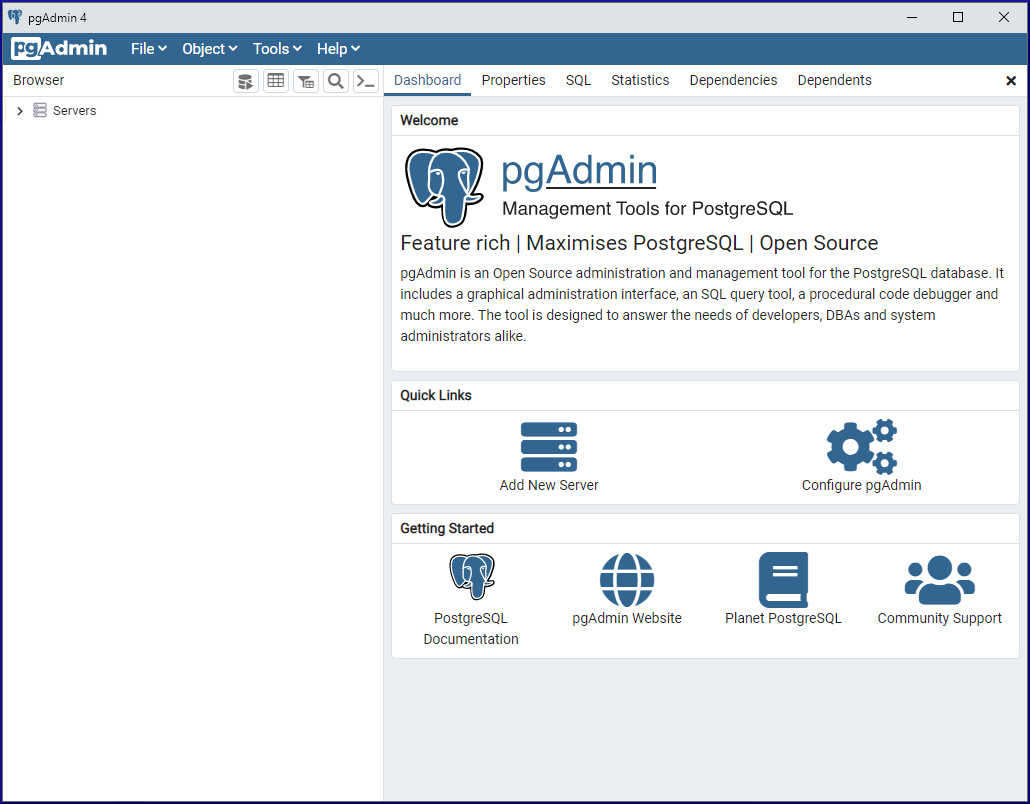


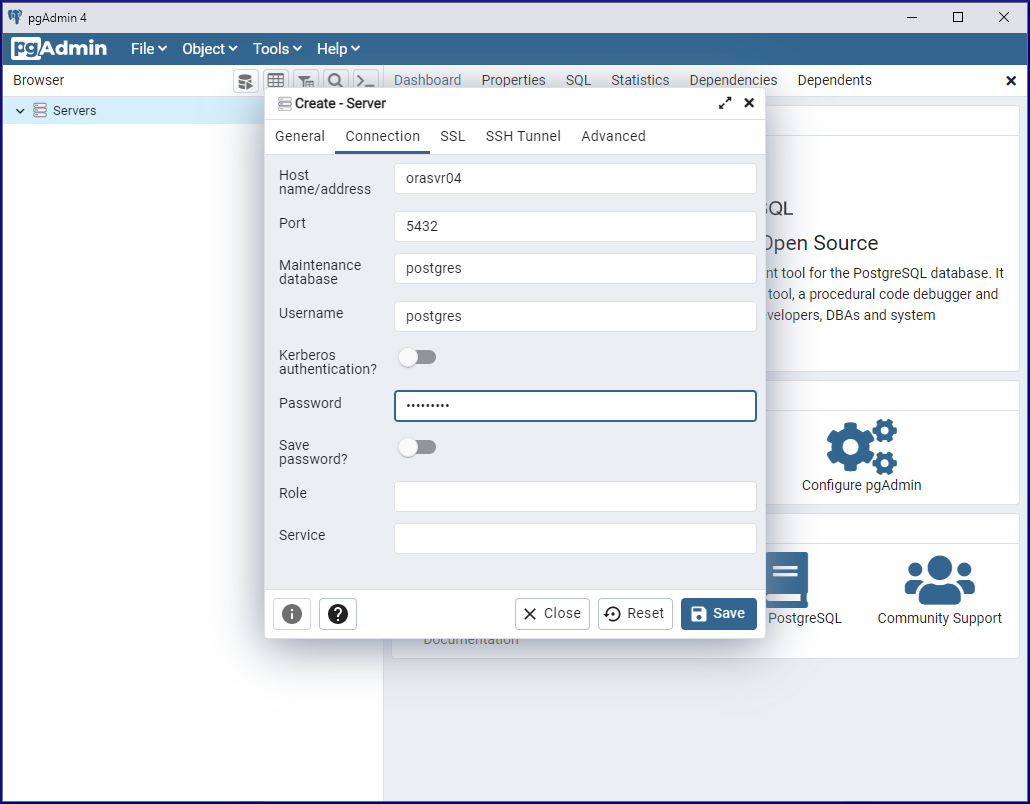
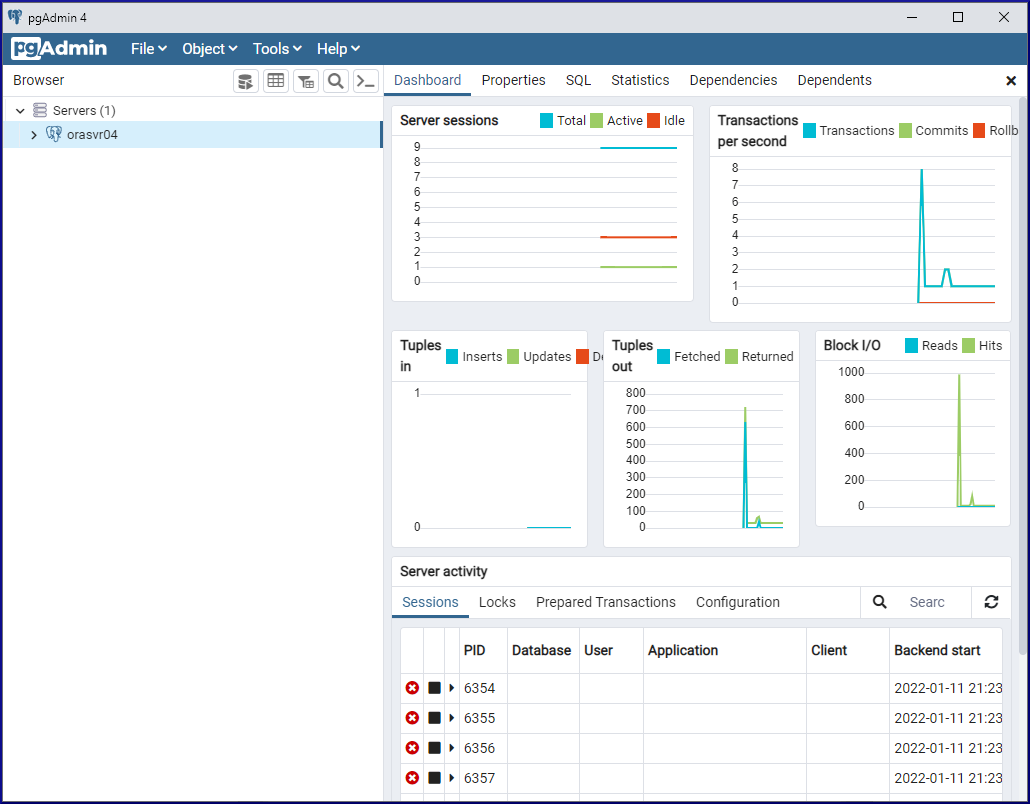
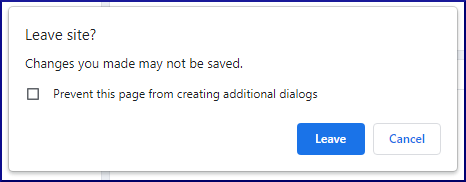

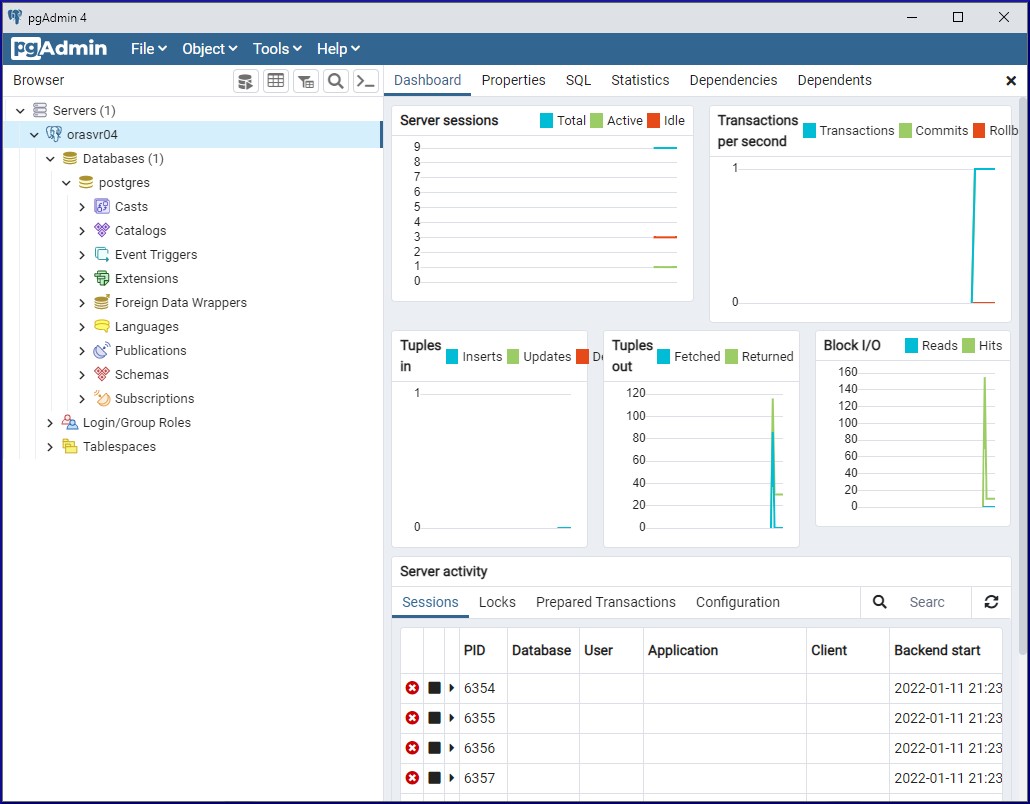
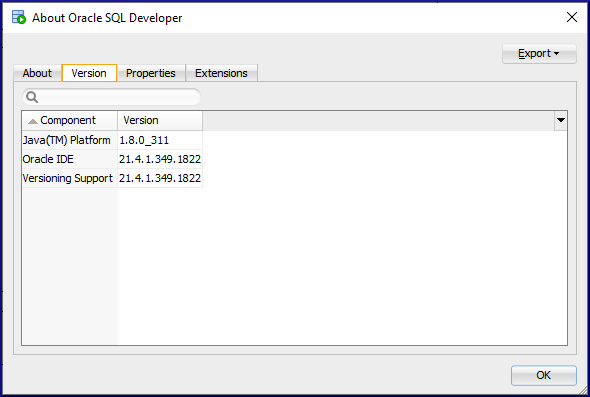
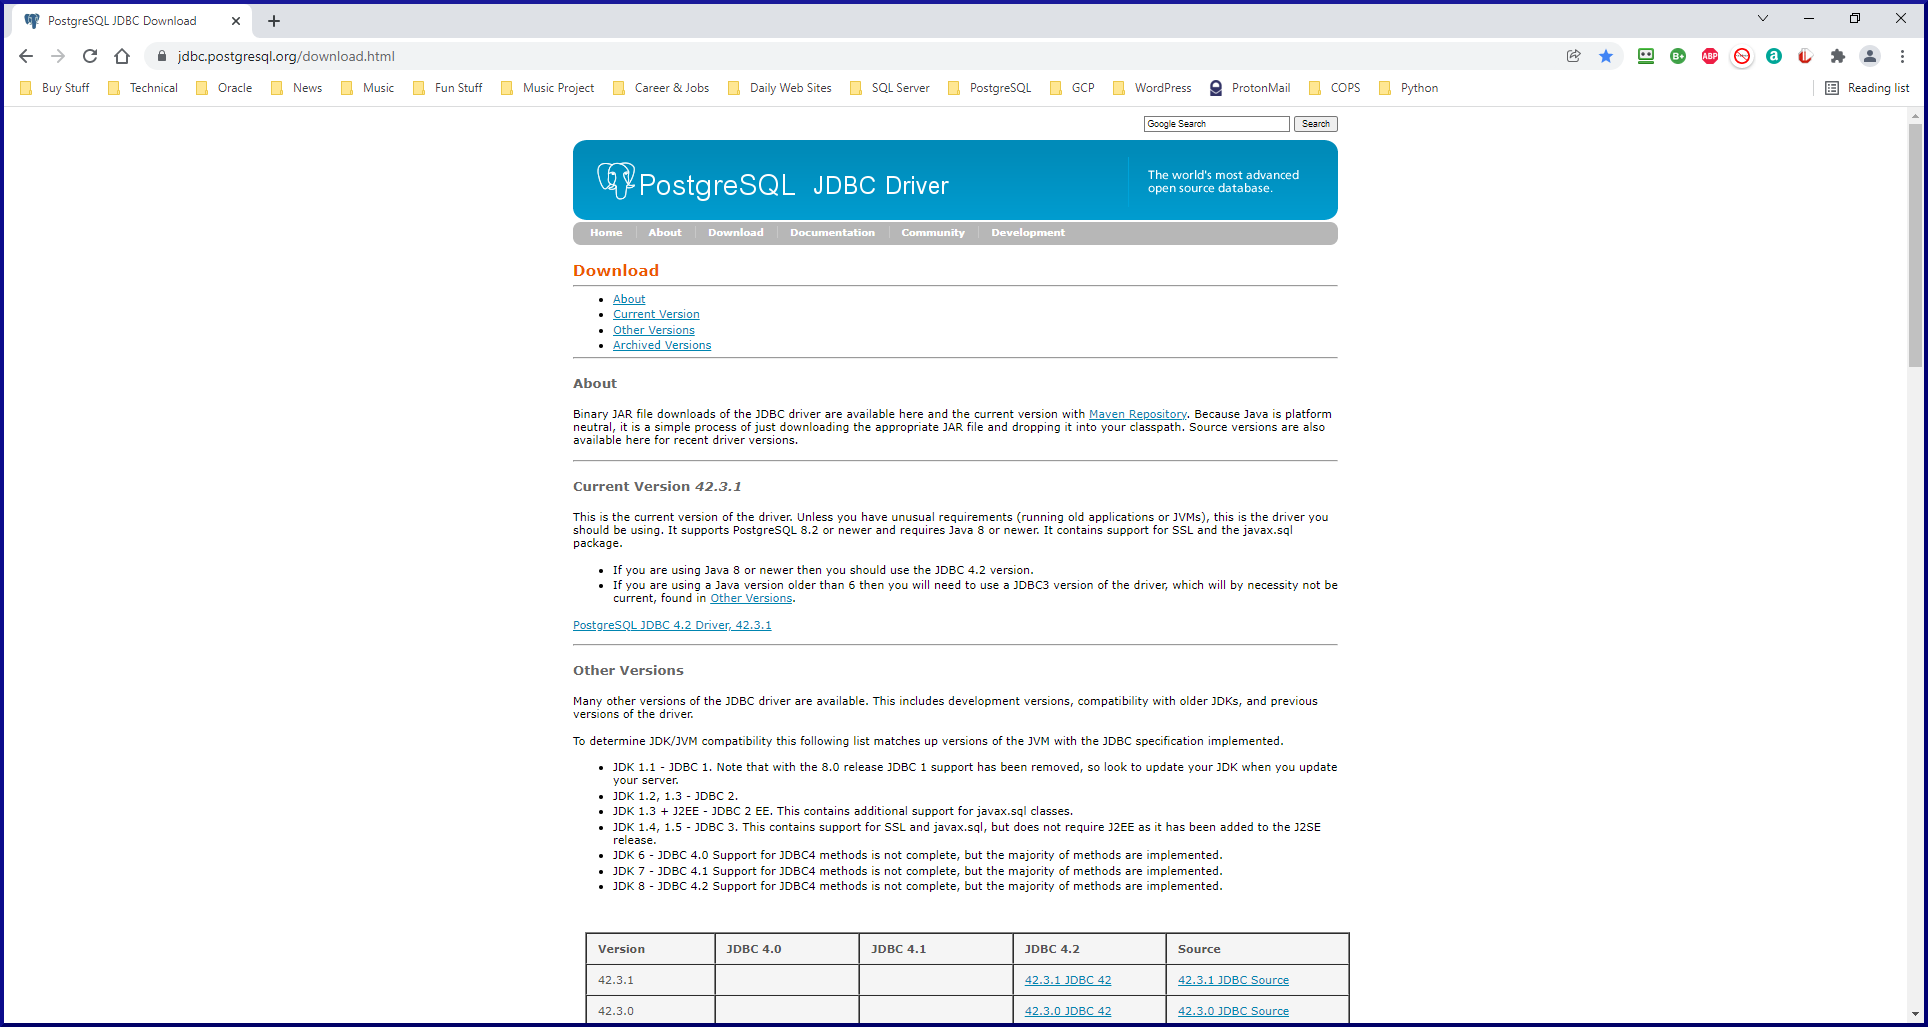
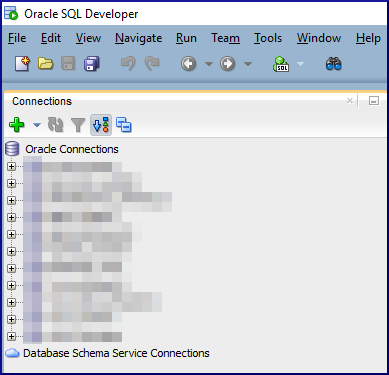
 to create a new connection