

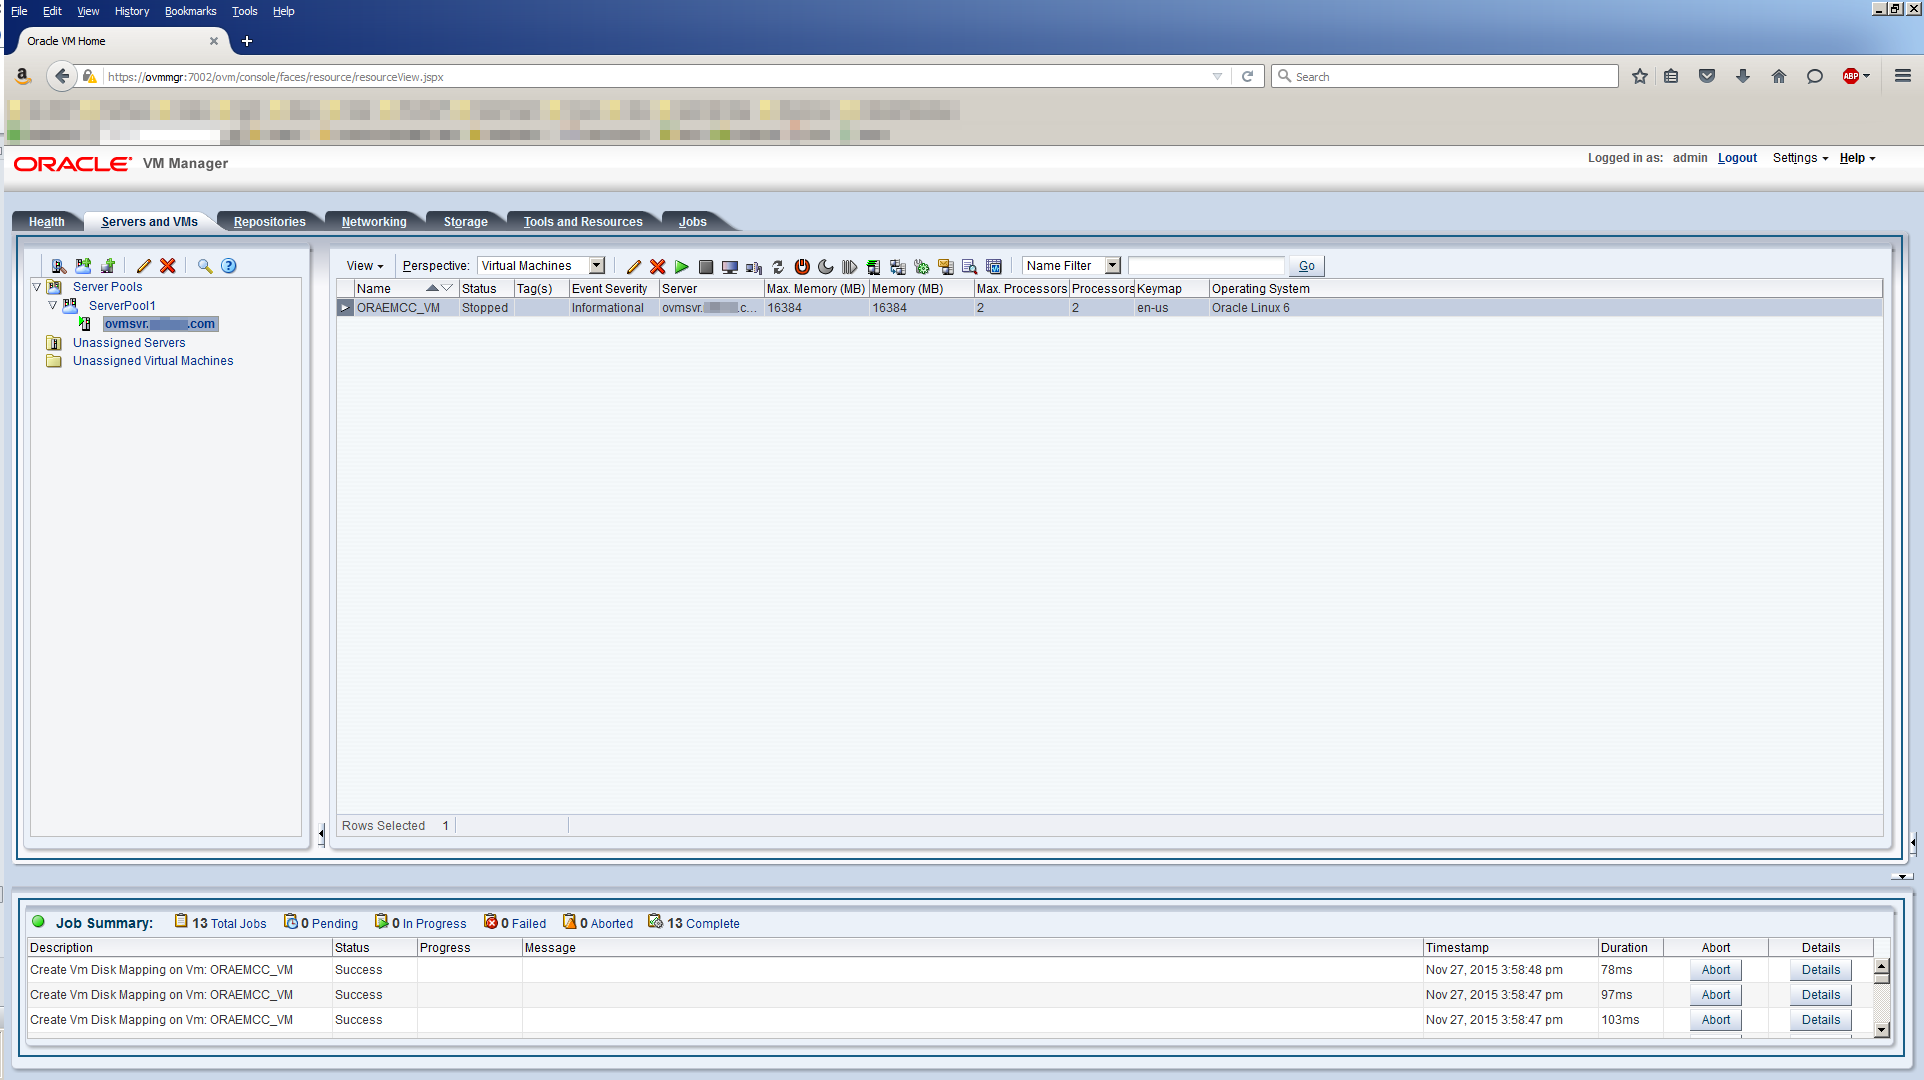
With the hard work of configuring the OVM Server behind us, we can move onto the relatively simple task of creating VMs.
Just as with a physical computer, a virtual computer is made up of various resources. These include CPU, memory, disk, network interfaces and an operating system.
The trick here is to decide how to distribute the available physical resources across the multiple VMs. Let’s start by reviewing what those physical resources are. The OVM Server, ovmsvr.mynet.com, running on the HP ProLiant DL380 has the following hardware resources:
| Resource | Quantity |
|---|---|
| CPU | 2 x Quad Core Intel Xeon E5640 (16 cores total) |
| RAM | 72 GB (now 144 GB) |
| Disk | 838 GB (VM_Filesystems_Repo) |
| NIC | 2 x Dual Port, 4 total (eth0, eth1, eth2, eth3) |
Allowing some resources for the OVM Server itself, we will distribute the following hardware across a total of 8 Virtual Machines:
| VM# | VM Name | CPU Cores | RAM | Total Disk | Usage |
|---|---|---|---|---|---|
| 1 | ORAEMCC_VM | 2 | 16 GB | 110 GB | Oracle EM Cloud Control Server |
| 2 | ORASVR01_VM | 2 | 8 GB | 100 GB | Oracle Database Server |
| 3 | ORASVR02_VM | 2 | 8 GB | 100 GB | Oracle Database Server |
| 4 | RACNODE1_VM | 1 | 6 GB | 70 GB | Oracle RAC Node Server |
| 5 | RACNODE2_VM | 1 | 6 GB | 70 GB | Oracle RAC Node Server |
| 6 | RACNODE3_VM | 1 | 6 GB | 70 GB | Oracle RAC Node Server |
| 7 | RACNODE4_VM | 1 | 6 GB | 70 GB | Oracle RAC Node Server |
| 8 | RACNODE5_VM | 1 | 6 GB | 70 GB | Oracle RAC Node Server |
| TOTAL | 11 | 62 GB | 660 GB | ||
This resource allocation still gives us some wiggle room in case we need another server or two. Not likely, but when was the last time you thought you had everything you’ll ever need? That said, 8 VMs is quite a few so what are they all for?
The ORAEMCC_VM will be used to run the complete stack of Oracle Enterprise Manager Cloud Control 12c and an RMAN Catalog database.
ORASVR01_VM and ORASVR02_VM will be used for some Data Guard and GoldenGate data replication testing.
RACNODE1, RACNODE2, RACNODE4 and RACNODE5 will be used to build two Oracle RAC clusters with 2 nodes each. These will be used to test cluster to cluster data replication and failover. RACNODE3 will be used to test adding and removing an additional node from a running cluster.
Quick links to all the tasks:
Task #1: Create ORAEMCC_VM.
Creating the ORAEMCC_VM is a 4 step process.
Task #1a: Add CPU and Memory.
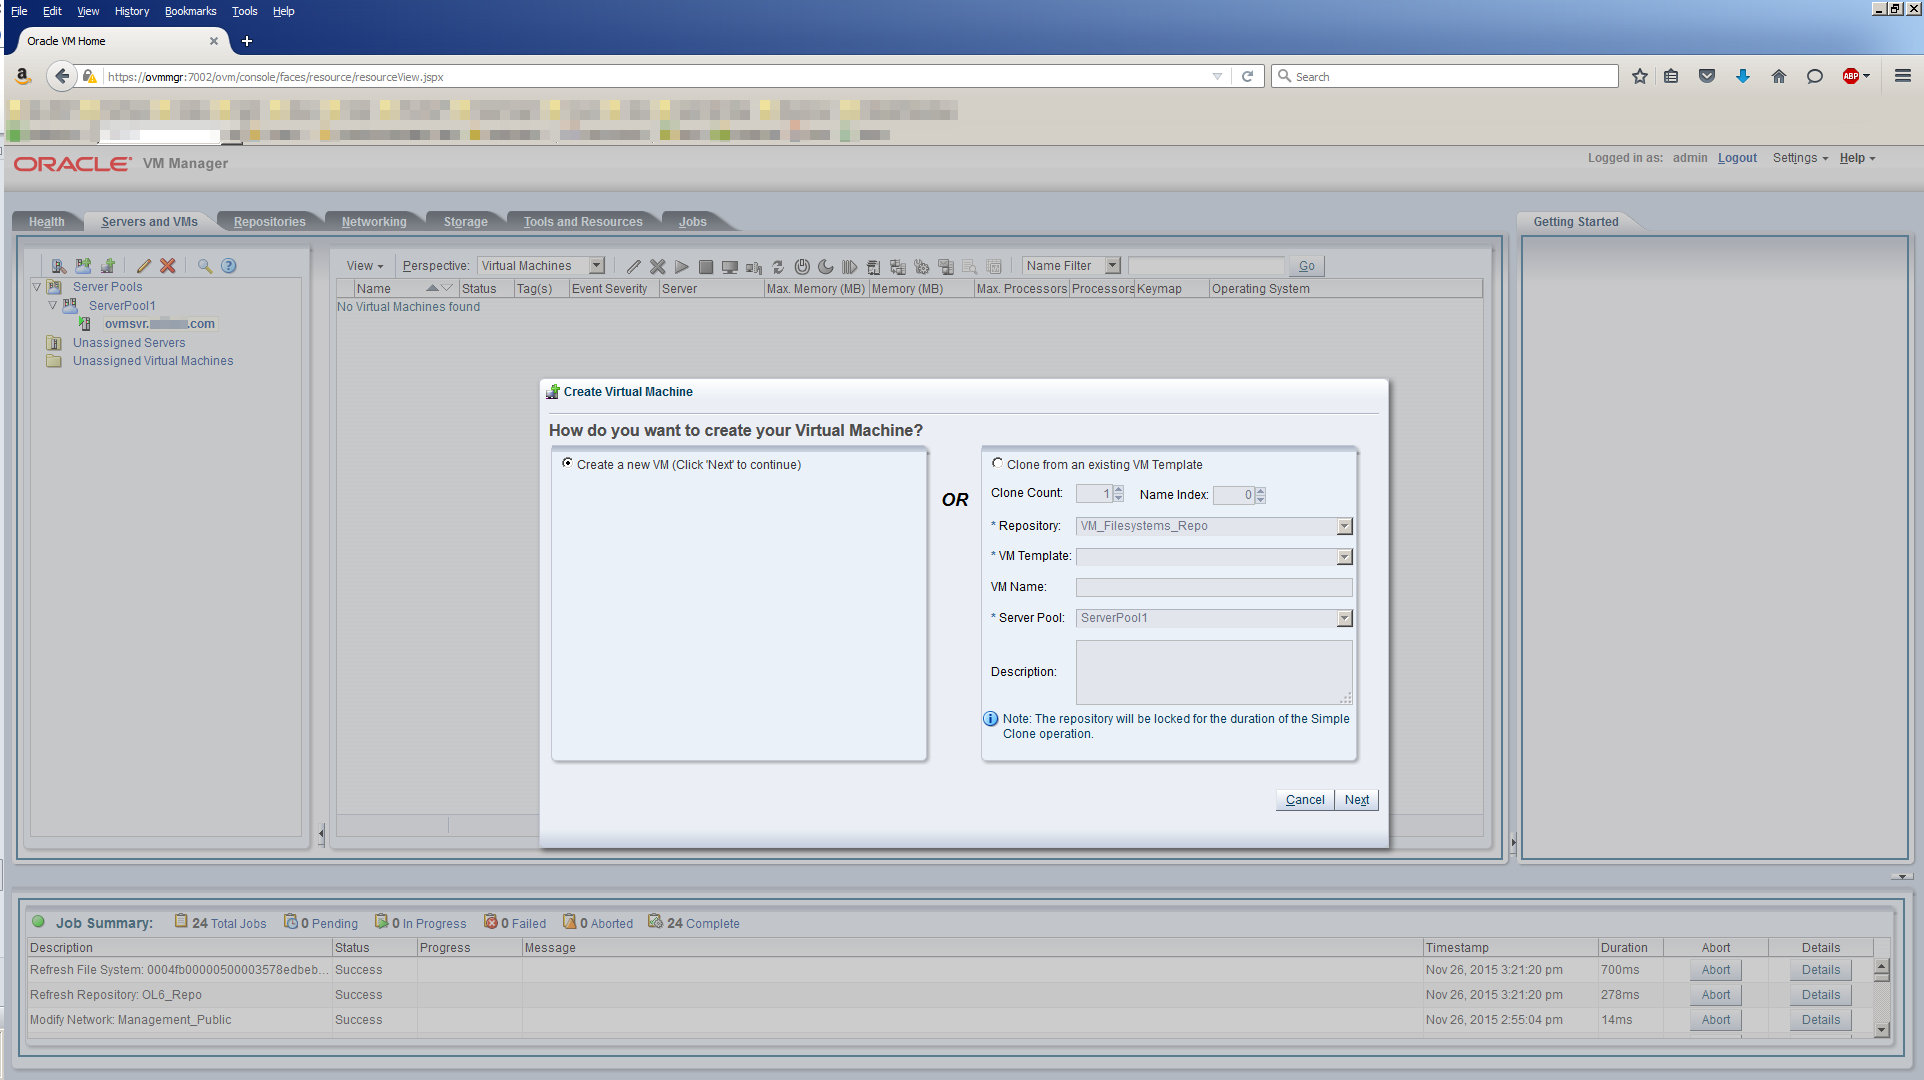
Open up Oracle VM Manager. Use the arrow head icon to expand Server Pools. Then expand ServerPool1, then right click on ovmsvr.mynet.com and select the option, Create Virtual Machine. You could also click on the Create Virtual Machine icon:
Your screen should look similar to this:
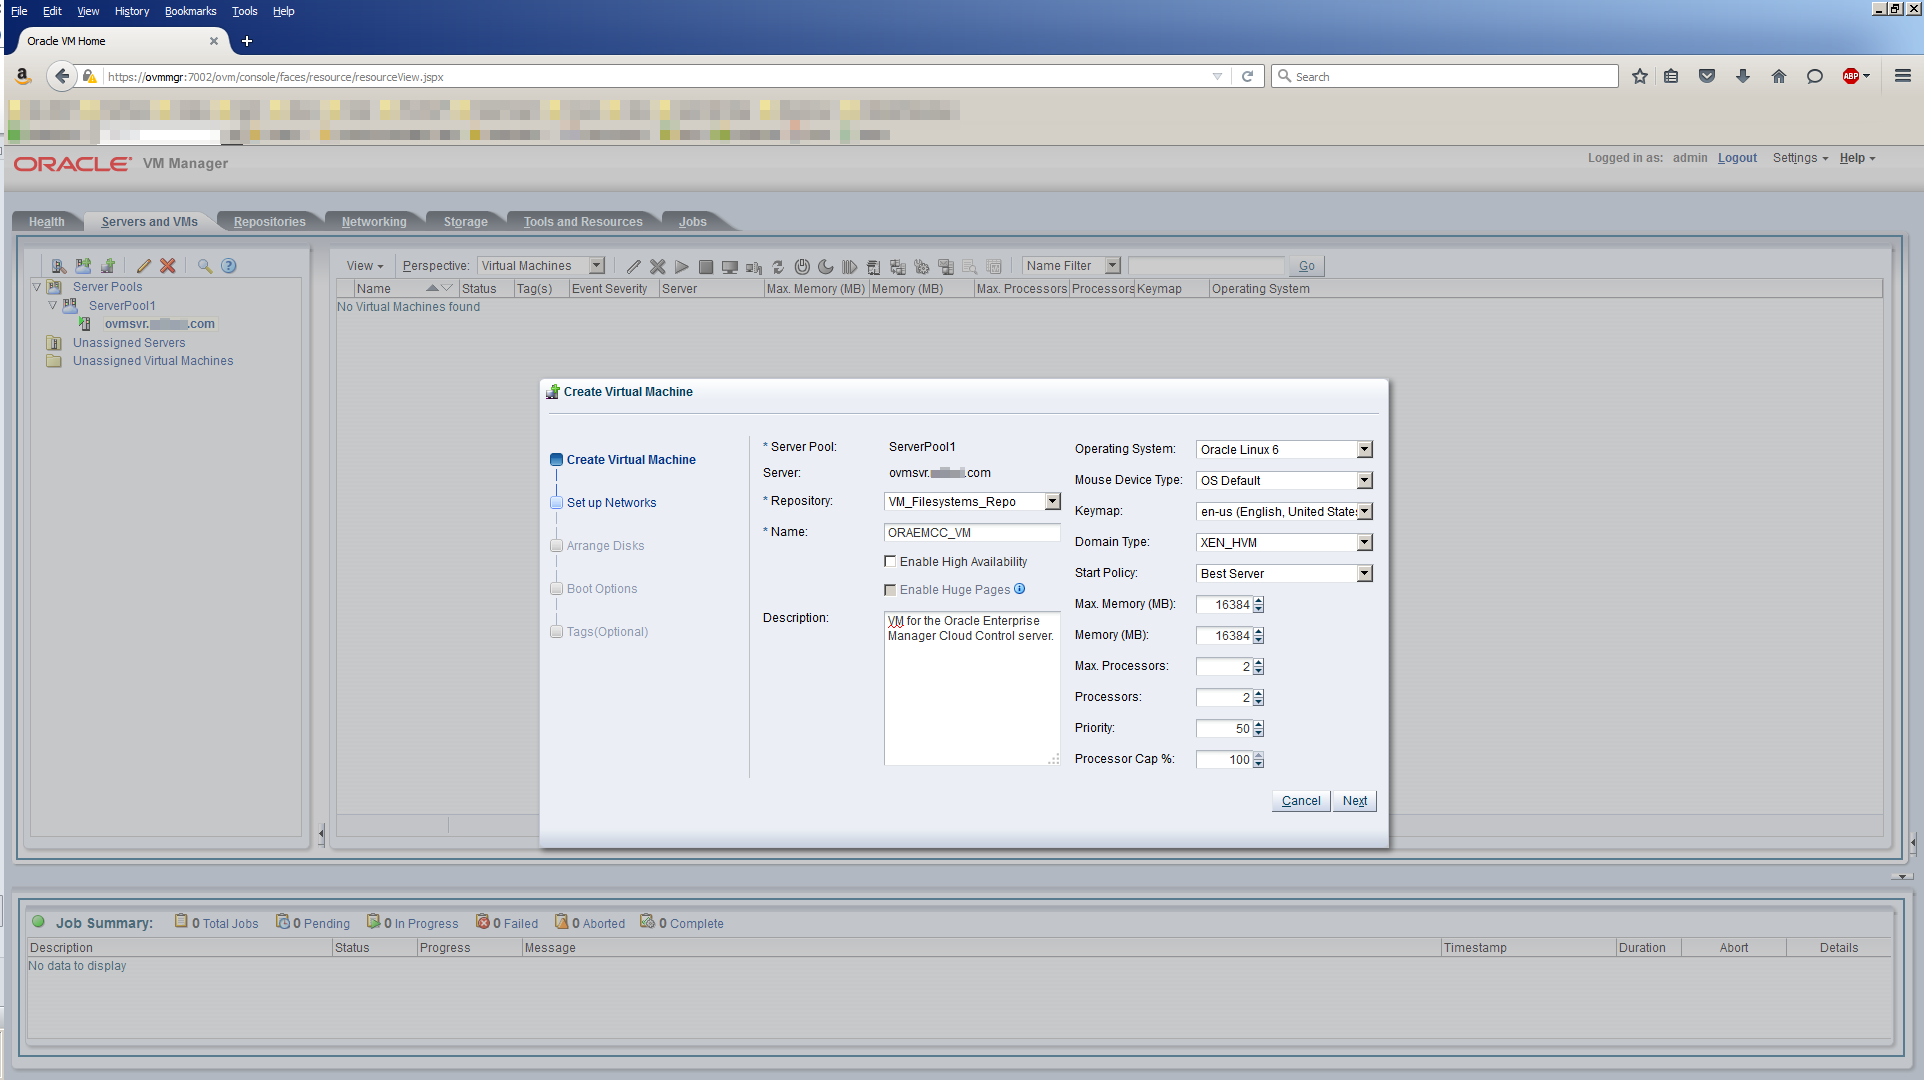
Click Next. Use the following field values to populate this next screen:
| Field | Value |
|---|---|
| Repository | VM_Filesystems_Repo |
| Name | ORAEMCC_VM |
| Description | VM for the Oracle Enterprise Manager Cloud Control Server |
| Operating System | Oracle Linux 6 |
| Mouse Device Type | OS Default (default) |
| Keymap | en-us (English, United States) (default) |
| Domain Type | XEN_HVM |
| Start Policy | Best Server (default) |
| Max. Memory (MB) | 16384 |
| Memory (MB) | 16384 |
| Max. Processors | 2 |
| Processors | 2 |
| Priority | 50 (default) |
| Processor Cap % | 100 (default) |
The screen should look similar to this:
Click Next.
Task #1b: Add Networks.
Use the Network pull down menu and the Add VNIC button to add the Management_Public network to the VM. You can leave the option, Dynamically Assign MAC, selected unless you want to provide your own MAC address. In which case, select the option, Specify MAC Address and enter your own value. ORAEMCC_VM only needs one network since it won’t be using shared storage or the private interconnect. Your screen should now look similar to this:
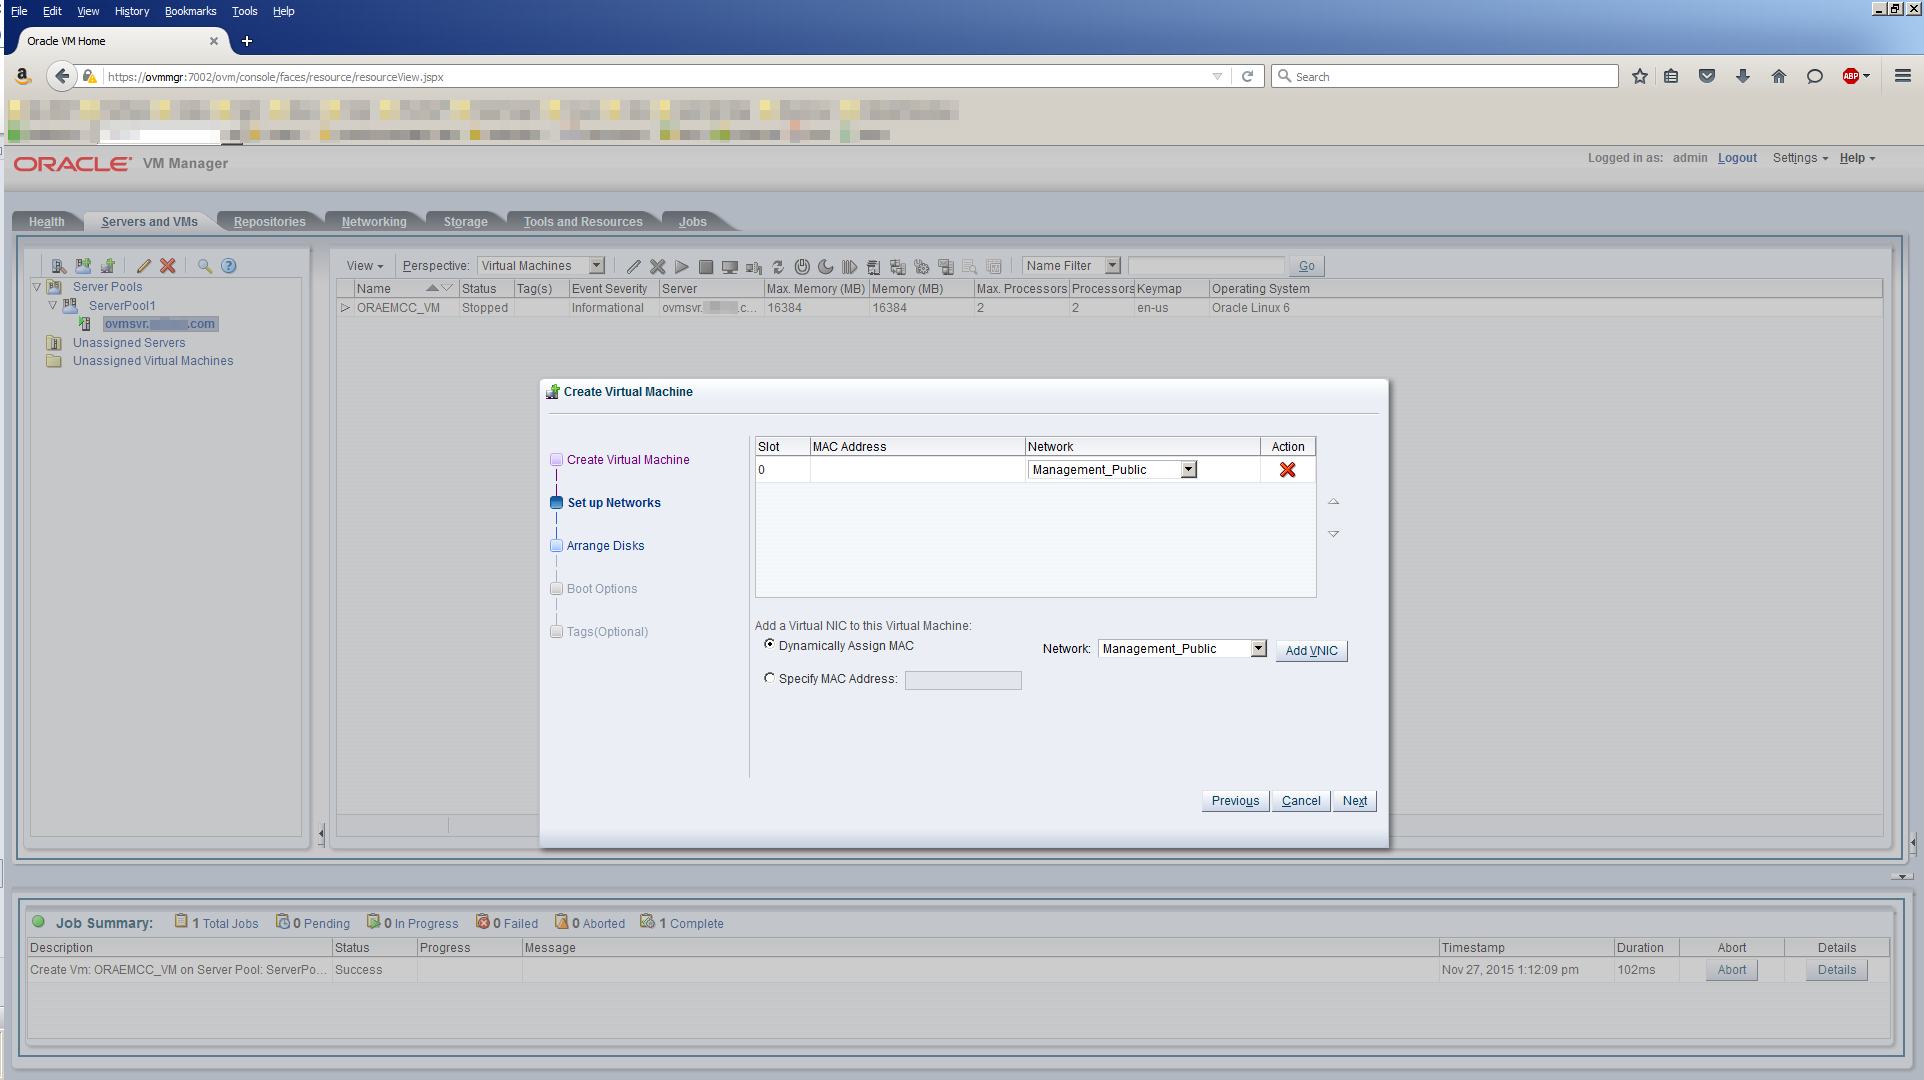
Click Next.
Note, in case you were wondering where a dynamically assigned MAC address comes from, there is a predefined range which OVM Manager uses. You can see and change this range from this screen:

Task #1c: Add Storage.
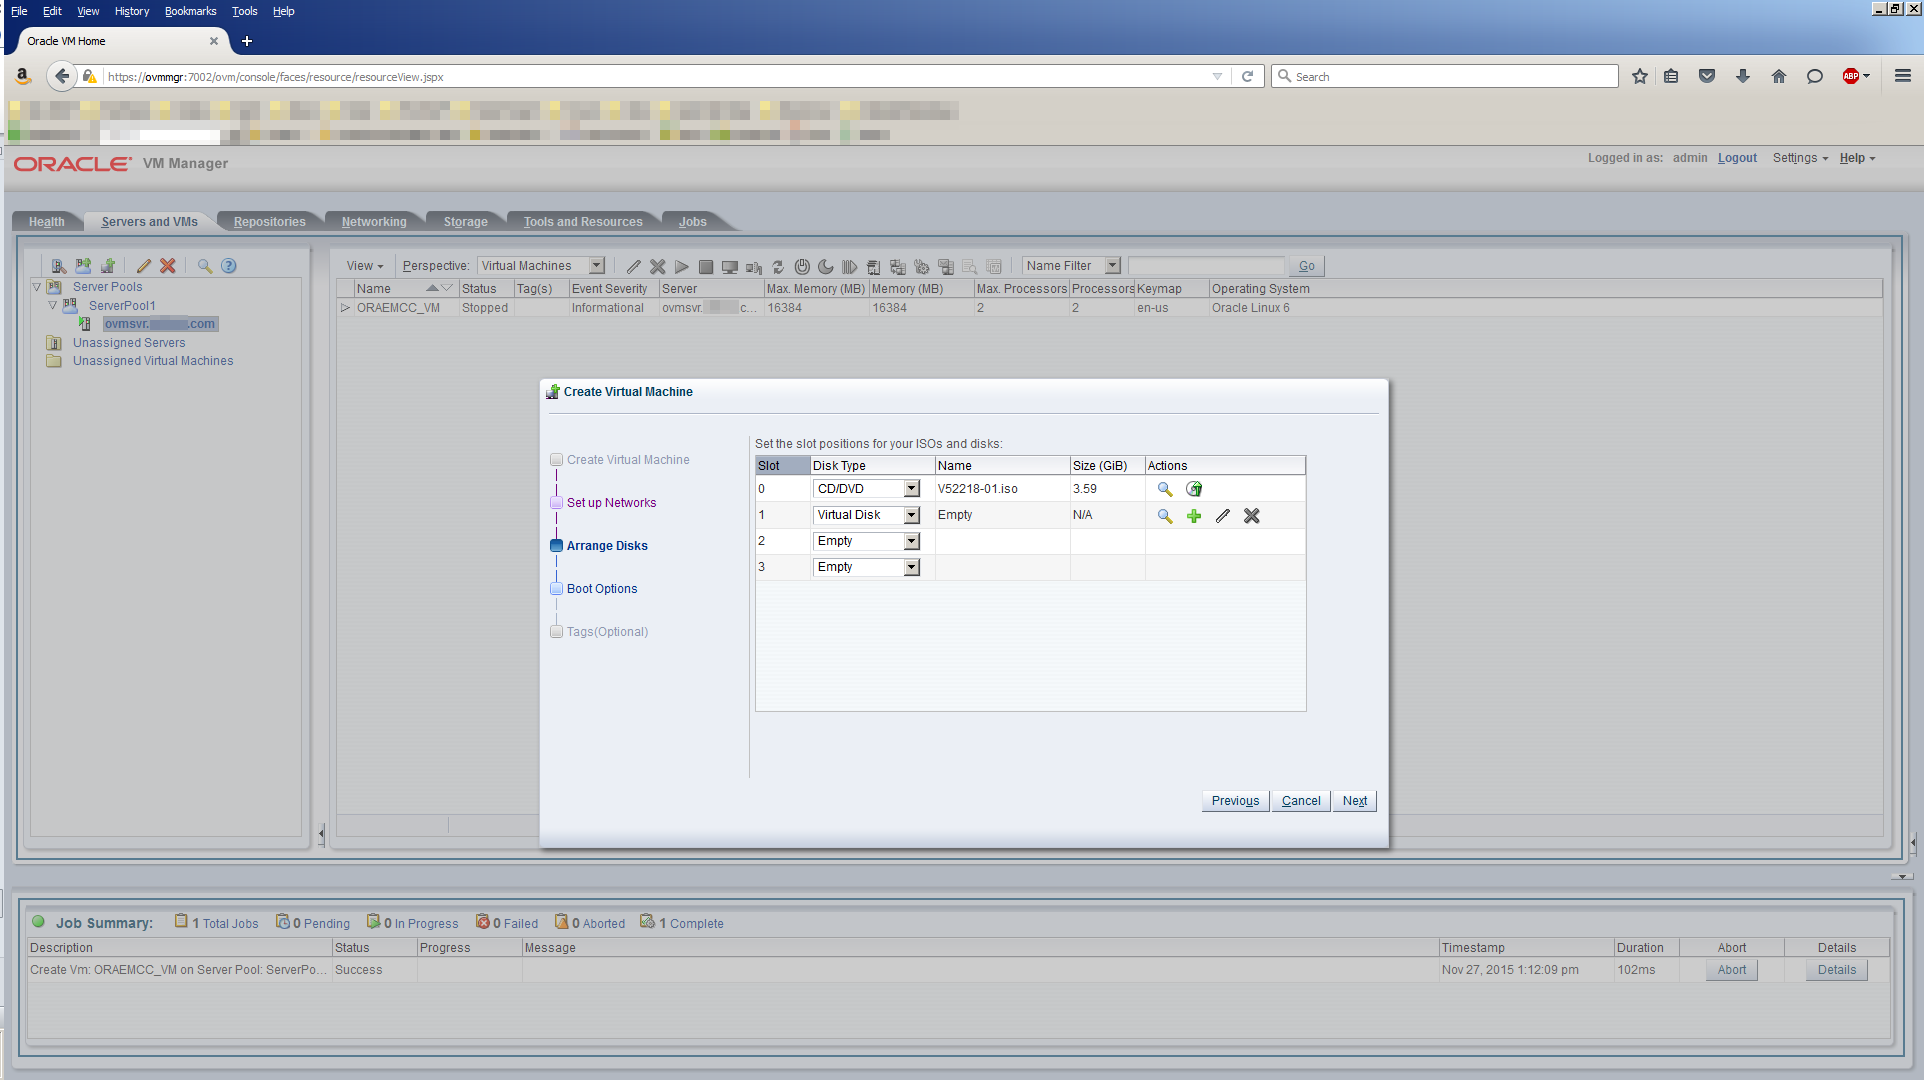
Since we chose a Domain Type of XEN_HVM, we only get 4 slots to add disk storage to this VM. That’s OK because we only need 4. If you had chosen a Domain Type of XEN_PVM, then you could add up to 103 pieces of disk storage. For this VM, we only need to add a CD/DVD drive and storage for 3 filesystems.
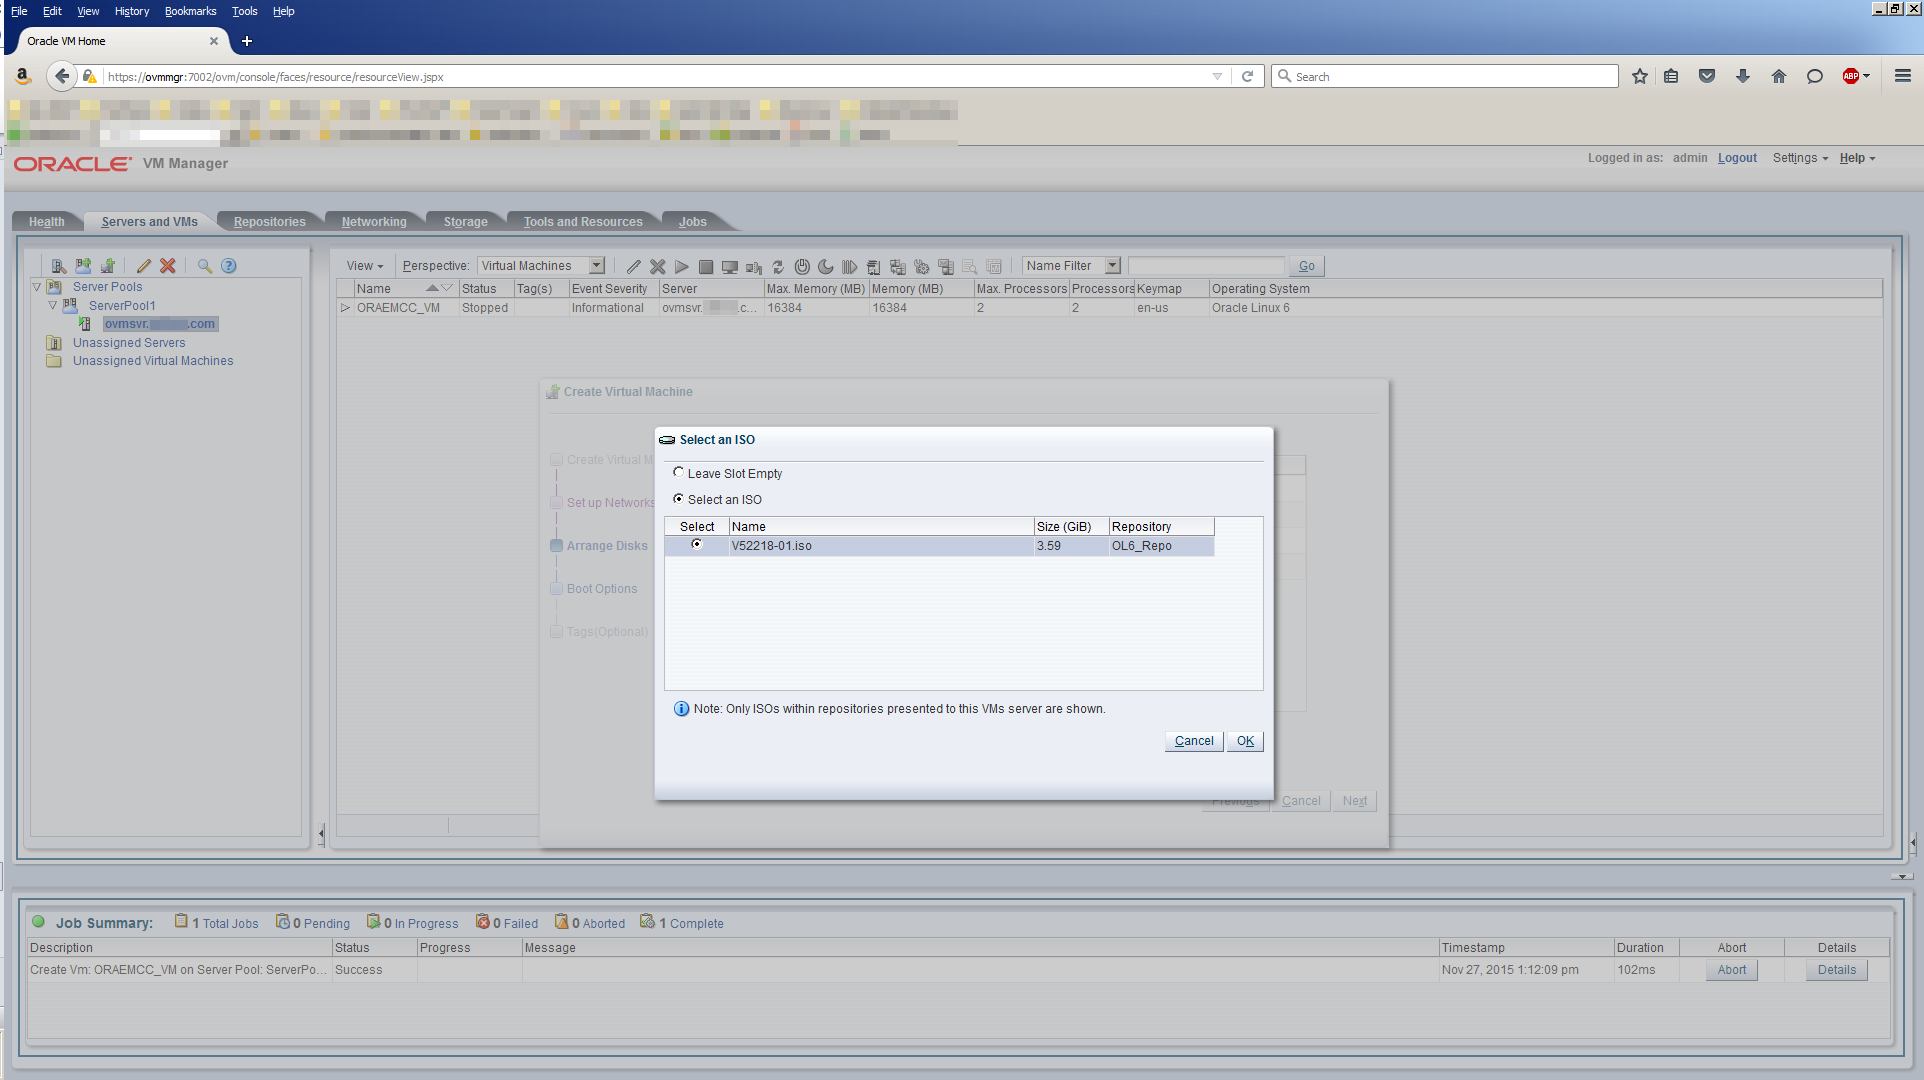
First, we’ll add the CD/DVD drive. This device will be used to store the Oracle Linux ISO which we’ll boot from later. For Slot 0, use the Disk Type pull down menu and select CD/DVD. Your screen should now look similar to this:

Click the magnifying glass icon. This will open up the Select an ISO dialog box. Select the Oracle Linux 6 Update 6 ISO file, V52218-01.iso. Notice the name of the repository it’s coming from, OL6_Repo. Hopefully you’re beginning to see how things are connected in OVM. Isn’t it fun? Your screen should look similar to this:
Click OK to return to the Arrange Disks dialog. For Slot 1, use the Disk Type pull down menu and select Virtual Disk. Your screen should look similar to this:
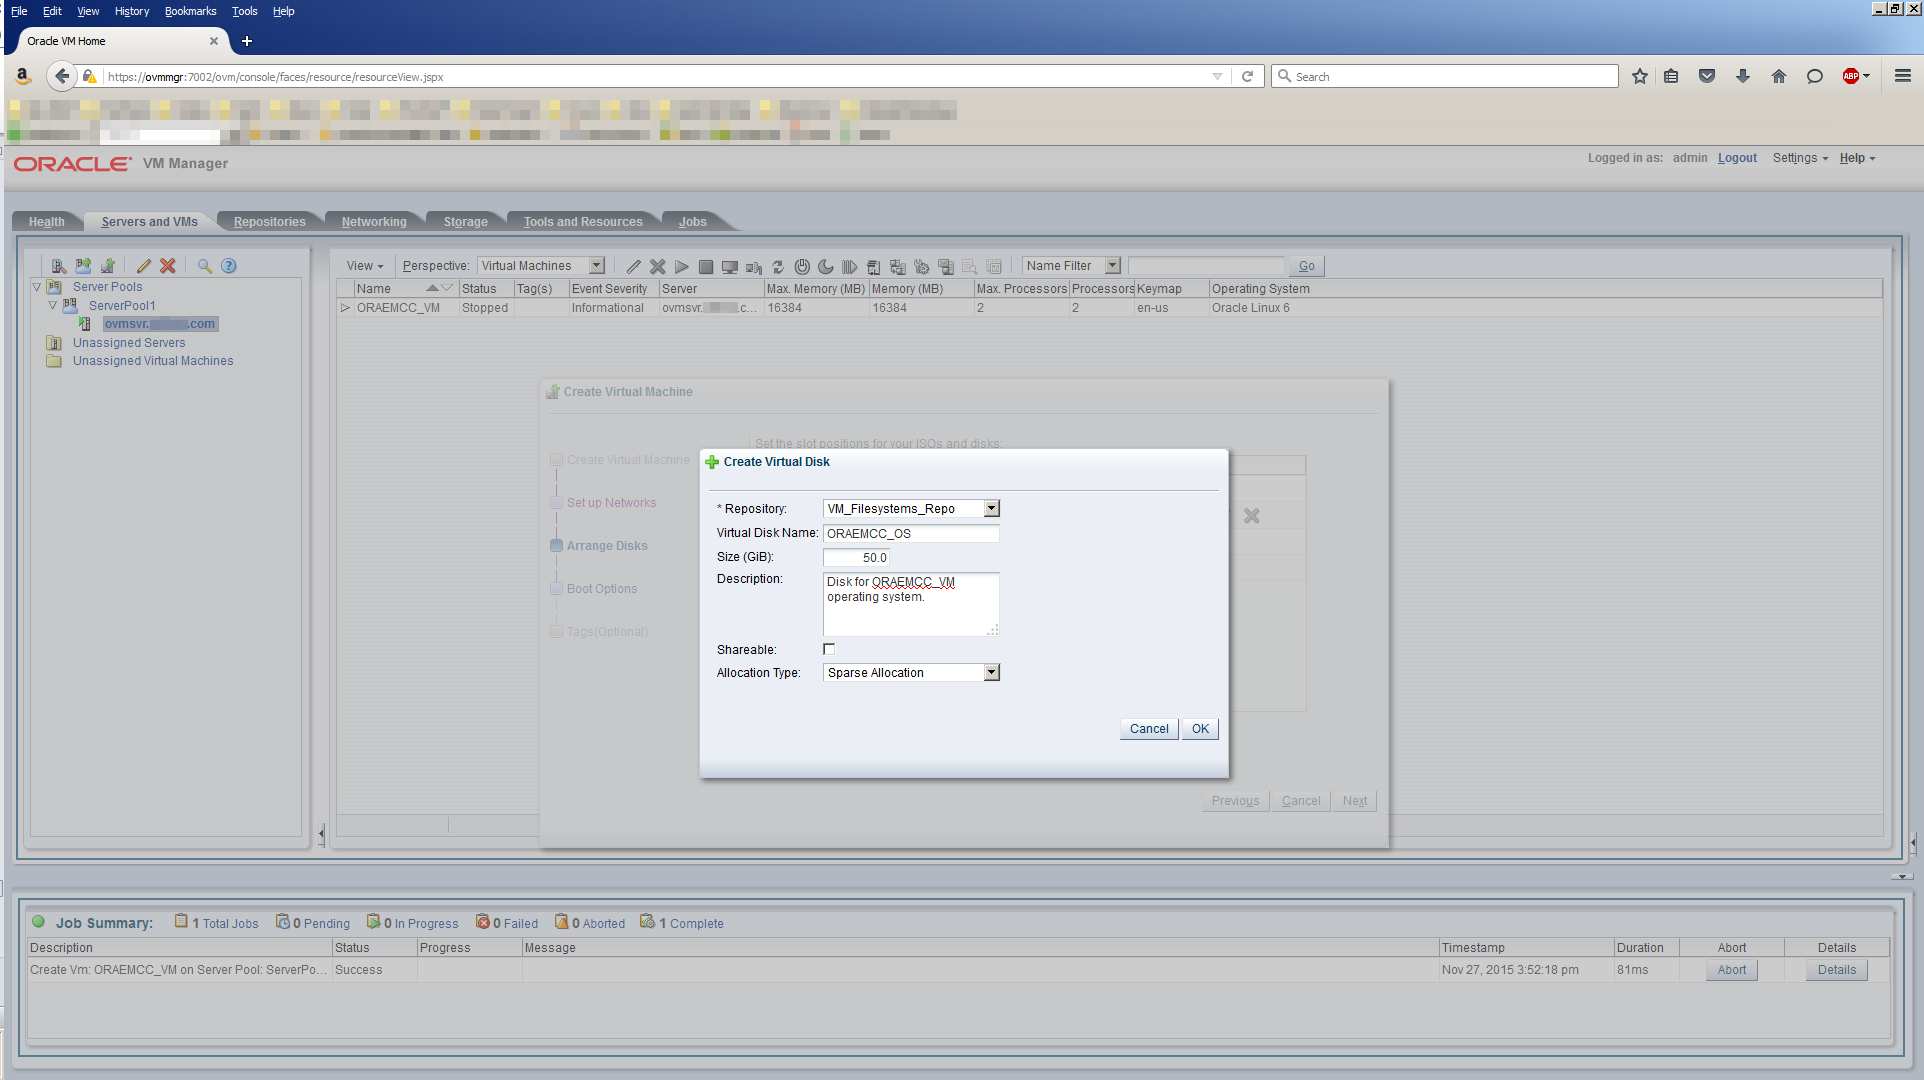
Click the green + sign to open up the Create Virtual Disk dialog. Use these values:
| Field | Value |
|---|---|
| Repository | VM_Filesystems_Repo |
| Virtual Disk Name | ORAEMCC_OS |
| Size (GiB) | 50.0 |
| Description | Disk for ORAEMCC_VM operating system. |
| Shareable | Leave unchecked (default) |
| Allocation Type | Sparse Allocation (default) |
The disk space allocated for the operating system includes space for the OS itself, swap and /home. The Oracle Enterprise Manager Cloud Control installation binaries will be copied here too, hence the generous 50 GB size. Notice that this 50 GB will be allocated from the VM_Filesystems_Repo Storage Repository we created earlier. Your screen should look similar to this:
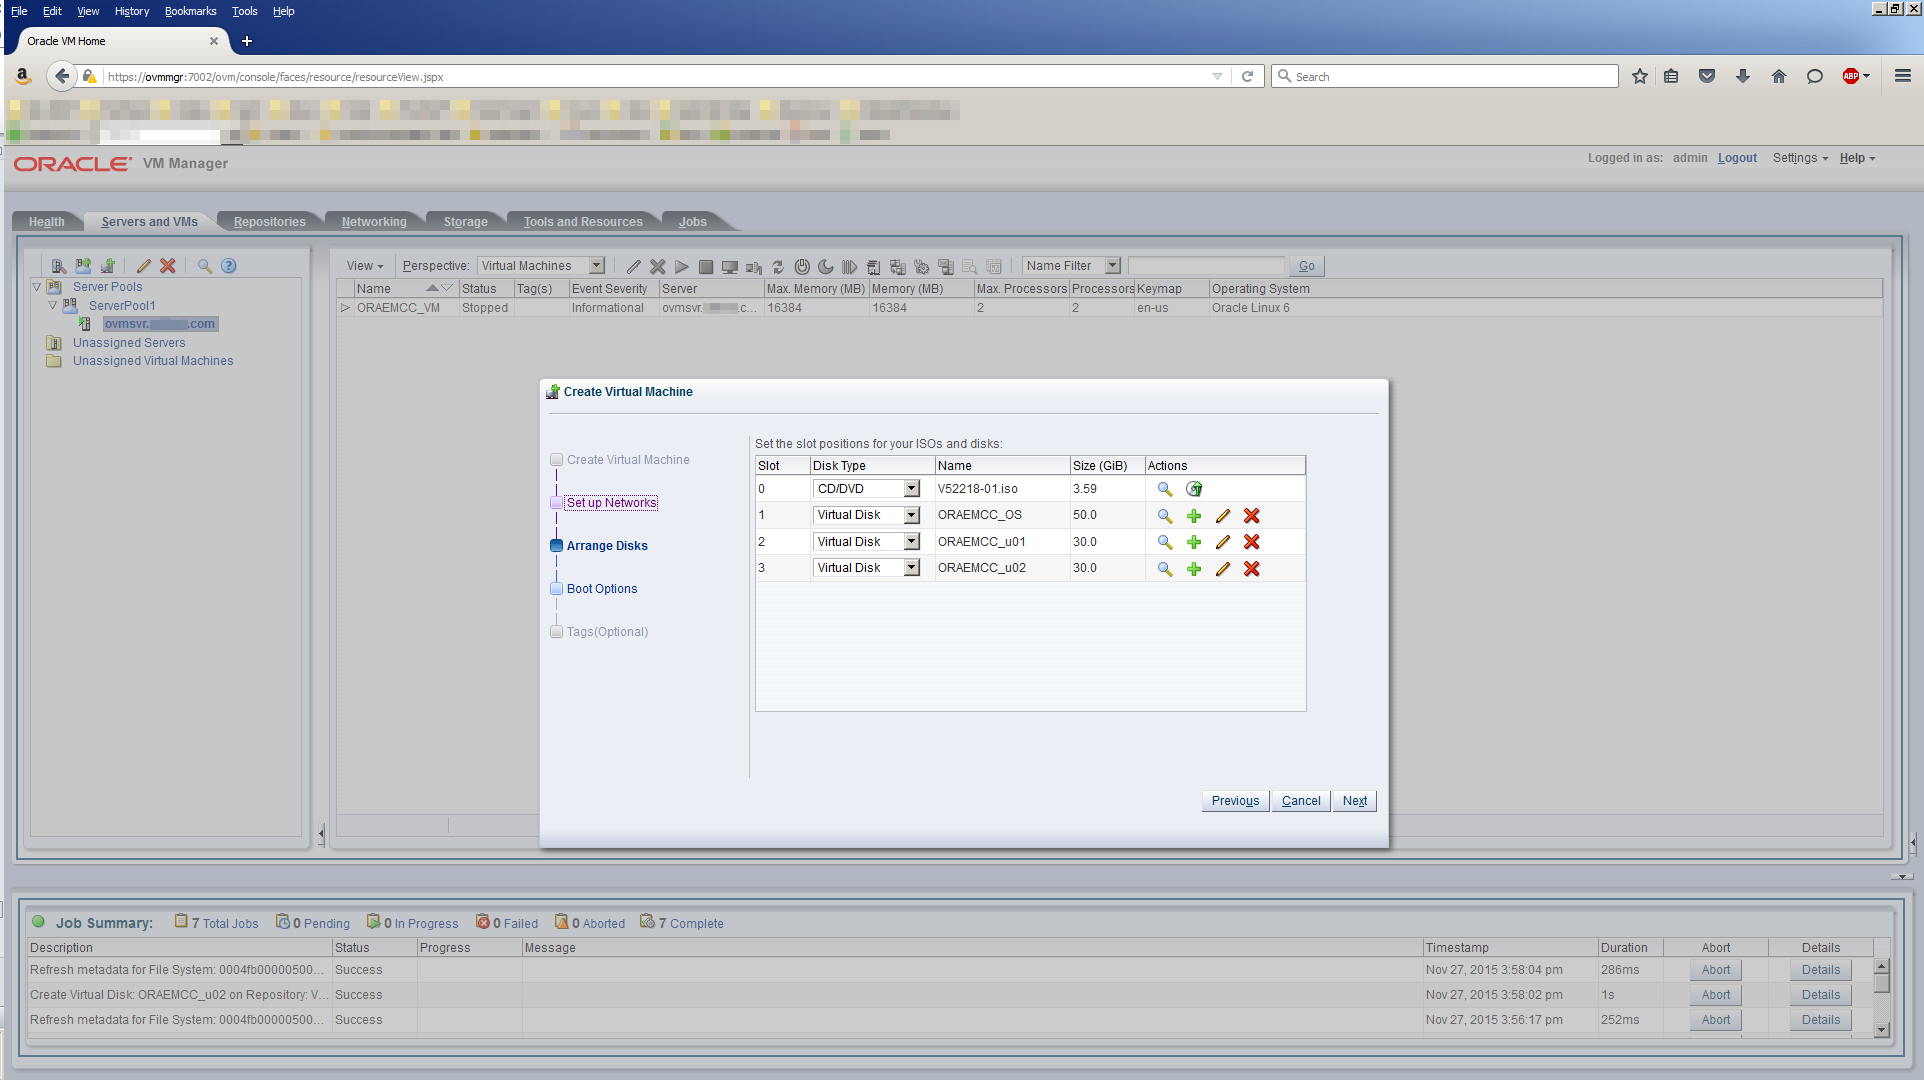
Click OK to return to the Arrange Disks dialog. Repeat this process to add 2 more Virtual Disks.
For slots 2 and 3 use these values:
| Slot# | Field | Value |
|---|---|---|
| Slot 2 | Repository | VM_Filesystems_Repo |
| Virtual Disk Name | ORAEMCC_u01 | |
| Size (GiB) | 30.0 | |
| Description | Disk for ORAEMCC_VM /u01 filesystem. | |
| Shareable | Leave unchecked (default) | |
| Allocation Type | Sparse Allocation (default) | |
| Slot 3 | Repository | VM_Filesystems_Repo |
| Virtual Disk Name | ORAEMCC_u02 | |
| Size (GiB) | 30.0 | |
| Description | Disk for ORAEMCC_VM /u02 filesystem. | |
| Shareable | Leave unchecked (default) | |
| Allocation Type | Sparse Allocation (default) | |
Note, the Oracle software will be installed into the /u01 filesystem. The data files for the Cloud Control repository database will be stored in the /u02 filesystem.
When you have completed adding Virtual Disks for Slots 2 and 3, your screen should look similar to this:
Click Next.
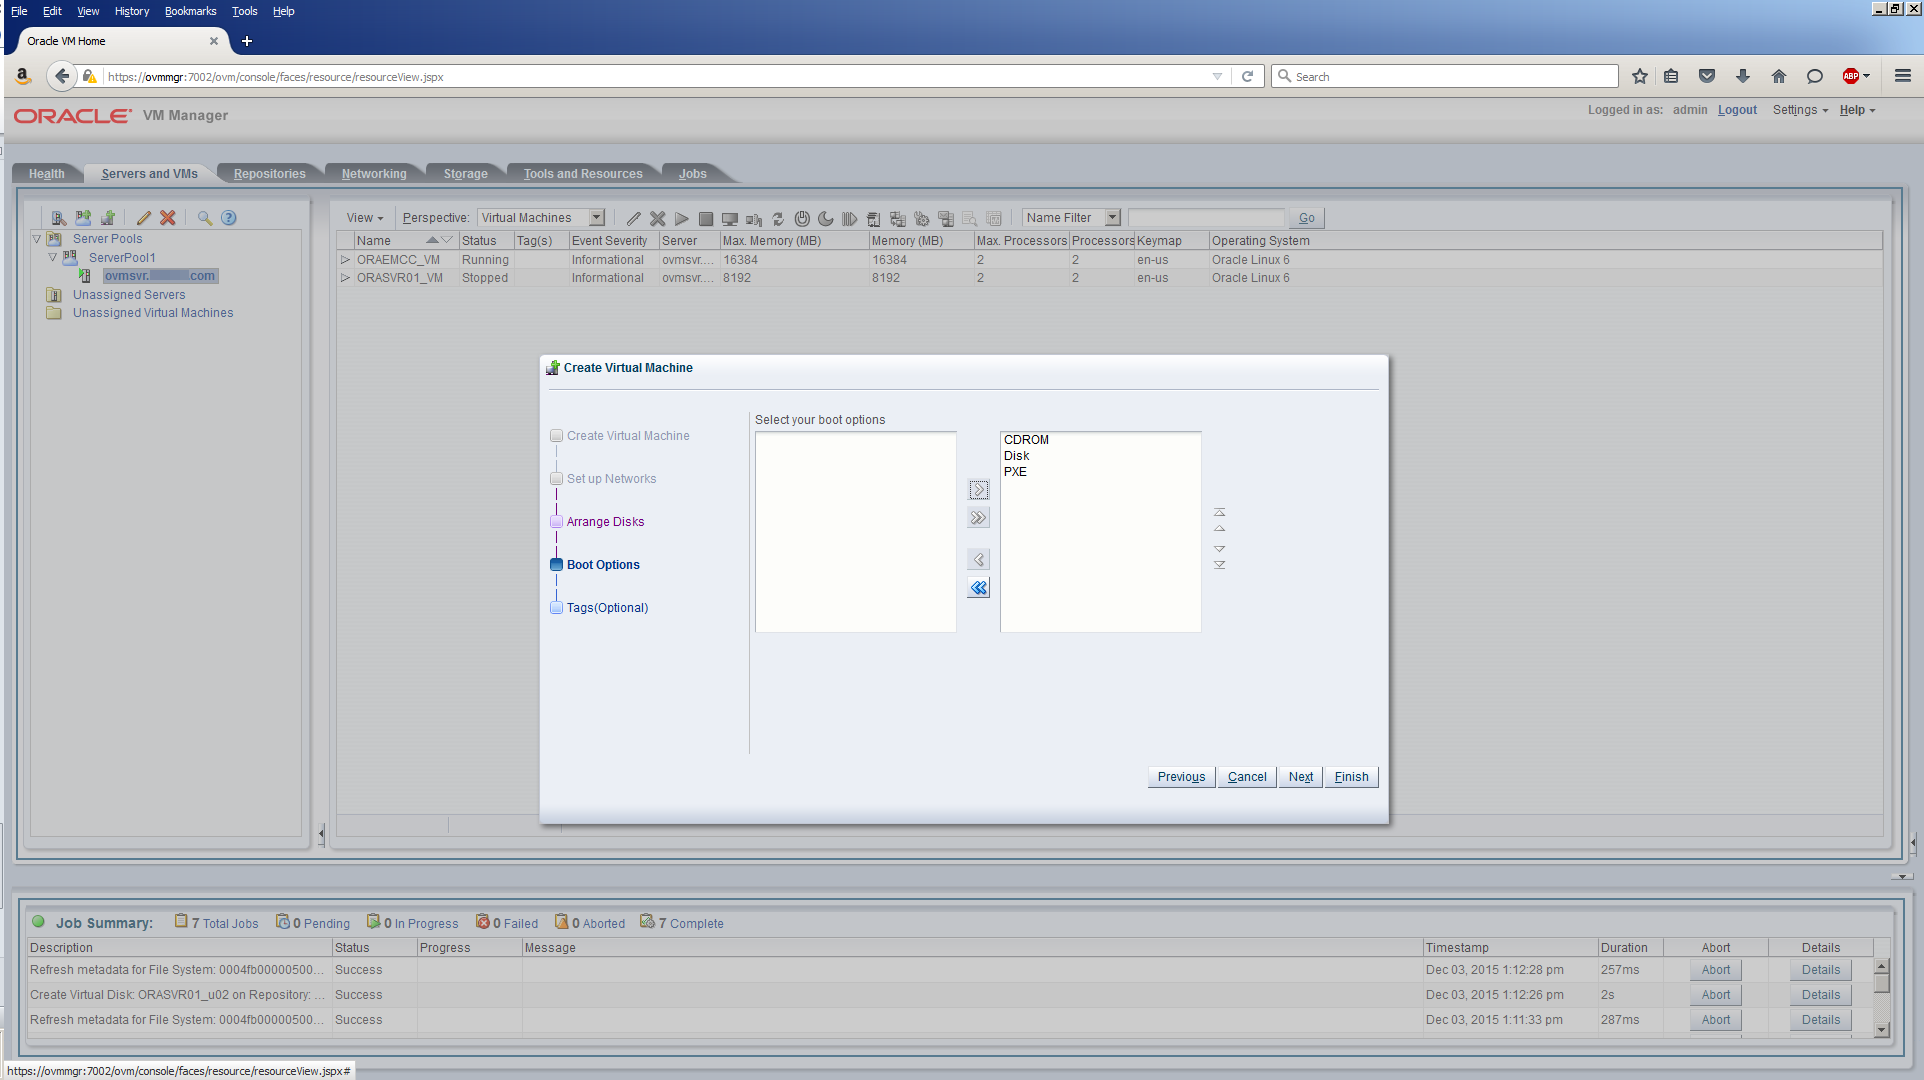
Task #1d: Add Boot Order.
Using the arrow icons, move the boot options from the left pane to the right pane in the order shown in this screen:
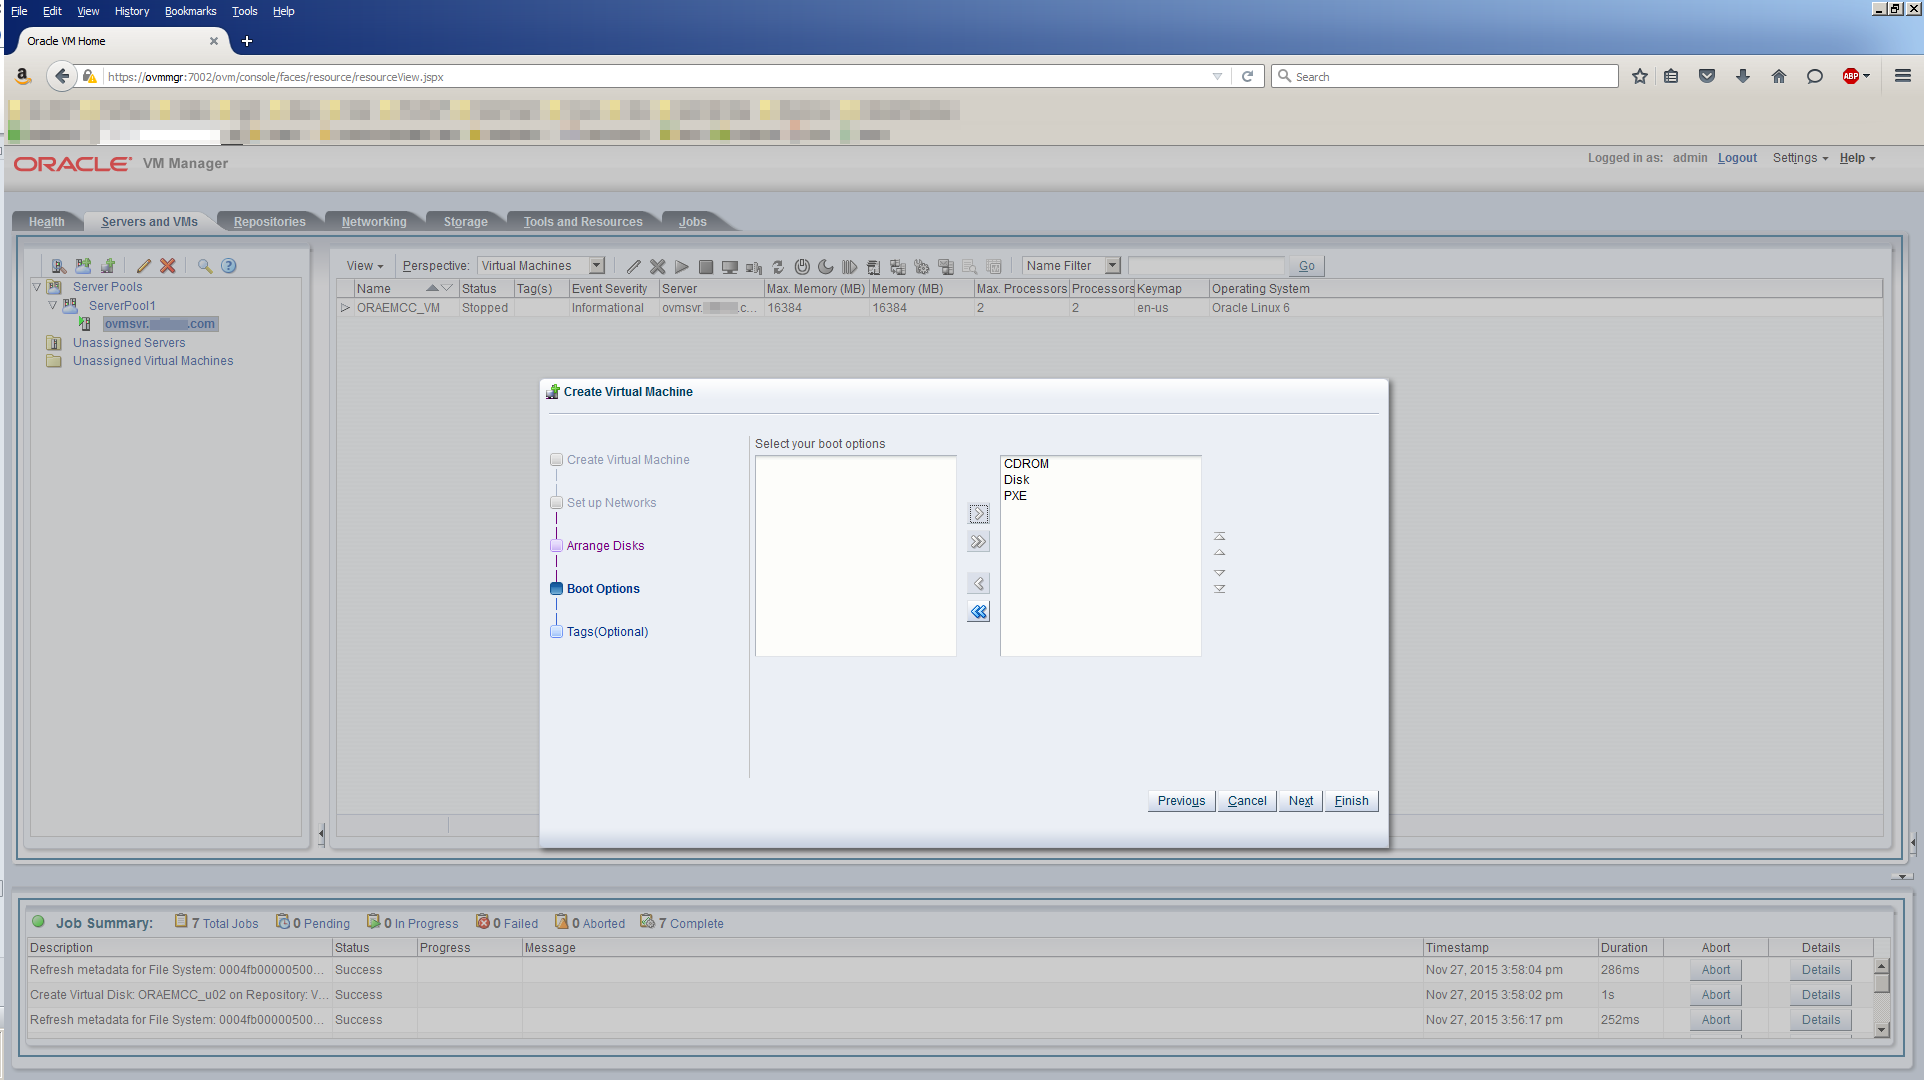
It’s important that CDROM is first in the list. When we start the VM for the very first time, it needs to boot from this device so we can install Oracle Linux.
Click Finish and your screen should look similar to this:
That’s all there is to creating a VM. At this point, the VM is effectively just metadata. It’s not a running server just yet. That comes later when we start the VM, boot from the ISO in the virtual CD/DVD drive and install the Oracle Linux operating system. Next we’ll create the first Oracle database server.
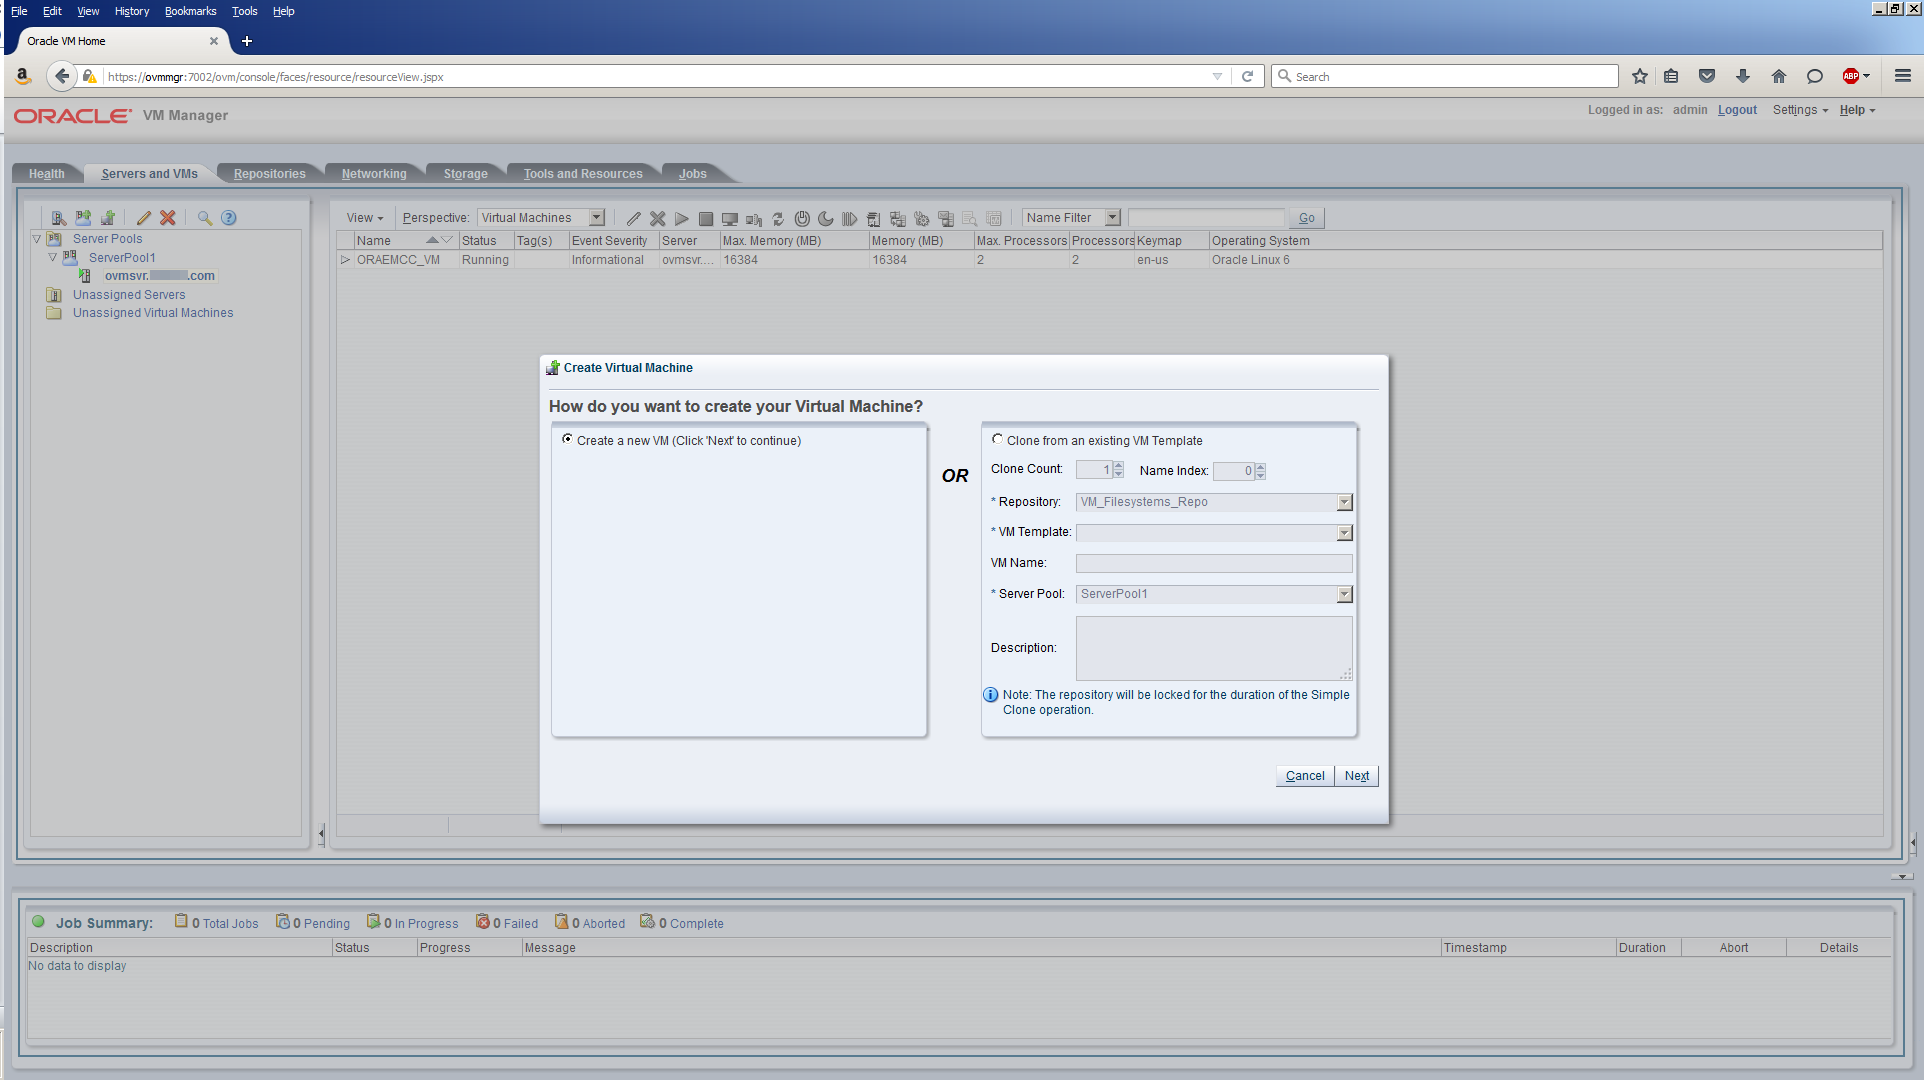
Task #2: Create ORASVR01_VM.
Creating an Oracle database server VM follows the same 4 steps.
Task #2a: Add CPU and Memory.
Click the Create Virtual Machine icon:
Your screen should look similar to this:
Click Next and complete this next screen with these values:
| Field | Value |
|---|---|
| Repository | VM_Filesystems_Repo |
| Name | ORASVR01_VM |
| Description | VM for Oracle Database Server #1. |
| Operating System | Oracle Linux 6 |
| Mouse Device Type | OS Default (default) |
| Keymap | en-us (English, United States) (default) |
| Domain Type | XEN_HVM |
| Start Policy | Best Server (default) |
| Max. Memory (MB) | 8192 |
| Memory (MB) | 8192 |
| Max. Processors | 2 |
| Processors | 2 |
| Priority | 50 (default) |
| Processor Cap % | 100 (default) |
The screen should look similar to this:
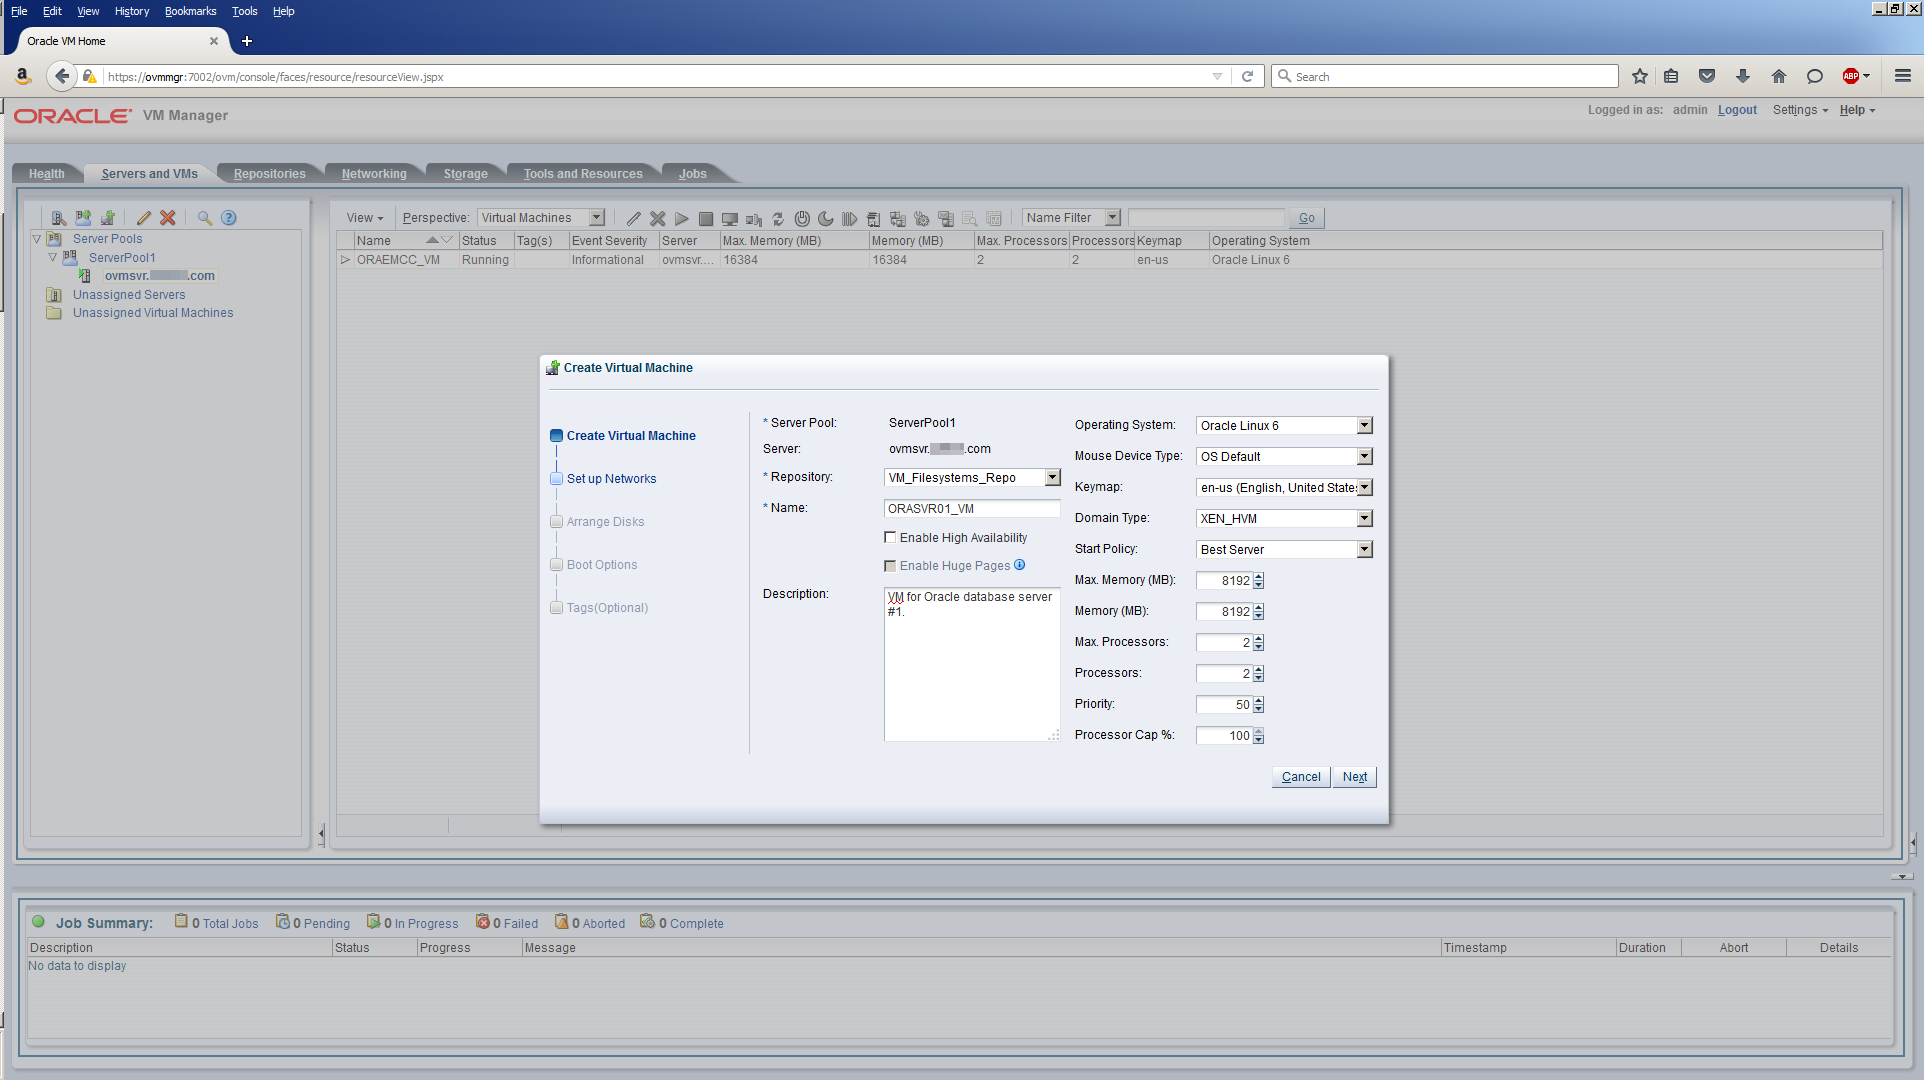
Click Next.
Task #2b: Add Networks.
Use the Network pull down menu and the Add VNIC button to add the Management_Public network to the VM. You can leave the option, Dynamically Assign MAC, selected unless you want to provide your own MAC address. In which case, select the option, Specify MAC Address and enter your own value. ORASVR01_VM only needs one network since it won’t be using shared storage or the private interconnect. Your screen should now look similar to this:

Click Next.
Task #2c: Add Storage.
Using the previous Add Storage step as a guide, complete the addition of storage to ORASVR01_VM using these values:
| Slot# | Disk Type | Name | Size (GiB) |
|---|---|---|---|
| 0 | CD/DVD | V52218-01.iso | 3.59 |
| 1 | Virtual Disk | ORASVR01_OS | 40.0 |
| 2 | Virtual Disk | ORASVR01_u01 | 30.0 |
| 3 | Virtual Disk | ORASVR01_u02 | 30.0 |
The /u01 filesystem will be used to install the Oracle Database software. The /u02 filesystem will be used to store the actual database data files.
Your screen should now look similar to this:
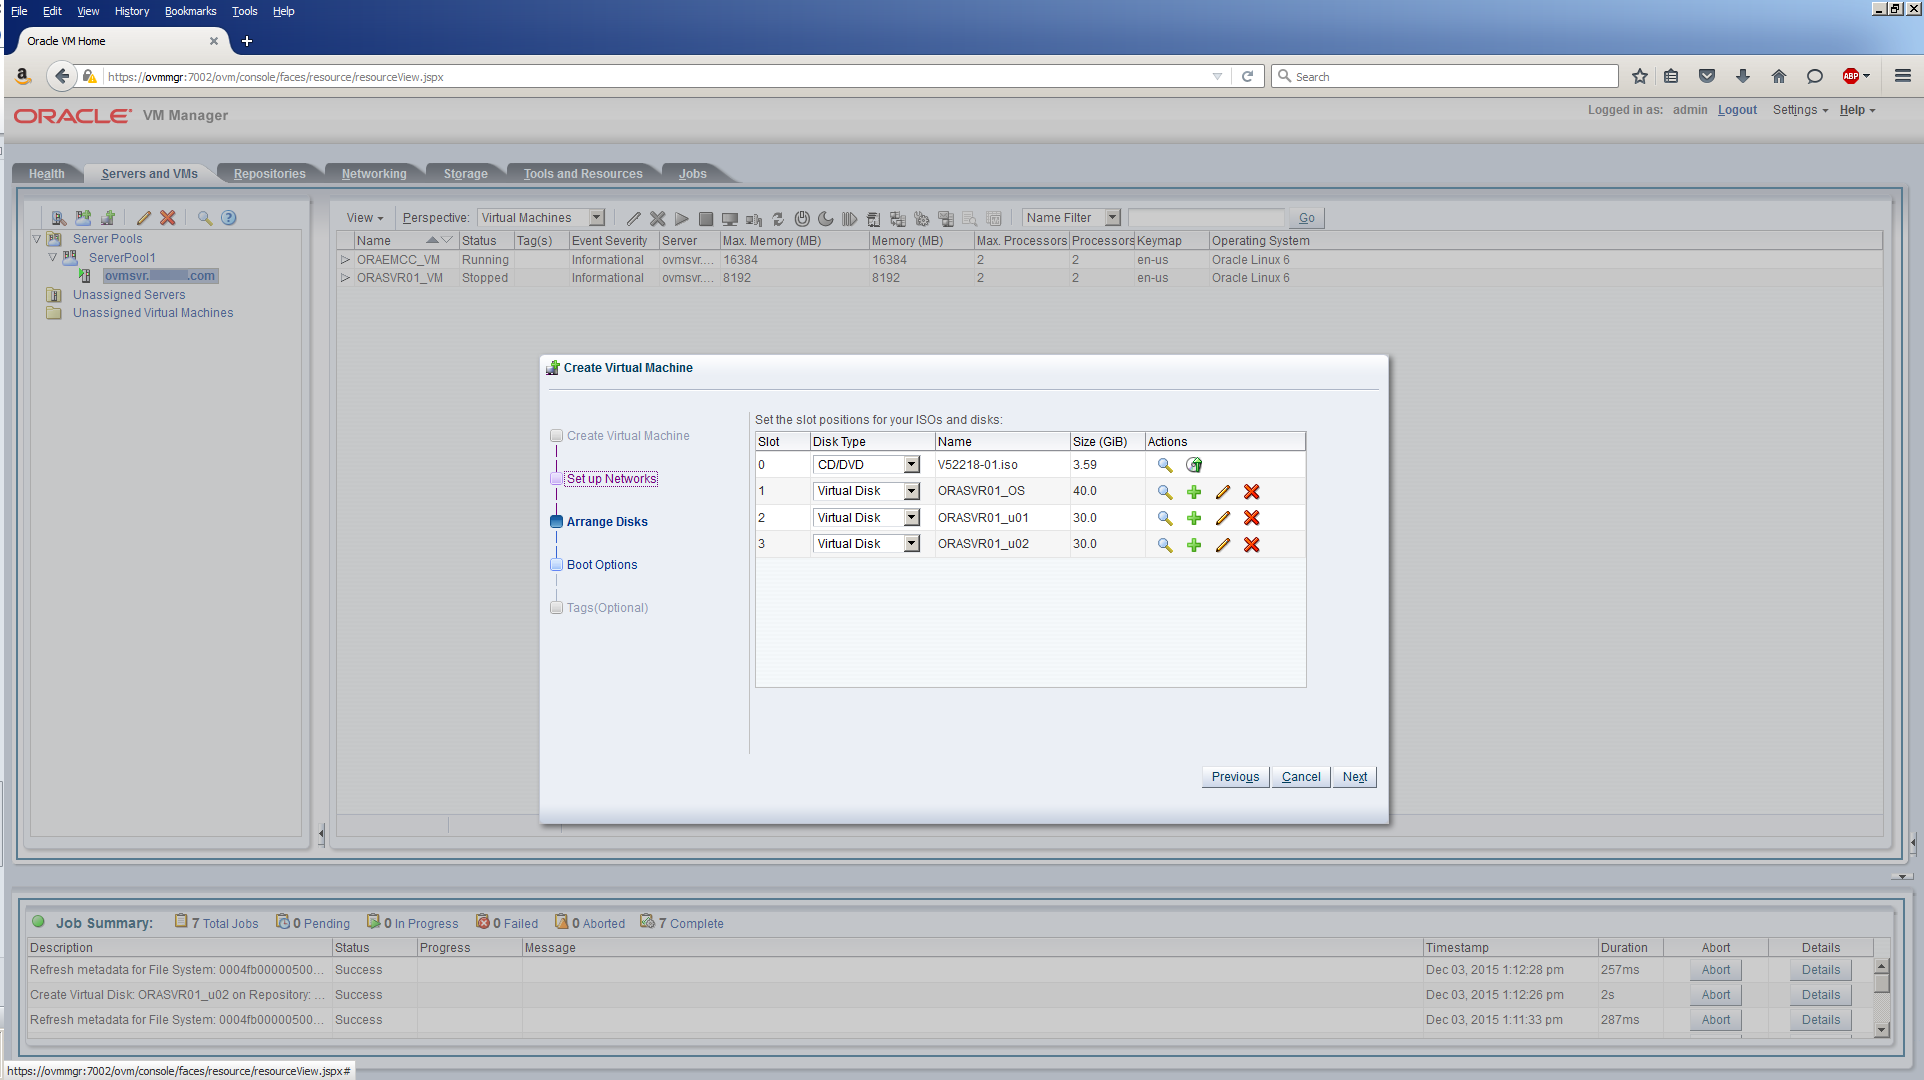
Click Next.
Task #2d: Add Boot Order.
Using the arrow icons, move the boot options from the left pane to the right pane in the order shown in this screen:
Click Finish and your screen should look similar to this:

That’s the first Oracle Database server VM created. Next we’ll create the first Oracle RAC node server.
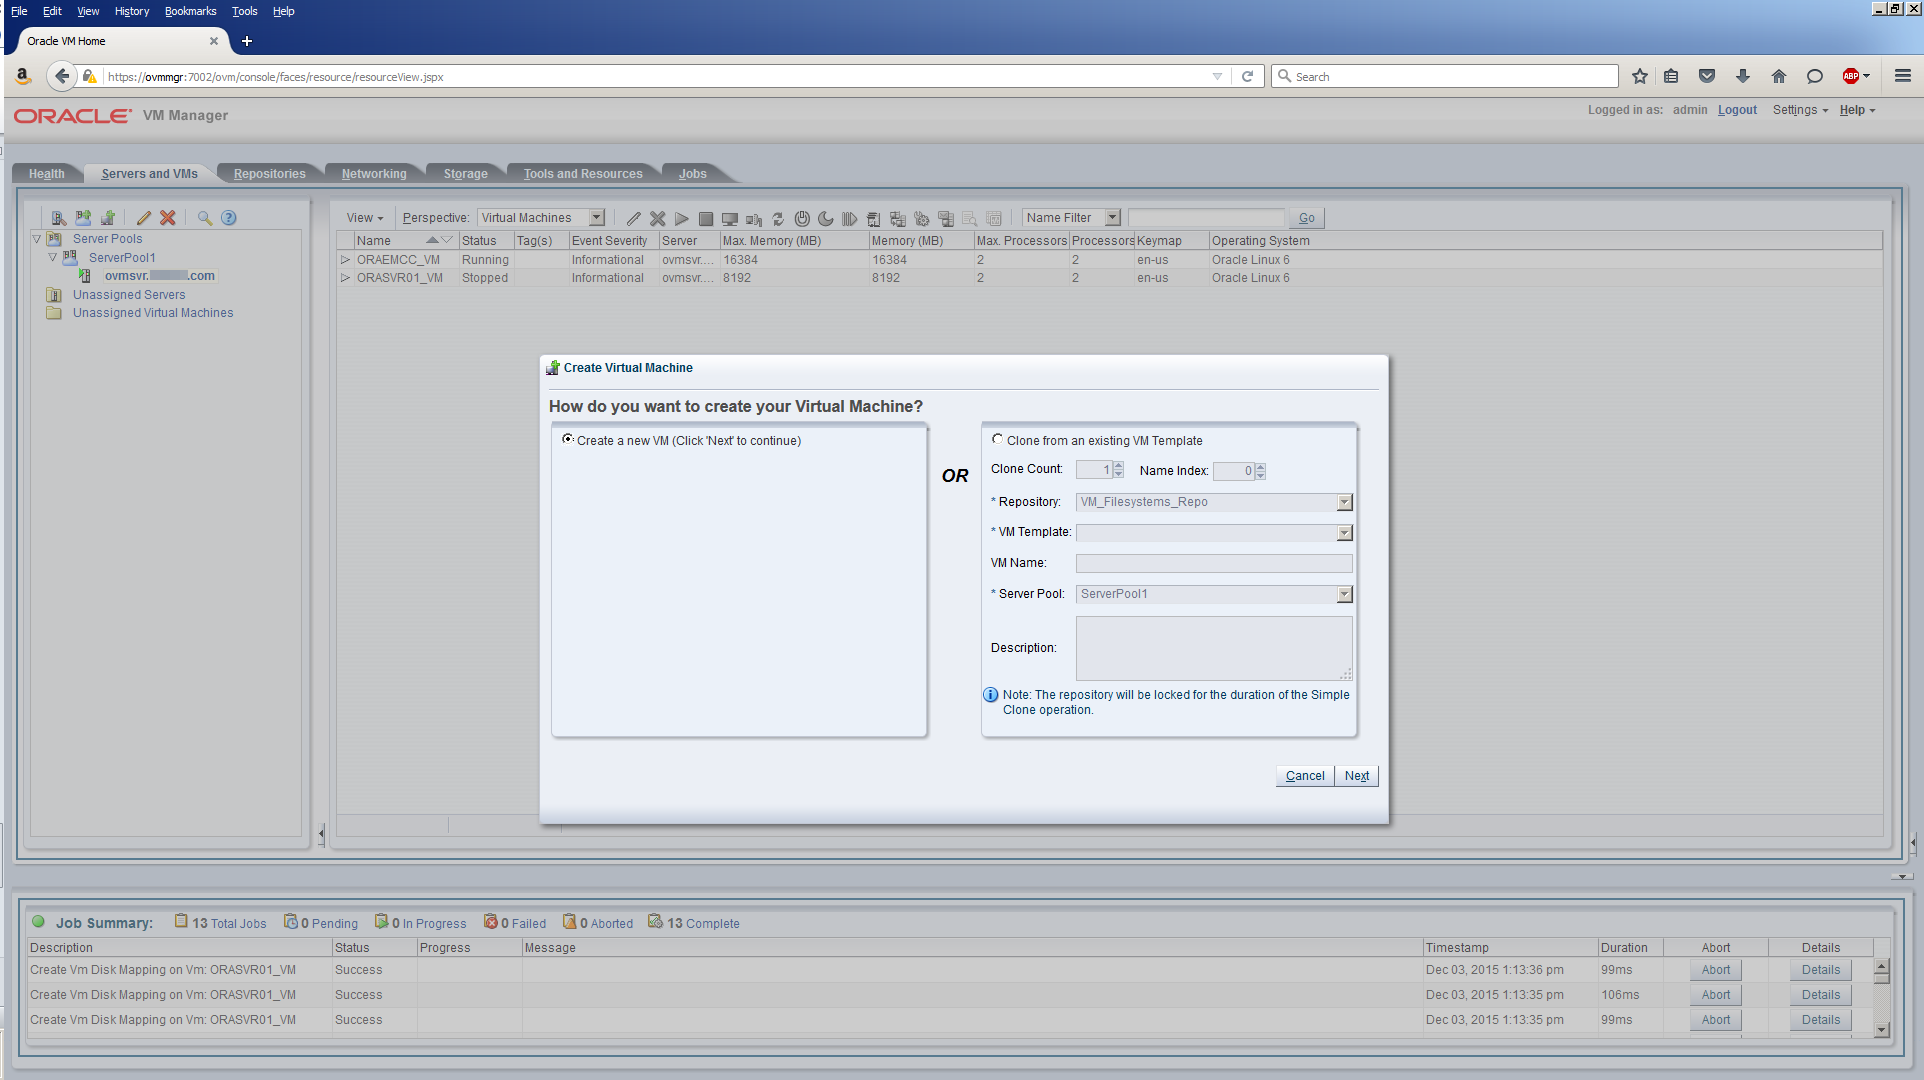
Task #3: Create RACNODE1_VM.
You know the drill by now.
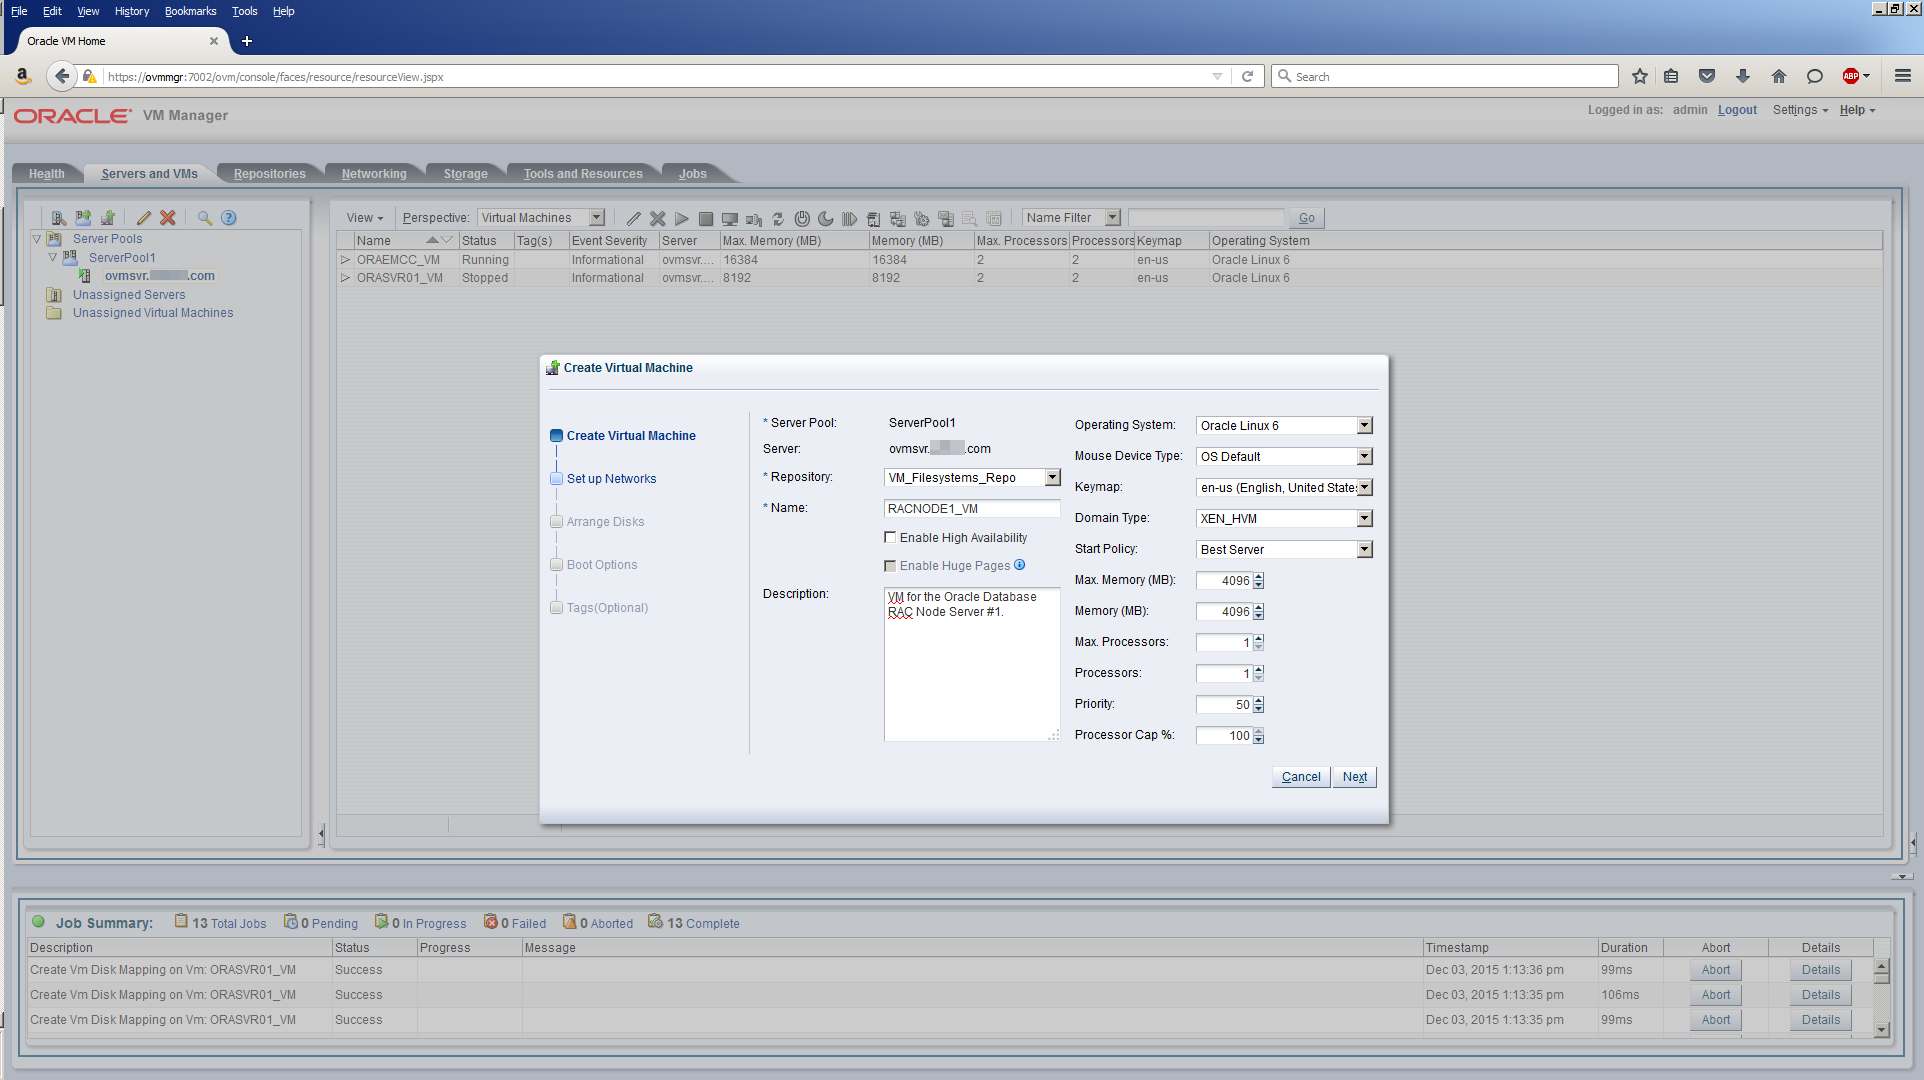
Task #3a: Add CPU and Memory.
Click the Create Virtual Machine icon:
Your screen should look similar to this:
Click Next and complete this next screen with these values:
| Field | Value |
|---|---|
| Repository | VM_Filesystems_Repo |
| Name | RACNODE1_VM |
| Description | VM for the Oracle Database RAC Node Server #1. |
| Operating System | Oracle Linux 6 |
| Mouse Device Type | OS Default (default) |
| Keymap | en-us (English, United States) (default) |
| Domain Type | XEN_HVM |
| Start Policy | Best Server (default) |
| Max. Memory (MB) | 6144 |
| Memory (MB) | 6144 |
| Max. Processors | 1 |
| Processors | 1 |
| Priority | 50 (default) |
| Processor Cap % | 100 (default) |
The screen should look similar to this:
Click Next.
A few notes about memory allocation with Oracle VM.
- When you allocate X MB of RAM to a VM, by the time Linux sees it, it’s actually X – Y MB.
- To get a Linux VM to see exactly X MB of RAM is virtually impossible because Y is not consistent across identical VMs nor across reboots. I have no idea why, but that’s been my consistent experience.
- For example, a 4096 MB (4 GB) RAM allocation produces about 3.86 GB of RAM visible to Linux. 4224 MB produces about 3.98 GB. 4352 MB produces about 4.11 GB and 16,384 MB produces about 15.67 GB.
- I upped the original memory allocation from 4096 MB (4 GB) to 6144 MB (6 GB) for 3 main reasons:
- 4096 MB only yielded 3.86 GB of visible RAM and that’s less than the 4 GB required by Oracle Grid Infrastructure 12c.
- With less than the 4 GB required, the Oracle Grid Infrastructure 12c installation (see Part 10) still succeeded, but took an excessively long time.
- Knowing the impact < 4 GB had on the Oracle Grid Infrastructure 12c installation, more memory would be needed to run an Oracle RAC database instance.
- Oracle VM cannot over allocate physical server memory. Therefore, the total RAM allocated to all the VMs must be within the physical RAM configured on the server.
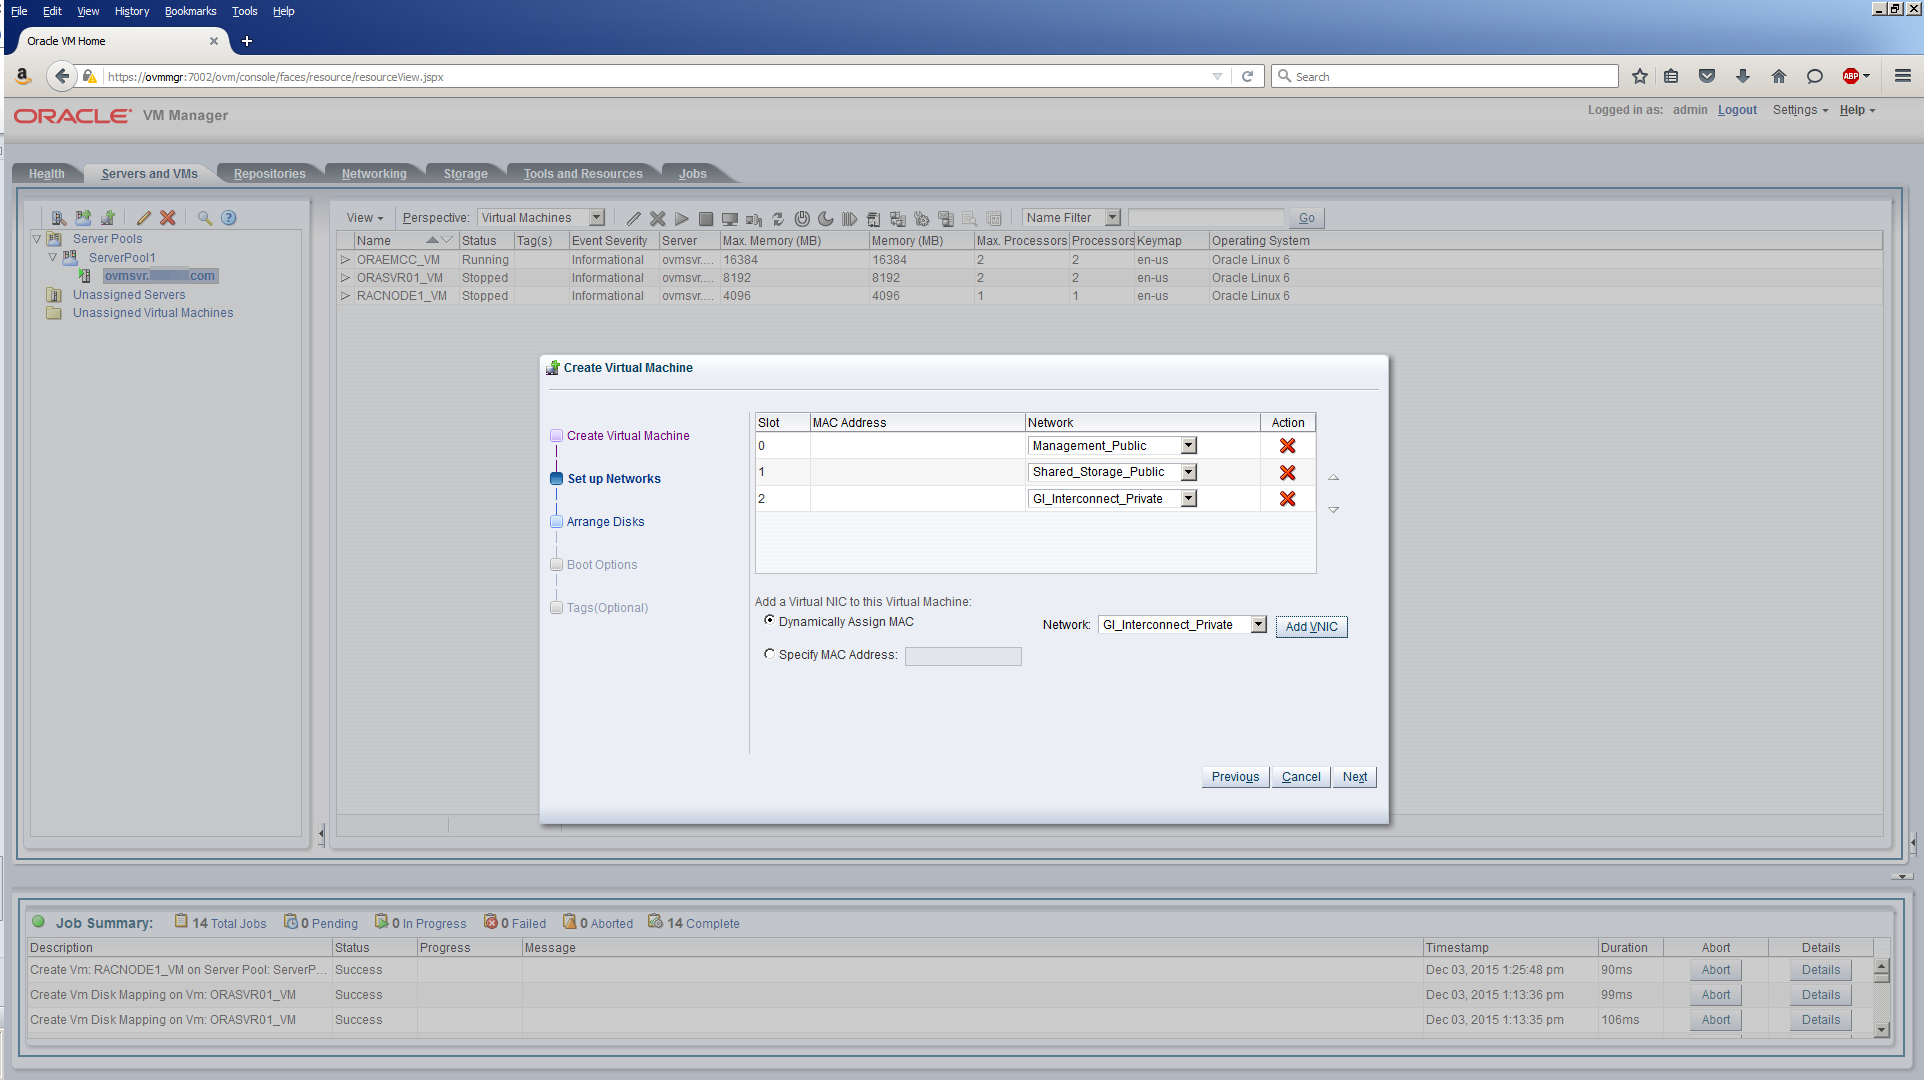
Task #3b: Add Networks.
The Oracle RAC node servers will need to operate on 3 different networks.The public network which you’ll use to login to the server. The private interconnect network for inter-node traffic and finally the shared storage network connected to the Openfiler shared storage server. Using a previous Add Networks step as a guide, complete the Set up Networks screen using these values:
| Slot# | Network |
|---|---|
| 0 | Management_Public |
| 1 | Shared_Storage_Public |
| 2 | GI_Interconnect_Private |
Your screen should now look similar to this:
Click Next.
Task #3c: Add Storage.
Using a previous Add Storage step as a guide, complete the addition of storage to RACNODE1_VM using these values:
| Slot# | Disk Type | Name | Size (GiB) |
|---|---|---|---|
| 0 | CD/DVD | V52218-01.iso | 3.59 |
| 1 | Virtual Disk | RACNODE1_OS | 40.0 |
| 2 | Virtual Disk | RACNODE1_u01 | 30.0 |
The /u01 filesystem will be used to install the Oracle Grid Infrastructure and Database software. The database data files will be stored in shared storage on the Openfiler server and accessed via the storage network. Hence, no need for a /u02 filesystem.
Your screen should now look similar to this:

Click Next.
Task #3d: Add Boot Order.
Using the arrow icons, move the boot options from the left pane to the right pane in the order shown in this screen:

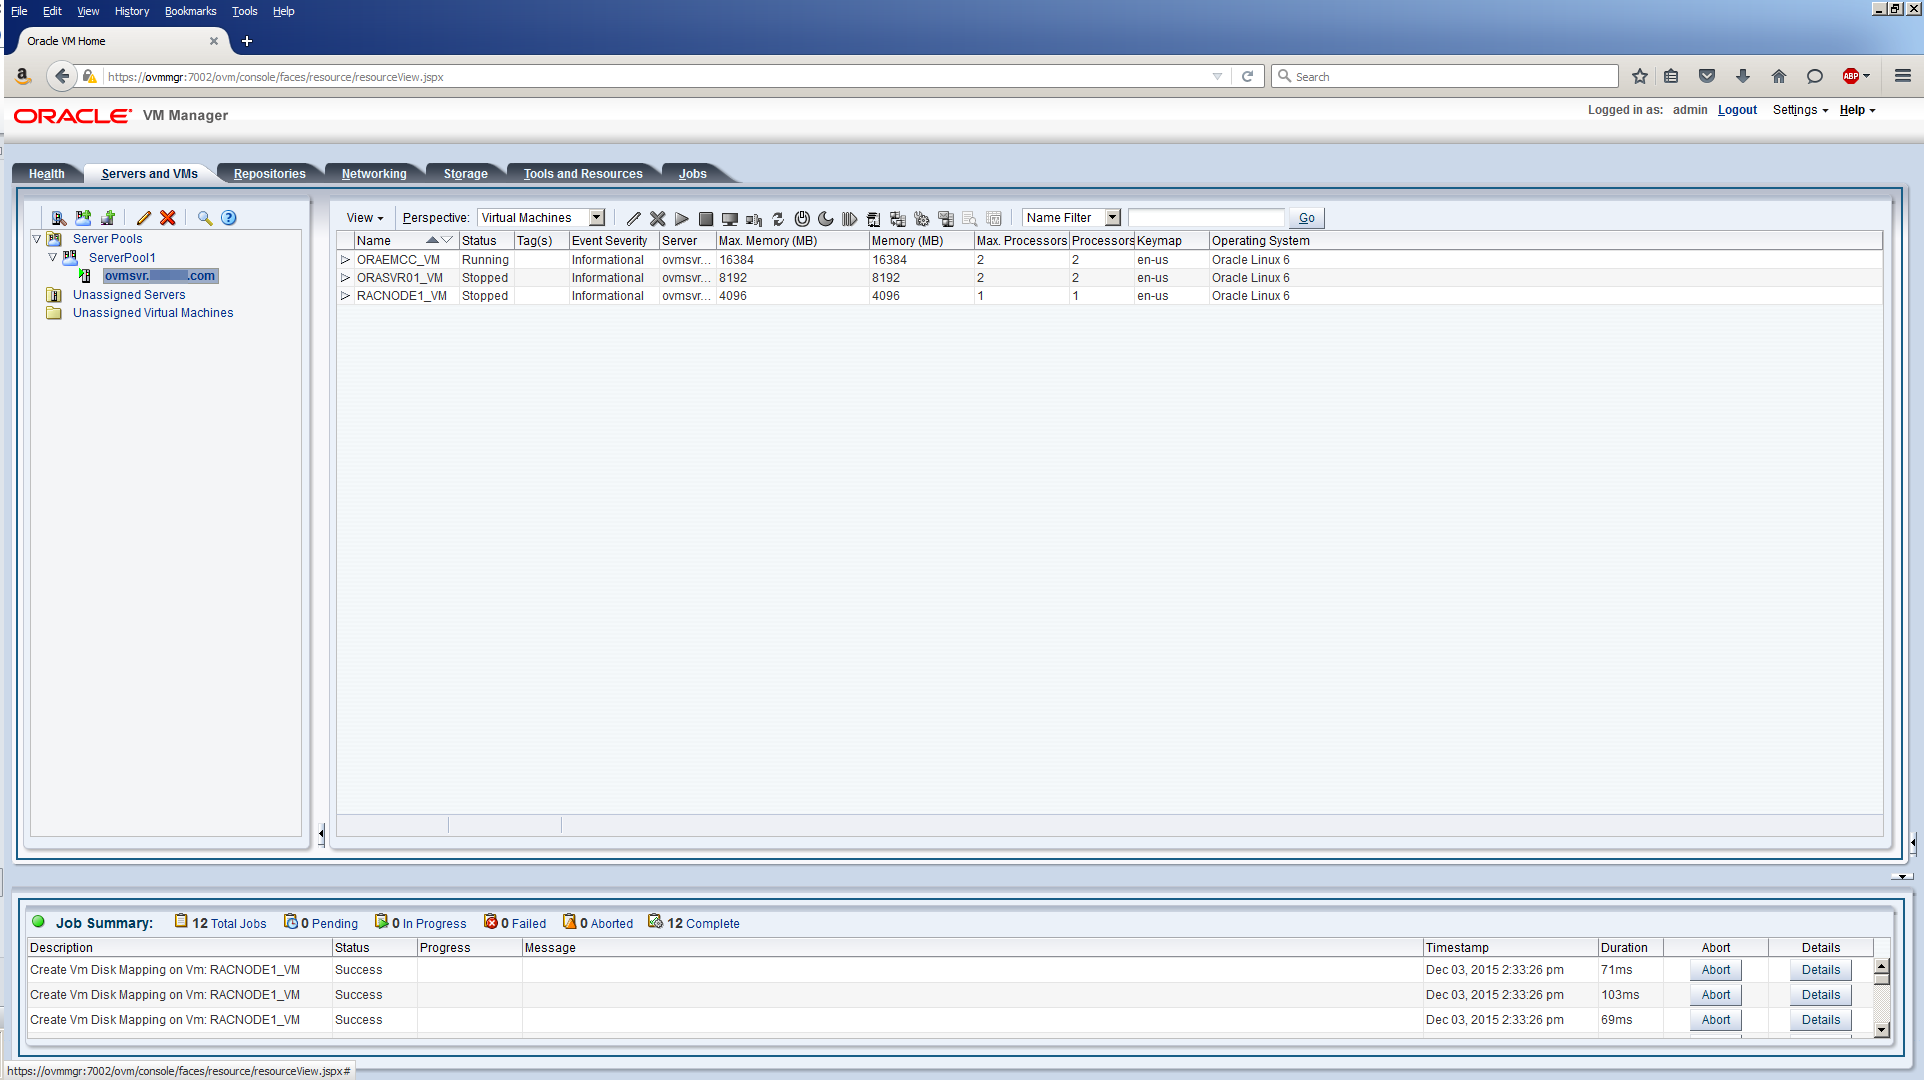
Click Finish and your screen should look similar to this:
That’s the last of the 3 VMs created. Nicely done. “What about the other 5 VMs?” I hear you say. You don’t miss a trick do you? We could continue to create more VMs using the procedures described above. However, there’s a smarter, more efficient way to get that job done. All will be revealed in Part 7. I bet you can’t wait!
Next up is building out the OEM Cloud Control Server in Part 6. See you there!
If you have any comments or questions about this post, please use the Contact form here.