
Now that the basic building blocks of the Oracle Database infrastructure are in place, it’s time to start building out the servers themselves.
A management console helps enormously with the administration and maintenance of servers and that’s what we’re going to build first.
Although hardly the last word in ease of use, intuitive interface design or economical deployment, Oracle Enterprise Manager (OEM) Cloud Control is, nonetheless, the standard Oracle management interface. So that’s what we’re going to use.
OEM installation and configuration has got progressively more complicated over the years. However, there is a simple installation option available which will get us up and running. The steps to get us from here to a shiny new OEM Cloud Control login screen require that we complete these 6 tasks.
Quick links to all the tasks:
- Task #1: Install Oracle Linux.
- Task #2: Configure Oracle Linux.
- Task #3: Install Oracle Database 12c.
- Task #4: Create a Repository Database.
- Task #5: Install OEM Cloud Control.
- Task #6: Start and Stop Cloud Control.
Task #1: Install Oracle Linux.
There are 4 steps to complete this task.
Task #1a: Start ORAEMCC_VM.
Log into OVM Manager and navigate to the list of VMs. Highlight ORAEMCC_VM by clicking on it, then click the green arrow head icon to start the VM. The CDROM is first in the VM’s Boot Order. It contains the Oracle Linux 6 ISO image, so starting the VM has the effect of booting from the ISO. Hence we can start the installation of Oracle Linux. The screen should look similar to this:
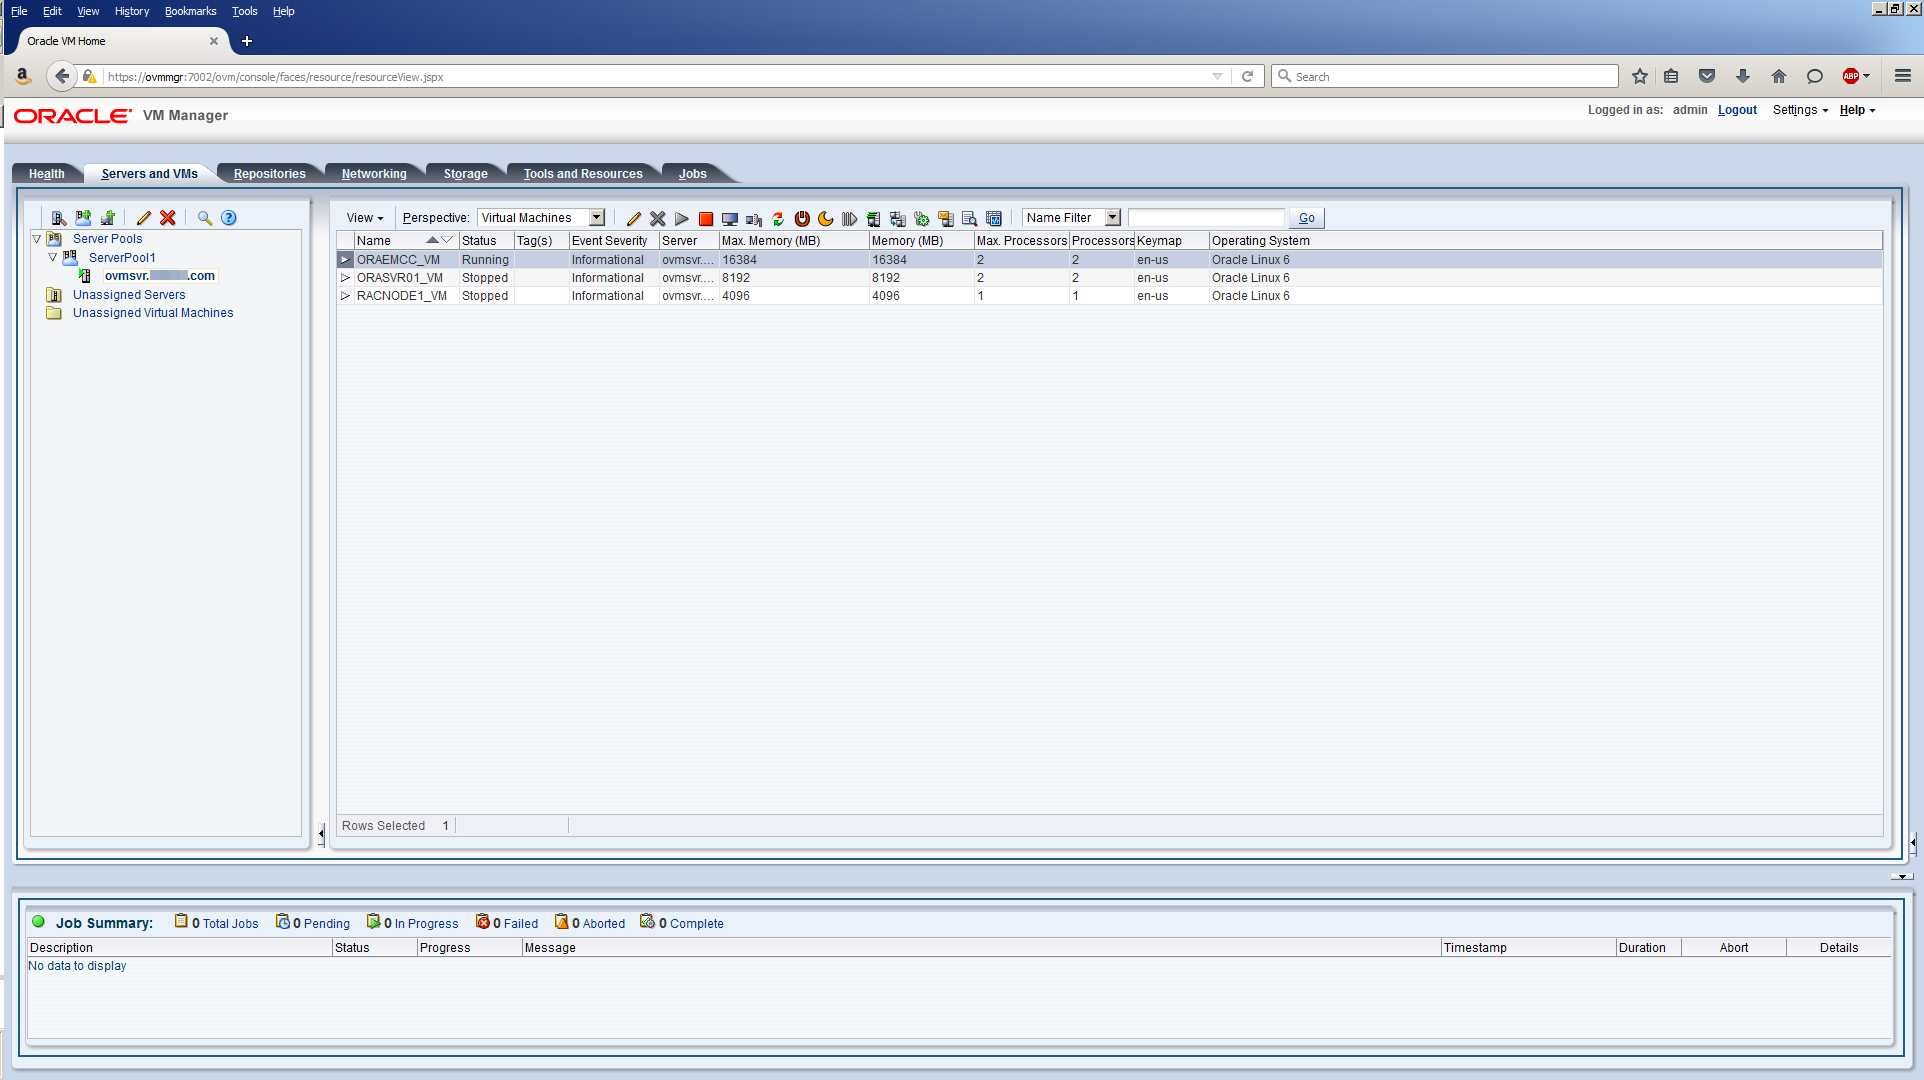
Once the VM’s status shows Running, click on the Launch Console icon.
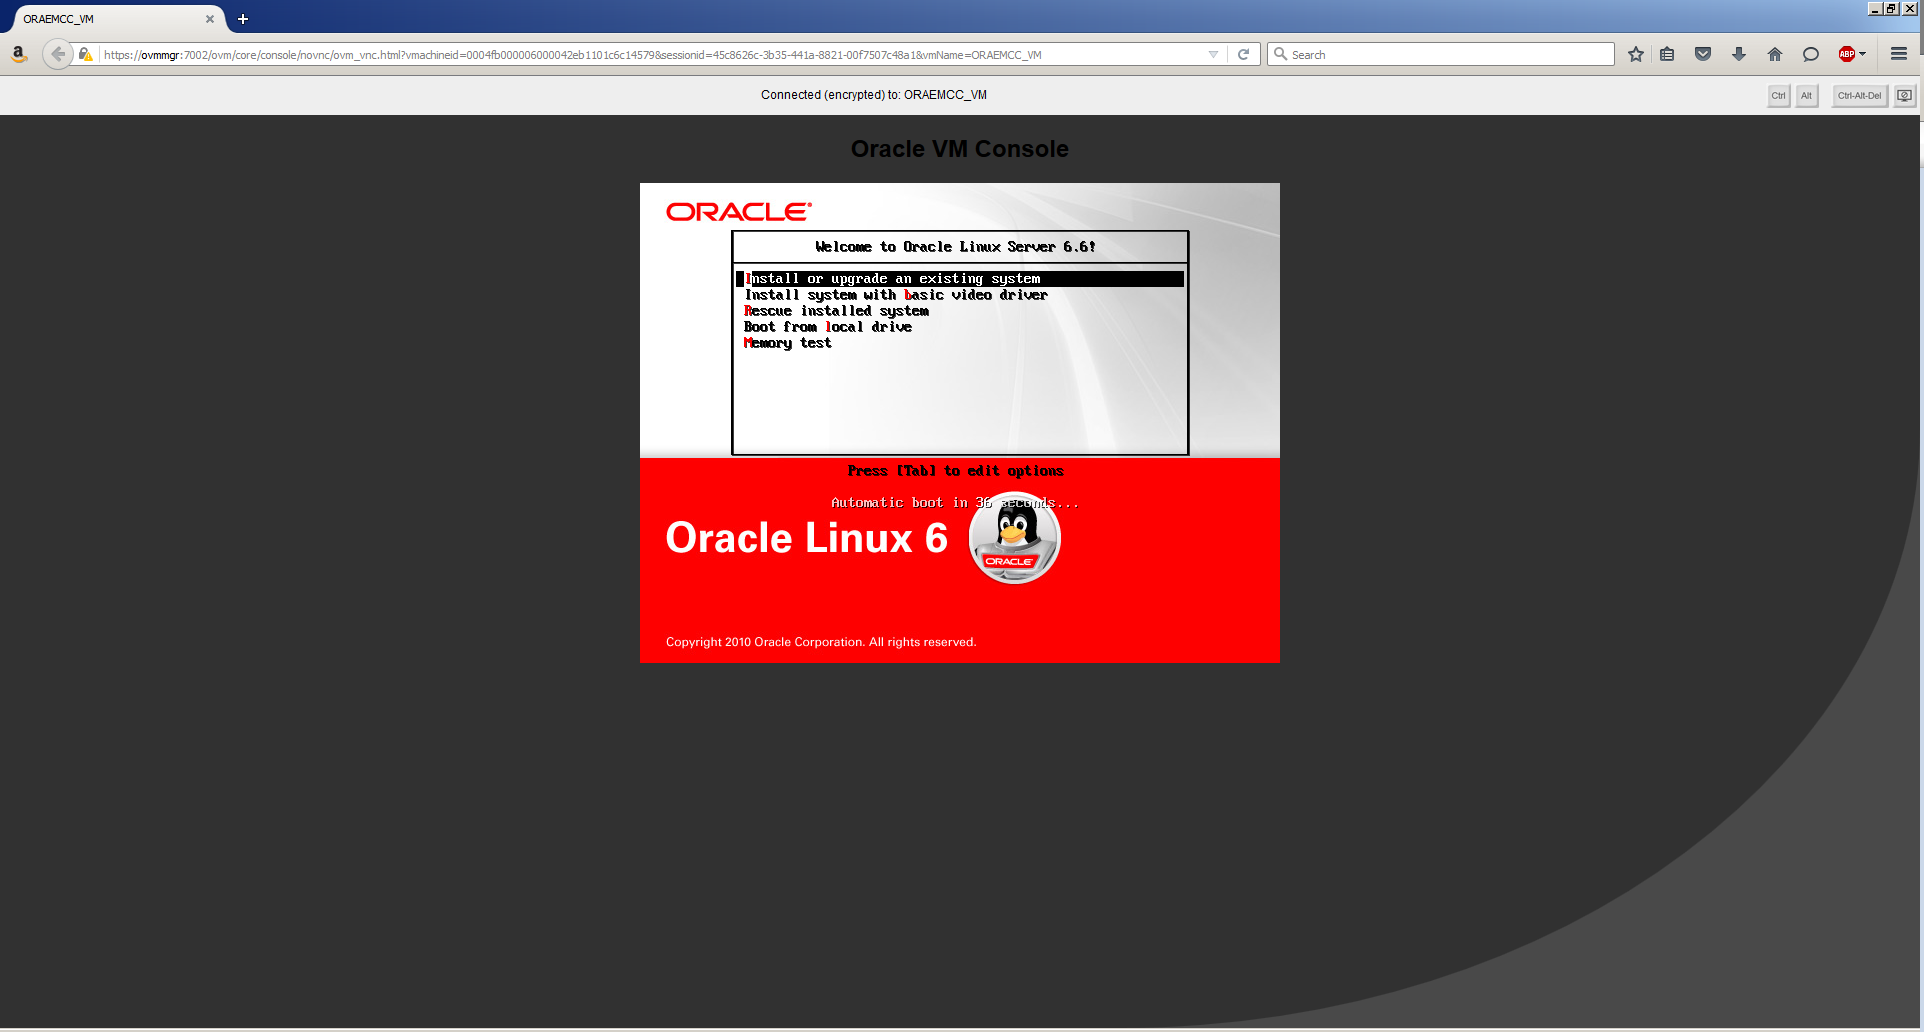
Task #1b: Follow the Oracle Linux Installation Screens.
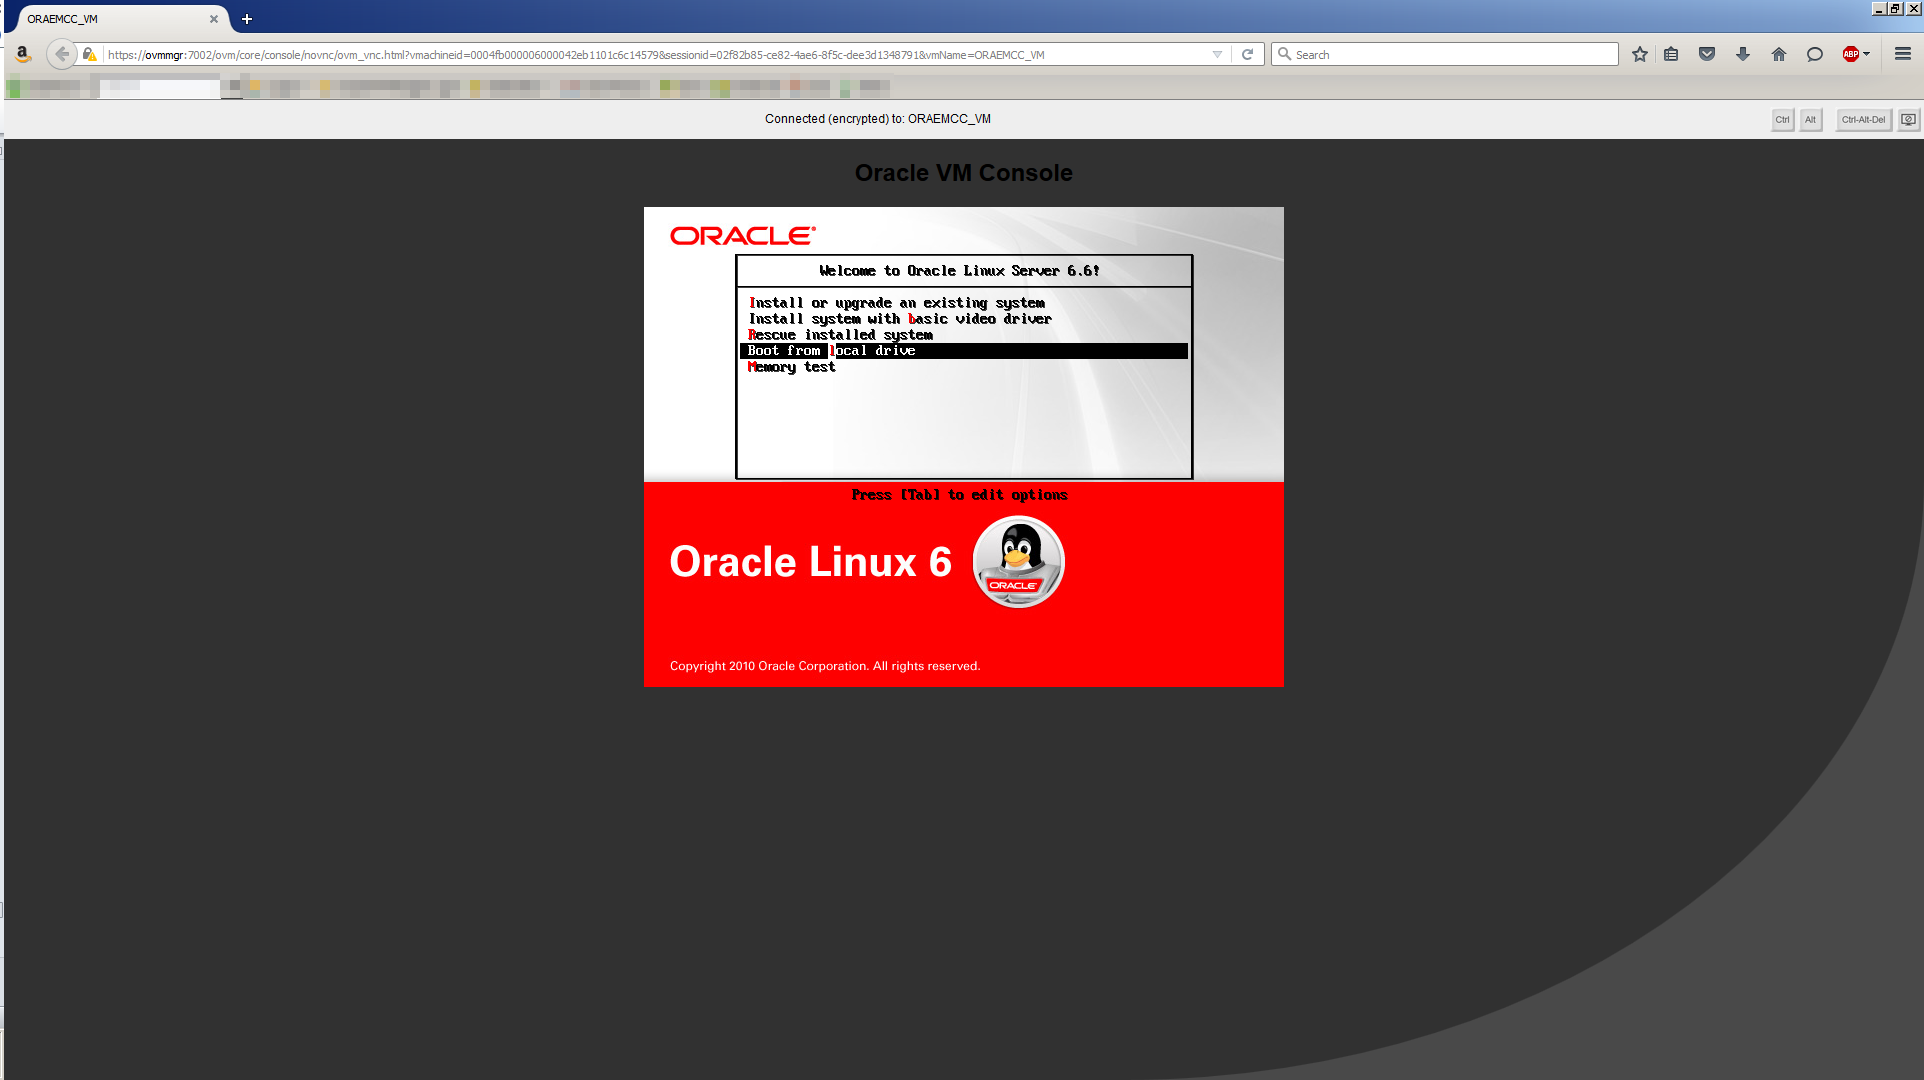
Press Enter to Install or Upgrade an existing system:
Skip the media test:

Click Next.

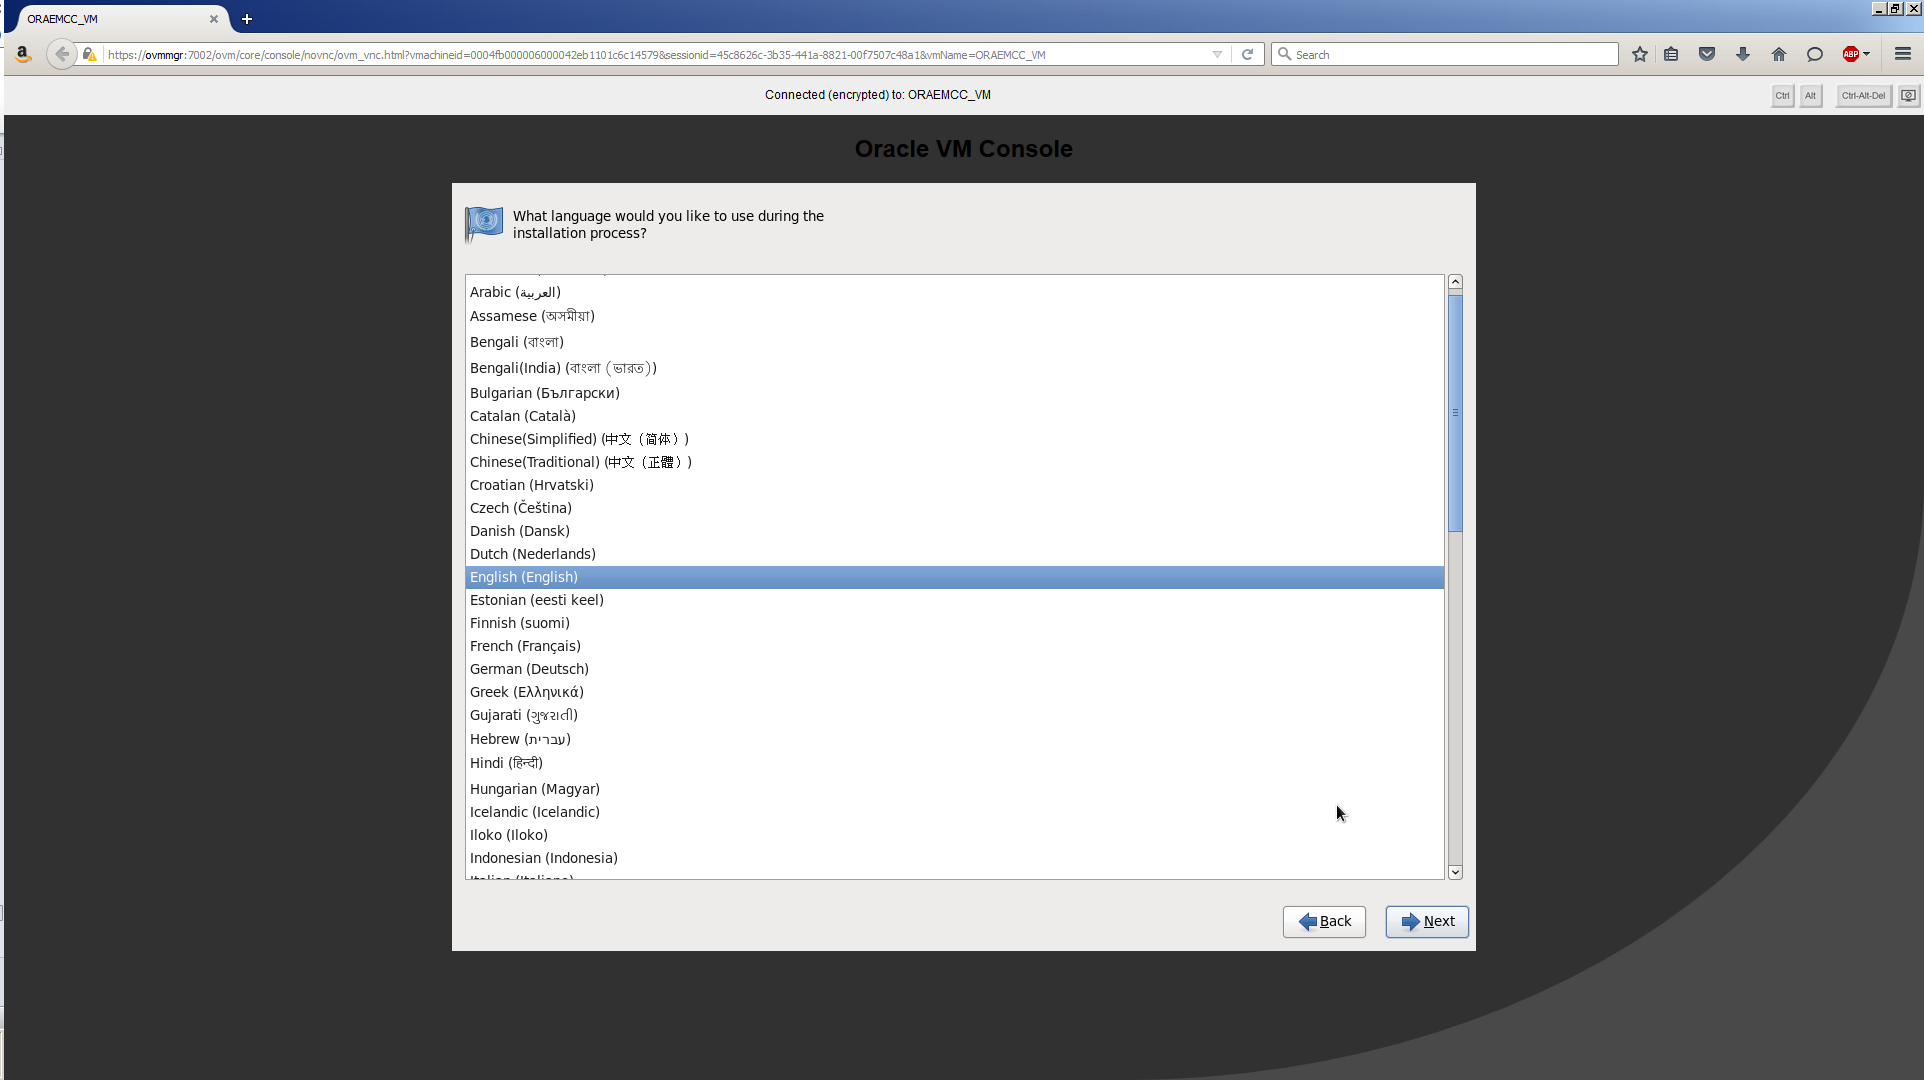
Choose your preferred language. Click Next.
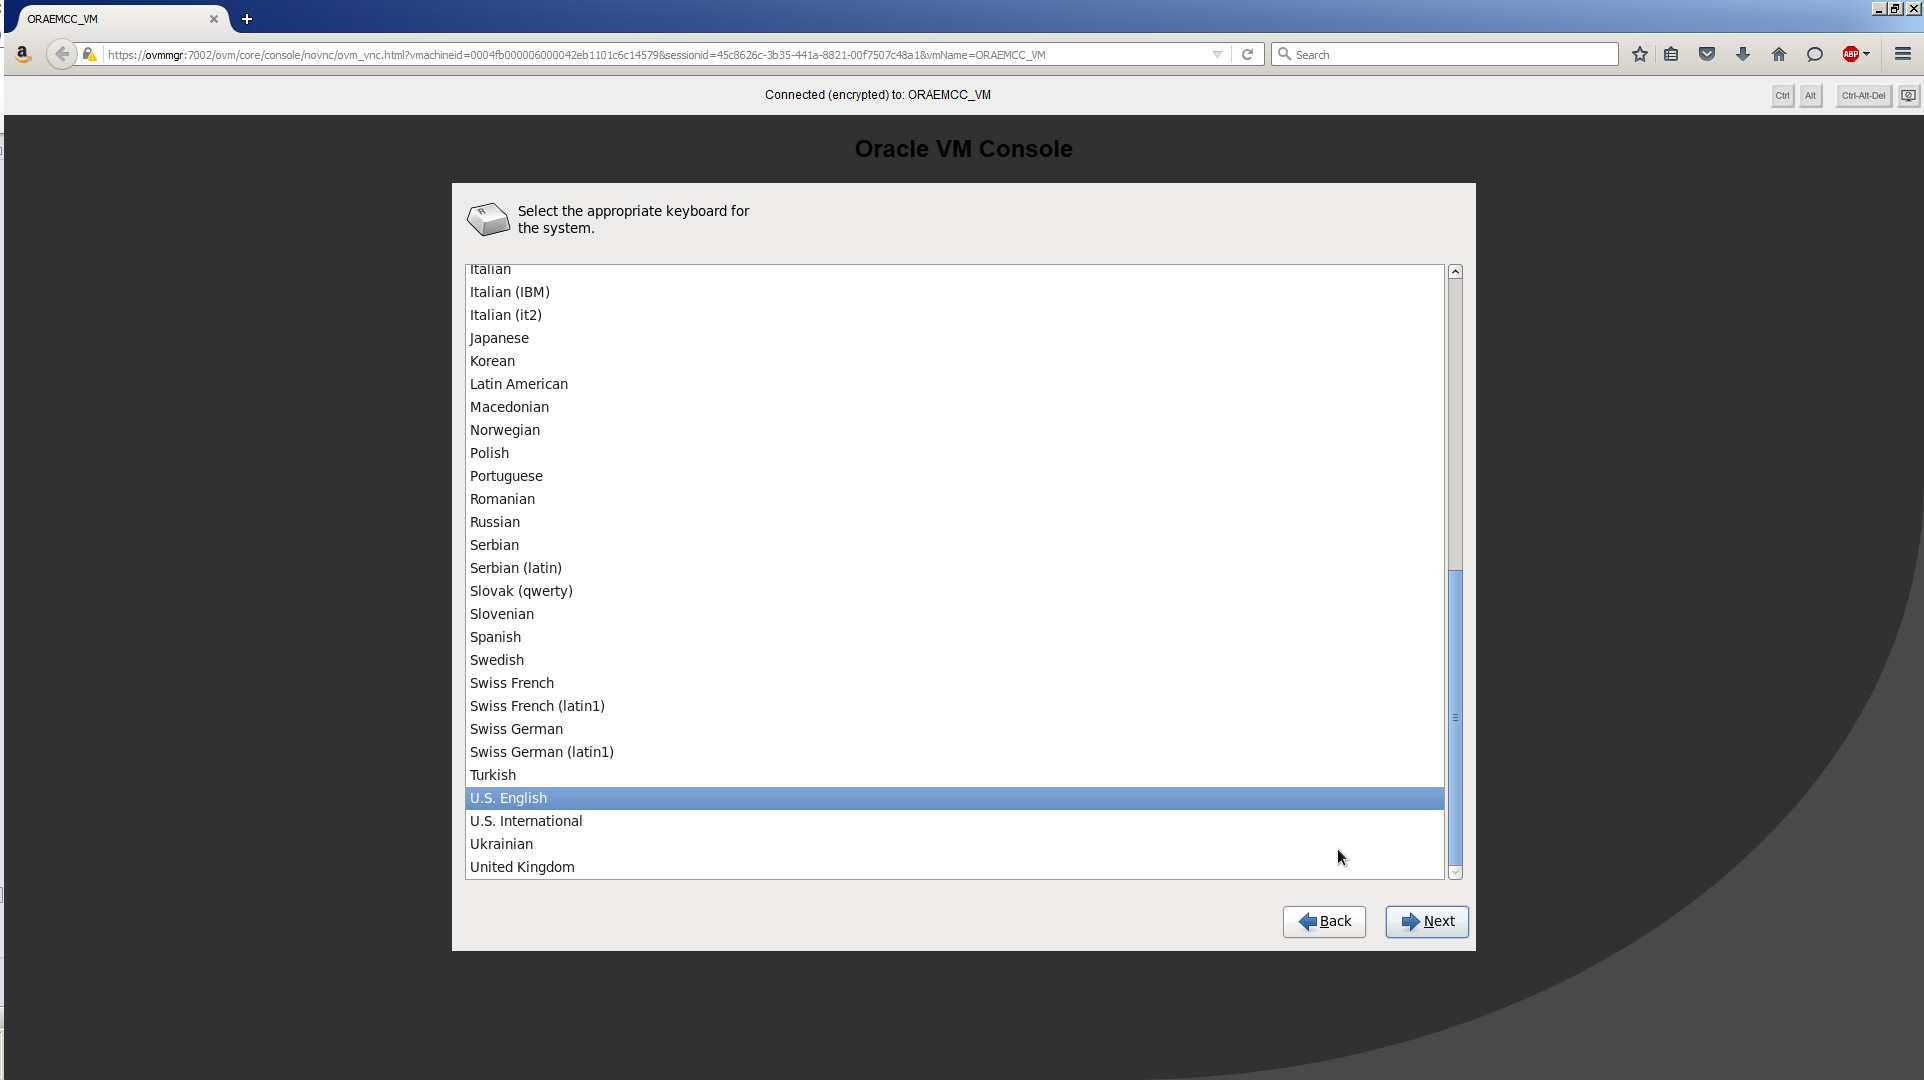
Choose your preferred keyboard layout. Click Next.
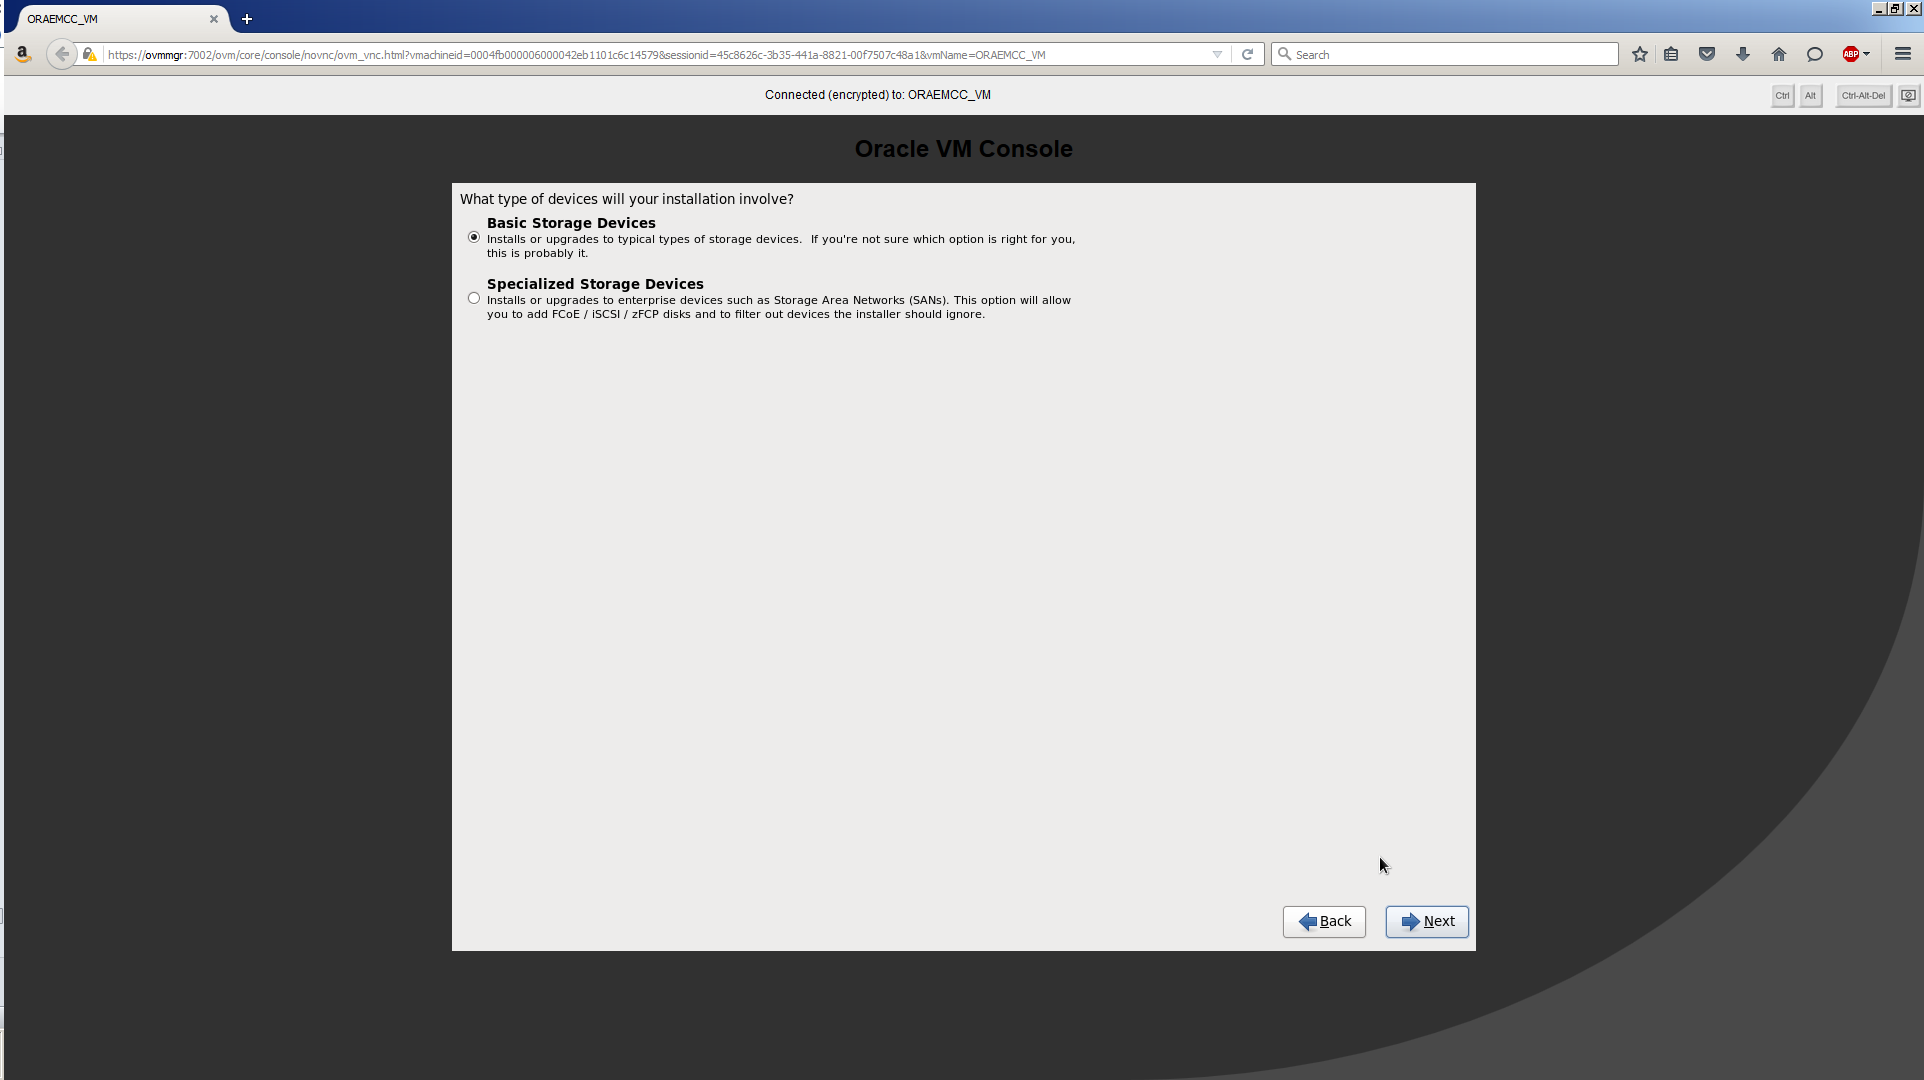
Select Basic Storage Devices. Click Next. Note the warm and fuzzy we’re all in this together phrase, “If you’re not sure which option is right for you, this is probably it”. Ahhh. I wish this person would write more of Oracle’s documentation.
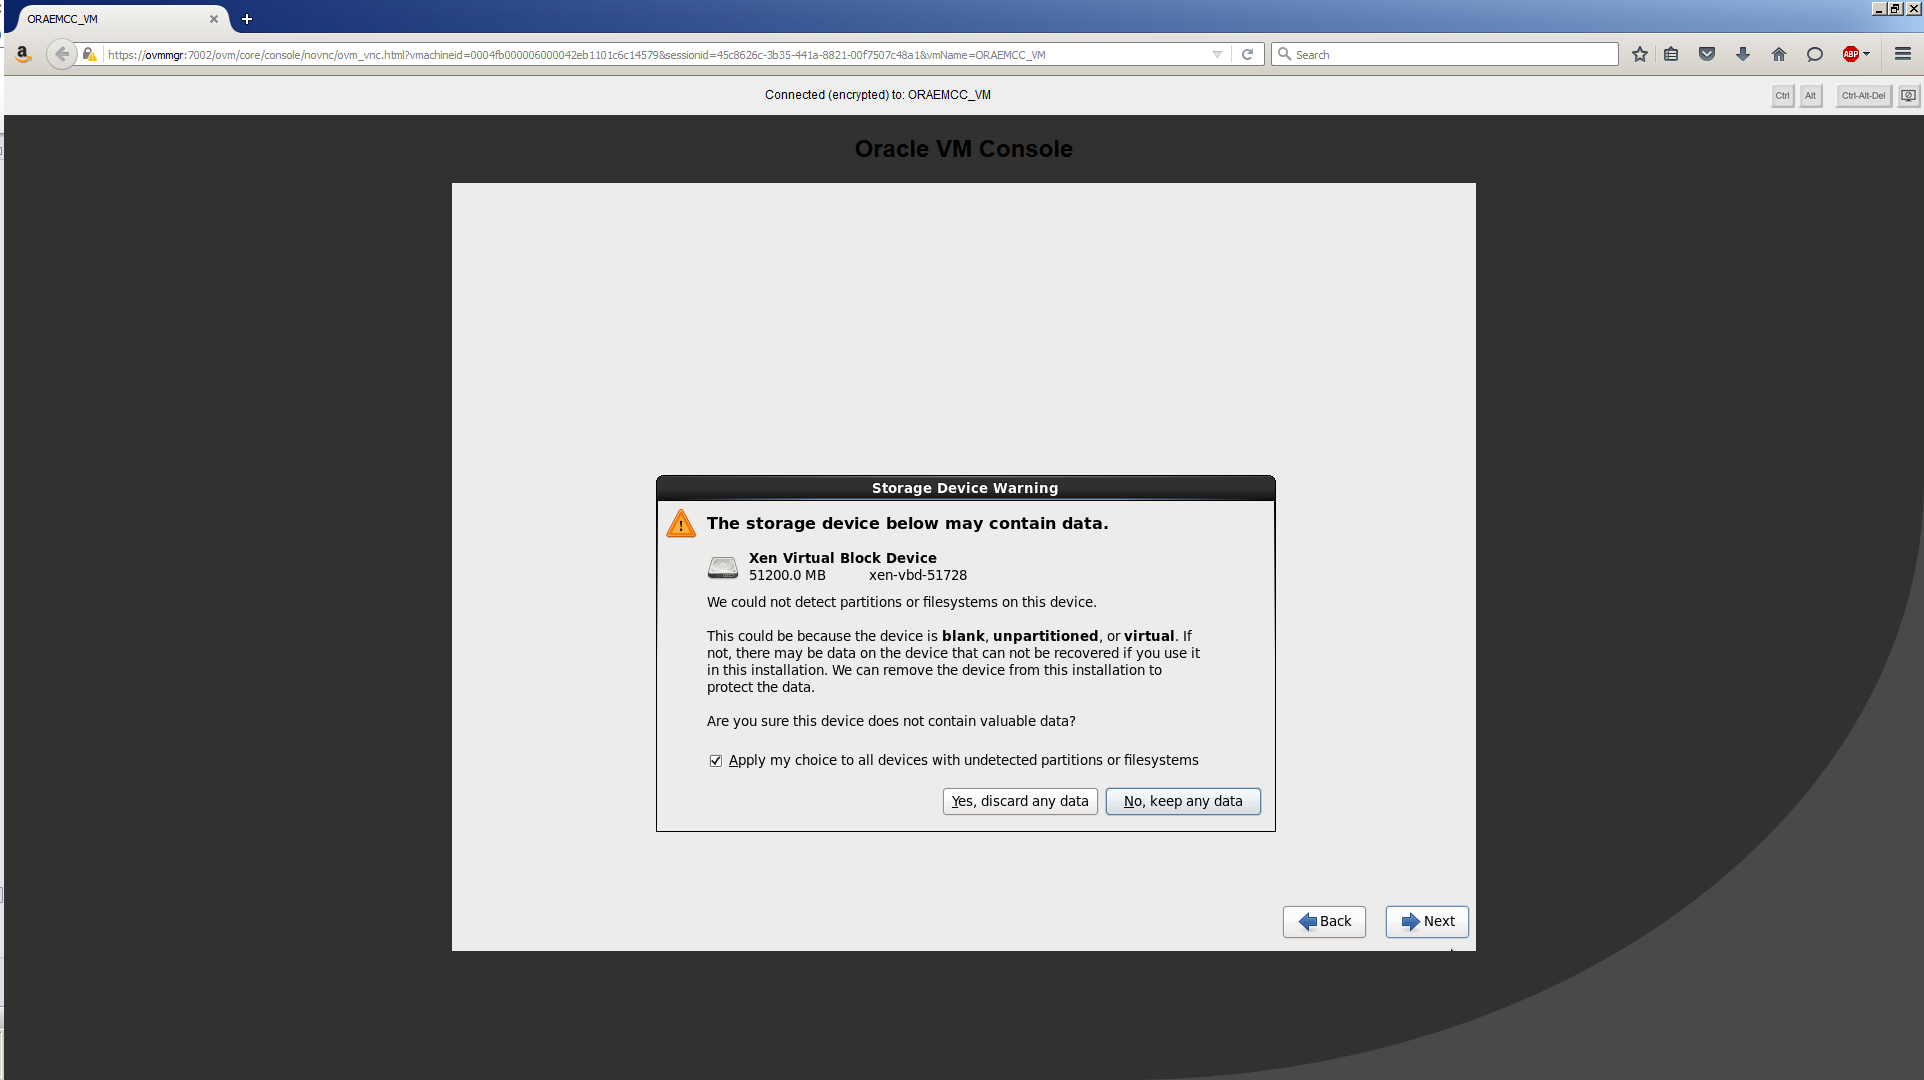
Click Yes, discard any data. Click Next.
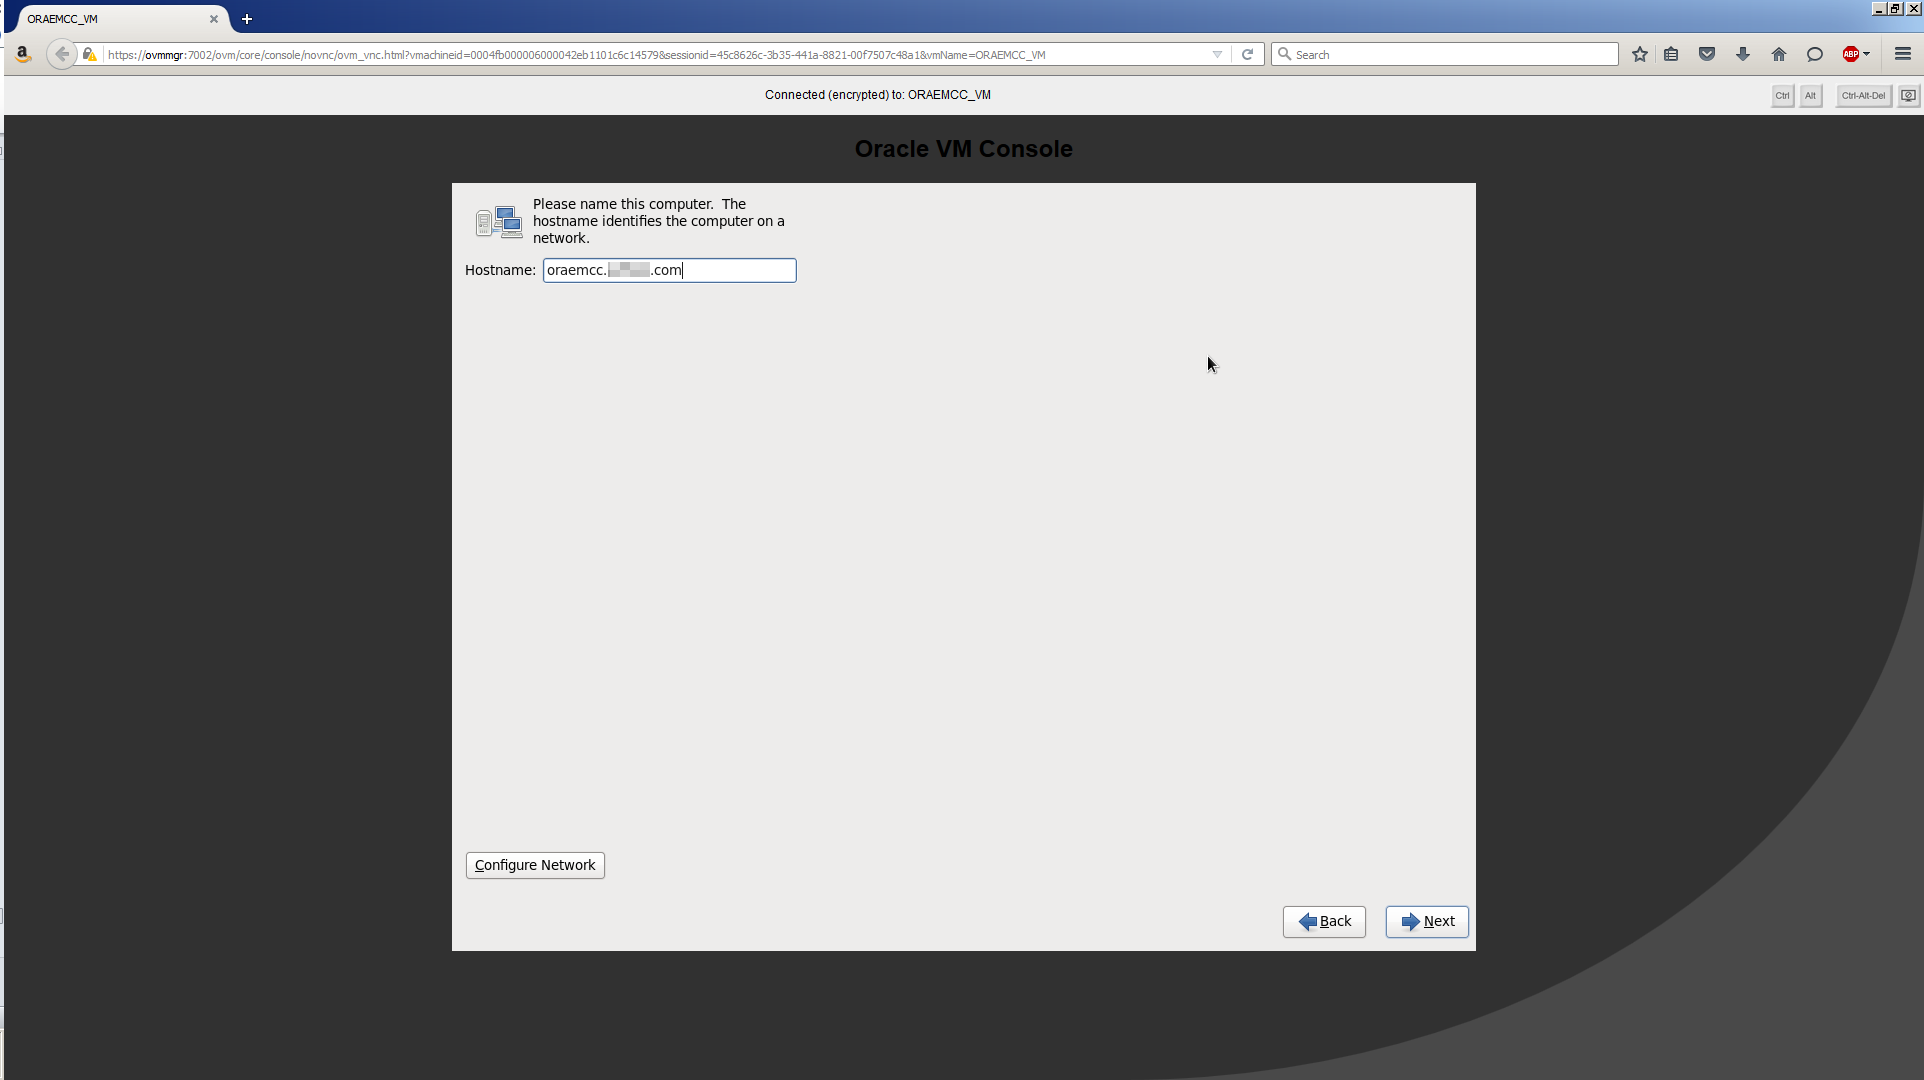
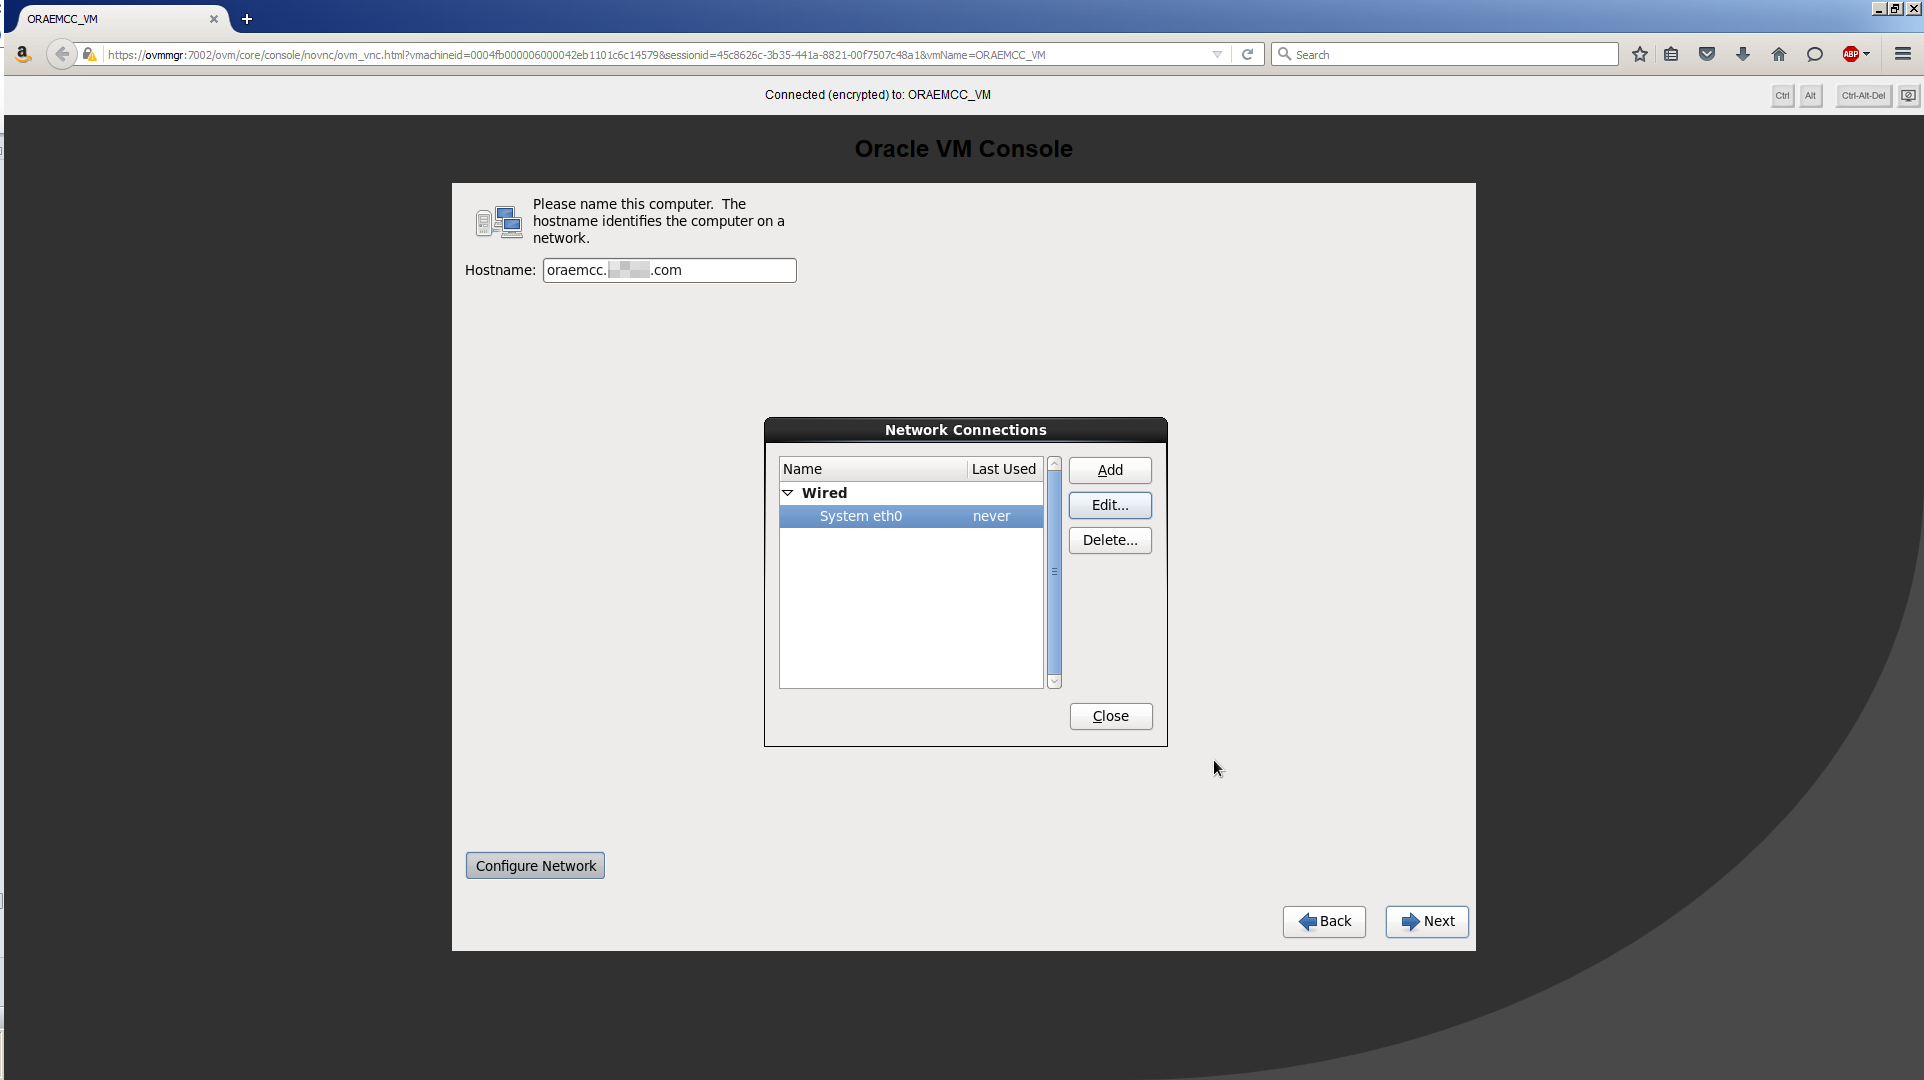
Enter the hostname, oraemcc.mynet.com. Your screen should look similar to this:
Click Configure Network. Highlight System eth0, then click Edit.
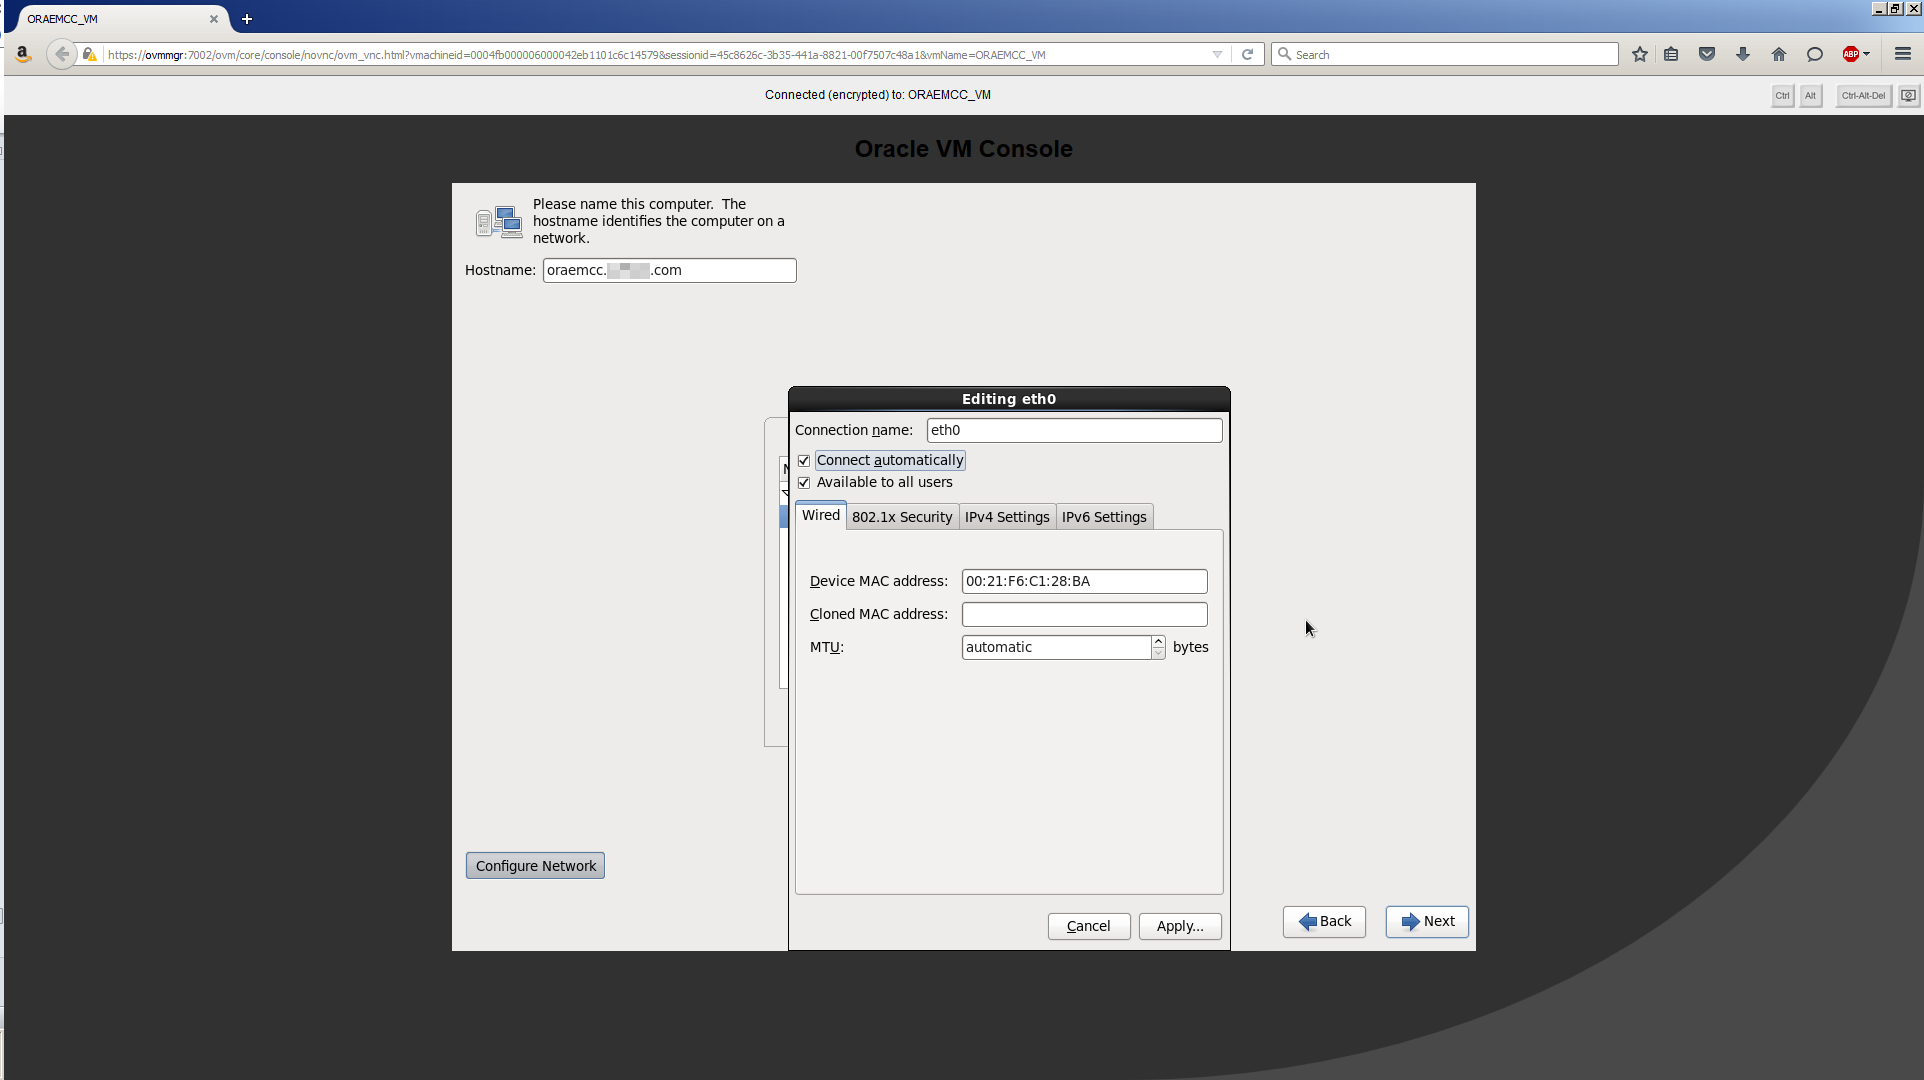
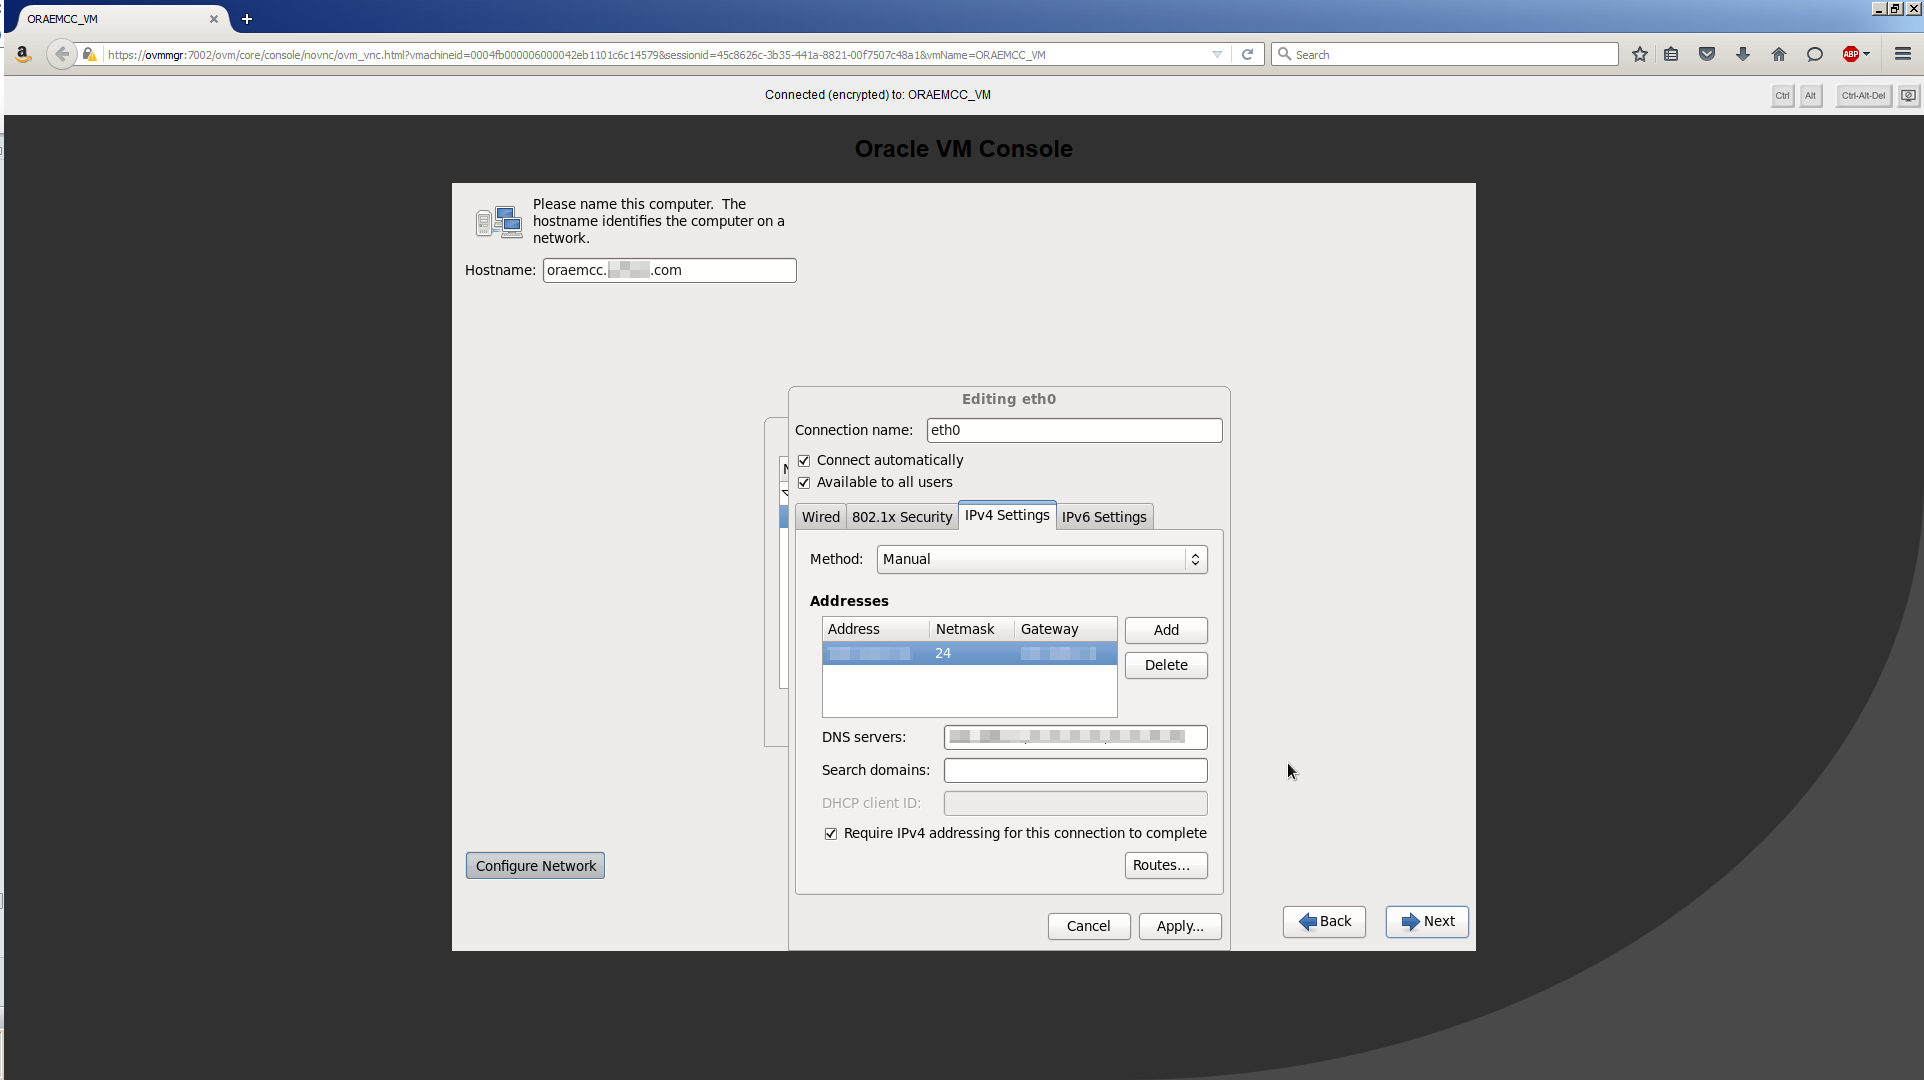
Change the Connection name to just eth0 (i.e. remove the word “System” – it’s not needed). Check both boxes for Connect automatically and Available to all users. Click the IPv4 Settings tab.
Use these values to populate this screen:
| Field | Value |
|---|---|
| Method | Manual |
| Address | 200.200.10.16 |
| Netmask | 24 (this auto-populates) |
| Gateway | 200.200.10.1 |
| DNS servers | 200.200.10.1,8.8.8.8,8.8.4.4 |
Your screen should look similar to this:
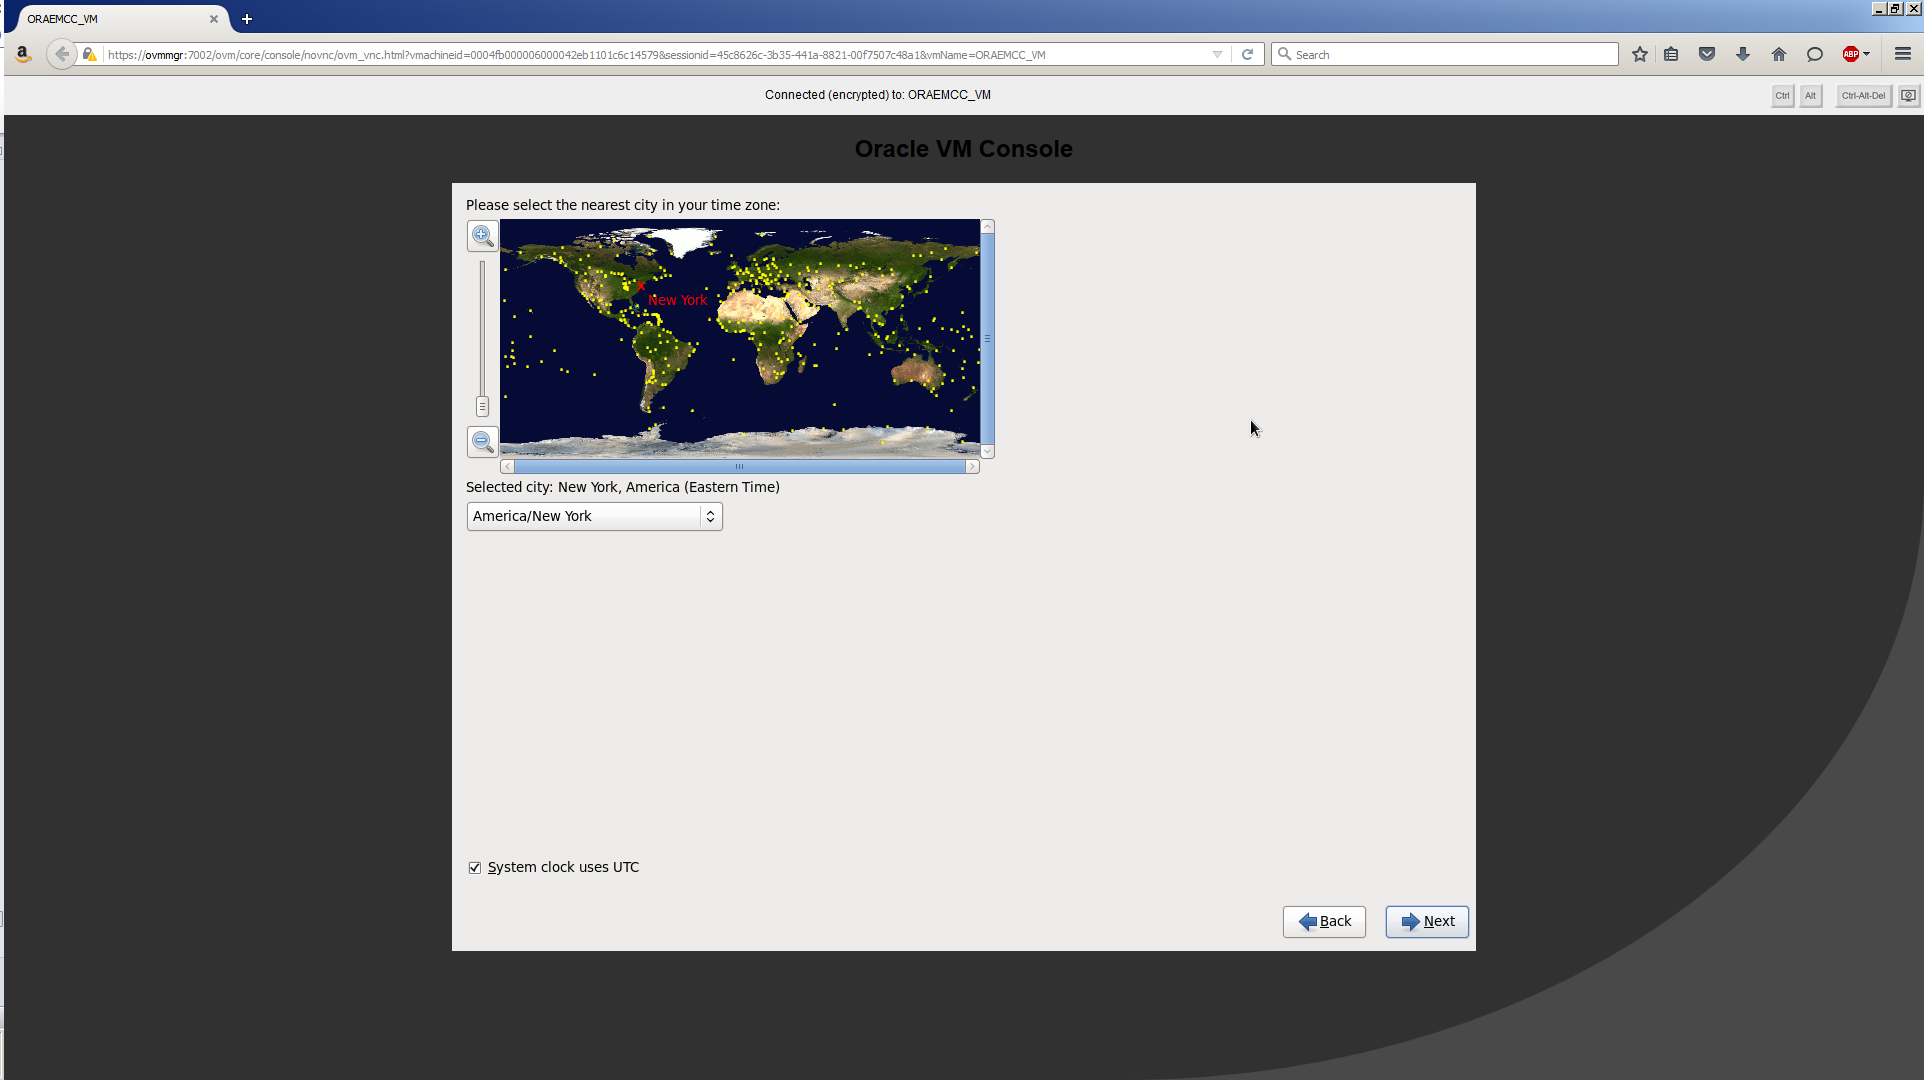
Click Apply. Click Close. Click Next. Choose your timezone. Click Next.
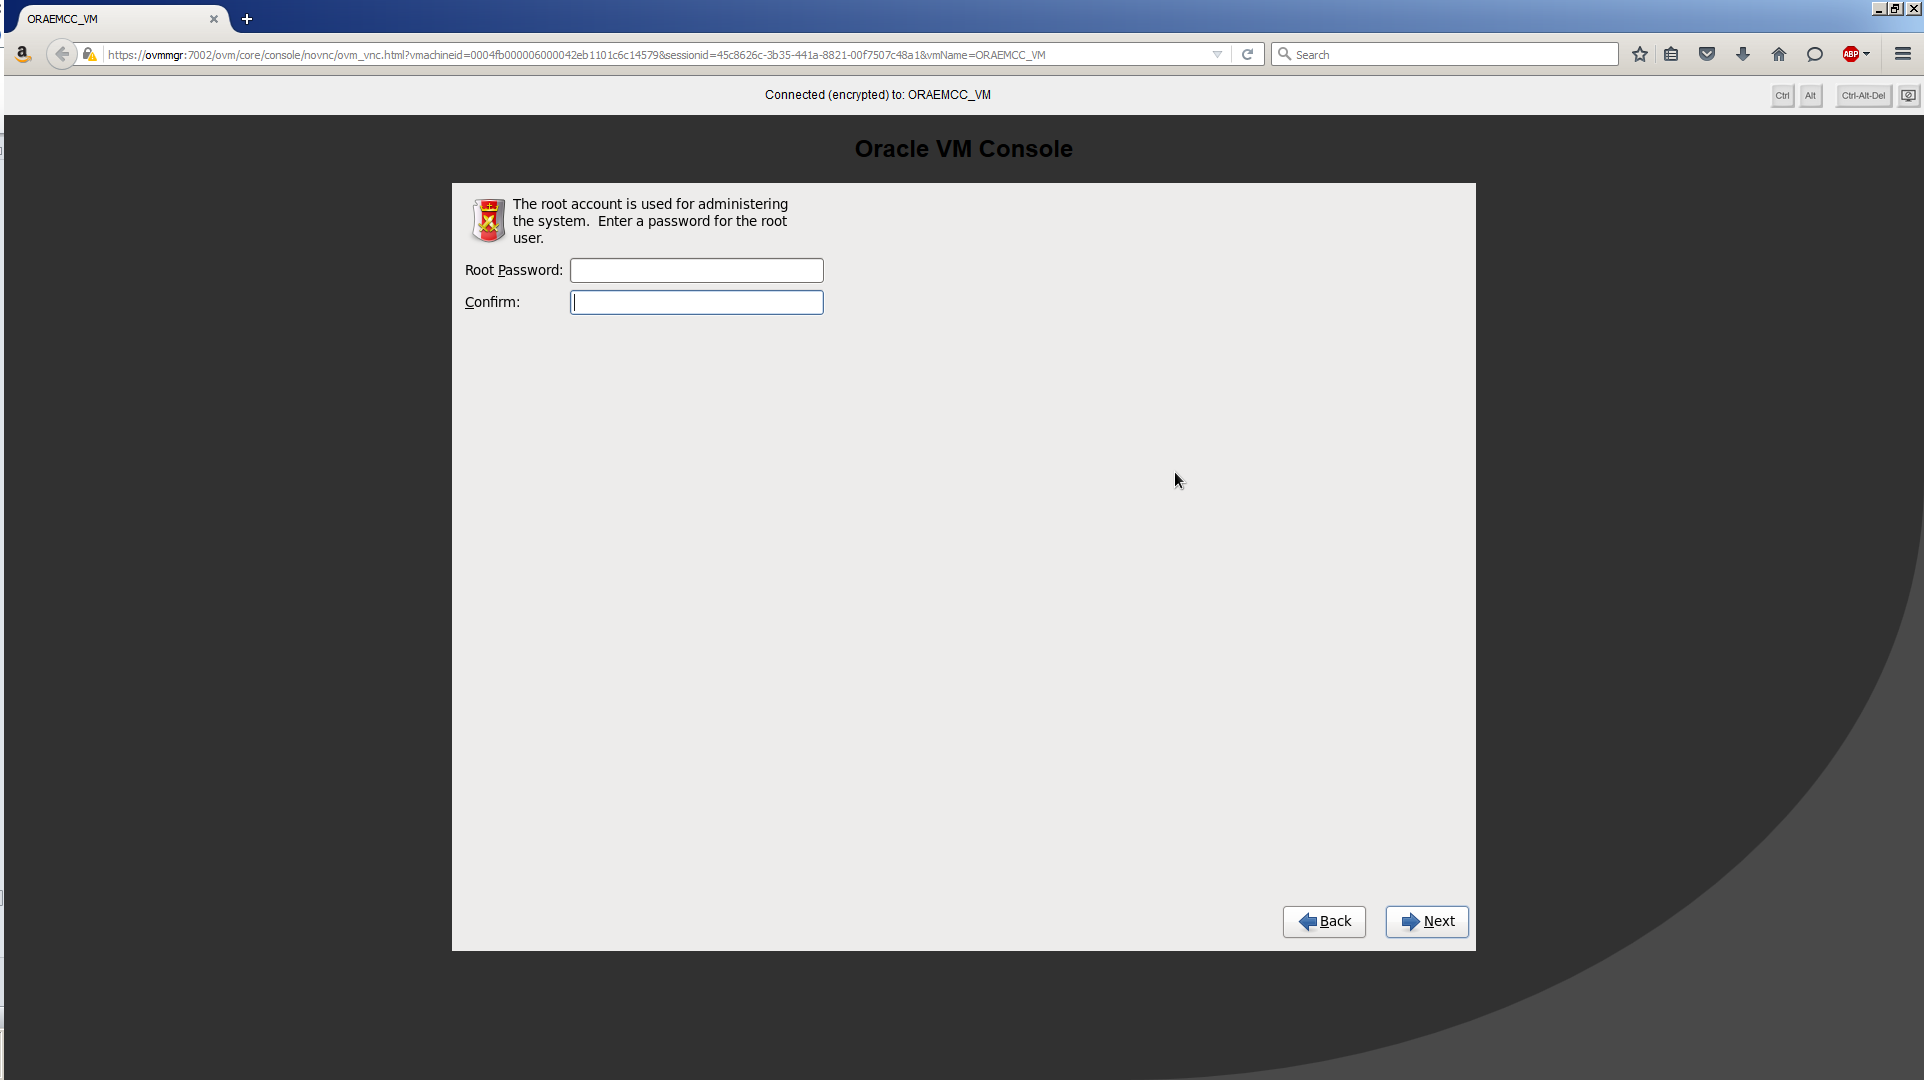
Choose a root password. Click Next.
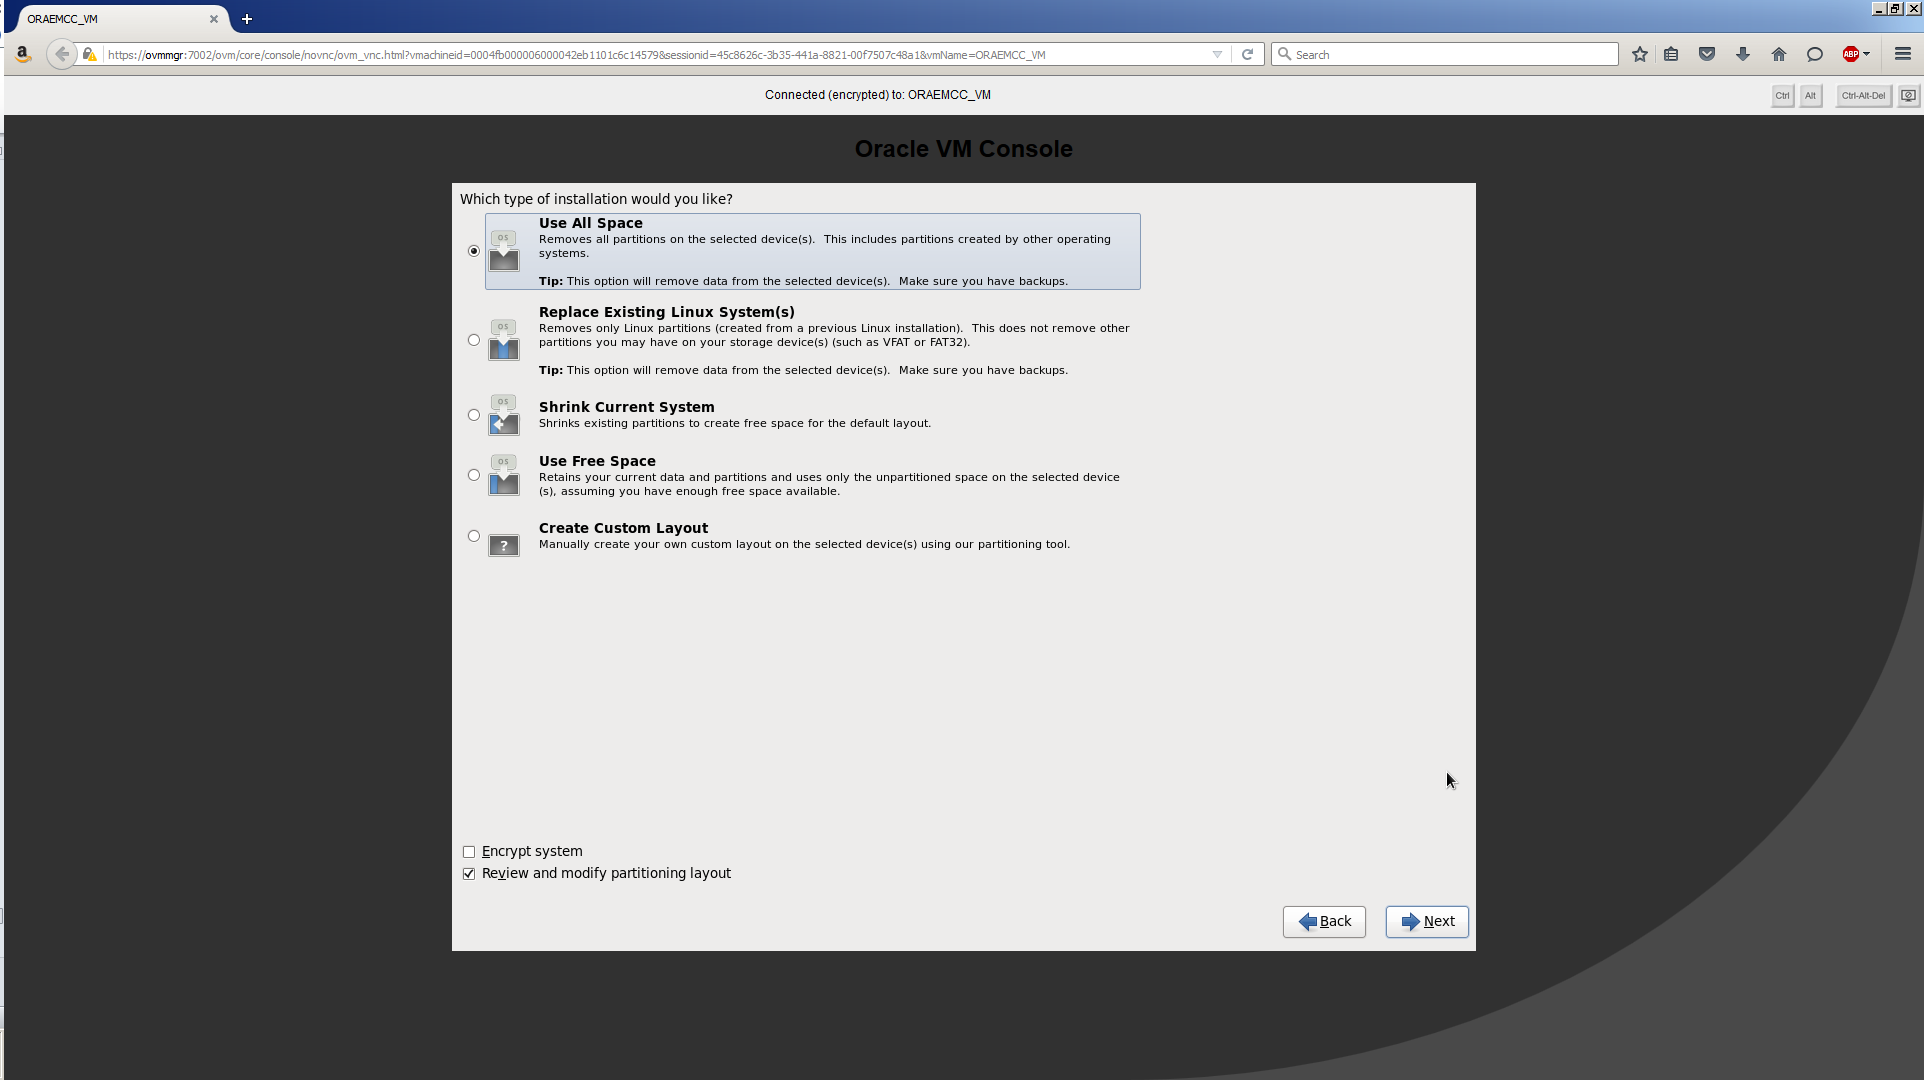
Choose Use All Space. Check Review and modify partitioning layout. Click Next.
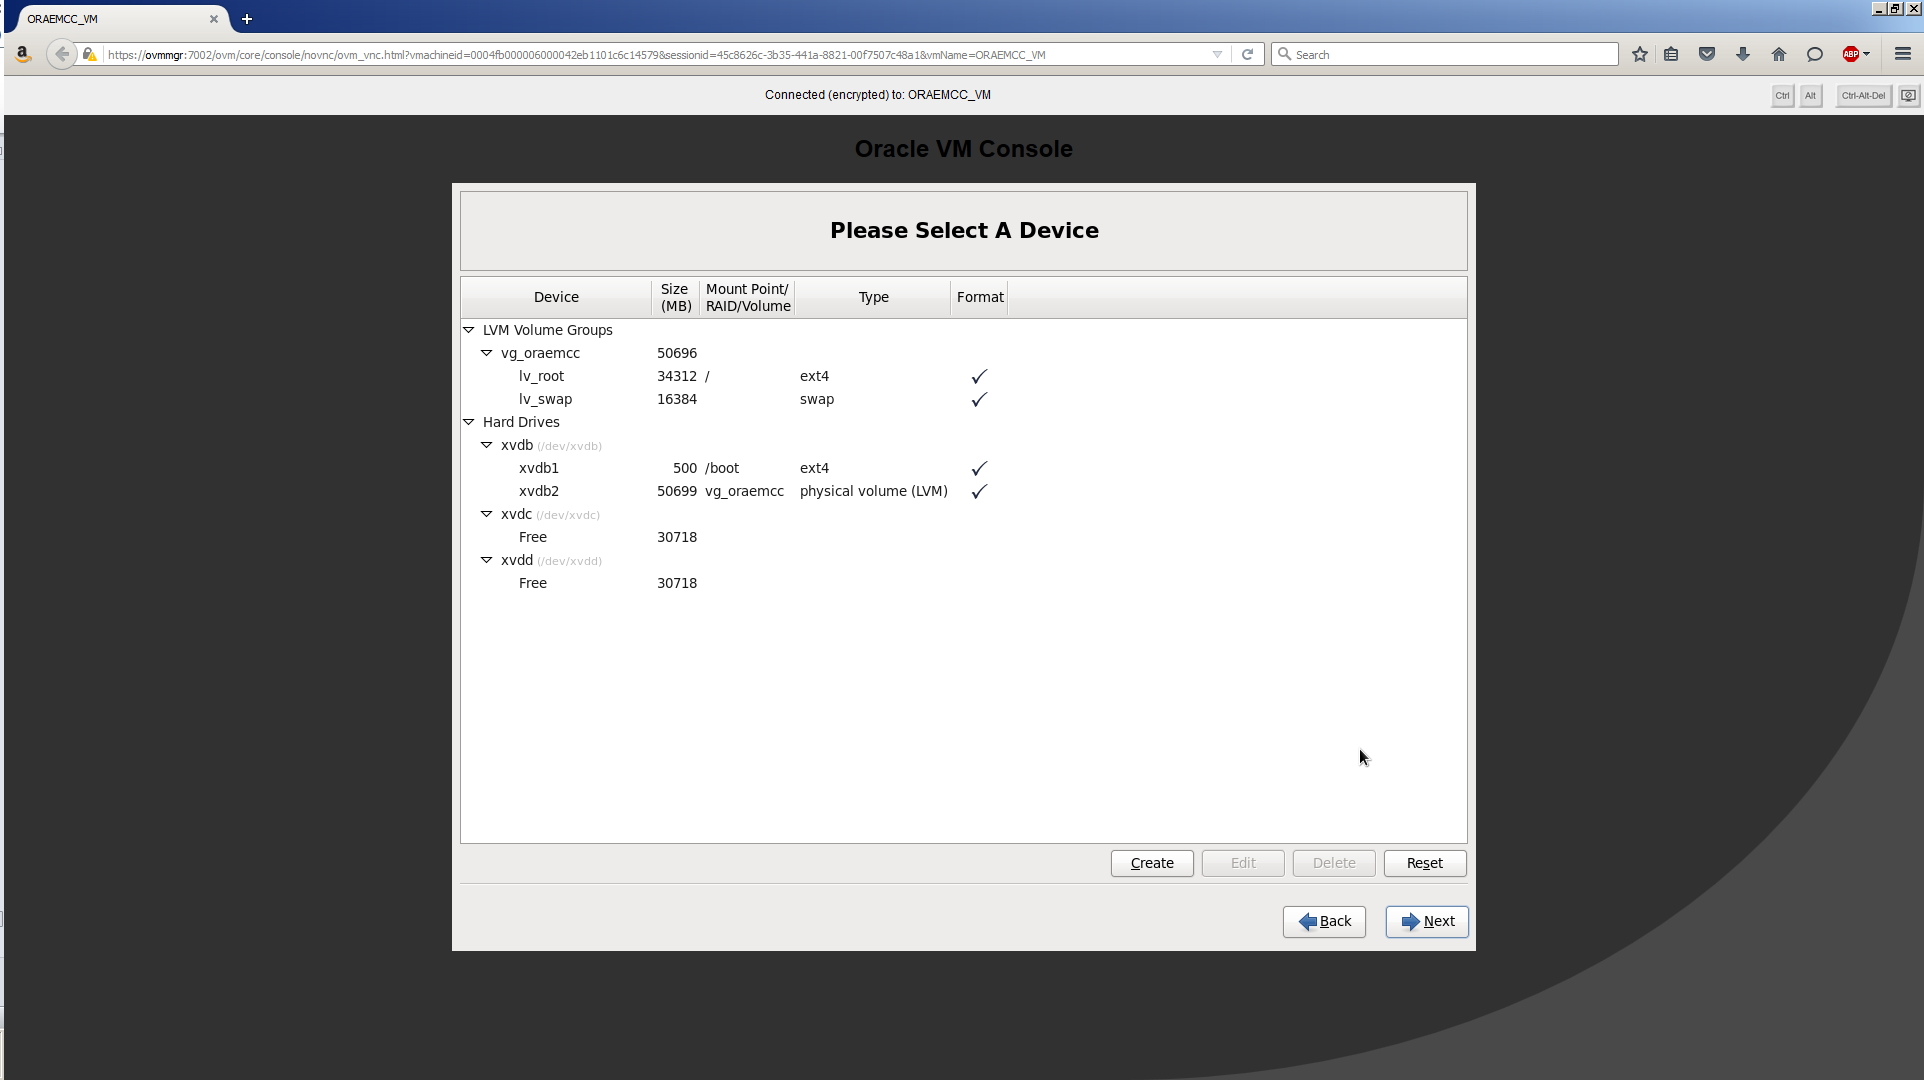
Using the right pointing arrow key, move the Xen Virtual Block Device (51200 MB) over to the Install Target Devices pane. Leave the two 30 GB disk devices where they are. We’ll use those later. Click Next.

Click to highlight the lv_root logical volume, then click Edit to reduce its size to 34312 MB. Click to highlight the lv_swap logical volume, then click Edit to increase its size to 16384 MB (16 GB). Click Next.
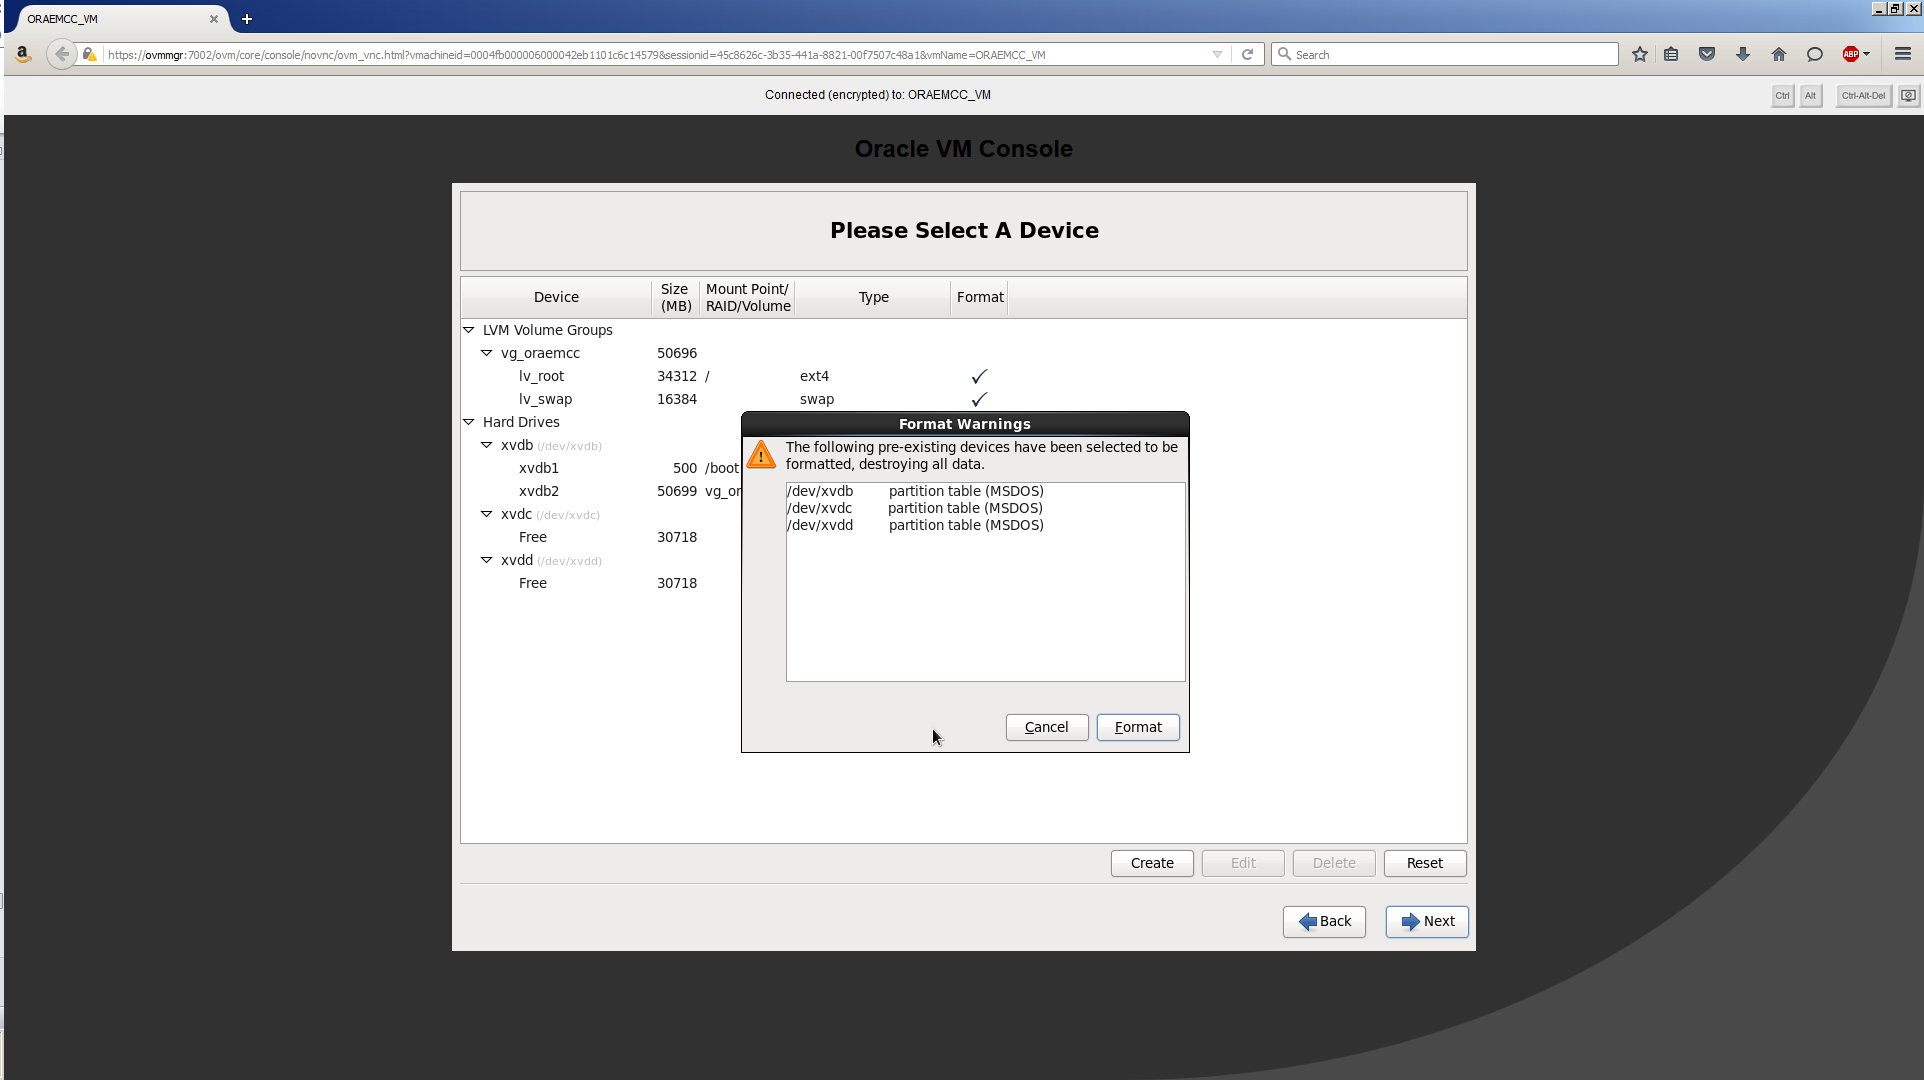
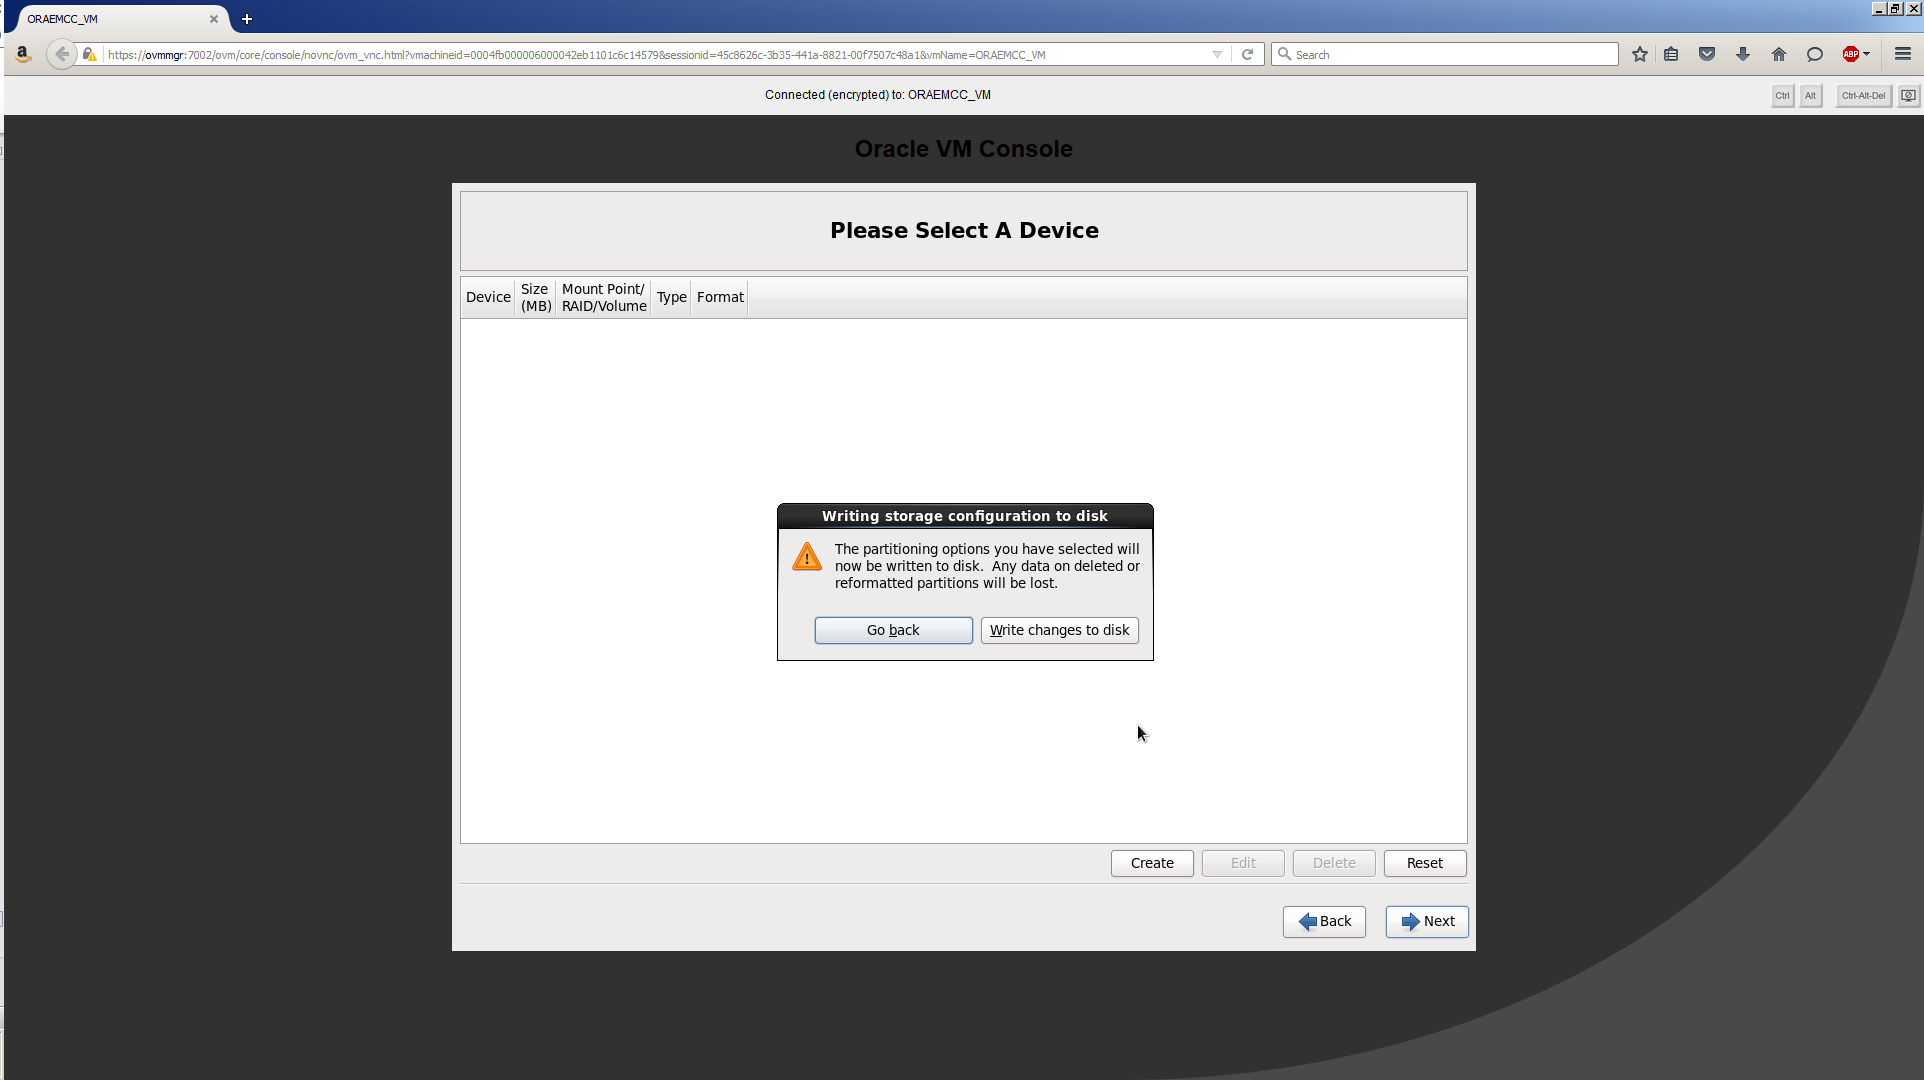
Click Format.
Click Write changes to disk.
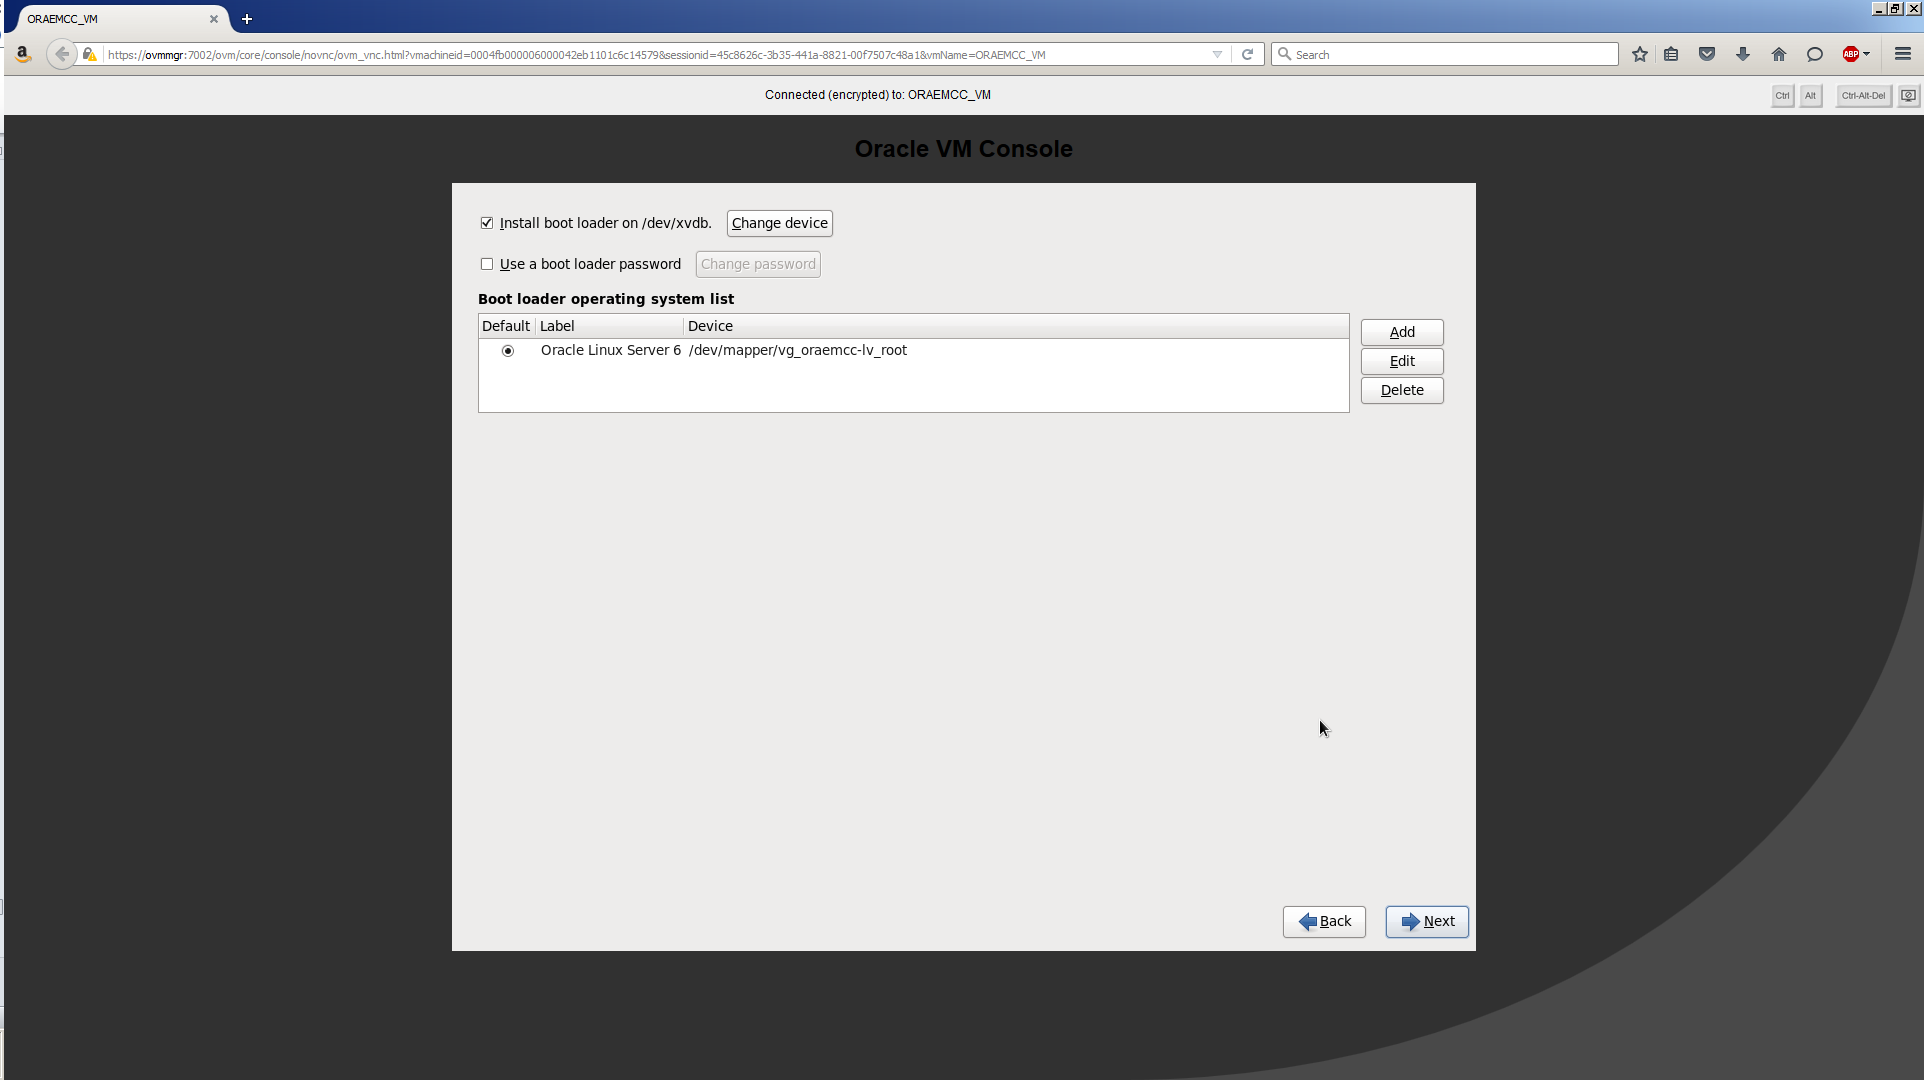
Check Install boot loader on /dev/xvdb. Select Oracle Linux Server 6 (Label) and /dev/mapper/vg_oraemcc-lv_root (Device). Click Next.
Select Database Server and Customize now. Click Next.

Use the following to complete this next screen:
| Category | Option |
|---|---|
| Base System | Leave the default options |
| Servers | Leave the default options |
| Web Services | Leave the defaults options |
| Databases | Uncheck everything |
| System Management | Leave the default options |
| Virtualization | Leave the default options |
| Desktops | Check everything |
| Applications | Check Internet Browser |
| Development | Leave the default options |
| UEK3 kernel repo | Leave the default options |
| Lanugages | Leave the default options |

The installation will progress, installing 1249 packages in total.
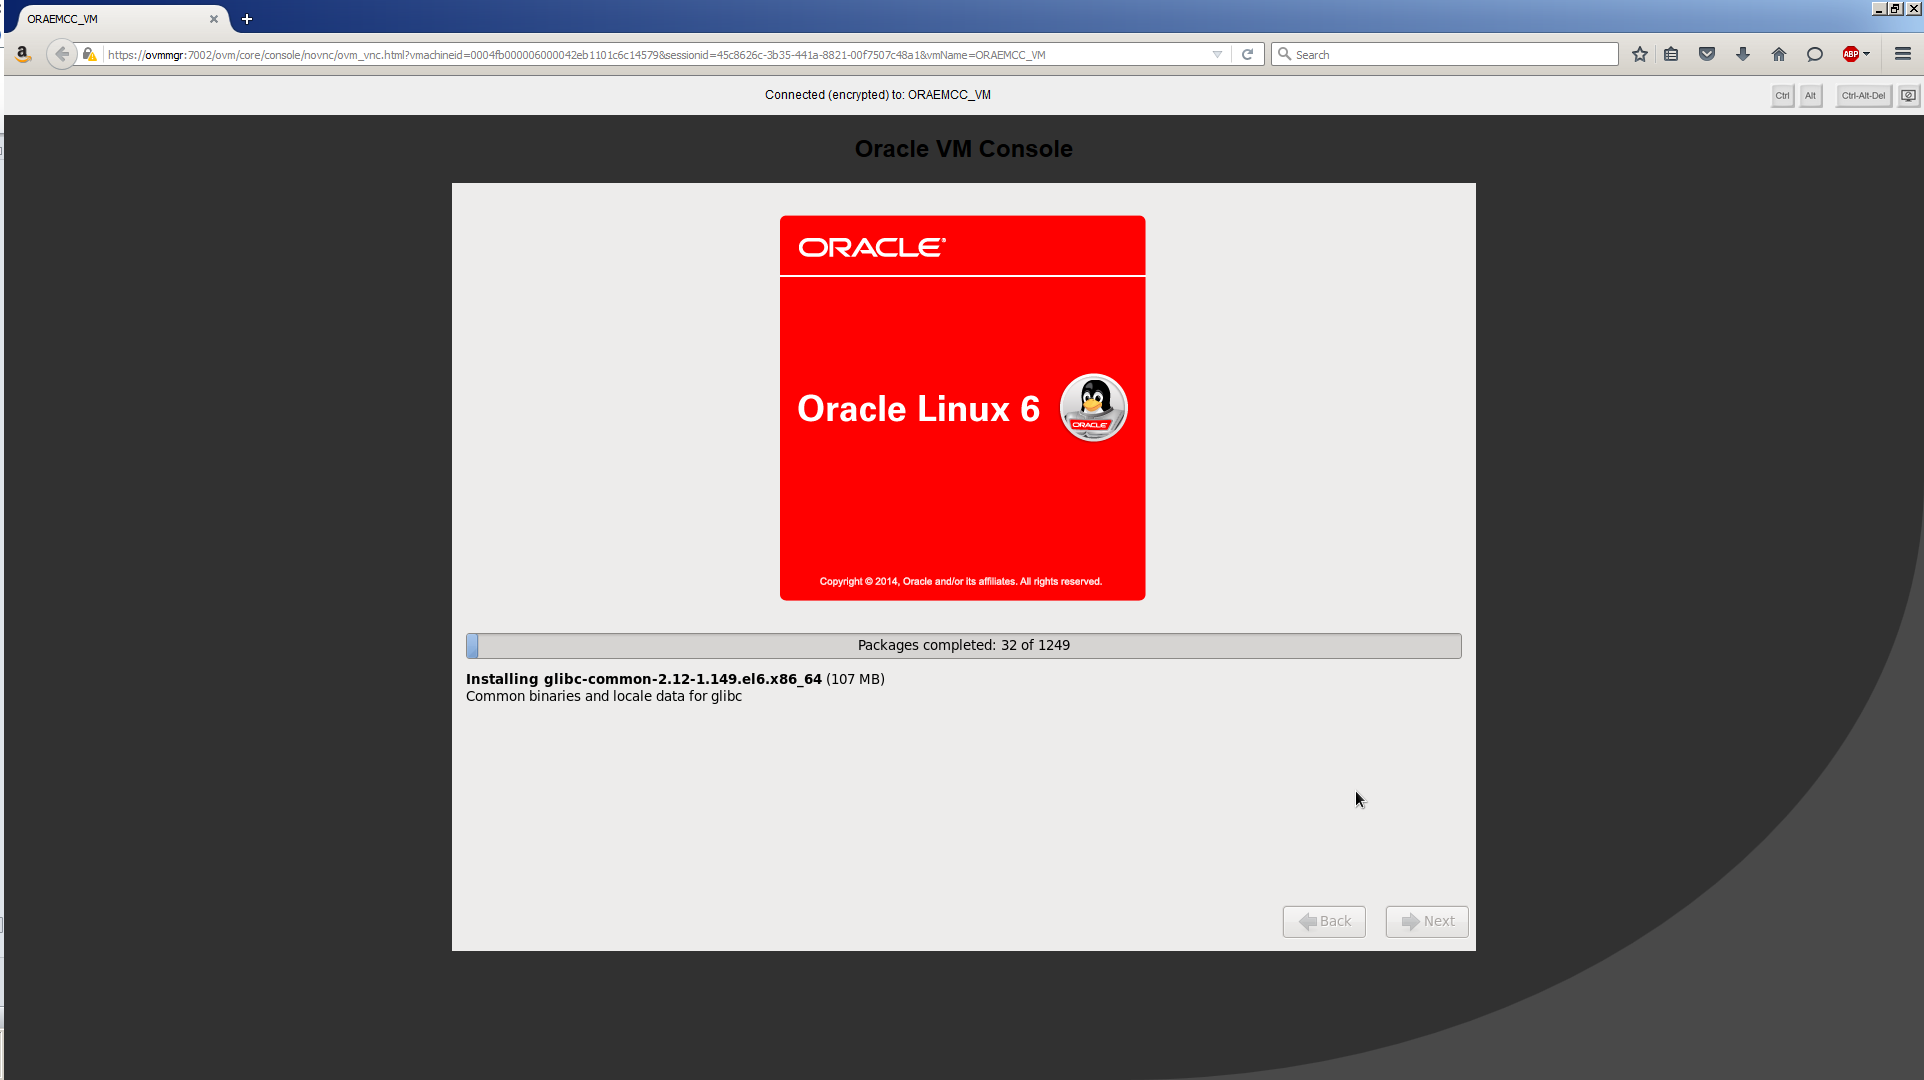
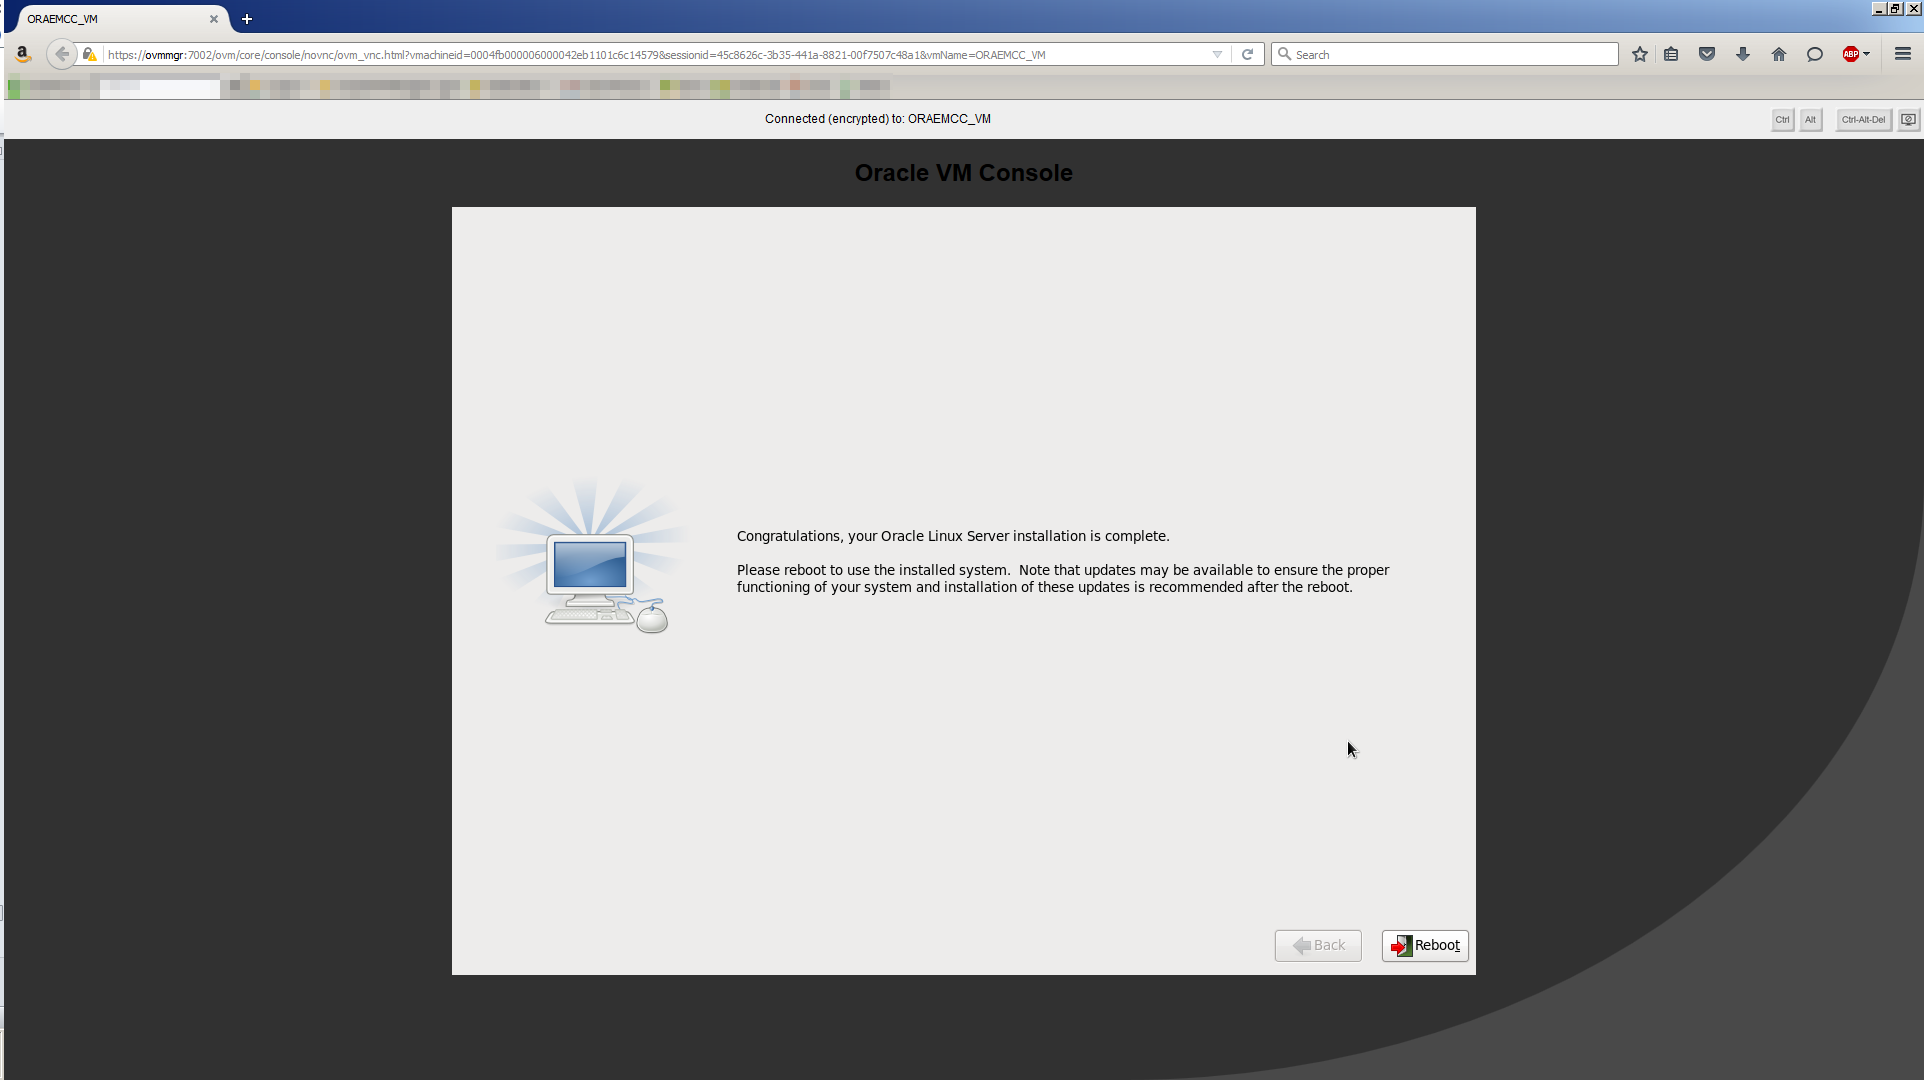
After a while, the package installation will complete and you’ll see this screen:
Task #1c: Eject the Oracle Linux 6 ISO.
Log into OVM Manager and navigate to the list of VMs. Highlight ORAEMCC_VM then click the pencil icon to edit the VM. Click the Disks tab. The screen should now look similar to this:
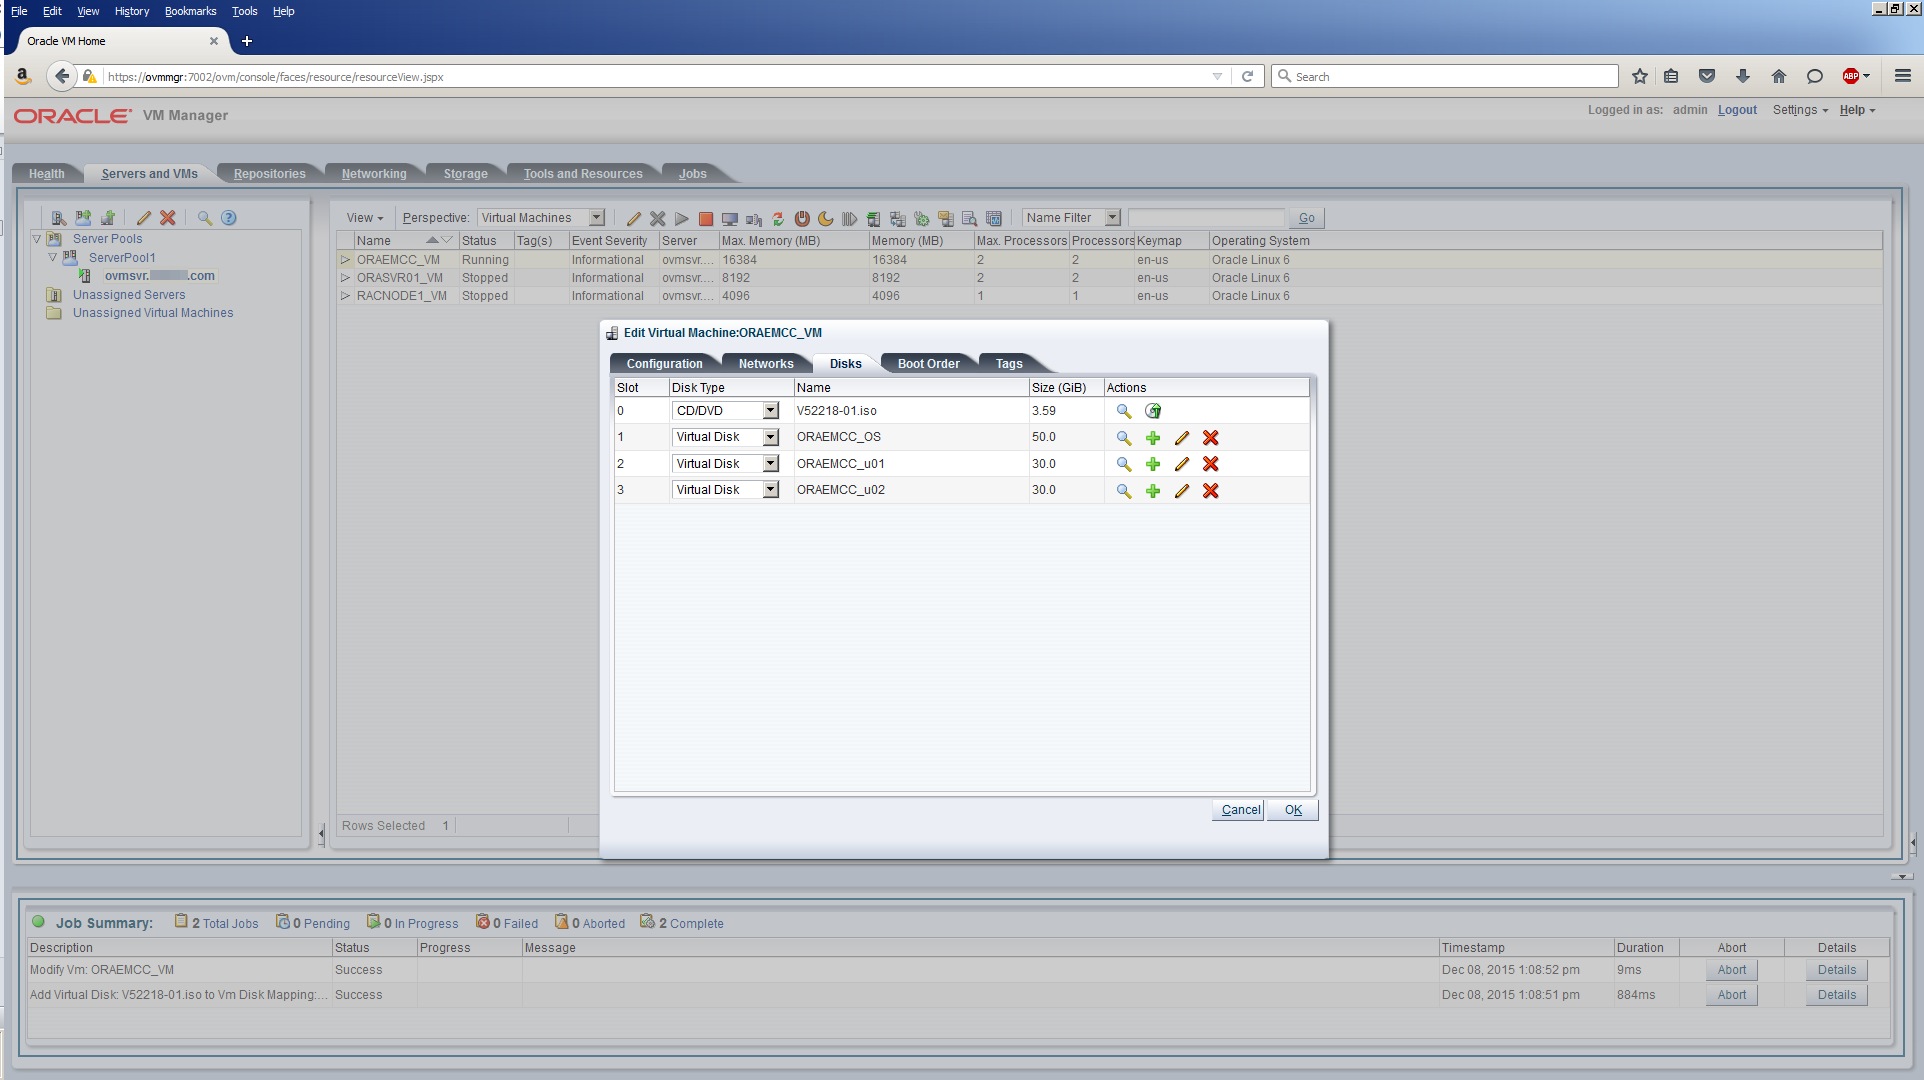
For the CD/DVD (Slot 0), click the Eject a CDROM icon. The screen should now look similar to this:

Task #1d: Complete Post Oracle Linux Installation.
Return to the ORAEMCC_VM console session. Click Reboot.
You may need to close the console session and open a new one. Review Task 1a for opening a console session from OVM Manager.
Select Boot from local drive and press Enter.
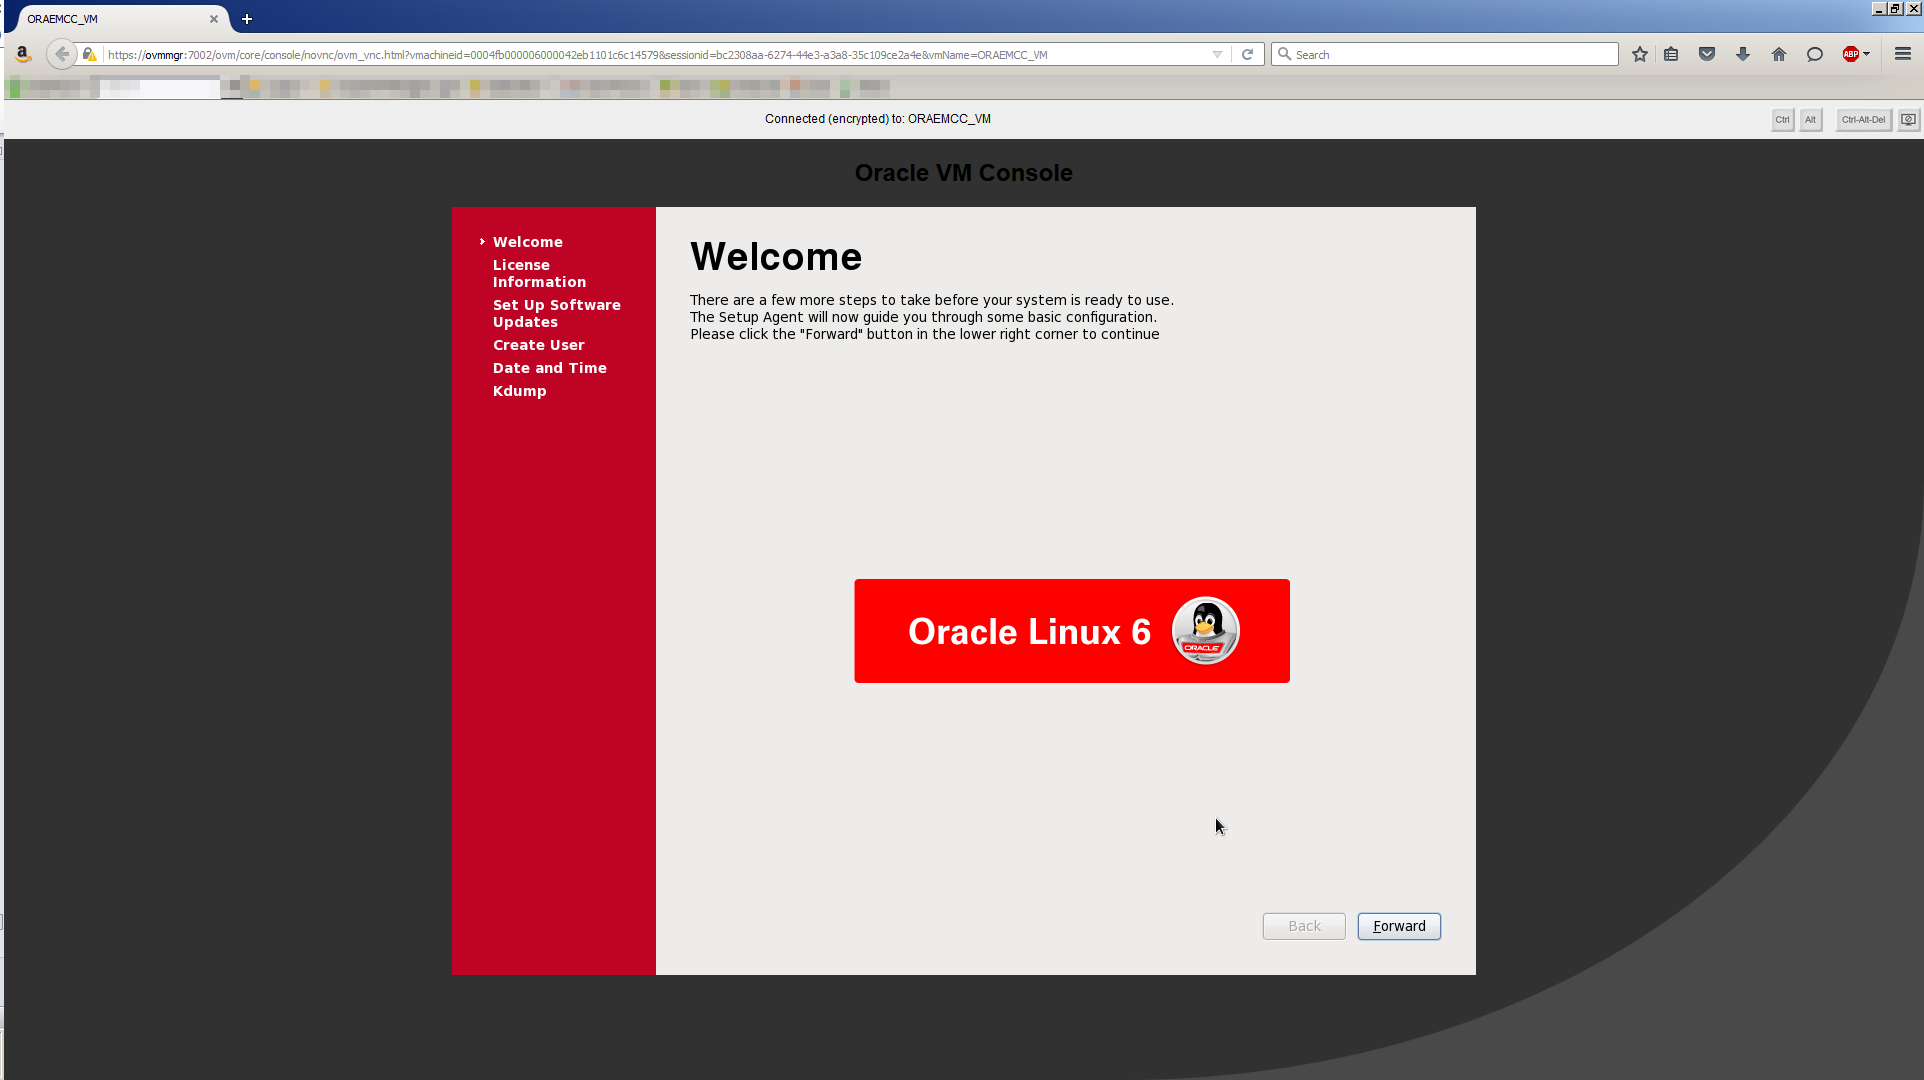
The system boots up and displays a Welcome screen. Click Forward.
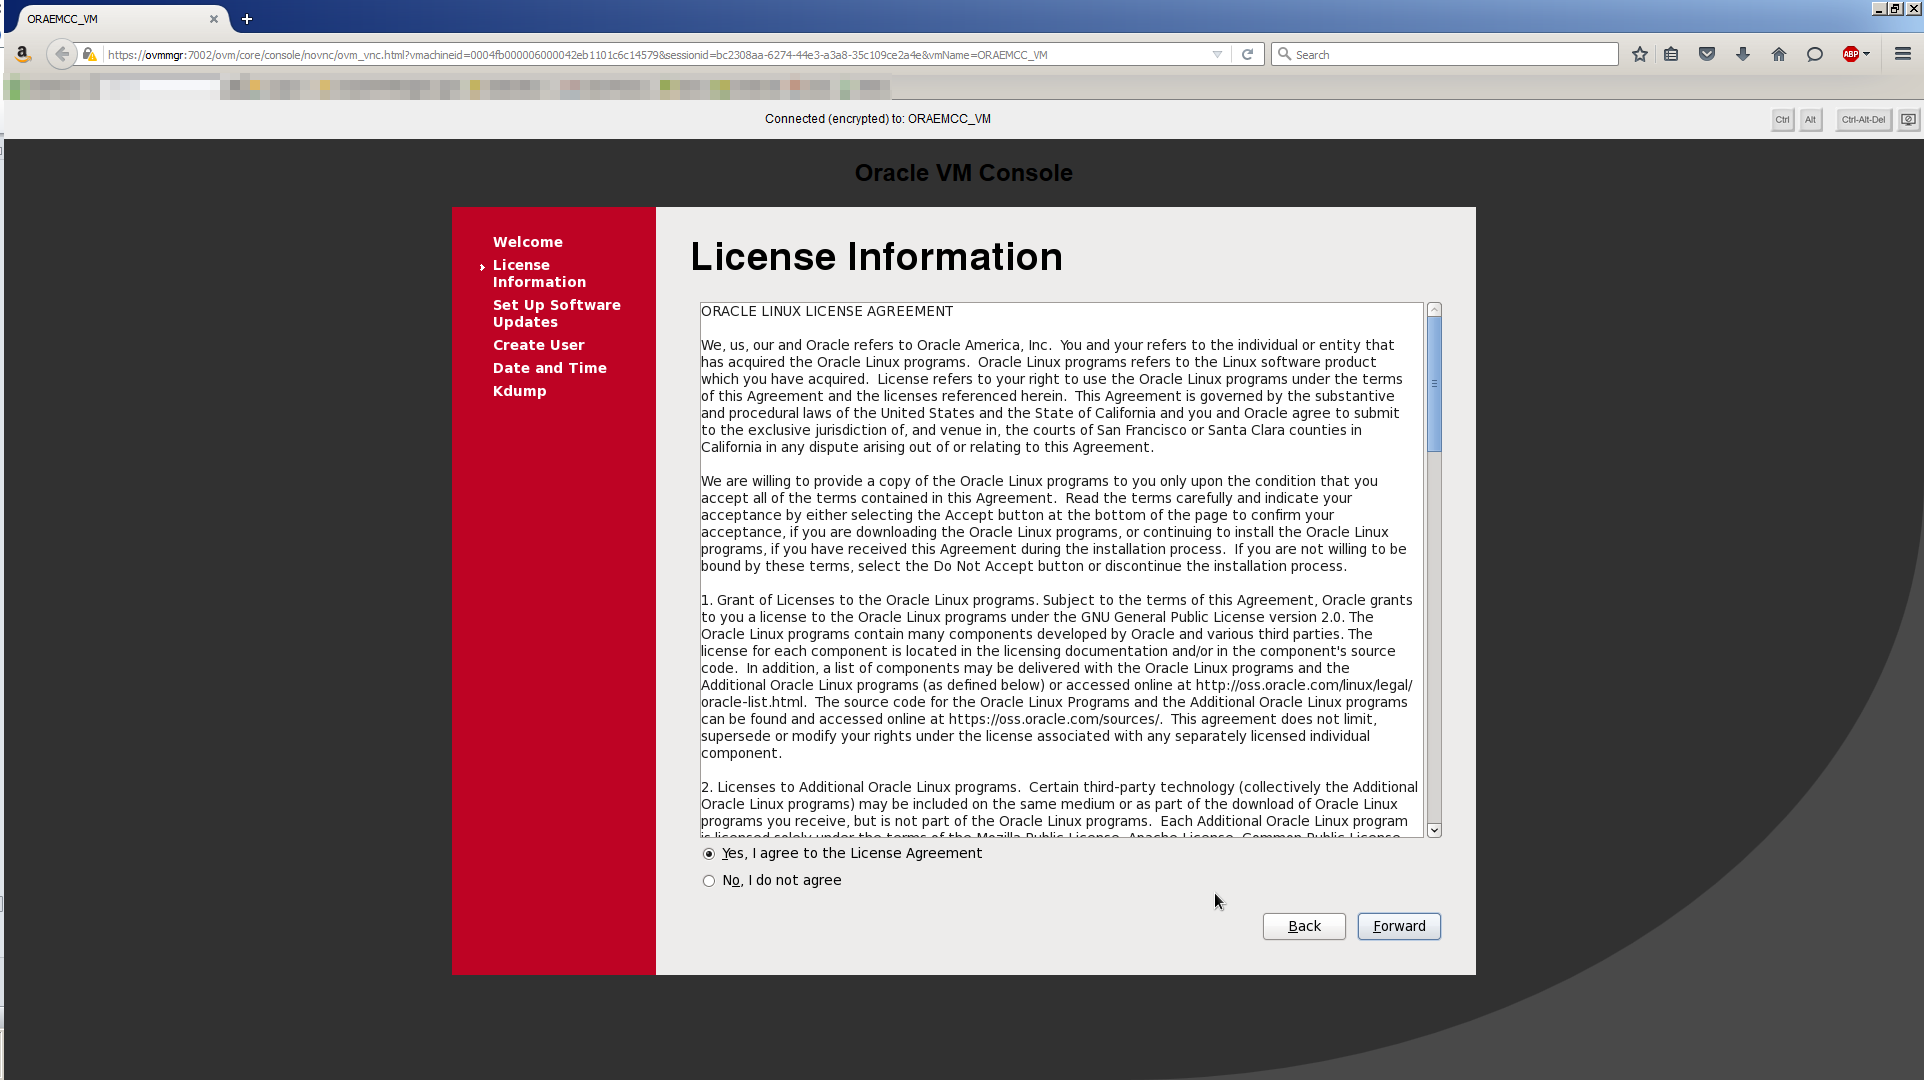
Select Yes, I agree to the License Agreement. Click Forward.
Select No, I prefer to register at a later time. Get ready for an argument which you’ll win.

Click No thanks, I’ll connect later. Click Forward.

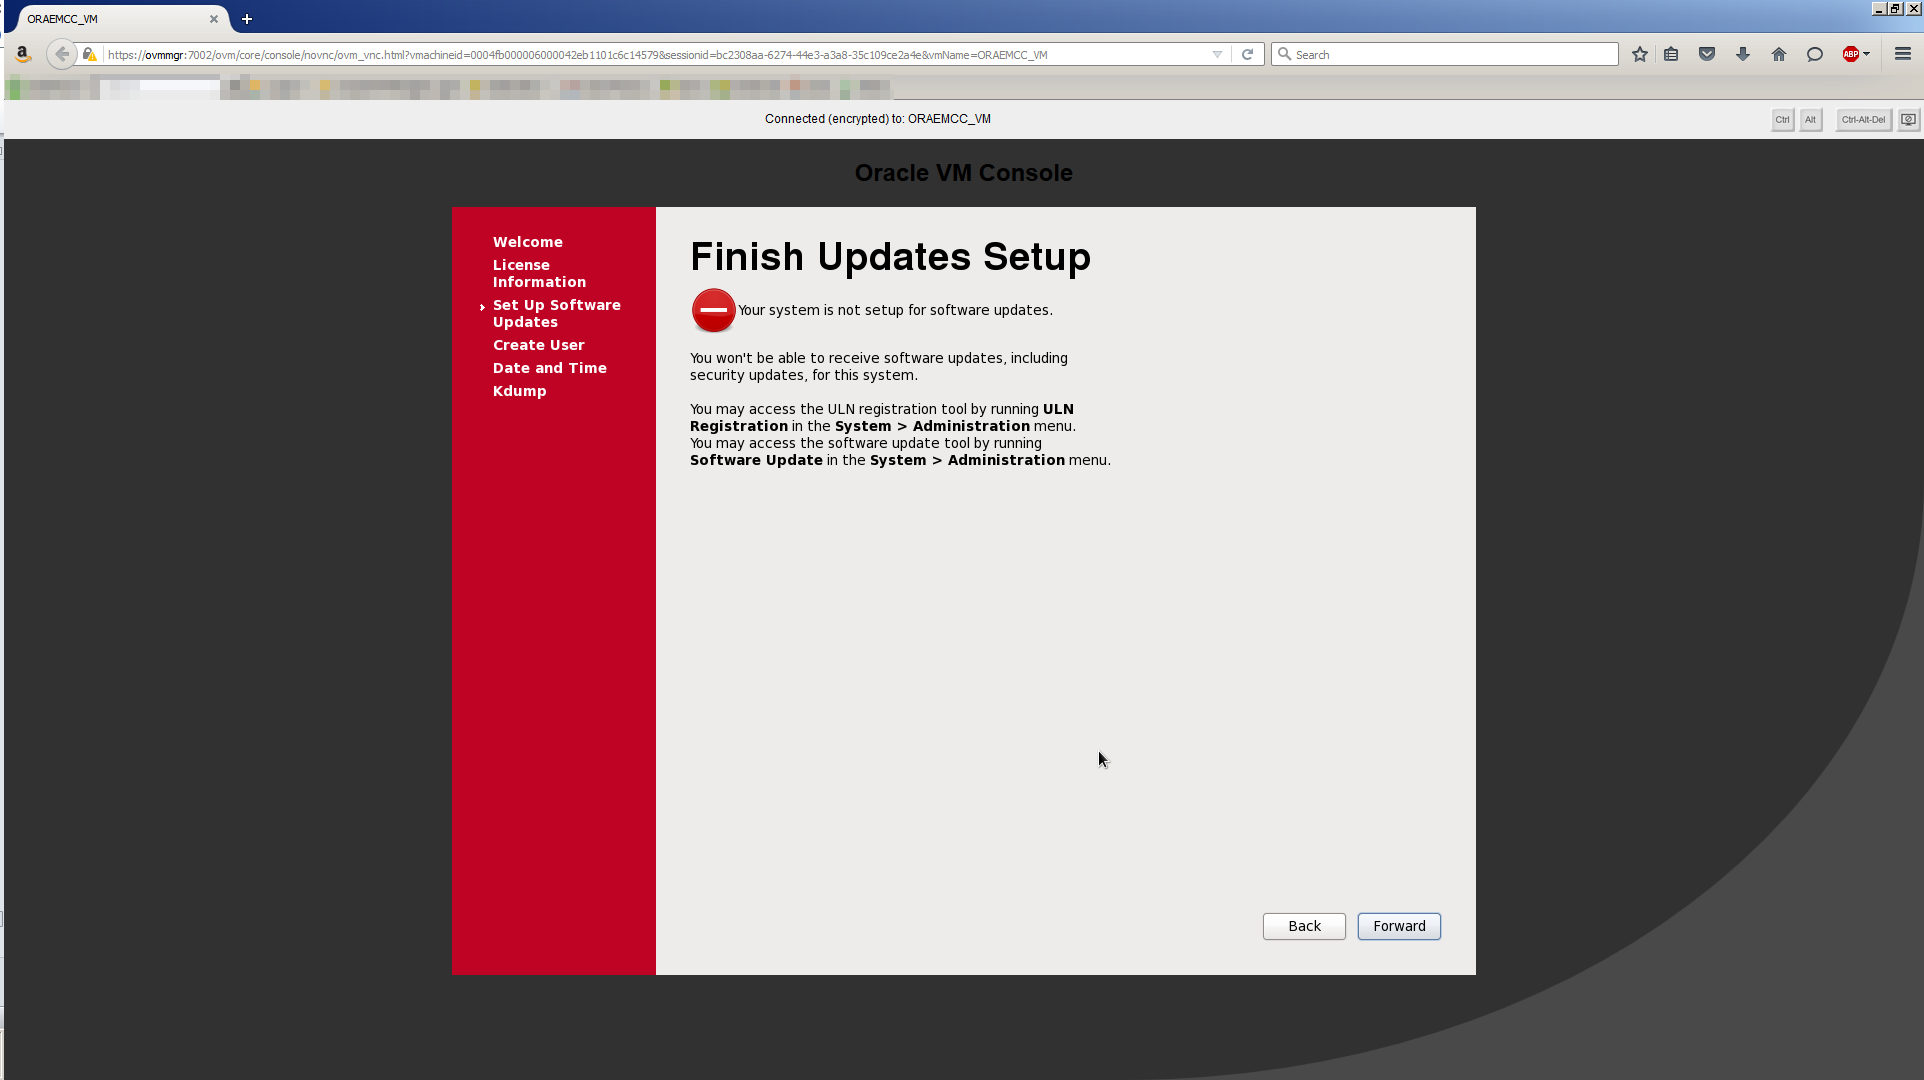
Ignore the chastisement about your system not being setup for software updates and click Forward.
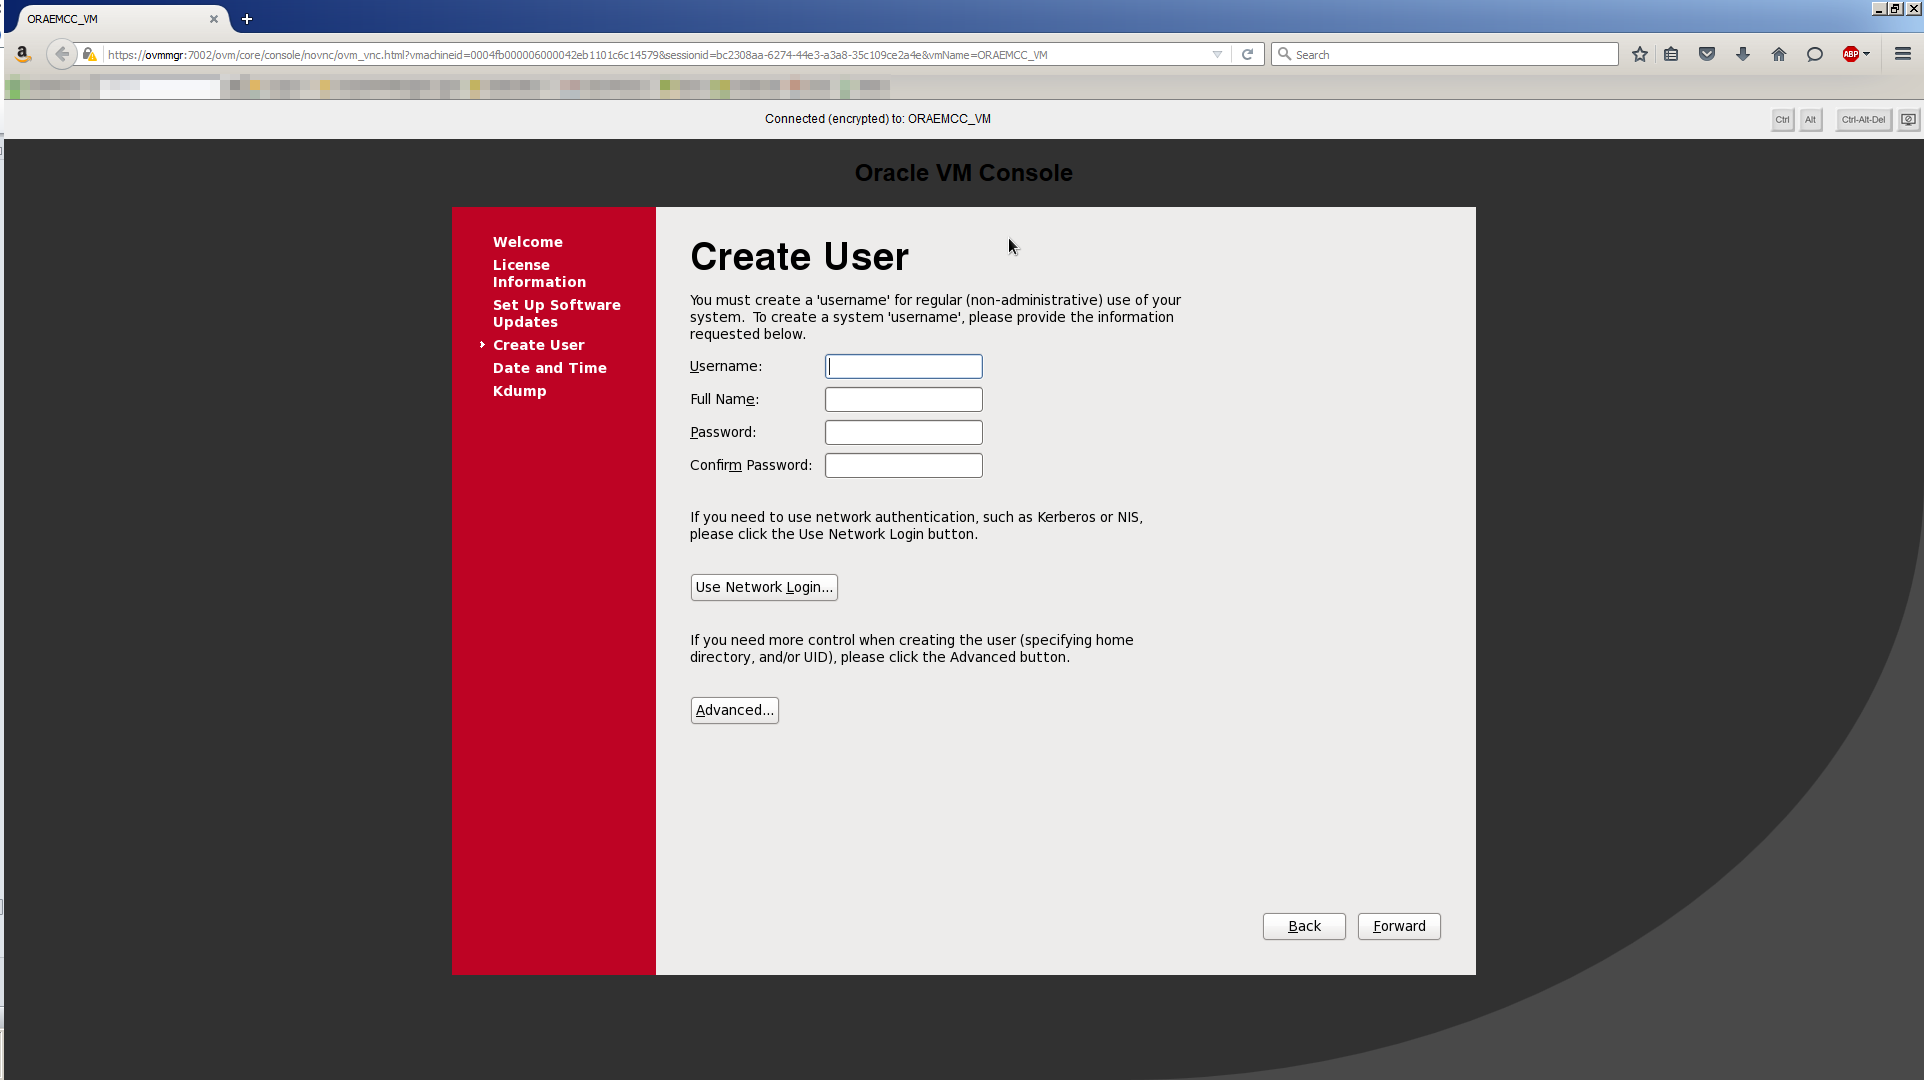
We will not be creating a user account at this time, so ignore this screen and click Forward.
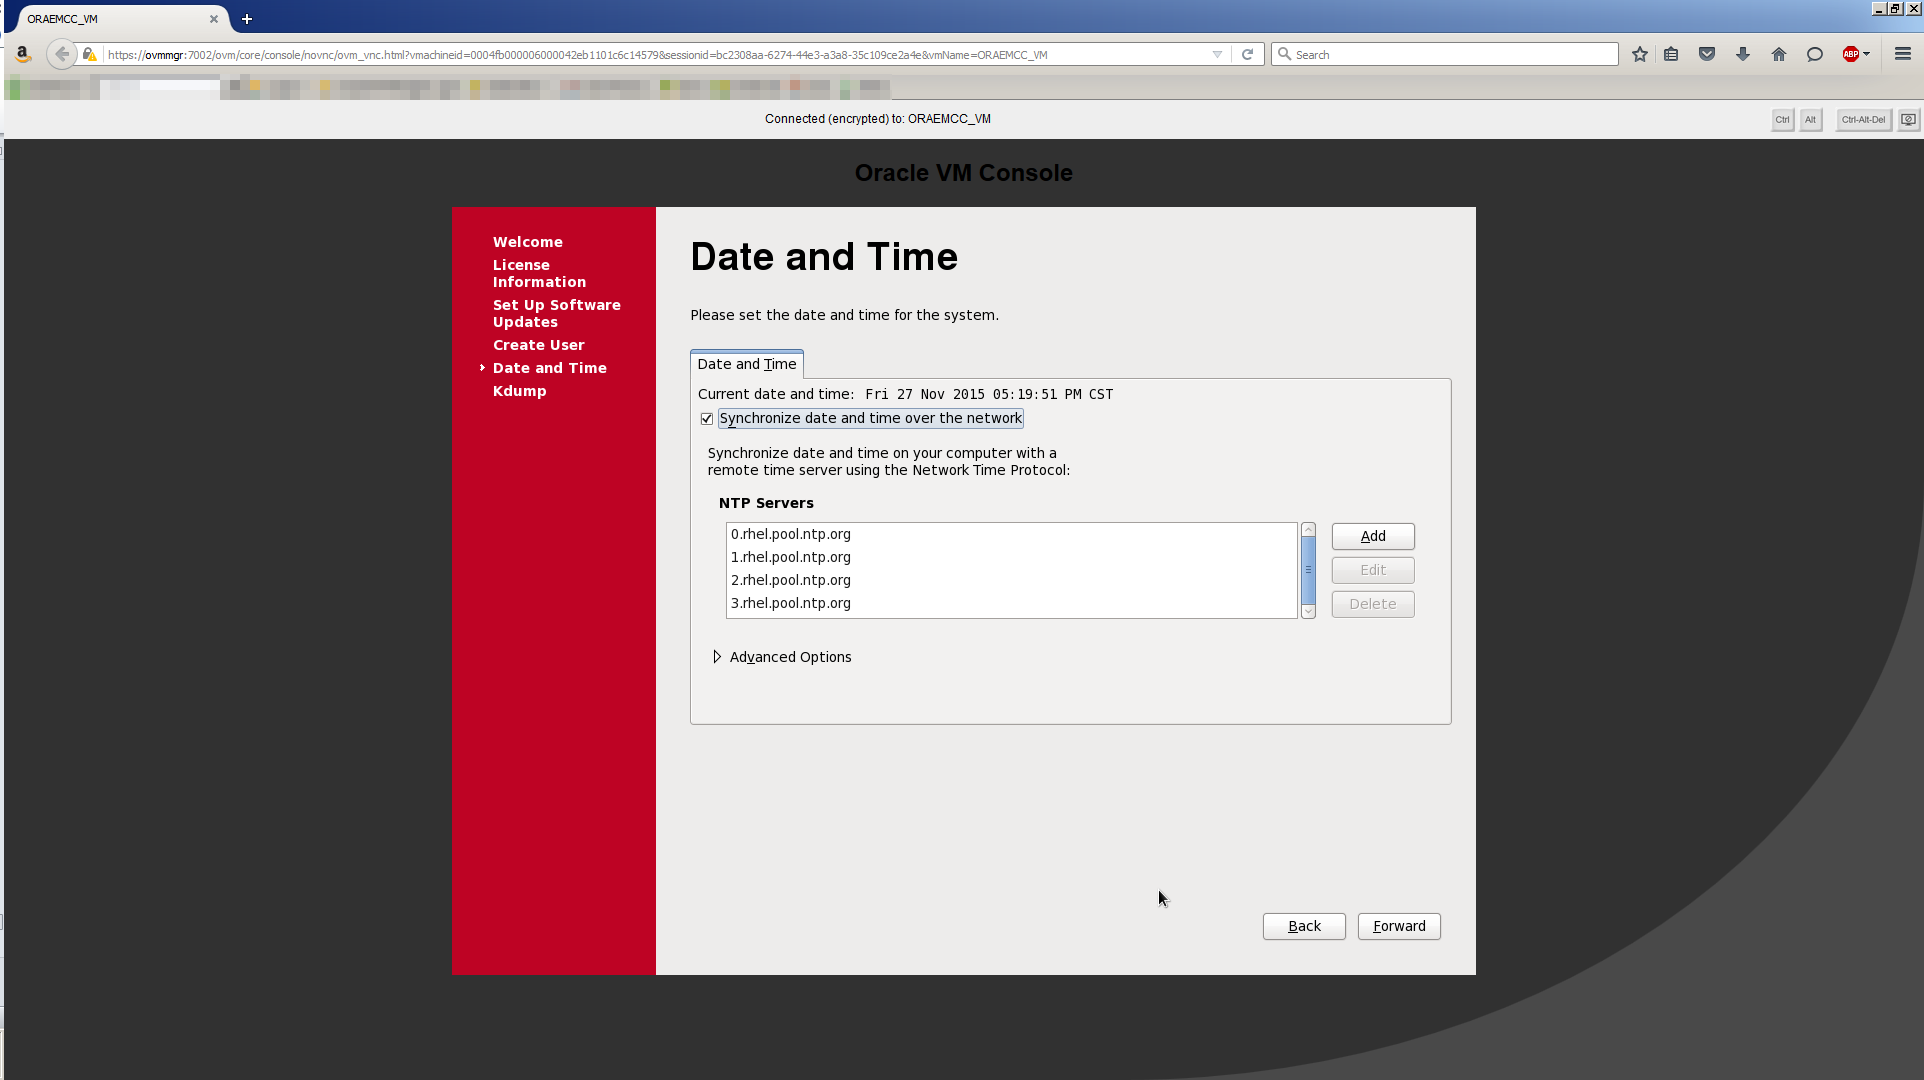
Check Synchronize date and time over the network. Click Forward.
Uncheck Enable kdump? Click Finish.

Kdump tells you it needs to reboot. Click Yes. The system reboots and you may have to close and re-open a console screen from OVM Manager.

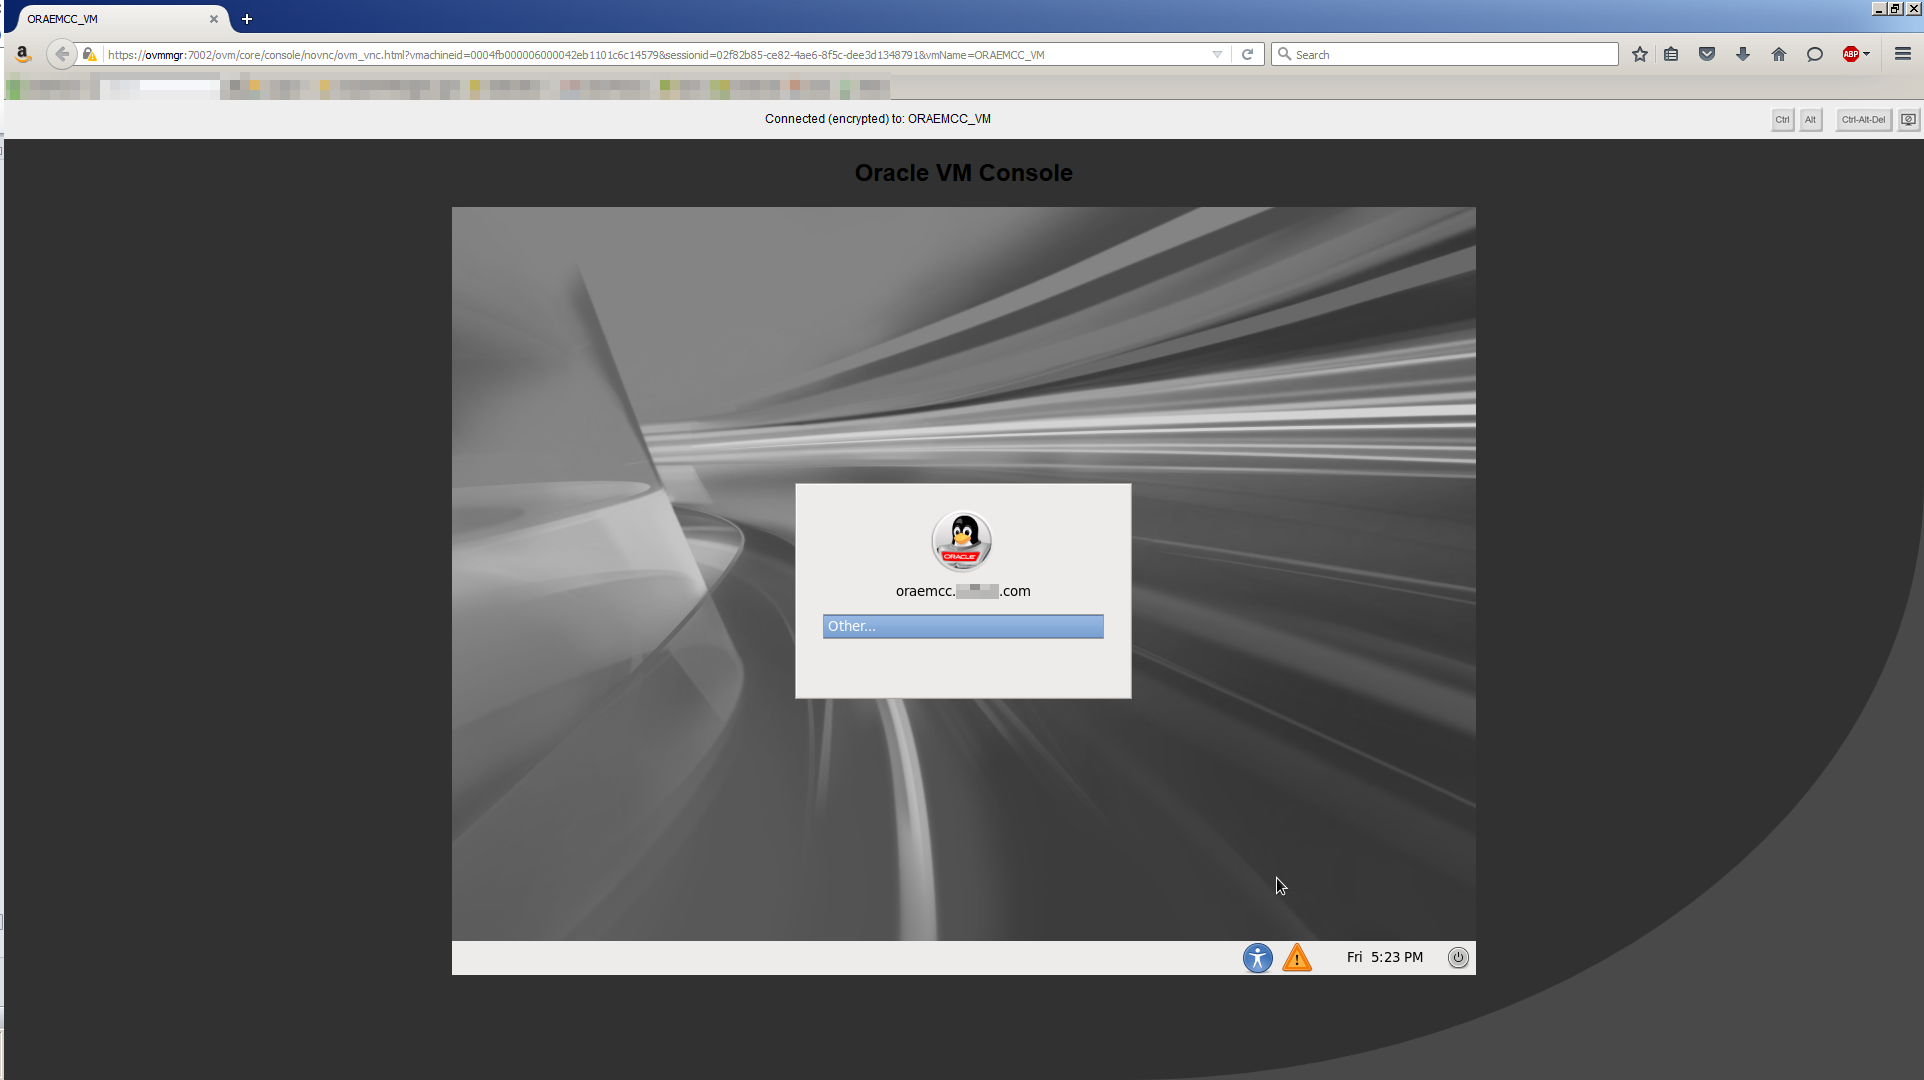
Once the system comes back up, you should see a login screen similar to this:
Task #2: Configure Oracle Linux.
Once Oracle Linux is installed, it needs to be configured to ensure the installation of Oracle Database 12c and OEM Cloud Control 12c Release 5 succeed. The OEM Cloud Control documentation is verbose to say the least, so the following 8 steps will guide you through the bare essentials.
Task #2a: Check Package Requirements for Oracle Management Service.
This step is more informational than anything. According to the Oracle Enterprise Manager Cloud Control Basic Installation Guide, you are warned to install only these package versions to support the Oracle Management Service (OMS):
| Oracle Linux Version | Package Version |
|---|---|
| Oracle Linux 6.x | make-3.81 |
| Oracle Linux 6.x | binutils-2.20.51.0.2-5.11 |
| Oracle Linux 6.x | gcc-4.4.4 |
| Oracle Linux 6.x | libaio-0.3.107 |
| Oracle Linux 6.x | glibc-common-2.12-1 |
| Oracle Linux 6.x | libstdc++-4.4.4 |
| Oracle Linux 6.x | libXtst-1.0.99.2-3.el6.x86_64.rpm |
| Oracle Linux 6.x | sysstat-9.0.4 |
| Oracle Linux 6.x | glibc-devel-2.12-1.7.el6.i686 (This is a 32-bit package) |
| Oracle Linux 6.x | glibc-devel-2.12-1.7.el6.x86_64 (This is a 64-bit package) |
| Oracle Linux 6.2 | glibc-2.12-1.47.0.2 |
A vanilla install of Oracle Linux 6.6 does not create all these packages at these versions. For example, the binutils package is installed at binutils-2.20.51.0.2-5.42.el6.x86_64 which is different from the required version. It’s tempting to remove the installed version and replace it with the exact version listed in the table. However, doing that will remove hundreds of dependent packages, so I wouldn’t recommend it.
The warning in the installation guide says having different versions of these packages, “might cause the installation to fail”. Trust me on this, it won’t as you’ll see later on.
Task #2b: Check Package Requirements for Oracle Management Agent.
Again, this step is informational and is taken from the Oracle Enterprise Manager Cloud Control Basic Installation Guide:
| Oracle Linux Version | Package Version |
|---|---|
| Oracle Linux 6.x | make-3.81 |
| Oracle Linux 6.x | binutils-2.20.51.0.2-5.11 |
| Oracle Linux 6.x | gcc-4.4.4 |
| Oracle Linux 6.x | libaio-0.3.107 |
| Oracle Linux 6.x | glibc-common-2.12-1.7 |
| Oracle Linux 6.x | libstdc++-4.4.4 |
| Oracle Linux 6.x | sysstat-9.0.4 |
It is a supported configuration to have a single server run the full OEM Cloud Control 12c Release 5 software stack, including a Management Agent for the Cloud Control server itself. That being the case, you’d think the package requirements for the OMS and Management Agent would be identical, but according to Oracle’s own documentation, they’re not! It’s either a documentation typo, which seems unlikely given the documentation’s longevity, or it doesn’t matter. Guess which one I’m going with. ?
Task #2c: Update Oracle Linux.
Let’s grab the latest and greatest packages and update the Linux kernel. To do that we need to run a yum update. To do that, we need to create a yum repository first. With the yum repository in place, run the update:
[root@oraemcc ~]# yum update
This will take a while. It will ask you to confirm progress in a couple of places, so don’t go to lunch or it’ll be waiting for you when you get back.
Note, this update will upgrade the version of Oracle Linux from 6.6 to 6.7.
Since we’re using a 64 bit version of Oracle Linux, we don’t get the 32 bit version of the glibc-devel package required for the OMS. To install that, run this command:
[root@oraemcc ~]# yum install glibc-devel.i686
Task #2d: Install the Oracle 12c Release 1 Pre-Installation Package.
Since we’re using a single server for the entire OEM software stack, the server will also need to run an Oracle 12c database. Consequently, the operating system needs to be configured to support that as well as the OEM components. The easiest way to introduce multiple configuration changes which benefit an Oracle Database 12c installation is to install Oracle’s 12cR1 pre-installation package. This can be done in a couple of ways.
The package is on the Oracle Linux 6 Update 6 DVD you created with ImgBurn. It’s located in /Server/Packages and is called oracle-rdbms-server-12cR1-preinstall-1.0-12.el6.x86_64.rpm. To install it, run this command:
[root@oraemcc Packages]# rpm -i oracle-rdbms-server-12cR1-preinstall-1.0-12.el6.x86_64.rpm
Or you could just run a yum install command which is easier:
[root@oraemcc ~]# yum install oracle-rdbms-server-12cR1-preinstall.x86_64
The installation of this package makes a number of changes to /etc/password and /etc/group. The UIDs and GIDs it creates may not be what you want. You can use a script to correct them and add some additional standard users and groups. Using the Oracle pre-install rpm followed by this script will guarantee UID and GID consistency across the entire server infrastructure. There will be much rejoicing and the Oracle gods will smile upon thee. ?
Add these entries to the end of the /etc/security/limits.conf file:
oracle   soft   nofile   8192
oracle   hard   nofile   65536
oracle   soft   nproc    2048
oracle   hard   nproc    16384
oracle   soft   stack    10240
oracle   hard   stack    32768
oracle   soft   core     unlimited
oracle   hard   core     unlimited
Despite the correct changes having been made to the system file /etc/security/limits.conf, I had to add the following line to the oracle user’s .bash_profile. Without it, the OEM installer failed a prerequisite check!
ulimit -n 4096
Now that the oracle user exists, set a password:
[root@oraemcc ~]# passwd oracle
Task #2e: Disable SELinux.
SELinux is enabled by default when you install Oracle Linux 6.6. It can have the nasty side effect of causing ASM disk instantiation failures. Hence, I always disable SELinux.
Task #2f: Disable Linux Firewall.
Generally speaking, firewalls are a good thing.
In a production environment, you’d want to work with your Network Administrator and have them open up the ports necessary for OEM Cloud Control to work. Information on those ports can be found here.
However, in our environment we can trust that we won’t hack ourselves and we’ll go ahead and disable the Linux firewall.
Task #2g: Create Additional File Systems.
The ORAEMCC_VM had 3 disk resources allocated to it. That means 3 disk devices should have shown up after we installed Oracle Linux. We already used /dev/xvdb for the Oracle Linux installation, so we need to use the other two disks to create the /u01 and /u02 filesystems.
This is the selective output from the fdisk command showing the other 2 disk devices:
[root@oraemcc ~]# fdisk -l

Disk /dev/xvdc: 32.2 GB, 32212254720 bytes
255 heads, 63 sectors/track, 3916 cylinders
Units = cylinders of 16065 * 512 = 8225280 bytes
Sector size (logical/physical): 512 bytes / 512 bytes
I/O size (minimum/optimal): 512 bytes / 512 bytes
Disk identifier: 0x0005a6bc

Disk /dev/xvdd: 32.2 GB, 32212254720 bytes
255 heads, 63 sectors/track, 3916 cylinders
Units = cylinders of 16065 * 512 = 8225280 bytes
Sector size (logical/physical): 512 bytes / 512 bytes
I/O size (minimum/optimal): 512 bytes / 512 bytes
Disk identifier: 0x00083a9b
First, let’s partition /dev/xvdc:
[root@oraemcc ~]# fdisk /dev/xvdc

WARNING: DOS-compatible mode is deprecated. It's strongly recommended to
         switch off the mode (command 'c') and change display units to
         sectors (command 'u').


Command (m for help): n
Command action
   e   extended
   p   primary partition (1-4)
p

Partition number (1-4): 1

First cylinder (1-3916, default 1):
Using default value 1
Last cylinder, +cylinders or +size{K,M,G} (1-3916, default 3916):
Using default value 3916

Command (m for help): w

The partition table has been altered!
Calling ioctl() to re-read partition table.
Syncing disks.
Perform the same operation for disk device, /dev/xvdd.
Next, create an ext4 filesystem in the primary partition of each disk:
[root@oraemcc ~]# mkfs -t ext4 -m 0 /dev/xvdc1

mke2fs 1.43-WIP (20-Jun-2013)
Discarding device blocks: done
Filesystem label=
OS type: Linux
Block size=4096 (log=2)
Fragment size=4096 (log=2)
Stride=0 blocks, Stripe width=0 blocks
1966080 inodes, 7863809 blocks
0 blocks (0.00%) reserved for the super user
First data block=0
Maximum filesystem blocks=4294967296
240 block groups
32768 blocks per group, 32768 fragments per group
8192 inodes per group
Superblock backups stored on blocks:
       32768, 98304, 163840, 229376, 294912, 819200, 884736, 1605632, 2654208,
       4096000
Allocating group tables: done
Writing inode tables: done
Creating journal (32768 blocks): done
Writing superblocks and filesystem accounting information: done
Perform the same operation for disk partition, /dev/xvdd1.
Next create the file system mount points and mount the file systems:
[root@oraemcc /]# cd /
[root@oraemcc /]# mkdir /u01 /u02
[root@oraemcc /]# mount /dev/xvdc1 /u01
[root@oraemcc /]# mount /dev/xvdd1 /u02

[root@oraemcc /]# df -h

Filesystem           Size Used  Avail Use% Mounted on
/dev/mapper/vg_oraemcc-lv_root
                      33G   15G   17G  46% /
tmpfs                7.9G   72K  7.9G   1% /dev/shm
/dev/xvdb1           477M  123M  325M  28% /boot
/dev/xvdc1            30G   44M   30G   1% /u01
/dev/xvdd1            30G   44M   30G   1% /u02
Next, add the following entries to the /etc/fstab file so the mounted filesystems survive system restarts:
/dev/xvdc1             /u01                 ext4   defaults       0 0
/dev/xvdd1             /u02                 ext4    defaults      0 0
Finally, create the directories which we’ll need later for the software installation and database files:
[root@oraemcc /]# cd /u01

[root@oraemcc u01]# mkdir app
[root@oraemcc u01]# chmod 755 app
[root@oraemcc u01]# chown oracle:oinstall app

[root@oraemcc u01]# cd /u02
[root@oraemcc u02]# mkdir oradata
[root@oraemcc u02]# chmod 755 oradata
[root@oraemcc u02]# chown oracle:oinstall oradata

[root@oraemcc u02]# mkdir FRA
[root@oraemcc u02]# chmod 755 FRA
[root@oraemcc u02]# chown oracle:oinstall FRA
Task #2h: Edit /etc/hosts file.
Add this line to the local /etc/hosts file. If you don’t the OEM installer has a hissy fit and you don’t want that:
200.200.10.16 oraemcc.mynet.com oraemcc
Task #3: Install Oracle Database 12c.
OEM Cloud Control uses its own repository which happens to be an Oracle Database. In order to have an Oracle Database up and running on this server, we need to install the Oracle Database 12c Release 1 (12.1.0.2) software. This is nice and easy. Nice and easy does it every time. (Sinatra reference ? )
With X-Win32 installed and up and running on your workstation, fire up an X term connected to oraemcc.mynet.com as the oracle user and point your DISPLAY variable back to your workstation’s IP address:
[oracle@oraemcc ~]# export DISPLAY=<your-workstation-IP>:0.0
Locate the Oracle Database software you copied to the server and ensure it’s unzipped. Then simply run the installer script as the oracle user:
[oracle@oraemcc ~]$ pwd
/home/oracle

[oracle@oraemcc ~]$ cd media/rdbms_12cR1_12.1.0.2/database
[oracle@oraemcc database]$ ./runInstaller
The Oracle Database 12c Release 1 Installer opens up. Simply follow the screens.
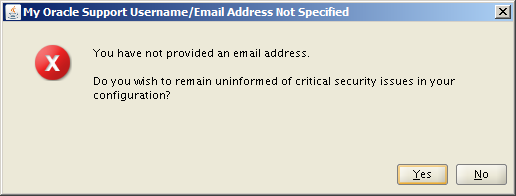
Uncheck the option, I wish to receive security updates via My Oracle Support, then click Next:

Click Yes to confirm that you wish to remain uninformed. Love the wording. Condescending much?
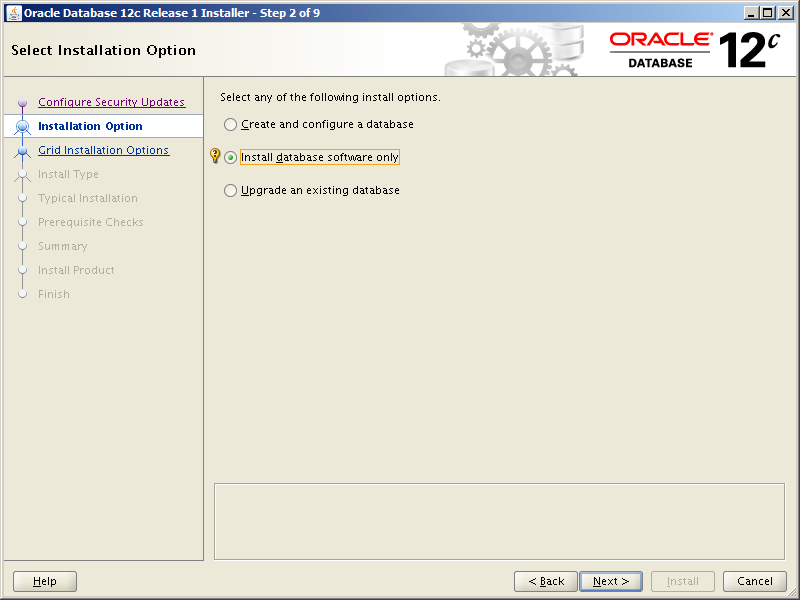
Select the option, Install database software only, then click Next:
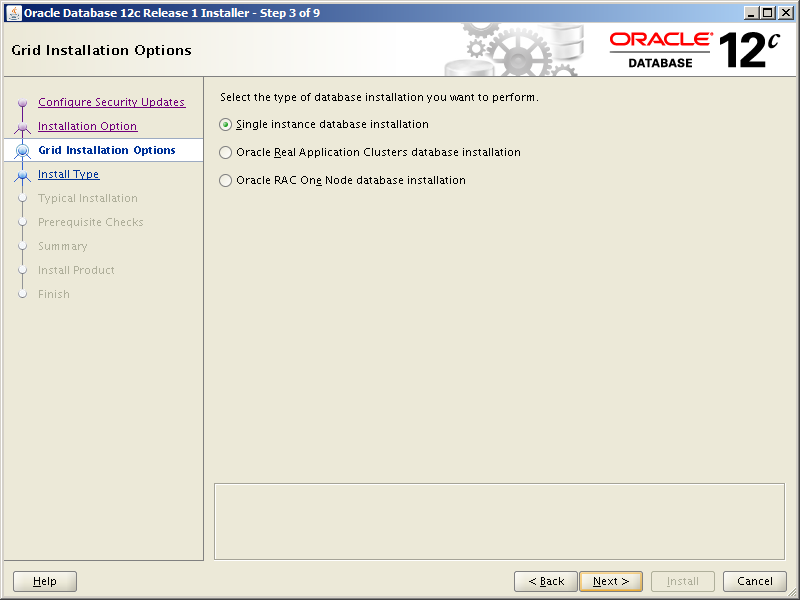
Select the option, Single instance database installation, then click Next:
Select your preferred language, then click Next:

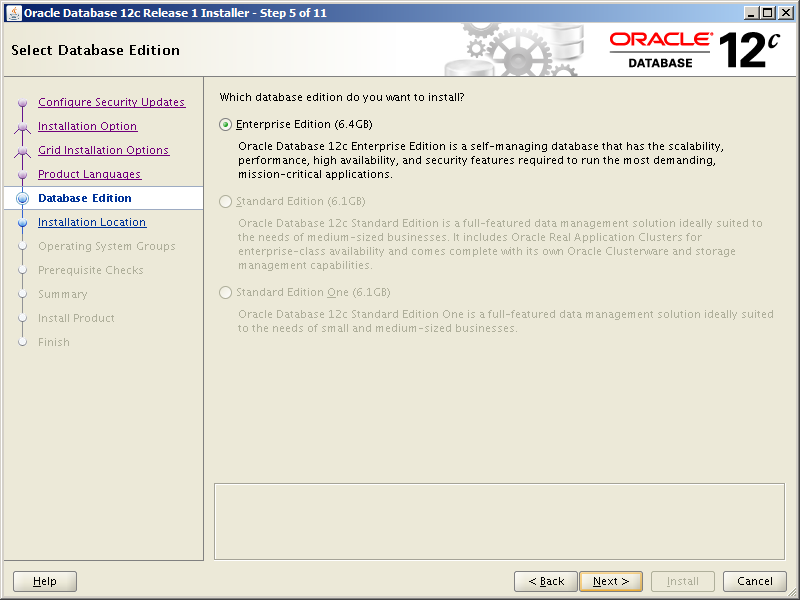
Select the option, Enterprise Edition (6.4 GB), then click Next:
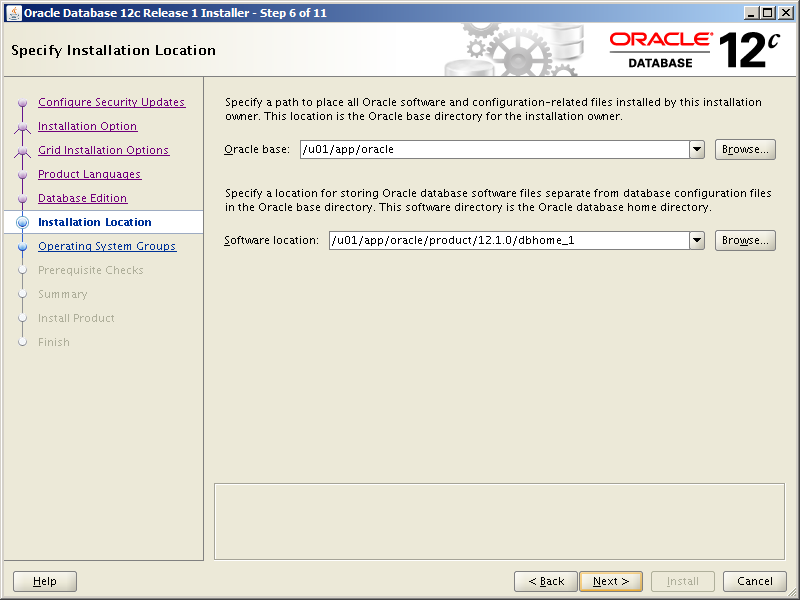
Choose the standard locations for Oracle base and Software location, then click Next:
| Field | Value |
|---|---|
| Oracle base | /u01/app/oracle |
| Software location | /u01/app/oracle/product/12.1.0/dbhome_1 |
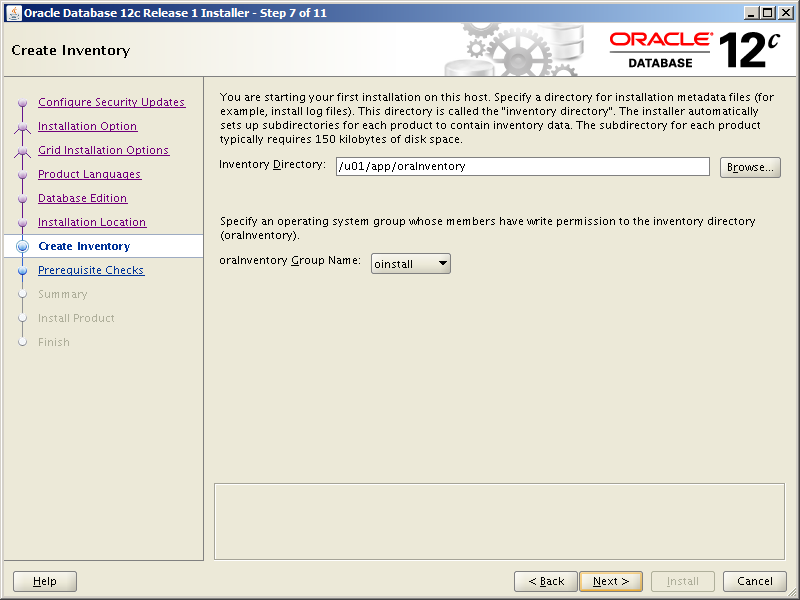
Choose the standard Inventory Directory (/u01/app/oraInventory) and the standard oraInventory Group Name (oinstall), then click Next:
Choose the standard OS groups then click Next:
| Field | Value |
|---|---|
| Database Administrator (OSDBA) group | dba |
| Database Operator (OSOPER) group (Optional) | oper |
| Database backup and Recovery (OSBACKUPDBA) group | backupdba |
| Data Guard administrative (OSDGDBA) group | dgdba |
| Encryption Key Management administrative (OSKMDBA) group | kmdba |

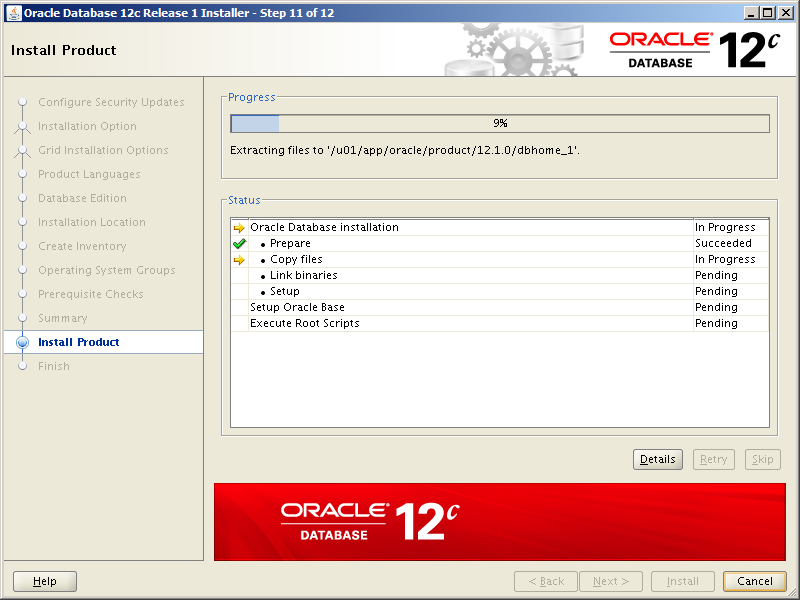
The installer then runs its prerequisite checks which should all pass without incident. You should then see this summary screen. Click Install to start the installation.

You’ll be looking at this screen for a little while:
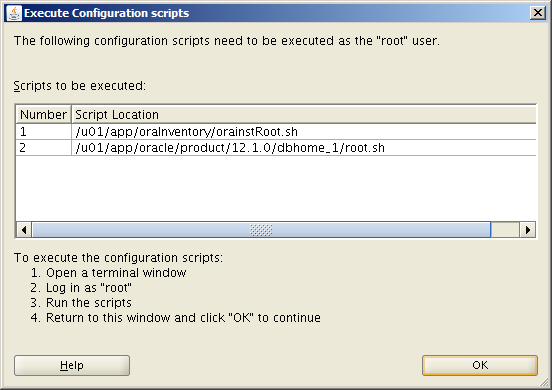
After several minutes you’ll be prompted to run some scripts as the root user:
Running the scripts looks like this:
[root@oraemcc ~]# cd /u01/app/oraInventory

[root@oraemcc oraInventory]# ./orainstRoot.sh
Changing permissions of /u01/app/oraInventory.
Adding read,write permissions for group.
Removing read,write,execute permissions for world.
Changing groupname of /u01/app/oraInventory to oinstall.
The execution of the script is complete.
[root@oraemcc oraInventory]# cd /u01/app/oracle/product/12.1.0/dbhome_1

[root@oraemcc dbhome_1]# ./root.sh
Performing root user operation.

The following environment variables are set as:
   ORACLE_OWNER= oracle
   ORACLE_HOME= /u01/app/oracle/product/12.1.0/dbhome_1

Enter the full pathname of the local bin directory: [/usr/local/bin]:
   Copying dbhome to /usr/local/bin ...
   Copying oraenv to /usr/local/bin ...
   Copying coraenv to /usr/local/bin ...

Creating /etc/oratab file...
Entries will be added to the /etc/oratab file as needed by
Database Configuration Assistant when a database is created

Finished running generic part of root script.
Now product-specific root actions will be performed.
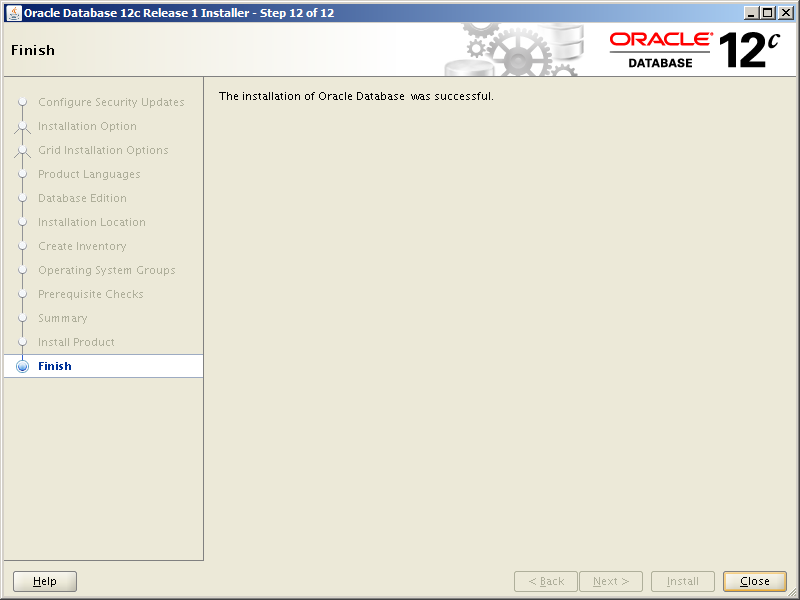
After the scripts have been run, return to the Execute Configuration Scripts dialog and click OK. You’ll then see this final screen and your work here is done. For now.
Task #4: Create a Repository Database.
In the good old days, you could create an empty database and have the installation of OEM populate it with all the necessary repository objects. Seems that’s beyond our capabilities now as Oracle wants you to use a pre-configured database template instead. Hopefully you have downloaded the Oracle Enterprise Manager Repository Database Template referenced in Part 2 of this series.
Note, this template is highly version specific. It is designed to work with Oracle Database 12c Release 1 (12.1.0.2) and Oracle Enterprise Manager Cloud Control 12c Release 5.
This is how you use it in 3 easy steps:
Task #4a: Unzip the Template.
Copy the template to $ORACLE_HOME/assistants/dbca/templates:
[oracle@oraemcc ~]$ cd /u01/app/oracle/product/12.1.0/dbhome_1/assistants/dbca/templates
[oracle@oraemcc templates]$ cp ~/media/oemcc_12cR5/12.1.0.2.0_Database_Template_for_EM12_1_0_5_0_Linux_x64.zip .
Unzip the template zip file to the templates directory:
[oracle@oraemcc templates]$ unzip 12.1.0.2.0_Database_Template_for_EM12_1_0_5_0_Linux_x64.zip
Task #4b: Set the Oracle Environment.
Add the following line to the /etc/oratab file:
dummy:/u01/app/oracle/product/12.1.0/dbhome_1:N
Then run the oraenv script to set the Oracle environment variables:
[oracle@oraemcc templates]$ . oraenv
ORACLE_SID = [oracle] ? dummy
The Oracle base has been set to /u01/app/oracle
Then unset the ORACLE_SID environment variable since we won’t be needing that:
[oracle@oraemcc templates]$ unset ORACLE_SID
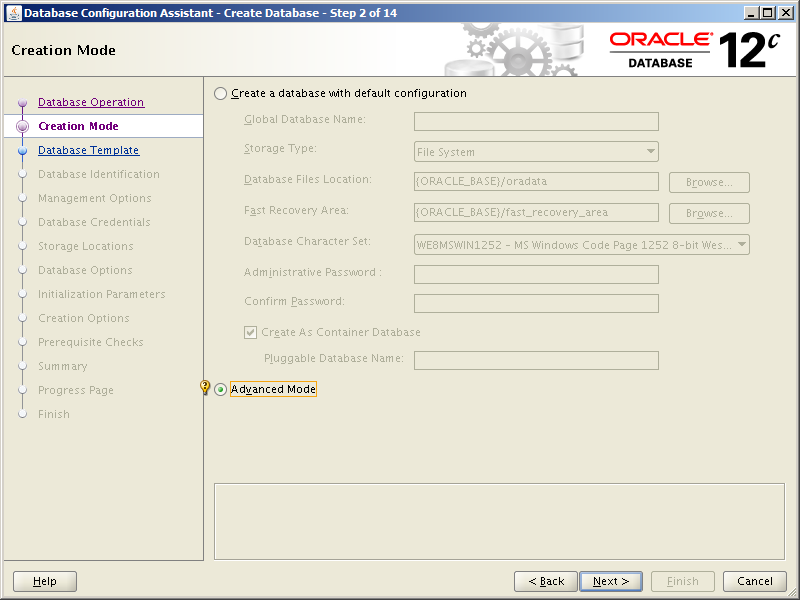
Task #4c: Run the Database Configuration Assistant.
With your oracle environment set, invoke the Database Configuration Assistant:
[oracle@oraemcc templates]$ dbca
Select the option, Create Database, then click Next:

Select the option, Advanced Mode, then click Next:
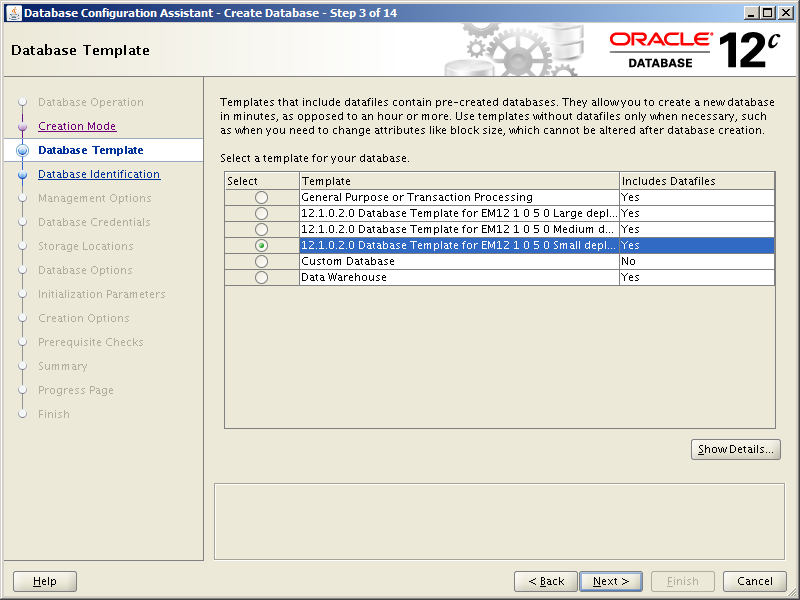
Select the option, 12.1.0.2.0_Database_Template_for_EM12_1_0_5_0_Small_deployment.dbc, then click Next:
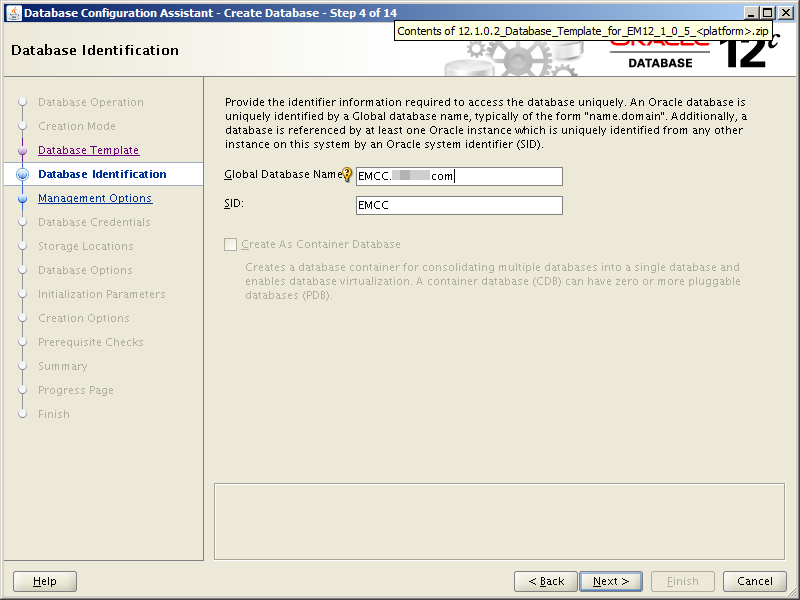
Use EMCC.mynet.com for the Global Database Name. The SID defaults to EMCC and your screen should look similar to this:
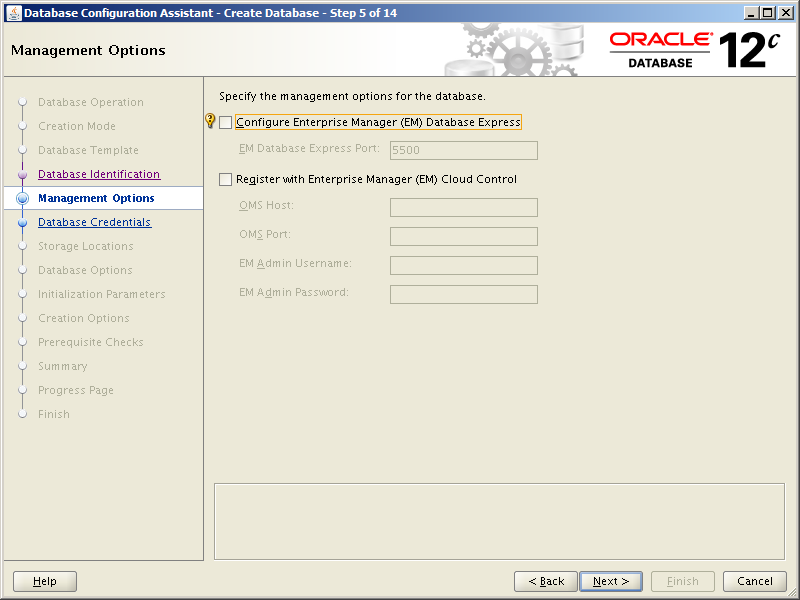
Uncheck the option, Configure Enterprise Manager (EM) Database Express. The option, Register with Enterprise Manager (EM) Cloud Control, should also be unchecked. Click Next:
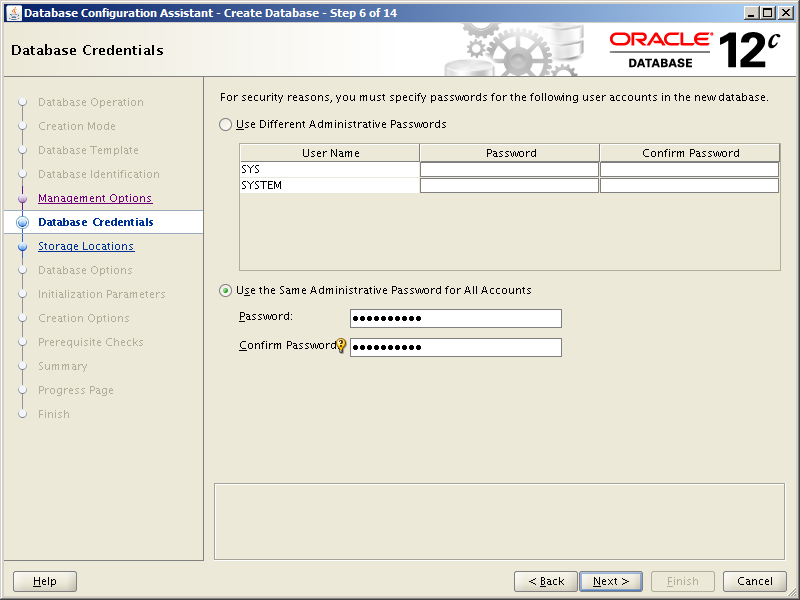
Select the option, Use the Same Administrative Password for All Accounts. Enter a password twice (write it down somewhere safe – do it now – seriously!), then click Next:
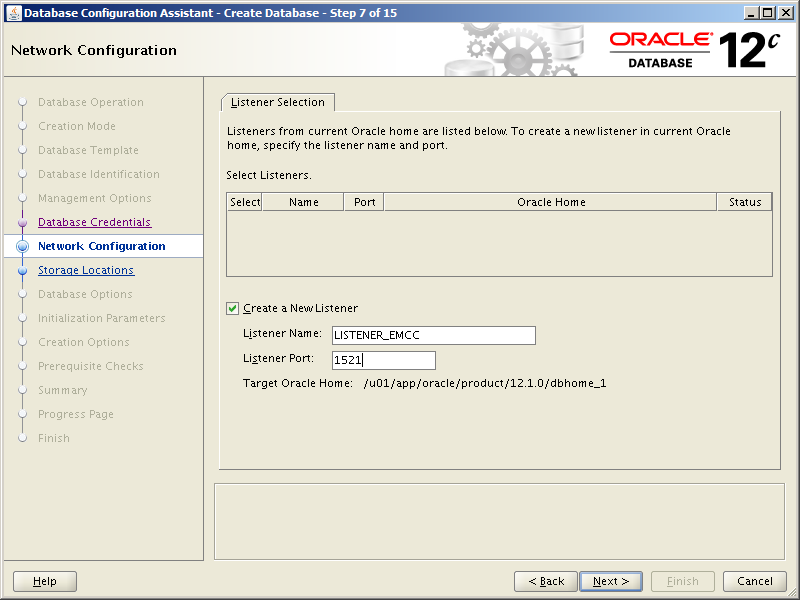
Check the box for Create a New Listener. Don’t be one of those people who uses the default name of LISTENER for the name of the listener. If you have to use the default port (1521) I won’t tell anyone. Click Next:
Complete this next screen with these values, then click Next:
| Field | Value |
|---|---|
| Database files Storage Type | File System |
| Use Common Location for All Database Files | /u02/oradata |
| Recovery files Storage Type | File System |
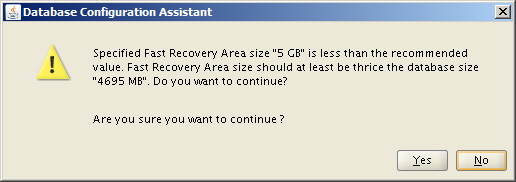
| Fast Recovery Area | /u02/FRA |
| Fast Recovery Area Size | 5 GB |
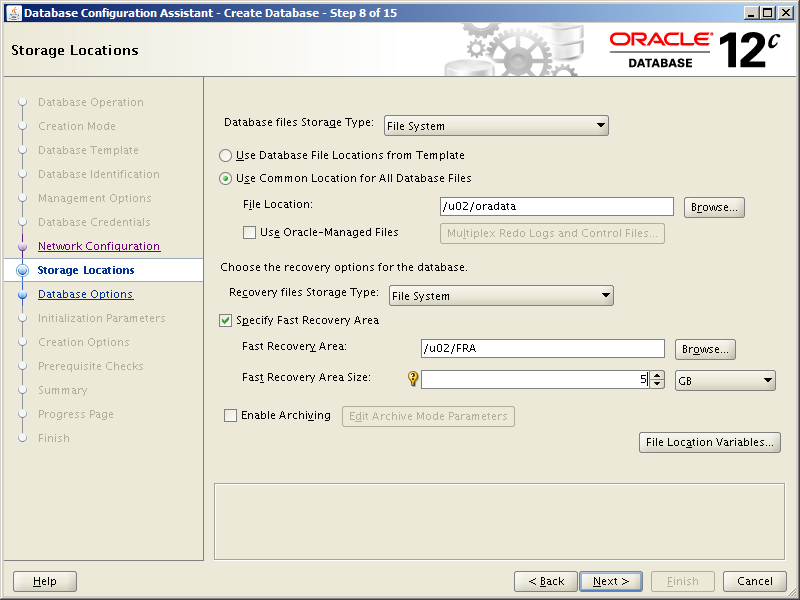
Ignore the next Pythonesque retort, “should at least be thrice the database size”. It’ll be telling you to fetch it a shrubbery next. ? Click Yes to move on.
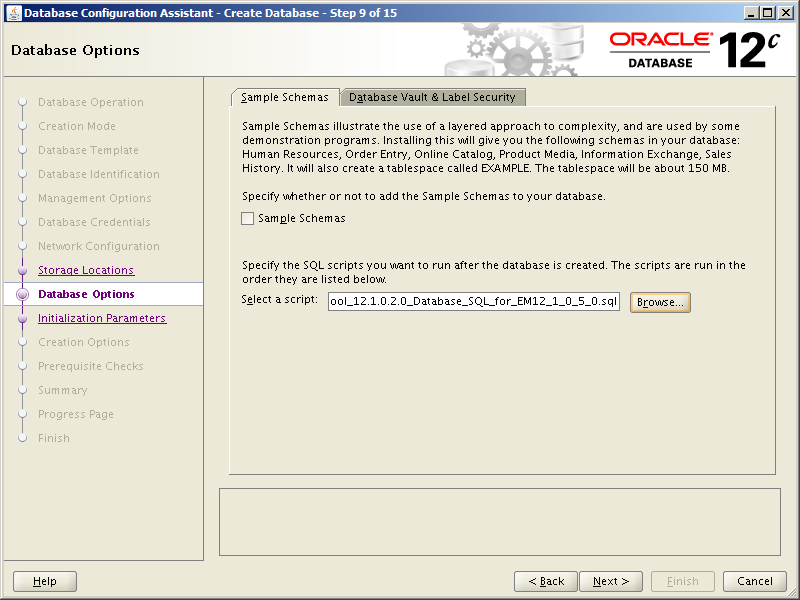
This next screen requires some help. The Oracle documentation says:
When you run Oracle Database Configuration Assistant to create the database, on the Database Content screen, by default the Run the following scripts option is selected to run the shpool script. The script sets the shared pool in the database. Make sure you RETAIN THE SELECTION. Do not deselect it.
There is no “Database Content” screen. Strike #1! ?
There is no script called “shpool”. Strike #2! ⚡
It’s not selected anywhere, so you can’t deselect it. Strike #3! ?
Here’s what you do. Click the Browse button and locate a file called:
shpool_12.1.0.2.0_Database_SQL_for_EM12_1_0_5_0.sql
You’ll find it in the same place you unzipped the template file:
/u01/app/oracle/product/12.1.0/dbhome_1/assistants/dbca/templates
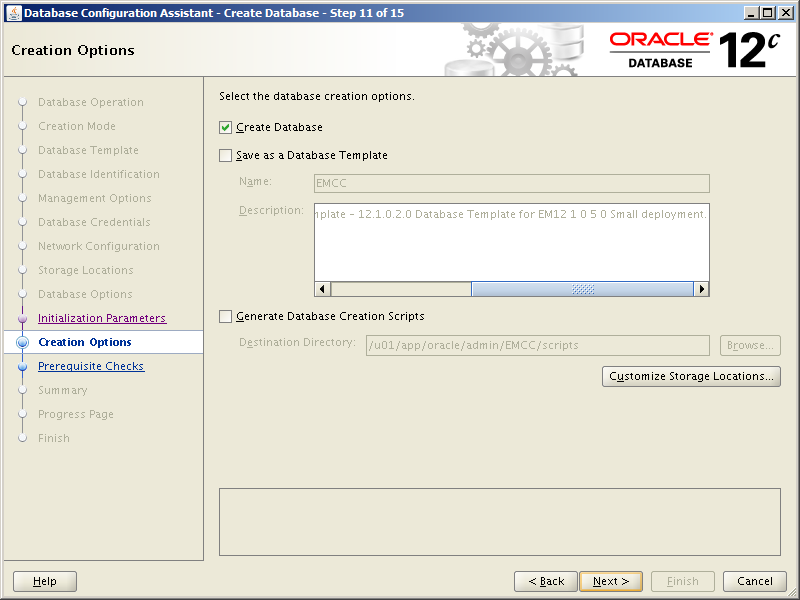
Your screen should end up looking like this. Click Next:
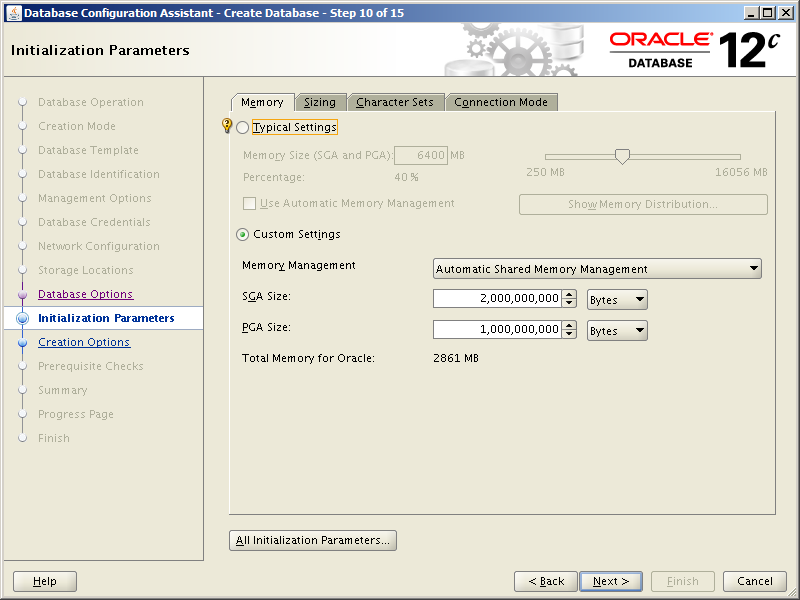
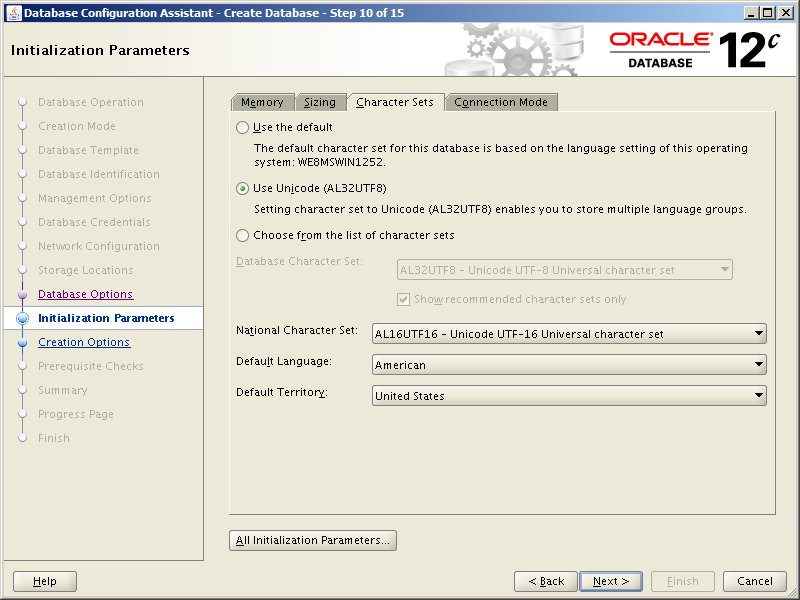
Leave the Memory settings at their pre-determined values unless you have a need to change anything. Click the Character Sets tab:
On the Character Sets tab select the option, Use Unicode (AL32UTF8). Click Next:
Ensure the option, Create Database, is selected and click Next:
DBCA goes through its validation checks which should all be fine. Click Next:

On the Create Database – Summary screen, click Finish:

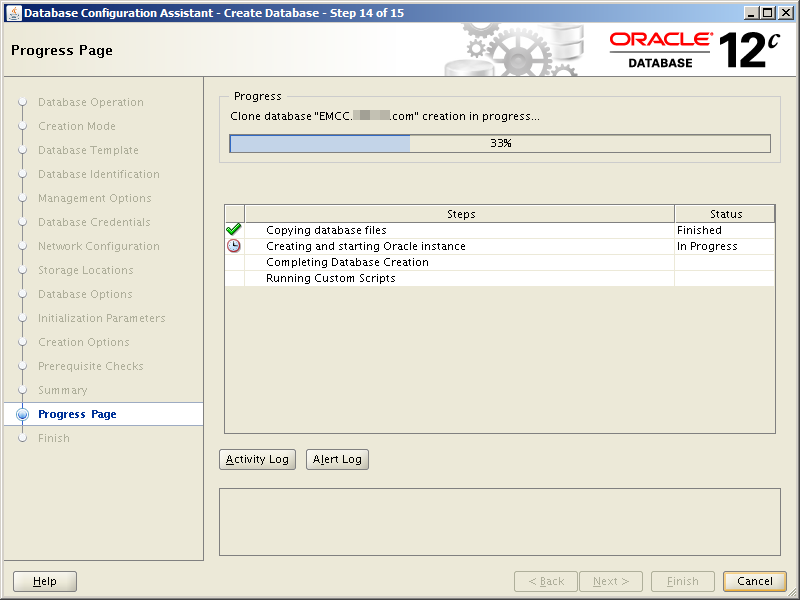
You’ll be looking at the Progress Page for a while. Make yourself a cup of coffee.
Eventually you’ll see the completion screen and all will be well with the world. Click Close.
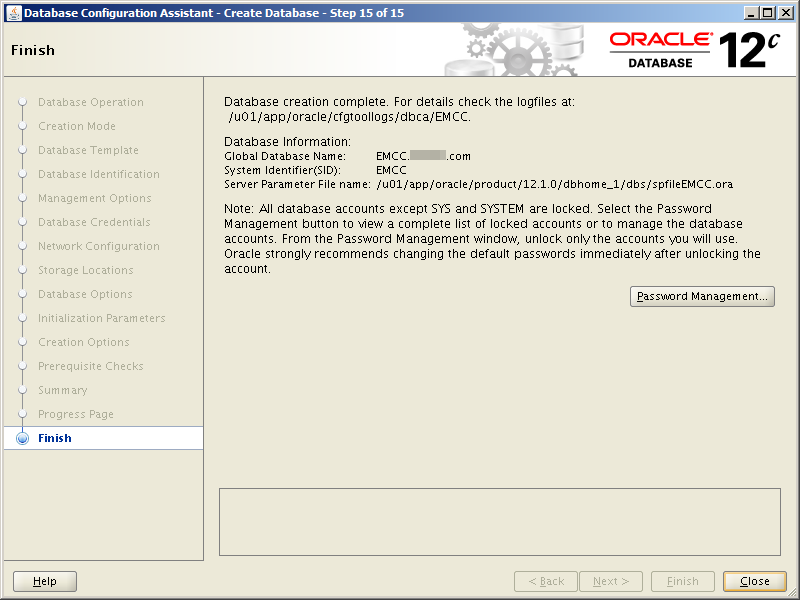
Don’t forget to remove the dummy line from /etc/oratab:
dummy:/u01/app/oracle/product/12.1.0/dbhome_1:N
Task #5: Install OEM Cloud Control.
Locate the Oracle Enterprise Manager Cloud Control 12c Release 5 software you copied to the server and ensure it’s unzipped. Then, as the oracle user, simply run the installer script:
[oracle@oraemcc ~]$ cd /home/oracle/media/oemcc_12cR5
[oracle@oraemcc oemcc_12cR5]$ ./runInstaller
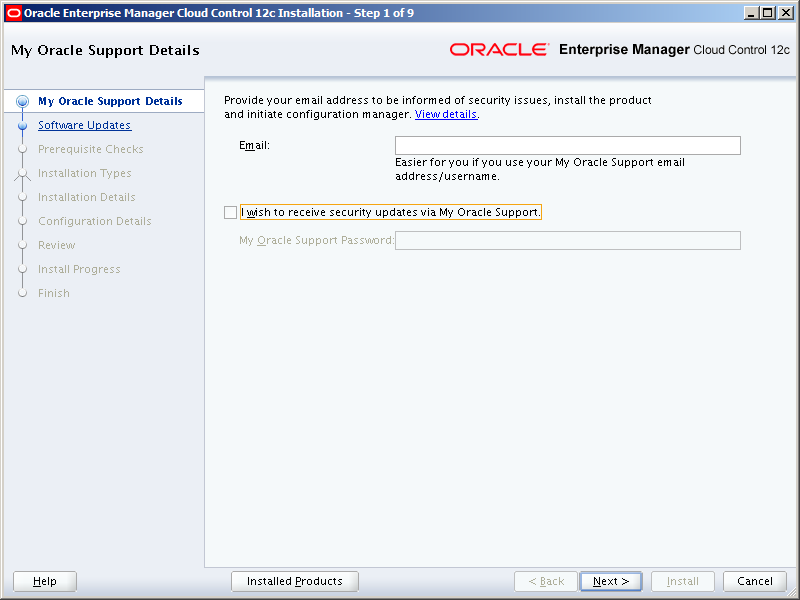
Uncheck the option, I wish to receive security updates via My Oracle Support. Click Next.
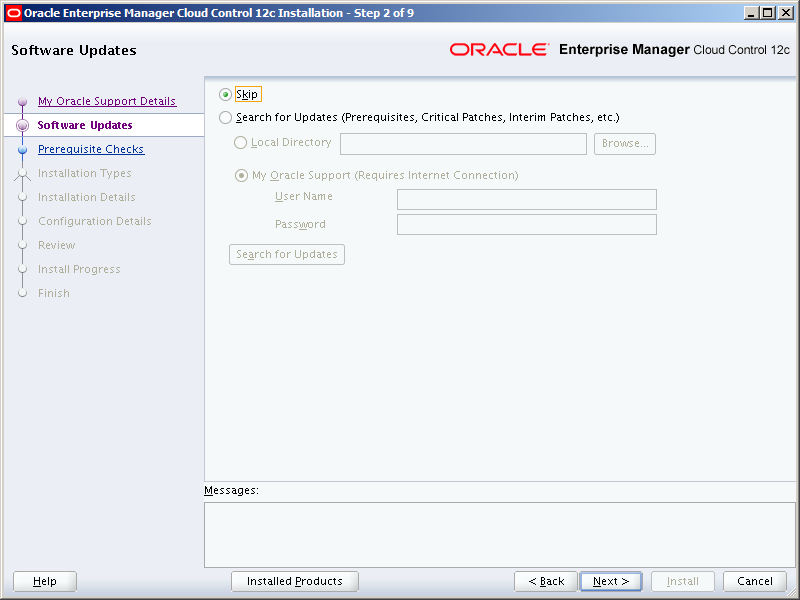
Click Yes to move past the security issue notification warning. Then select the option, Skip, to skip over software updates. Click Next:
The installer will run a series of prerequisite checks to verify everything is in order prior to installing the software. Notice how everything succeeded despite the versions of the installed packages not matching the requirements in Oracle’s documentation. Told you! 😉 Click Next:

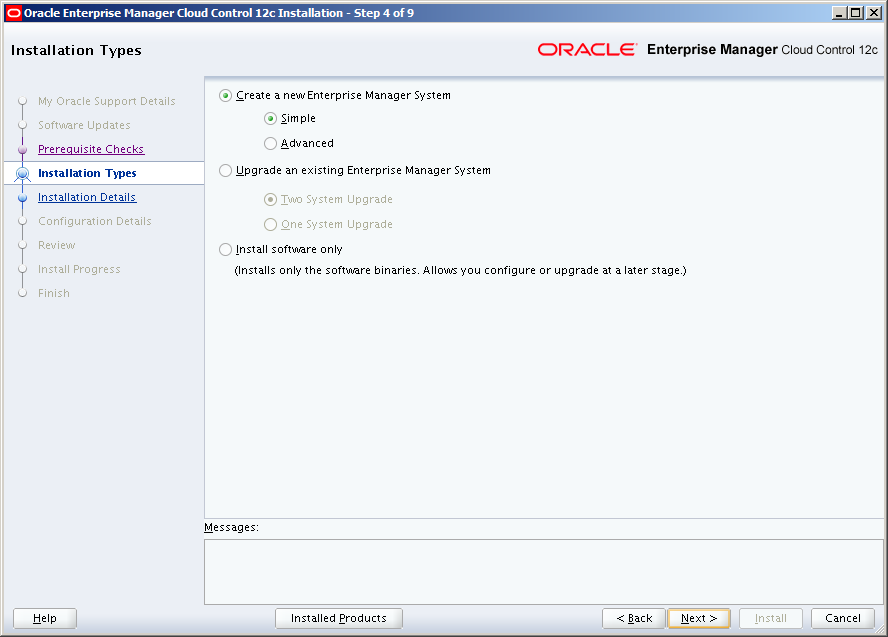
Select the option, Create a new Enterprise Manager System, along with the Simple option. Click Next:
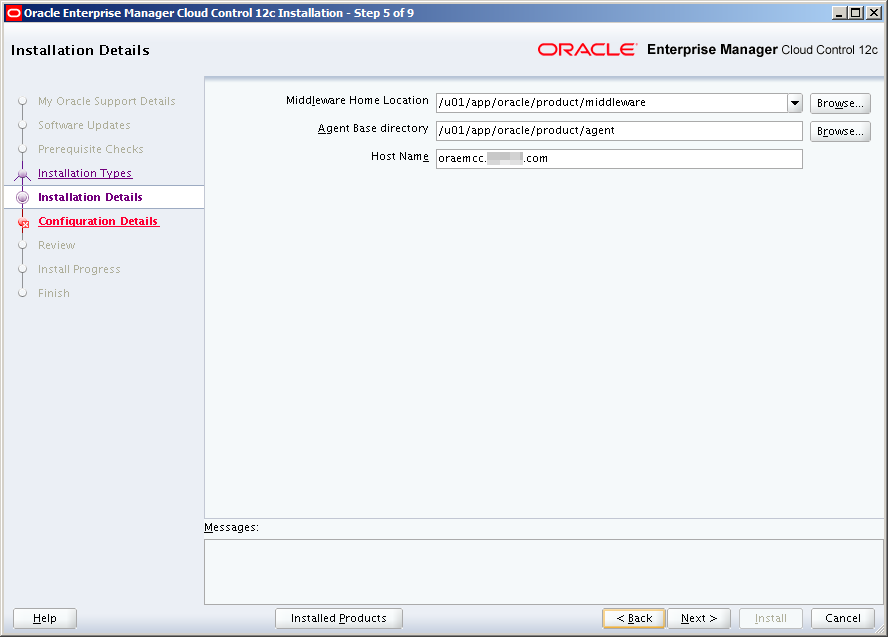
Use the following values to populate this next screen, then click Next:
| Field | Value |
|---|---|
| Middleware Home Location | /u01/app/oracle/product/middleware |
| Agent Base directory | /u01/app/oracle/product/agent |
| Host Name | oraemcc.mynet.com |
Part of the basic installation of OEM includes simplified password management. A single Administrator password covers several important accounts. As the screen says, the passwords for these accounts can be changed later if required.
For the Database Connection Details, use these values:
| Field | Value |
|---|---|
| Database Host Name | oraemcc.mynet.com |
| Port | 1521 (referenced here) |
| Service/SID | emcc (referenced here) |
| SYS Password | (referenced here) |
Check the option, Configure Oracle Software Library and leave the location as the default (/u01/app/oracle/product/swlib). Click Next:

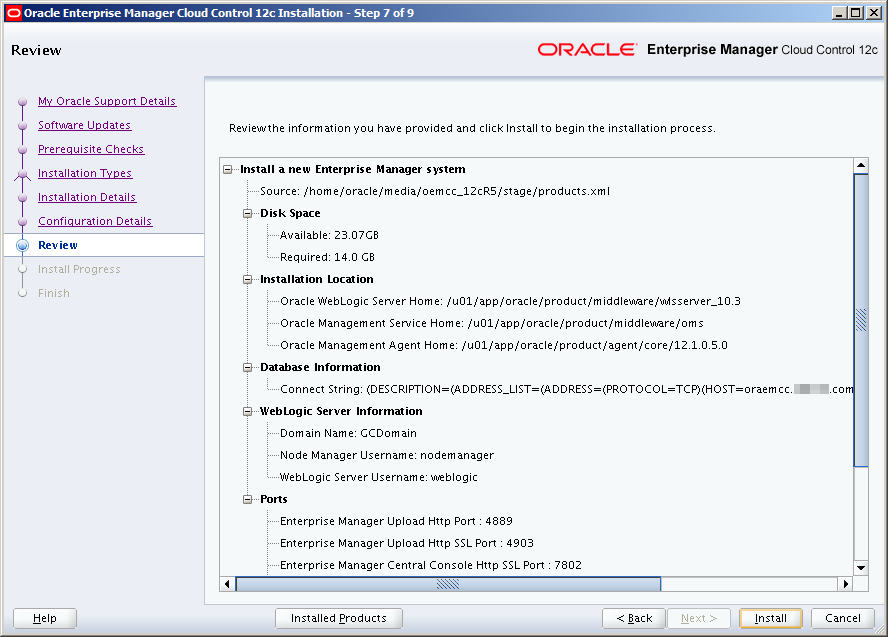
The installer will then display a Review screen. Click Install:
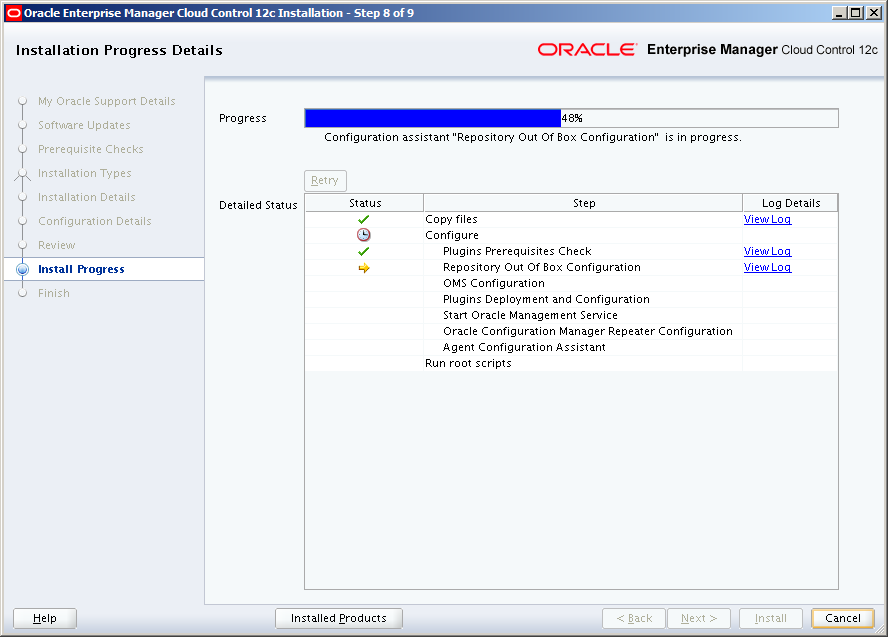
The next screen, Installation Progress Details, ticks along for quite some time. Go to lunch, seriously. Nothing much of interest happens other than things hopefully succeeding:
Eventually you’ll be presented with this dialog requesting you run the allroot.sh script as the root user:
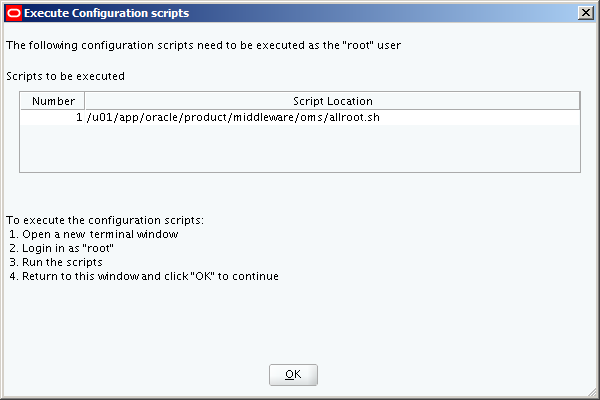
[root@oraemcc ~]# cd /u01/app/oracle/product/middleware/oms

[root@oraemcc oms]# ./allroot.sh
Starting to execute allroot.sh .........
Starting to execute /u01/app/oracle/product/middleware/oms/root.sh ......
Running Oracle 11g root.sh script...

The following environment variables are set as:
   ORACLE_OWNER= oracle
   ORACLE_HOME= /u01/app/oracle/product/middleware/oms

Enter the full pathname of the local bin directory: [/usr/local/bin]:
The file "dbhome" already exists in /usr/local/bin. Overwrite it? (y/n)
[n]: n
The file "oraenv" already exists in /usr/local/bin. Overwrite it? (y/n)
[n]: n
The file "coraenv" already exists in /usr/local/bin. Overwrite it? (y/n)
[n]: n

Entries will be added to the /etc/oratab file as needed by
Database Configuration Assistant when a database is created
Finished running generic part of root.sh script.


Now product-specific root actions will be performed.
/etc exist

Creating /etc/oragchomelist file...
/u01/app/oracle/product/middleware/oms
Finished execution of /u01/app/oracle/product/middleware/oms/root.sh ......

Starting to execute /u01/app/oracle/product/agent/core/12.1.0.5.0/root.sh ......
Finished product-specific root actions.
/etc exist

Finished execution of /u01/app/oracle/product/agent/core/12.1.0.5.0/root.sh ......
Return to the previous dialog box and click OK. A Finish screen will be displayed and you’re done!
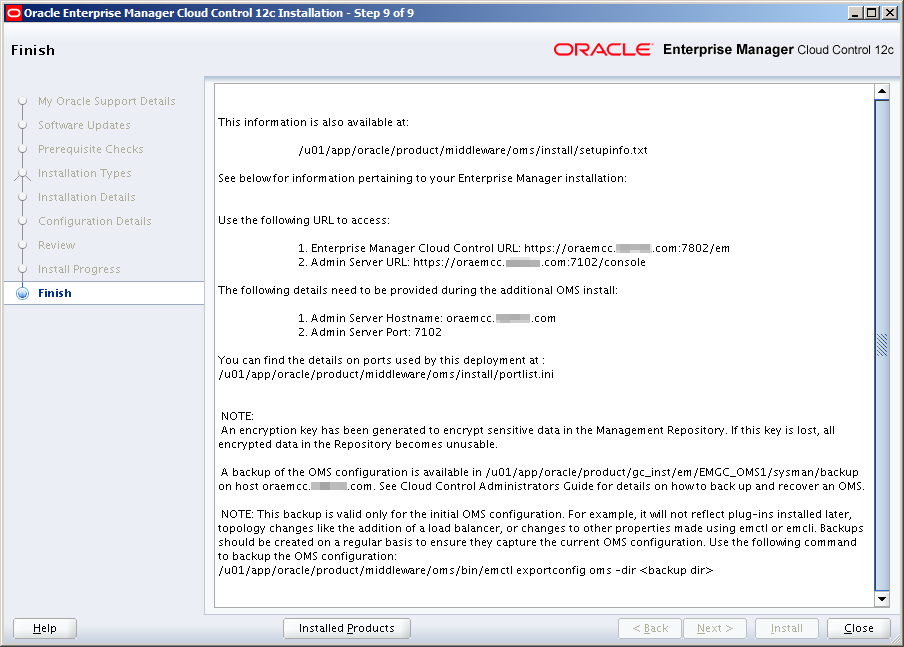
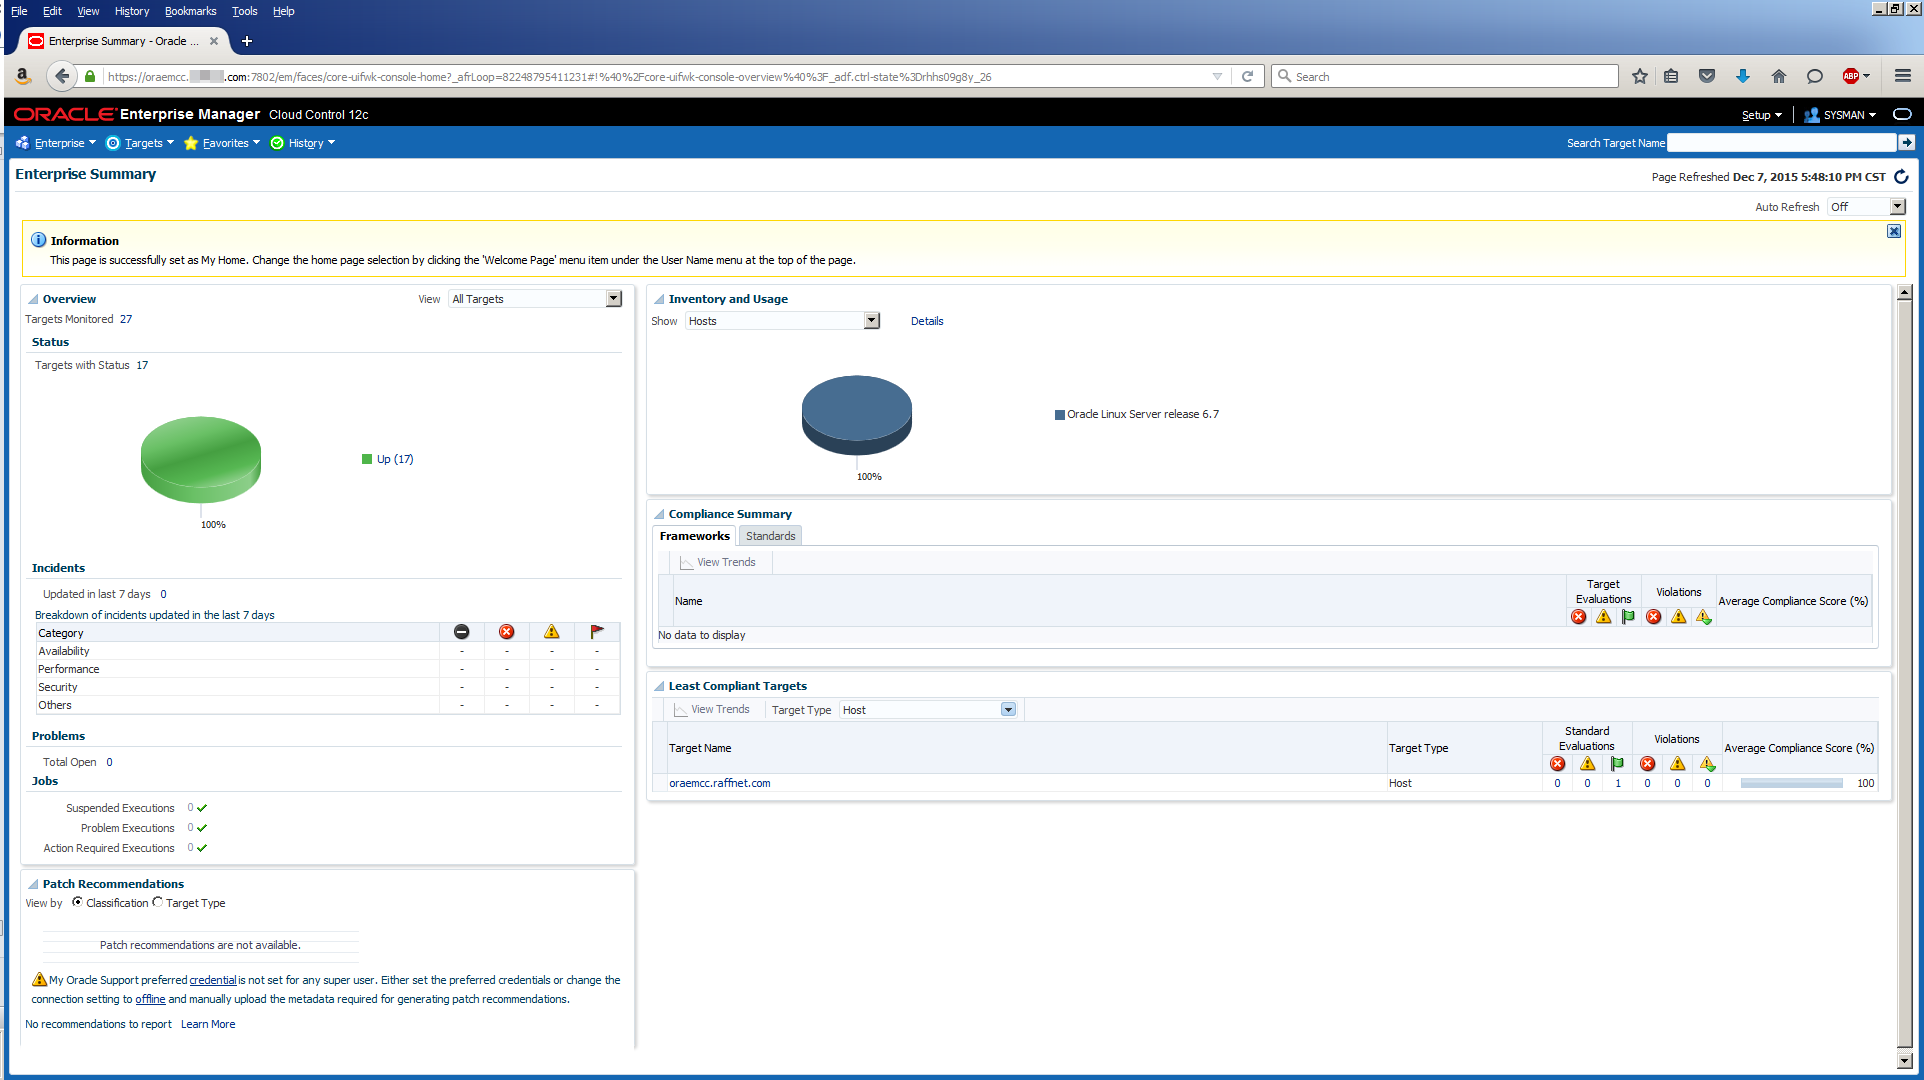
Accessing the URL, https://oraemcc.mynet.com:7802/em, brings up the Cloud Control login screen (after your browser complains about security certificates):

You can use the User Name SYSMAN with the Administrator Password you chose earlier. The first time you login you’ll have to choose some screen preferences and accept the displayed agreement. After that, you’re off to the races:
Task #6: Start and Stop Cloud Control.
Now that we have everything installed, up and running this is a useful little reminder of how to start and stop the Cloud Control infrastructure.
Click the link you need:
Task 6-1: Start Cloud Control.
There are 4 steps to starting the Cloud Control infrastructure:
Task 6-1a: Start the database listener.
[oracle@oraemcc ~]$ . oraenv
ORACLE_SID = [oracle] ? EMCC
The Oracle base has been set to /u01/app/oracle

[oracle@oraemcc bin]$ lsnrctl start LISTENER_EMCC
Task 6-1b: Start the Repository database.
[oracle@oraemcc bin]$ sqlplus / as sysdba
SQL*Plus: Release 12.1.0.2.0 Production on Tue Jan 26 13:43:41 2016
Copyright (c) 1982, 2014, Oracle. All rights reserved.
Connected to an idle instance.

SQL> startup
Task 6-1c: Start the Oracle Management Server.
[oracle@oraemcc bin]$ pwd
/u01/app/oracle/product/middleware/oms/bin

[oracle@oraemcc bin]$ ./emctl start oms
Oracle Enterprise Manager Cloud Control 12c Release 5
Copyright (c) 1996, 2015 Oracle Corporation. All rights reserved.
Starting Oracle Management Server...
Starting WebTier...
WebTier Successfully Started
Oracle Management Server Already Started
Oracle Management Server is Up

[oracle@oraemcc bin]$ ./emctl status oms
Oracle Enterprise Manager Cloud Control 12c Release 5
Copyright (c) 1996, 2015 Oracle Corporation. All rights reserved.
WebTier is Up
Oracle Management Server is Up
Task 6-1d: Start the Management Agent.
[oracle@oraemcc bin]$ pwd
/u01/app/oracle/product/agent/core/12.1.0.5.0/bin

[oracle@oraemcc bin]$ ./emctl start agent
Oracle Enterprise Manager Cloud Control 12c Release 5
Copyright (c) 1996, 2015 Oracle Corporation. All rights reserved.
Agent is already running

[oracle@oraemcc bin]$ ./emctl status agent
Oracle Enterprise Manager Cloud Control 12c Release 5
Copyright (c) 1996, 2015 Oracle Corporation. All rights reserved.
---------------------------------------------------------------
Agent Version          : 12.1.0.5.0
OMS Version            : 12.1.0.5.0
Protocol Version       : 12.1.0.1.0
Agent Home             : /u01/app/oracle/product/agent/agent_inst
Agent Log Directory    : /u01/app/oracle/product/agent/agent_inst/sysman/log
Agent Binaries         : /u01/app/oracle/product/agent/core/12.1.0.5.0
Agent Process ID       : 4074
Parent Process ID      : 3936
Agent URL              : https://oraemcc.mynet.com:3872/emd/main/
Local Agent URL in NAT : https://oraemcc.mynet.com:3872/emd/main/
Repository URL         : https://oraemcc.mynet.com:4903/empbs/upload
Started at             : 2016-01-26 13:07:57
Started by user        : oracle
Operating System       : Linux version 3.8.13-118.2.1.el6uek.x86_64 (amd64)
Last Reload            : (none)
Last successful upload                       : 2016-01-26 13:50:29
Last attempted upload                        : 2016-01-26 13:50:29
Total Megabytes of XML files uploaded so far : 0.16
Number of XML files pending upload           : 0
Size of XML files pending upload(MB)         : 0
Available disk space on upload filesystem    : 21.13%
Collection Status                            : Collections enabled
Heartbeat Status                             : Ok
Last attempted heartbeat to OMS              : 2016-01-26 13:49:56
Last successful heartbeat to OMS             : 2016-01-26 13:49:56
Next scheduled heartbeat to OMS              : 2016-01-26 13:50:56
---------------------------------------------------------------
Agent is Running and Ready
Task 6-2: Stop Cloud Control.
There are 4 steps to stopping the Cloud Control infrastructure.
Task 6-2a: Stop the Oracle Management Server.
[oracle@oraemcc bin]$ pwd
/u01/app/oracle/product/middleware/oms/bin

[oracle@oraemcc bin]$ ./emctl stop oms -all
Oracle Enterprise Manager Cloud Control 12c Release 5
Copyright (c) 1996, 2015 Oracle Corporation.  All rights reserved.
Stopping WebTier...
WebTier Successfully Stopped
Stopping Oracle Management Server...
Oracle Management Server Successfully Stopped
AdminServer Successfully Stopped
Oracle Management Server is Down
Task 6-2b: Stop the Management Agent.
[oracle@oraemcc bin]$ pwd
/u01/app/oracle/product/agent/core/12.1.0.5.0/bin

[oracle@oraemcc bin]$ ./emctl stop agent
Oracle Enterprise Manager Cloud Control 12c Release 5
Copyright (c) 1996, 2015 Oracle Corporation.  All rights reserved.
Stopping agent ..... stopped.
Task 6-2c: Stop the Repository database.
[oracle@oraemcc ~]$ sqlplus / as sysdba
SQL*Plus: Release 12.1.0.2.0 Production on Tue Jan 26 15:25:33 2016
Copyright (c) 1982, 2014, Oracle.  All rights reserved.
Connected to:
Oracle Database 12c Enterprise Edition Release 12.1.0.2.0 - 64bit Production
With the Partitioning, OLAP, Advanced Analytics and Real Application Testing options

SQL> shutdown immediate
Database closed.
Database dismounted.
ORACLE instance shut down.
Task 6-2d: Stop the database listener.
[oracle@oraemcc ~]$ lsnrctl stop LISTENER_EMCC
LSNRCTL for Linux: Version 12.1.0.2.0 - Production on 26-JAN-2016 15:26:16
Copyright (c) 1991, 2014, Oracle.  All rights reserved.
Connecting to (DESCRIPTION=(ADDRESS=(PROTOCOL=TCP)(HOST=oraemcc.mynet.com)(PORT=1521)))
The command completed successfully
Wow! That was quite the marathon. Many steps and not an insignificant amount of time has hopefully got Cloud Control up and running. In Part 7, we’ll build out the Oracle RAC server nodes. Stay tuned for updates.
If you have any comments or questions about this post, please use the Contact form here.