Build Your Own Oracle Infrastructure: Part 9 – Build Shared Storage Server.

P9-logo

The last major hurdle we need to overcome before installing some Oracle software and building a RAC database is to configure shared storage.

Shared storage is the key to making Oracle RAC work. The same storage concurrently visible to and updatable from multiple servers really is the heart of the system.

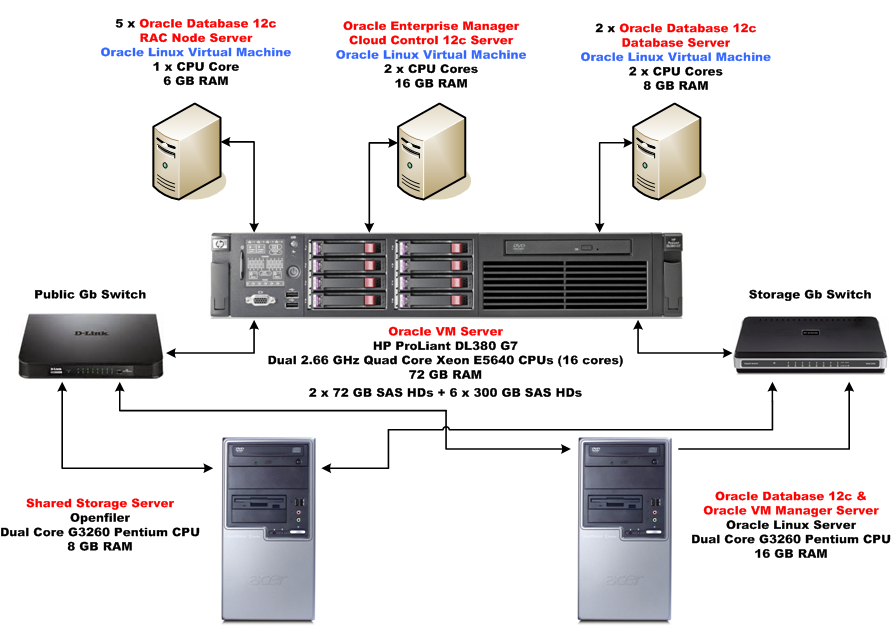
Enterprise class dedicated SAN or NAS filers are very cool but very expensive. What we need is a scaled down economical solution which does the same thing. The answer? Openfiler!

Quick links to all the tasks:

Task #1: Install Openfiler.

Download the Openfiler 2.99.1 ISO and burn it to a DVD using ImgBurn. Then use the DVD to boot the shared storage server computer. Installing Openfiler is very simple and similar to installing Oracle Linux. Since we’re not installing Openfiler in a virtual environment, it’s a bit tricky to capture screen shots of a bare metal install. So I’ll have to rely on a text description. Fear not, this install is ridiculously easy and completes in 8 simple steps.

Task #1a: Press Enter to install in graphical mode.

After the server boots from DVD, simply hit the Enter key to get the install started.

Task #1b: Click Next.

Once the GUI comes up, just hit the Enter key to continue.

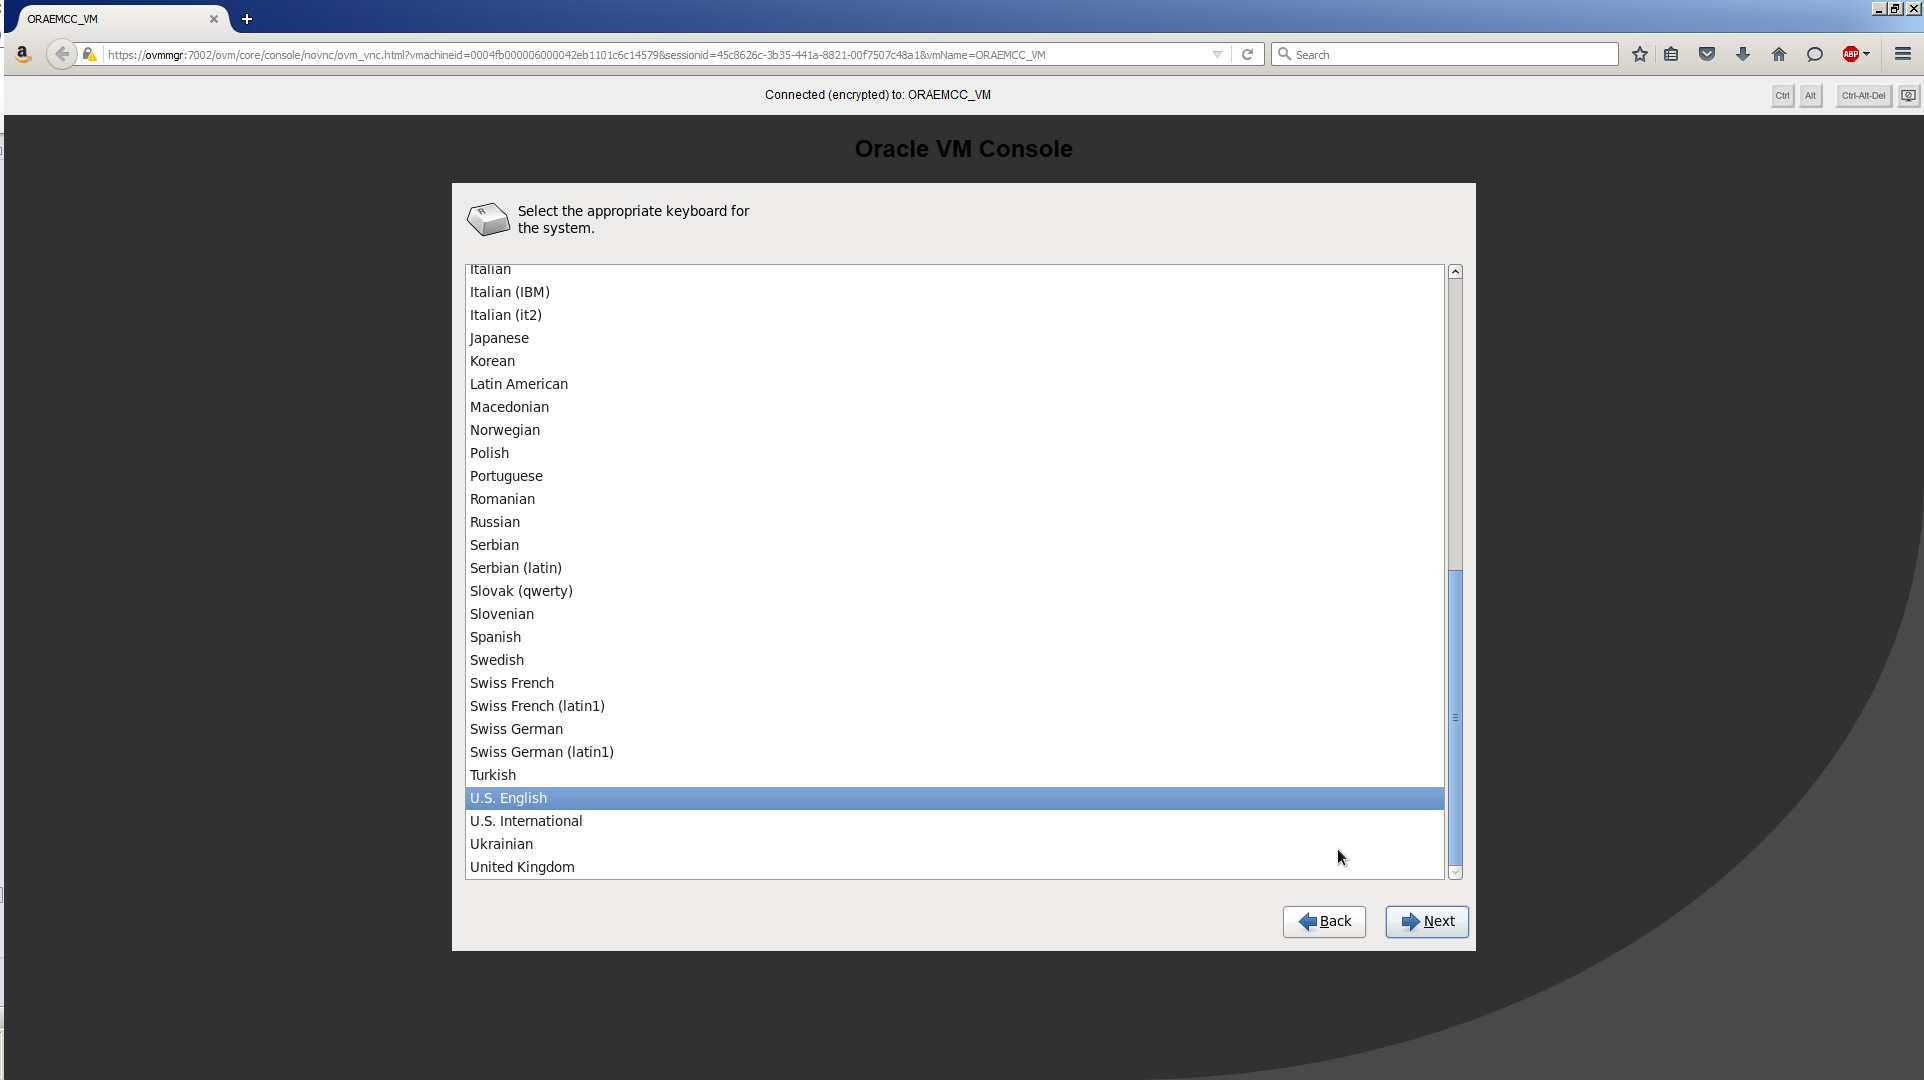
Task #1c: Select keyboard.

Select your desired keyboard layout from the menu and click Next.

Task #1d: Select installation drive.

The shared storage server has 4 drives in total, identified as sda, sdb, sdc and sdd:

Device Physical Drive Usage
sda Samsung 850 EVO 120GB 2.5-Inch SATA III Internal SSD Openfiler OS
sdb Western Digital 300 GB VelociRaptor SATA 3 Internal HD Data
sdc Western Digital 300 GB VelociRaptor SATA 3 Internal HD Data
sdd Samsung 850 EVO 120GB 2.5-Inch SATA III Internal SSD Data

Select the option to Remove all partitions on selected drives and create default layout.
Leave the first drive, sda, checked and uncheck all the other drives.
Finally, select sda as the boot installation drive and click Next.

Task #1e: Configure network devices.

The shared storage server has two NICs. Click Edit and configure them with these values:

Interface Field Value
eth0 IP Address 200.200.10.6
Prefix (Netmask) 255.255.255.0
eth1 IP Address 200.200.20.6
Prefix (Netmask) 255.255.255.0

Note, do not forget to disable IPv6 support and ensure both NICs are Active on Boot.

Set the remaining networking fields manually with these values, then click Next:

Field Value
Hostname openfiler.mynet.com
Gateway 200.200.10.1
Primary DNS 200.200.10.1
Secondary DNS 8.8.8.8

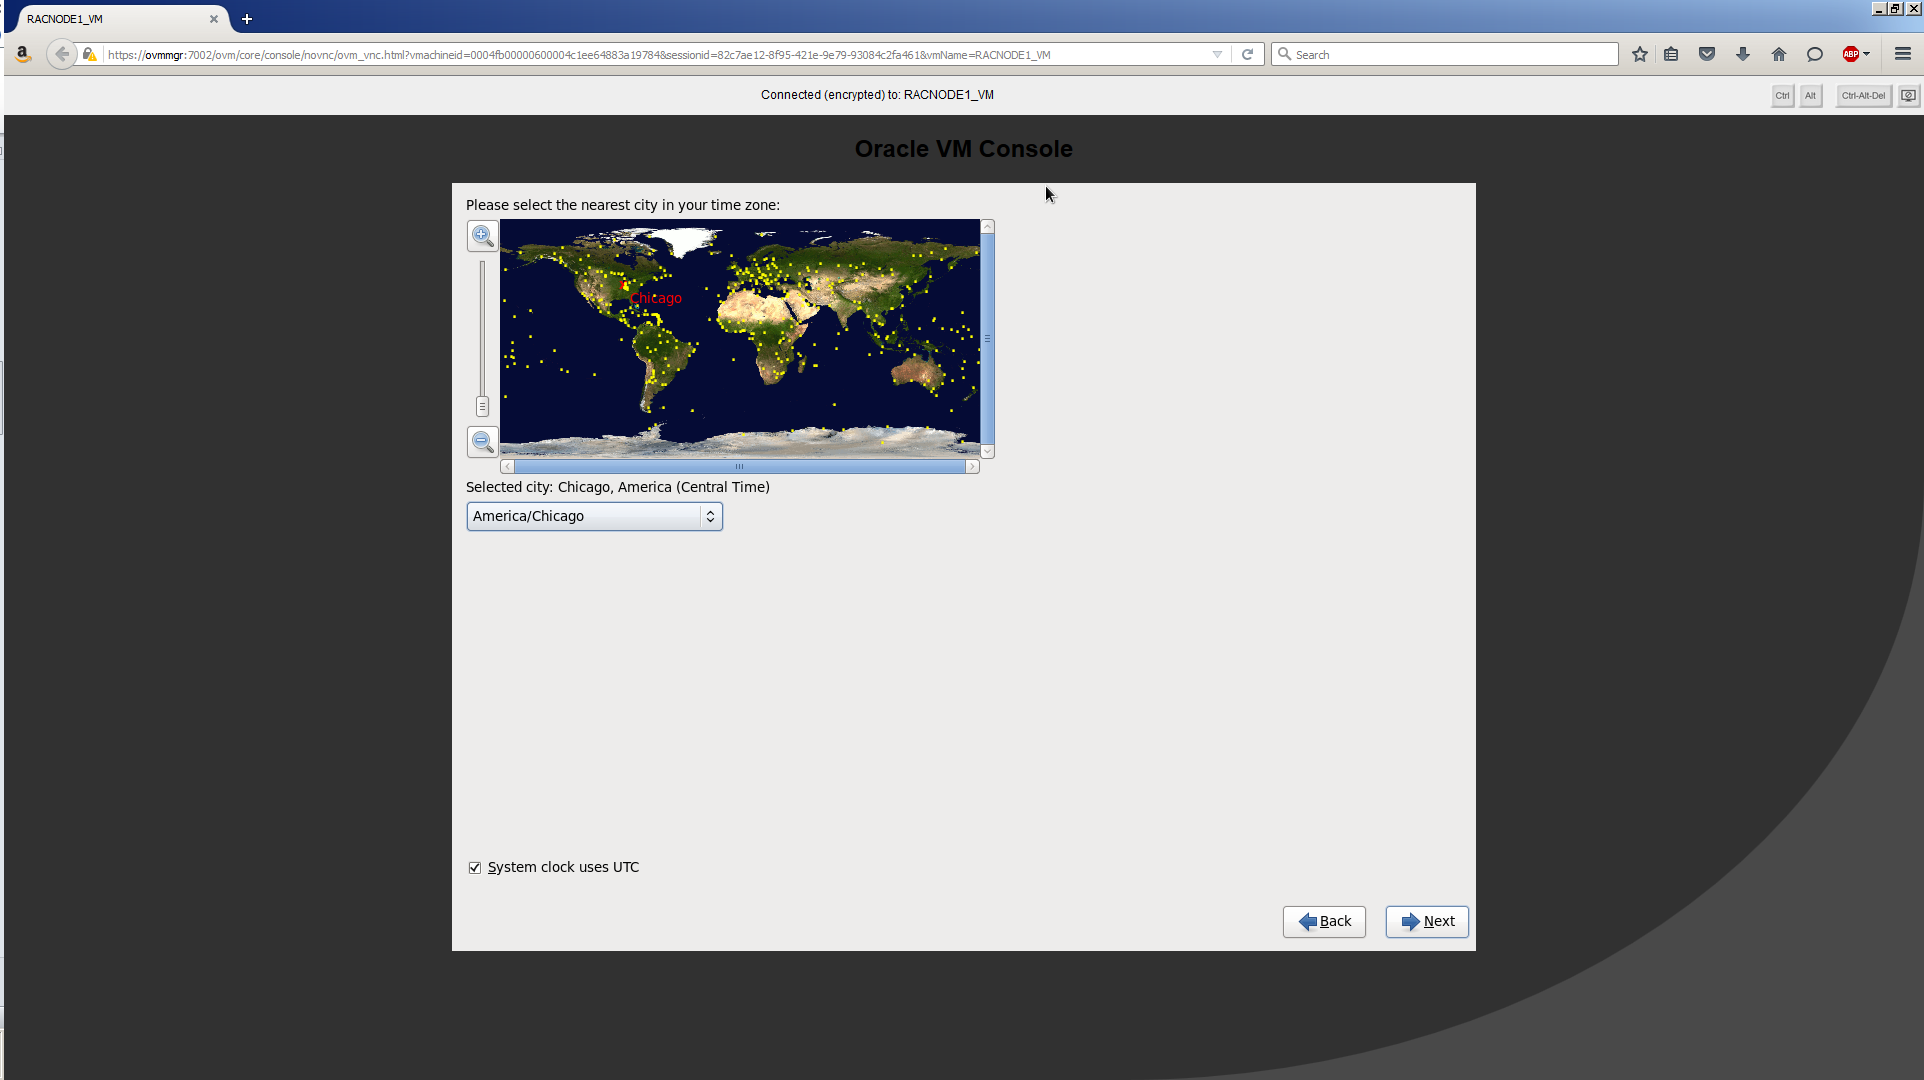
Task #1f: Choose timezone.

Select your preferred timezone from the menu. Leave System clock uses UTC checked. Click Next.

Task #1g: Choose root password.

Enter a root password twice. Write it down somewhere safe. Now! Don’t argue, just do it. Click Next.

Task #1h: Install the software.

A familiar looking left to right progress bar shows the installation’s progress. It only takes about a minute, then you’ll see a congratulations screen. Click Reboot.

Note, this reboot sometimes sticks at a completely blank screen. Don’t be alarmed. If this happens hard power off the machine, then power it back on and all will be well.

When the machine comes back up, it will display the URL for the Openfiler console, which in our case will be, https://200.200.10.6:446/. The default username is “openfiler” and the default password is, wait for it, “password”. No quotes of course.

Once you get logged in, you’ll see a status screen similar to this:

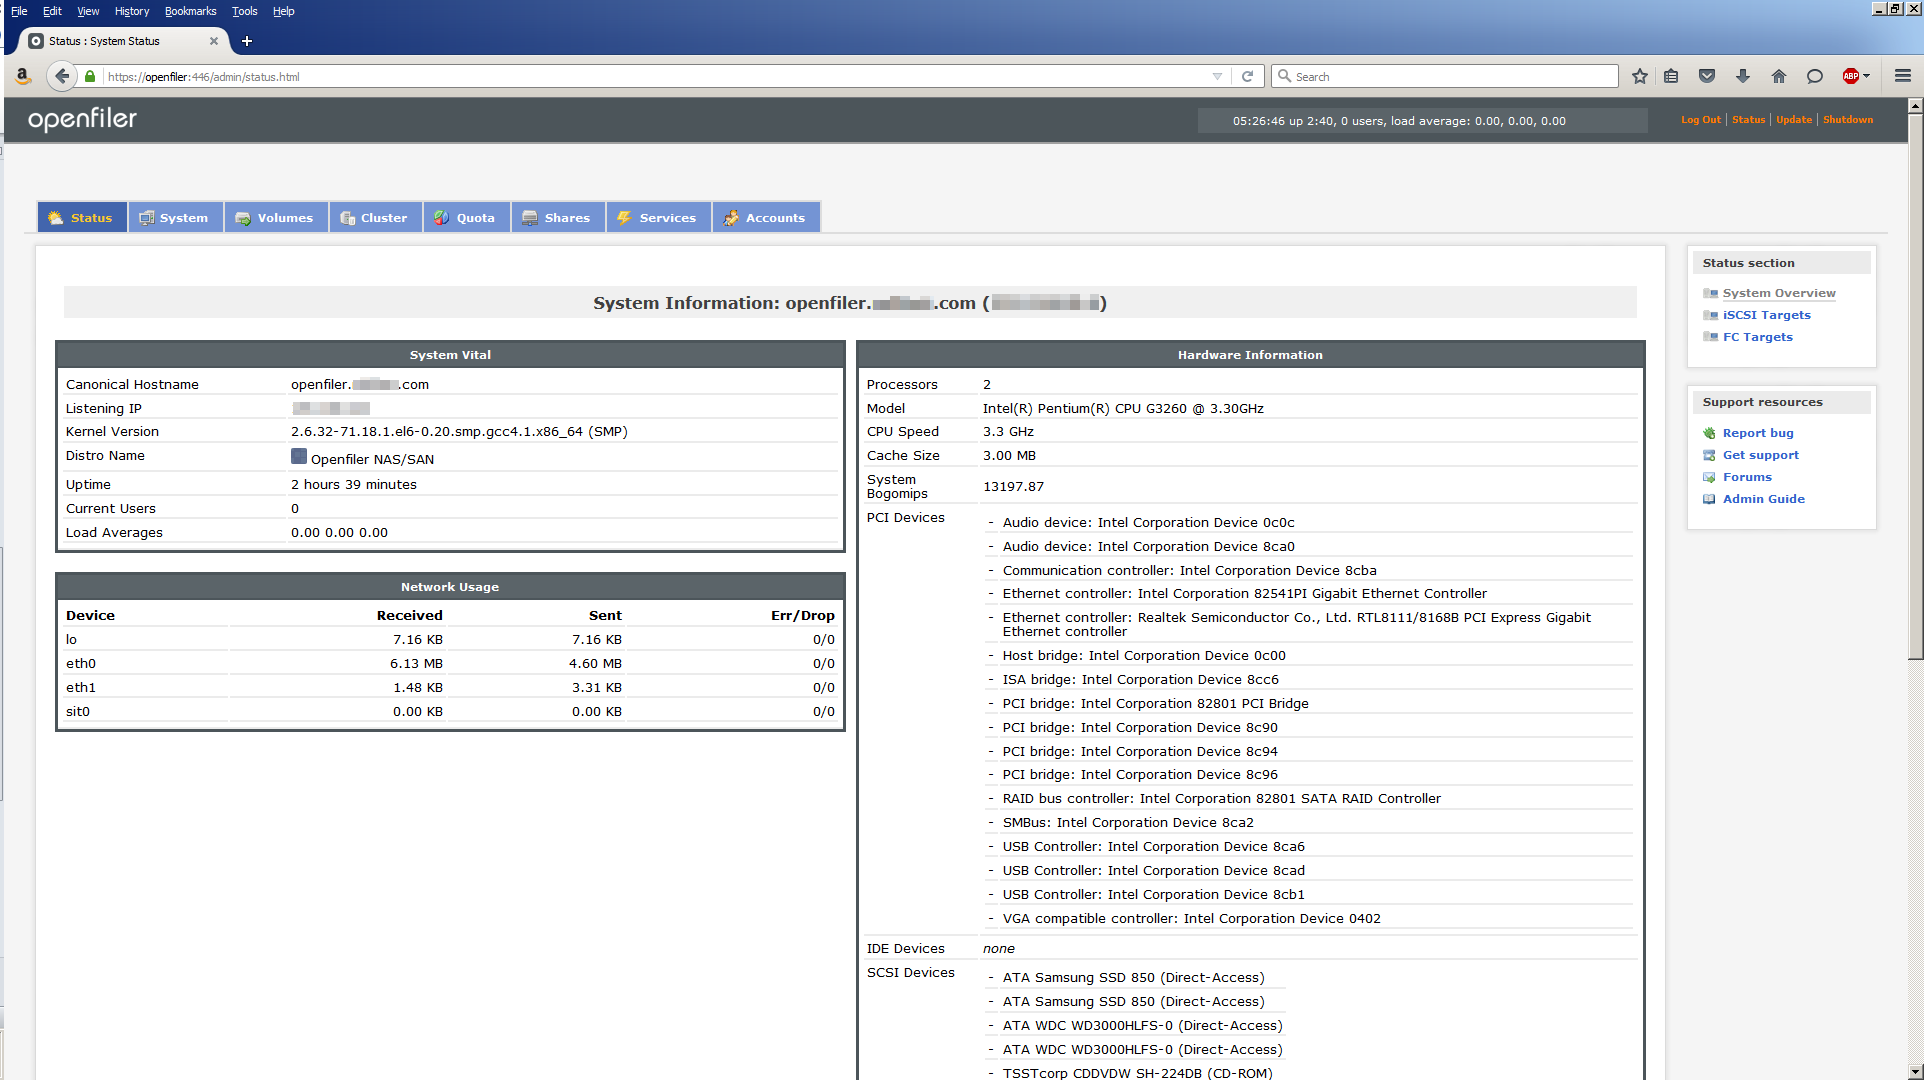
Told you it was easy! ?

Task #2: Configure Openfiler.

Installing Openfiler was quite easy. Configuring the storage it manages is a little involved. There are 8 steps to this. Pay close attention. Maximum attention to detail is needed here!!!

Task #2a: Edit /etc/hosts.

Add the following to the openfiler server’s /etc/hosts file:

200.200.20.11 racnode1-storage
200.200.20.12 racnode2-storage

Then test network connectivity both ways from each racnode server:

[root@racnode1 ~]# ping -I eth1 openfiler-storage
[root@racnode2 ~]# ping -I eth1 openfiler-storage

[root@openfiler ~]# ping -I eth1 racnode1-storage
[root@openfiler ~]# ping -I eth1 racnode2-storage

Task #2b: Enable iSCSI.

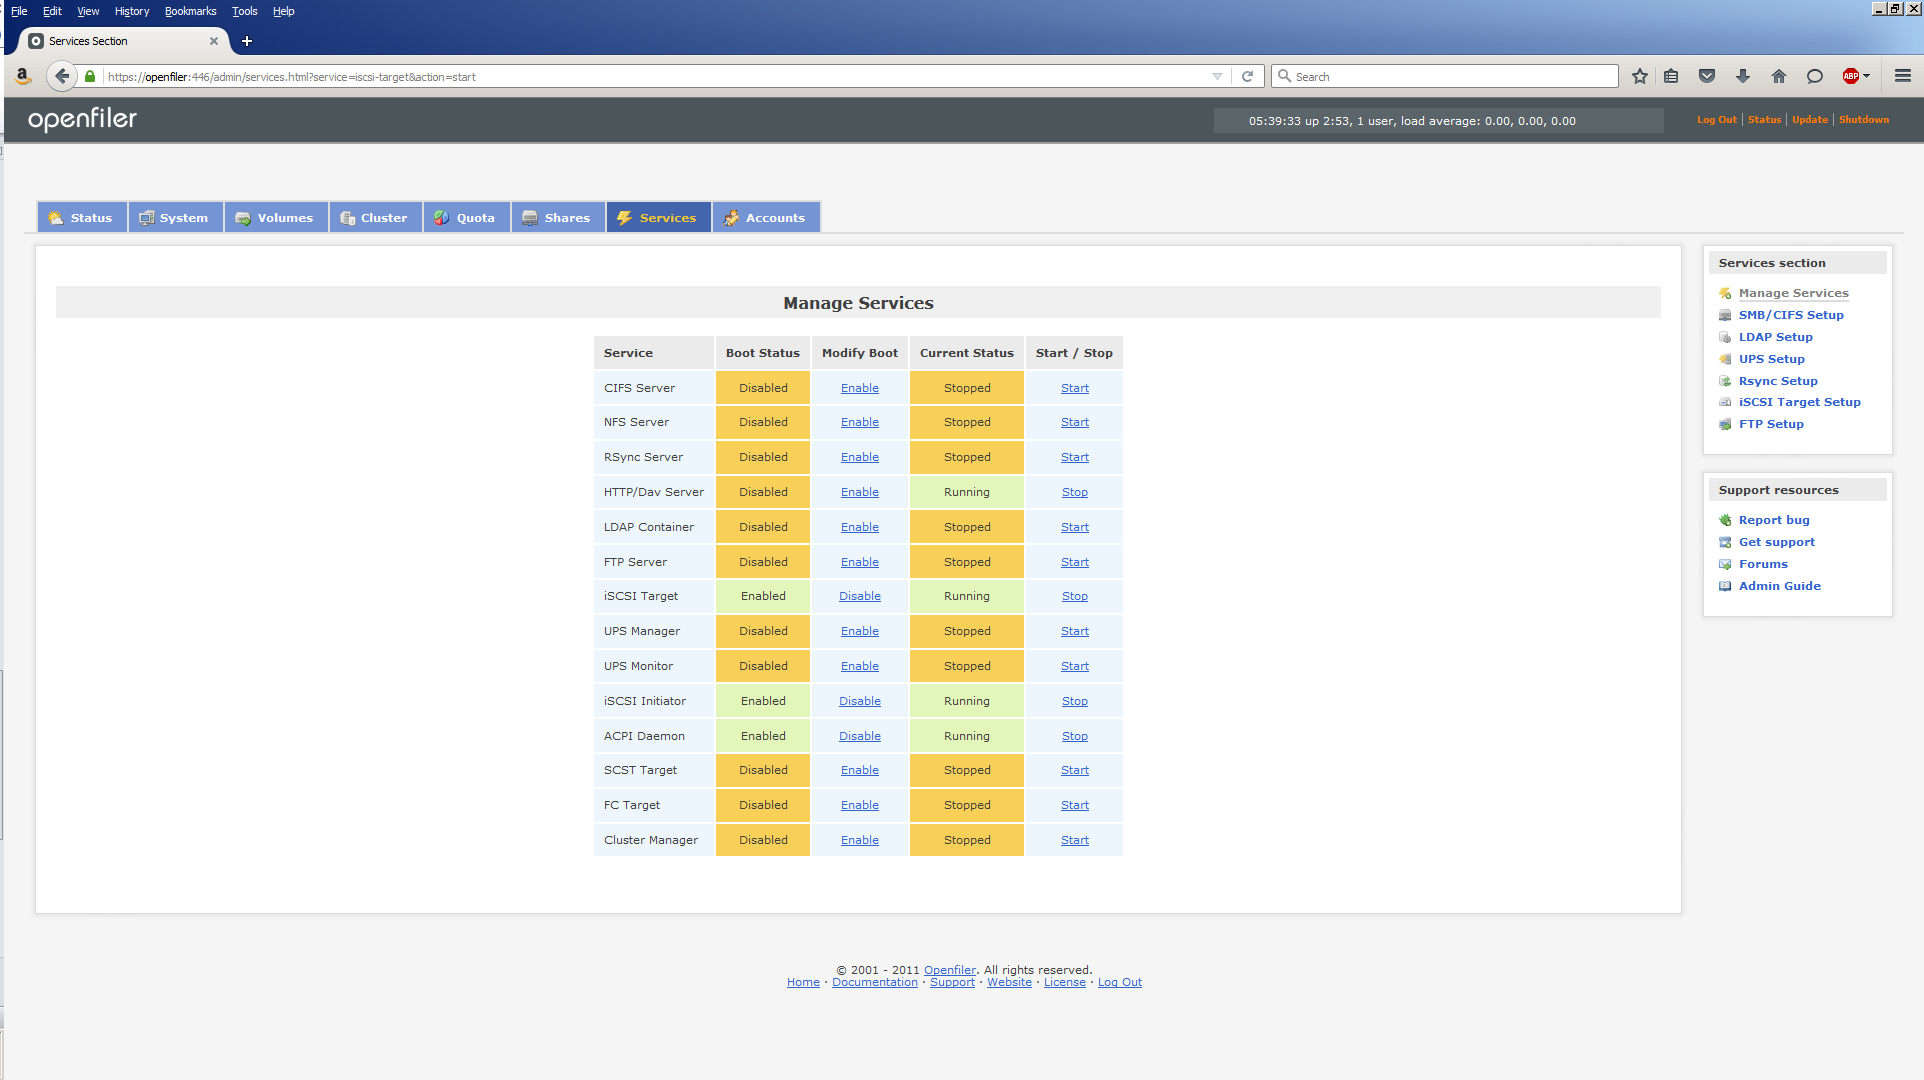
On the status screen, click Services to go to the Manage Services page:

For iSCSI target, click Enable and Start. For iSCSI Initiator, click Enable and start. The screen should now look like this:

Task #2c: Network Access Configuration.

Click on System to display the networking configuration. Use the following values to to populate the Network Access Configuration section:

Name Network/Host Netmask Type
racnode1-storage 200.200.20.11 255.255.255.255 Share
racnode2-storage 200.200.20.12 255.255.255.255 Share

The screen should now look similar to this:

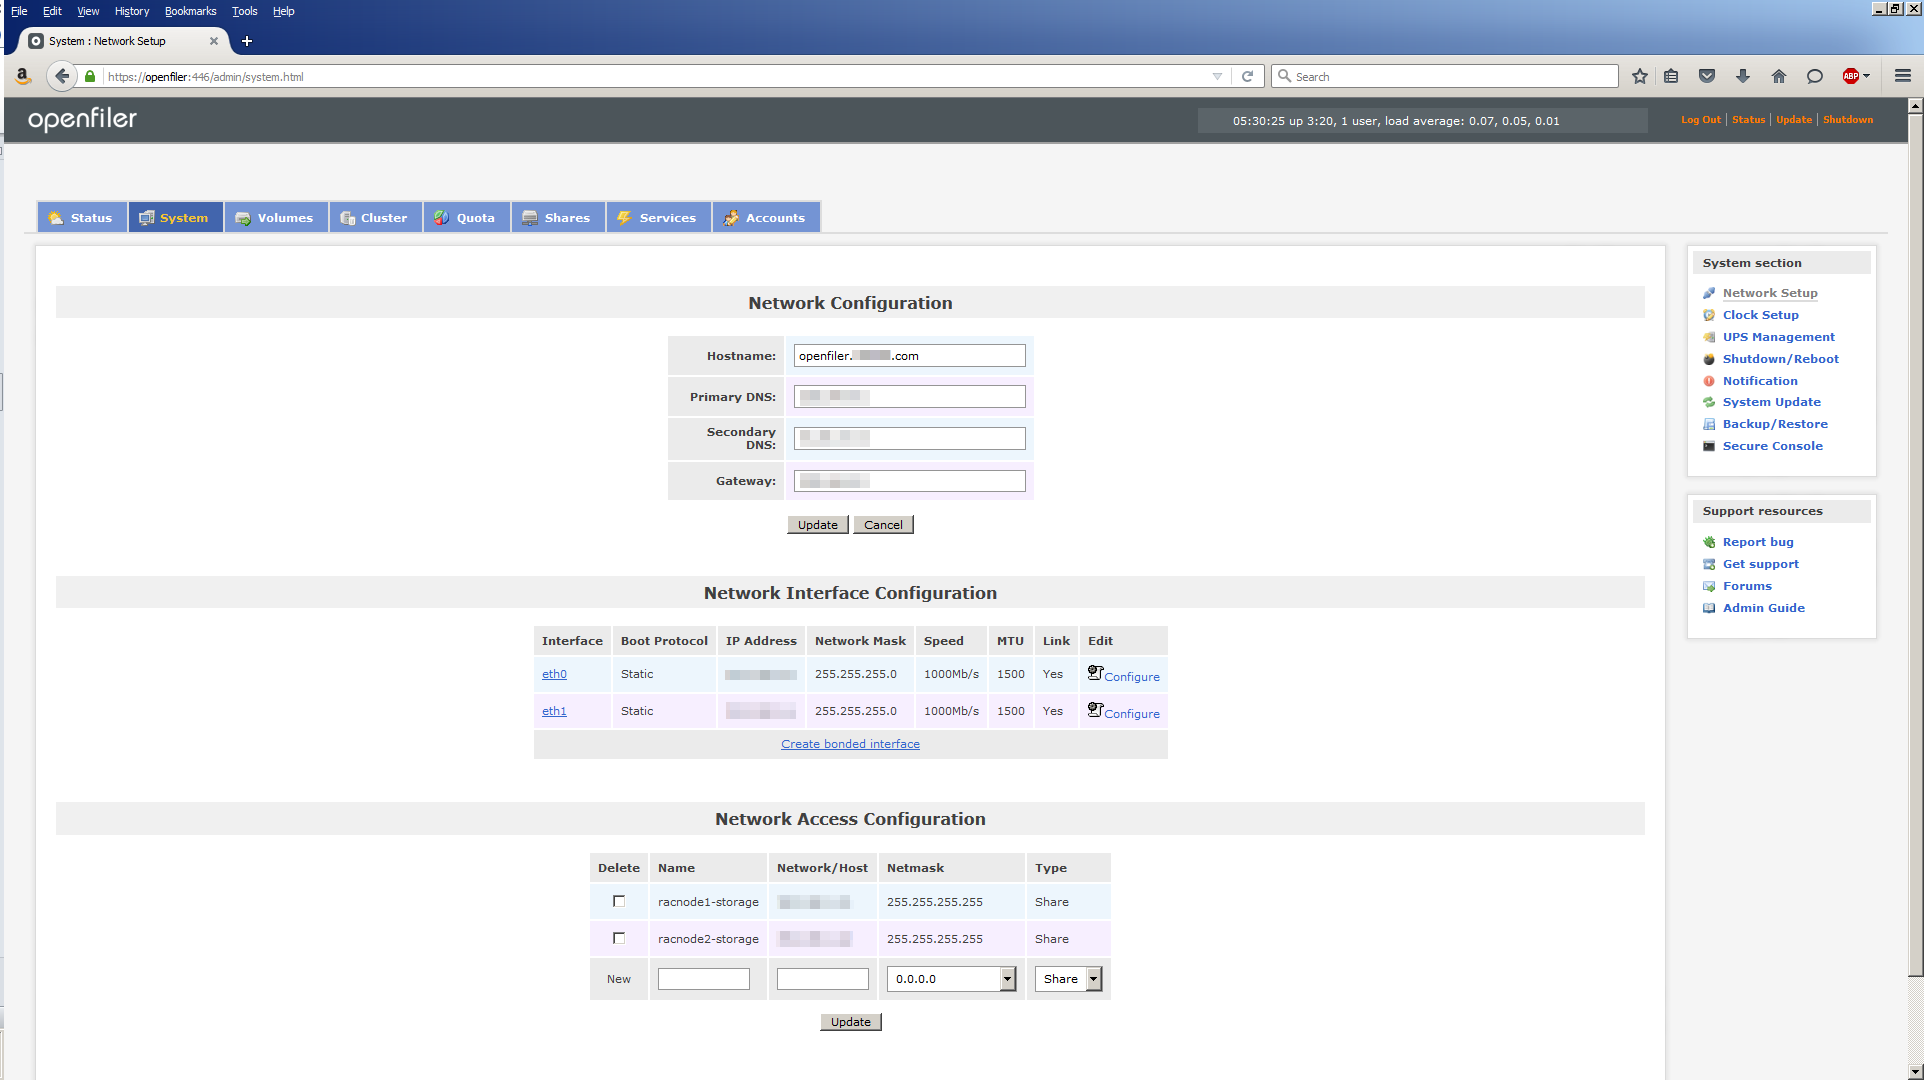
Note, it’s tempting to put the hostname in the Network/Host column especially if you’ve added the correct entries in the Openfiler server’s /etc/hosts file. However, don’t! It doesn’t work when you come to discover the storage from the Oracle RAC nodes. You MUST use the IP address!

Task #2d: Partition the Disk.

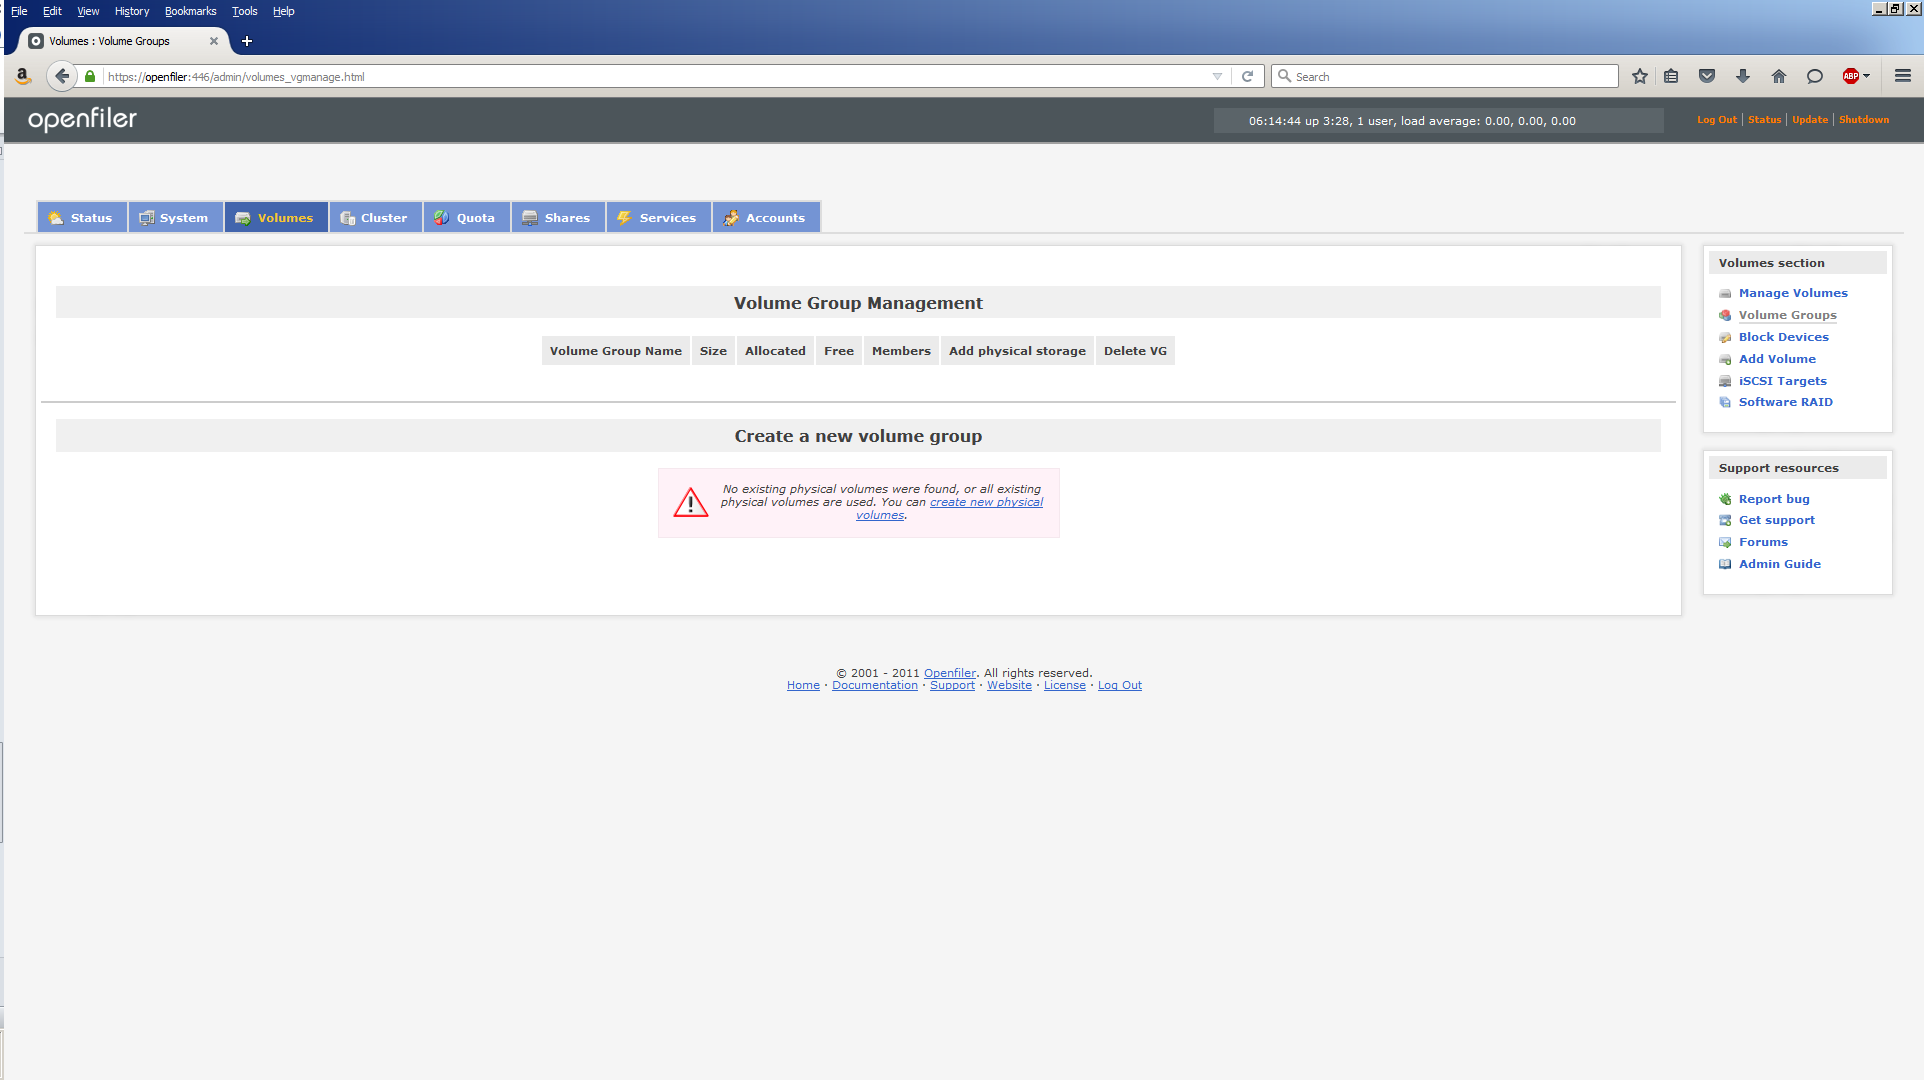
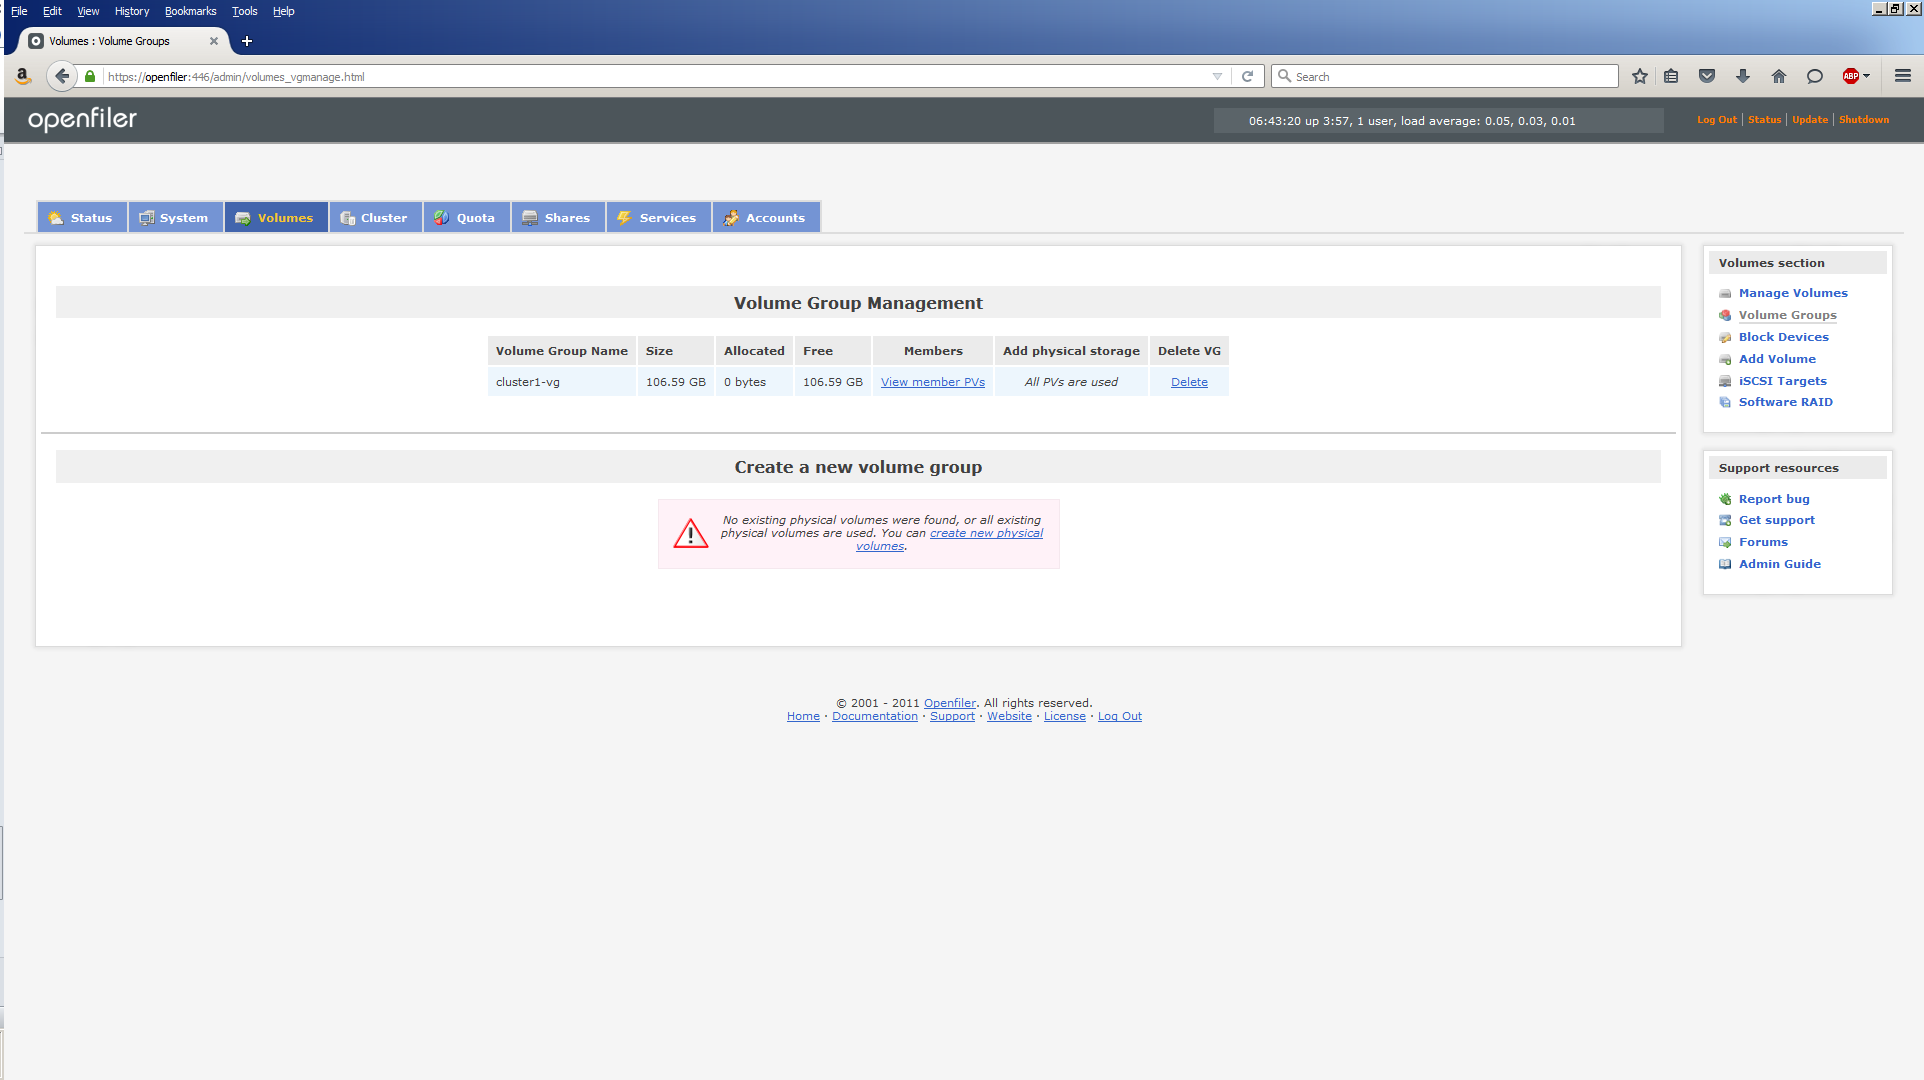
Click Volumes to display the Volume Group Management screen which currently shows no volume groups having been created:

Click Block Devices which shows the physical disks attached to the server:

The /dev/sda device is where Openfiler is installed. For the first Oracle RAC cluster, we’ll be using the other Samsung SSD, /dev/sdd. Click on /dev/sdd:

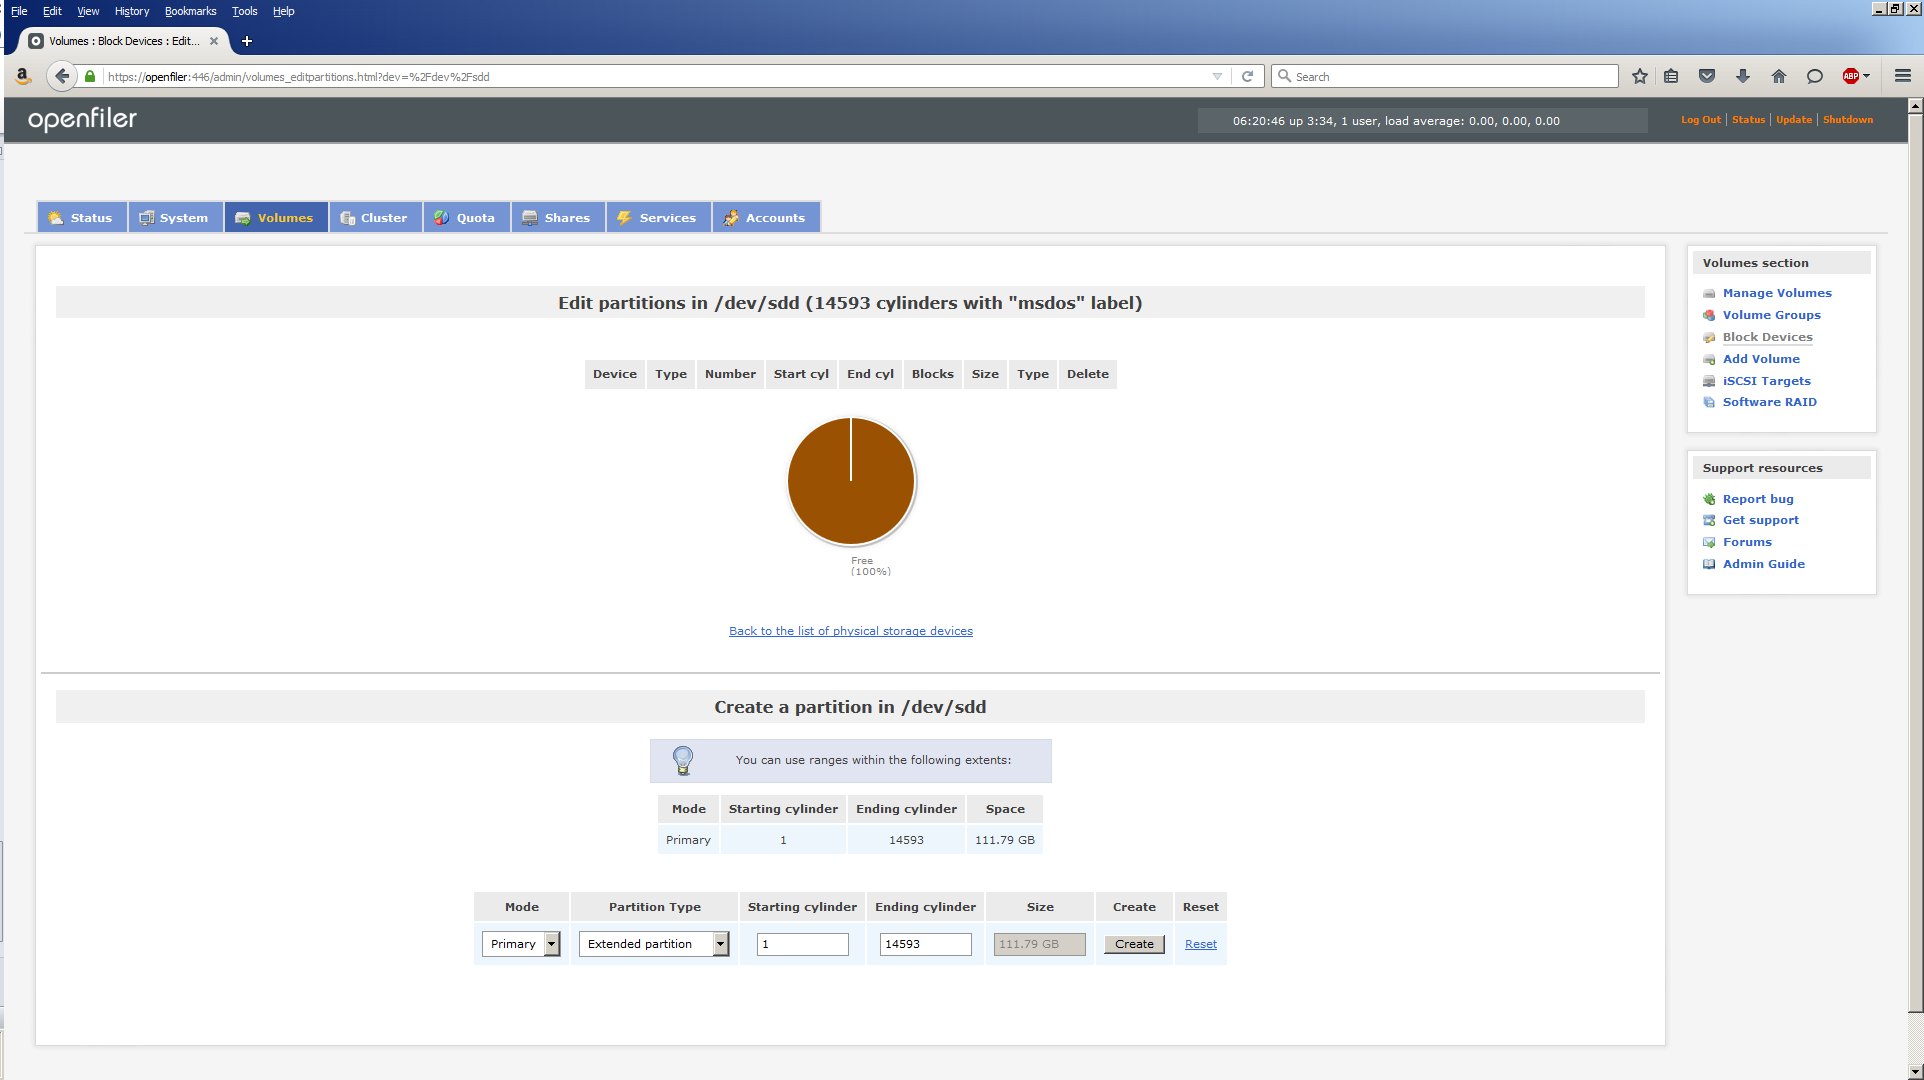
In the Create a partition in /dev/sdd section, use these values then click Create:

Field Value
Mode Primary
Partition Type Physical Volume
Starting Cylinder 1
Ending Cylinder 14593

The screen should now look like this:

Note, despite the values you used, Openfiler insists on keeping 5% of the disk free.

Task #2e: Create a Volume Group.

Click Volume Groups. Enter a new volume group name, cluster1-vg and check the box to select the /dev/sdd1 partition:

Then click Add volume group and the screen display changes to this:

Task #2f: Create Logical Volumes.

The logical volumes we create will eventually end up as ASM disks visible to the Oracle RAC node servers.Click Add Volume.

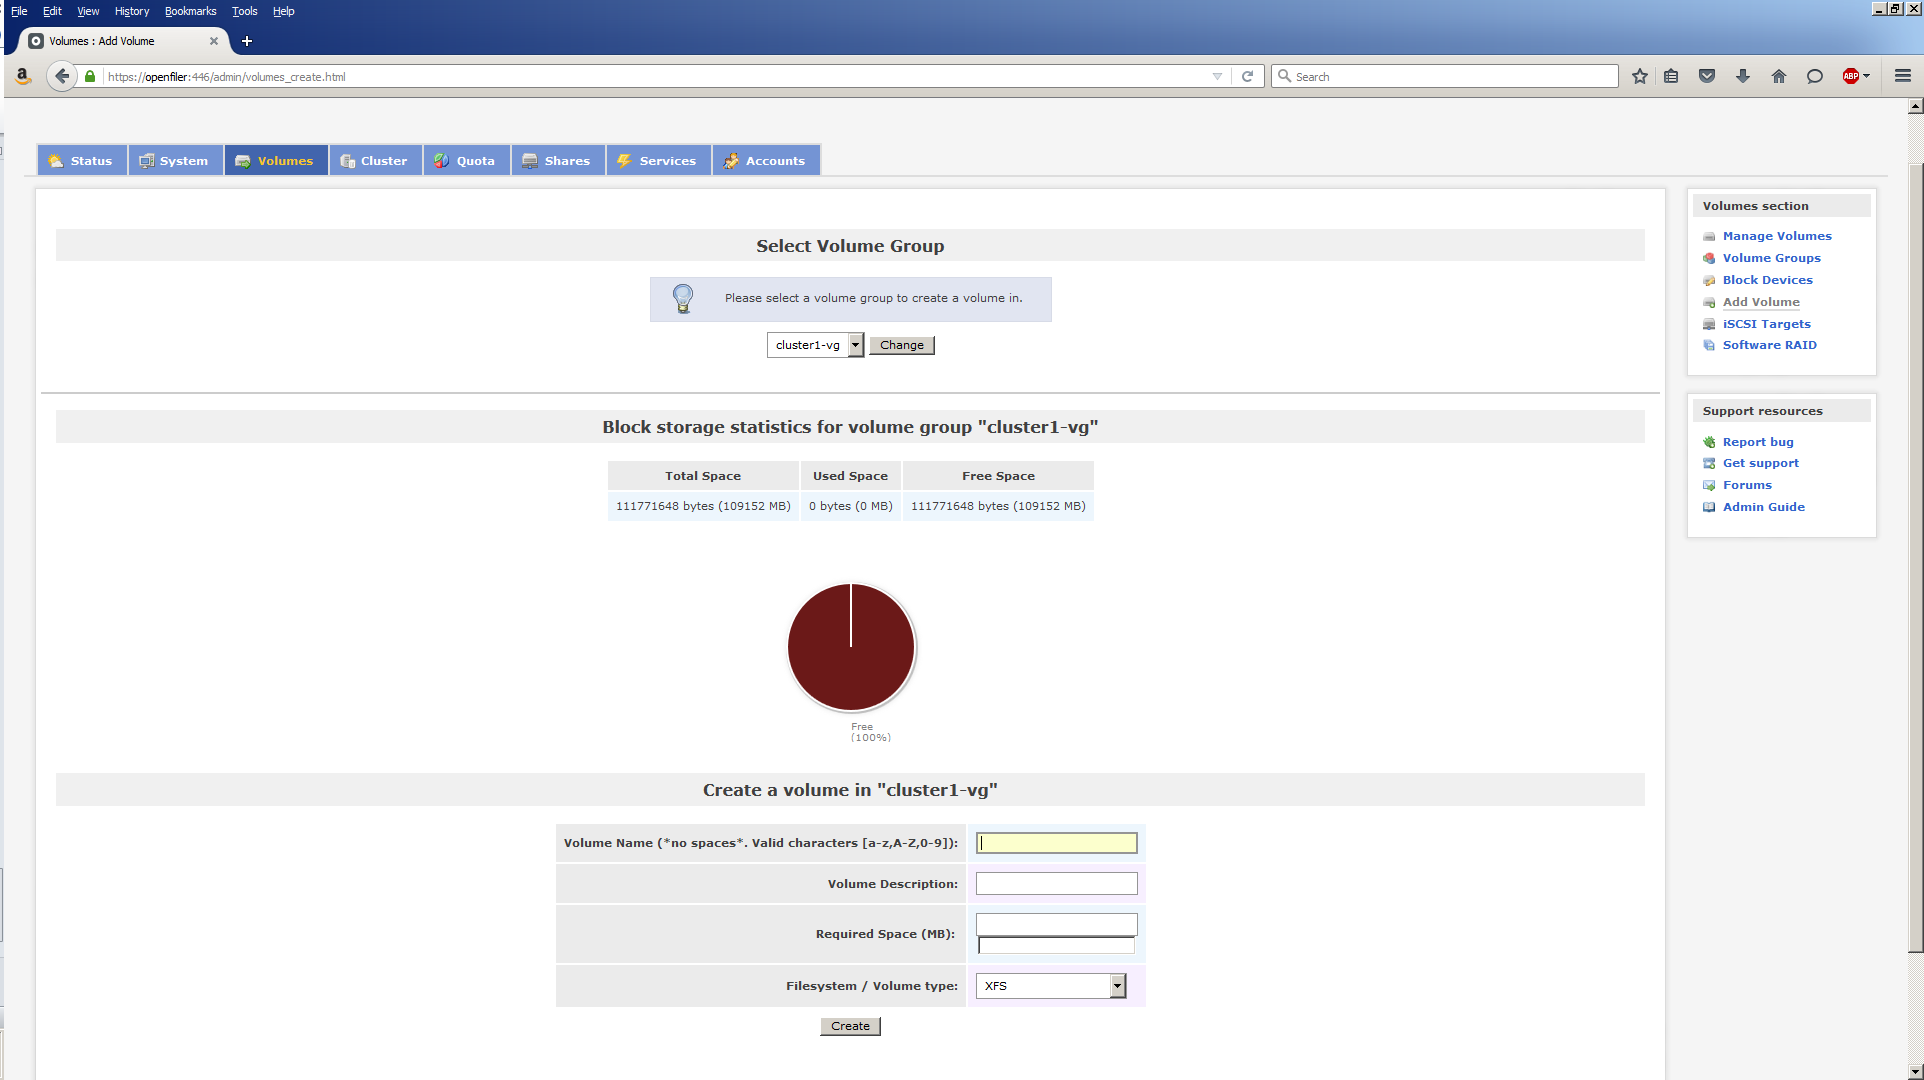
We can now use this screen to create volumes within the cluster1-vg volume group. Use the following values to create 10 x 10 GB volumes:

Volume Name Volume Description Required Space (MB) Filesystem / Volume type
c1vg-vol01 Cluster1 VG Volume #1 10240 block (iSCSI,FC,etc)
c1vg-vol02 Cluster1 VG Volume #2 10240 block (iSCSI,FC,etc)
c1vg-vol03 Cluster1 VG Volume #3 10240 block (iSCSI,FC,etc)
c1vg-vol04 Cluster1 VG Volume #4 10240 block (iSCSI,FC,etc)
c1vg-vol05 Cluster1 VG Volume #5 10240 block (iSCSI,FC,etc)
c1vg-vol06 Cluster1 VG Volume #6 10240 block (iSCSI,FC,etc)
c1vg-vol07 Cluster1 VG Volume #7 10240 block (iSCSI,FC,etc)
c1vg-vol08 Cluster1 VG Volume #8 10240 block (iSCSI,FC,etc)
c1vg-vol09 Cluster1 VG Volume #9 10240 block (iSCSI,FC,etc)
c1vg-vol10 Cluster1 VG Volume #10 10240 block (iSCSI,FC,etc)

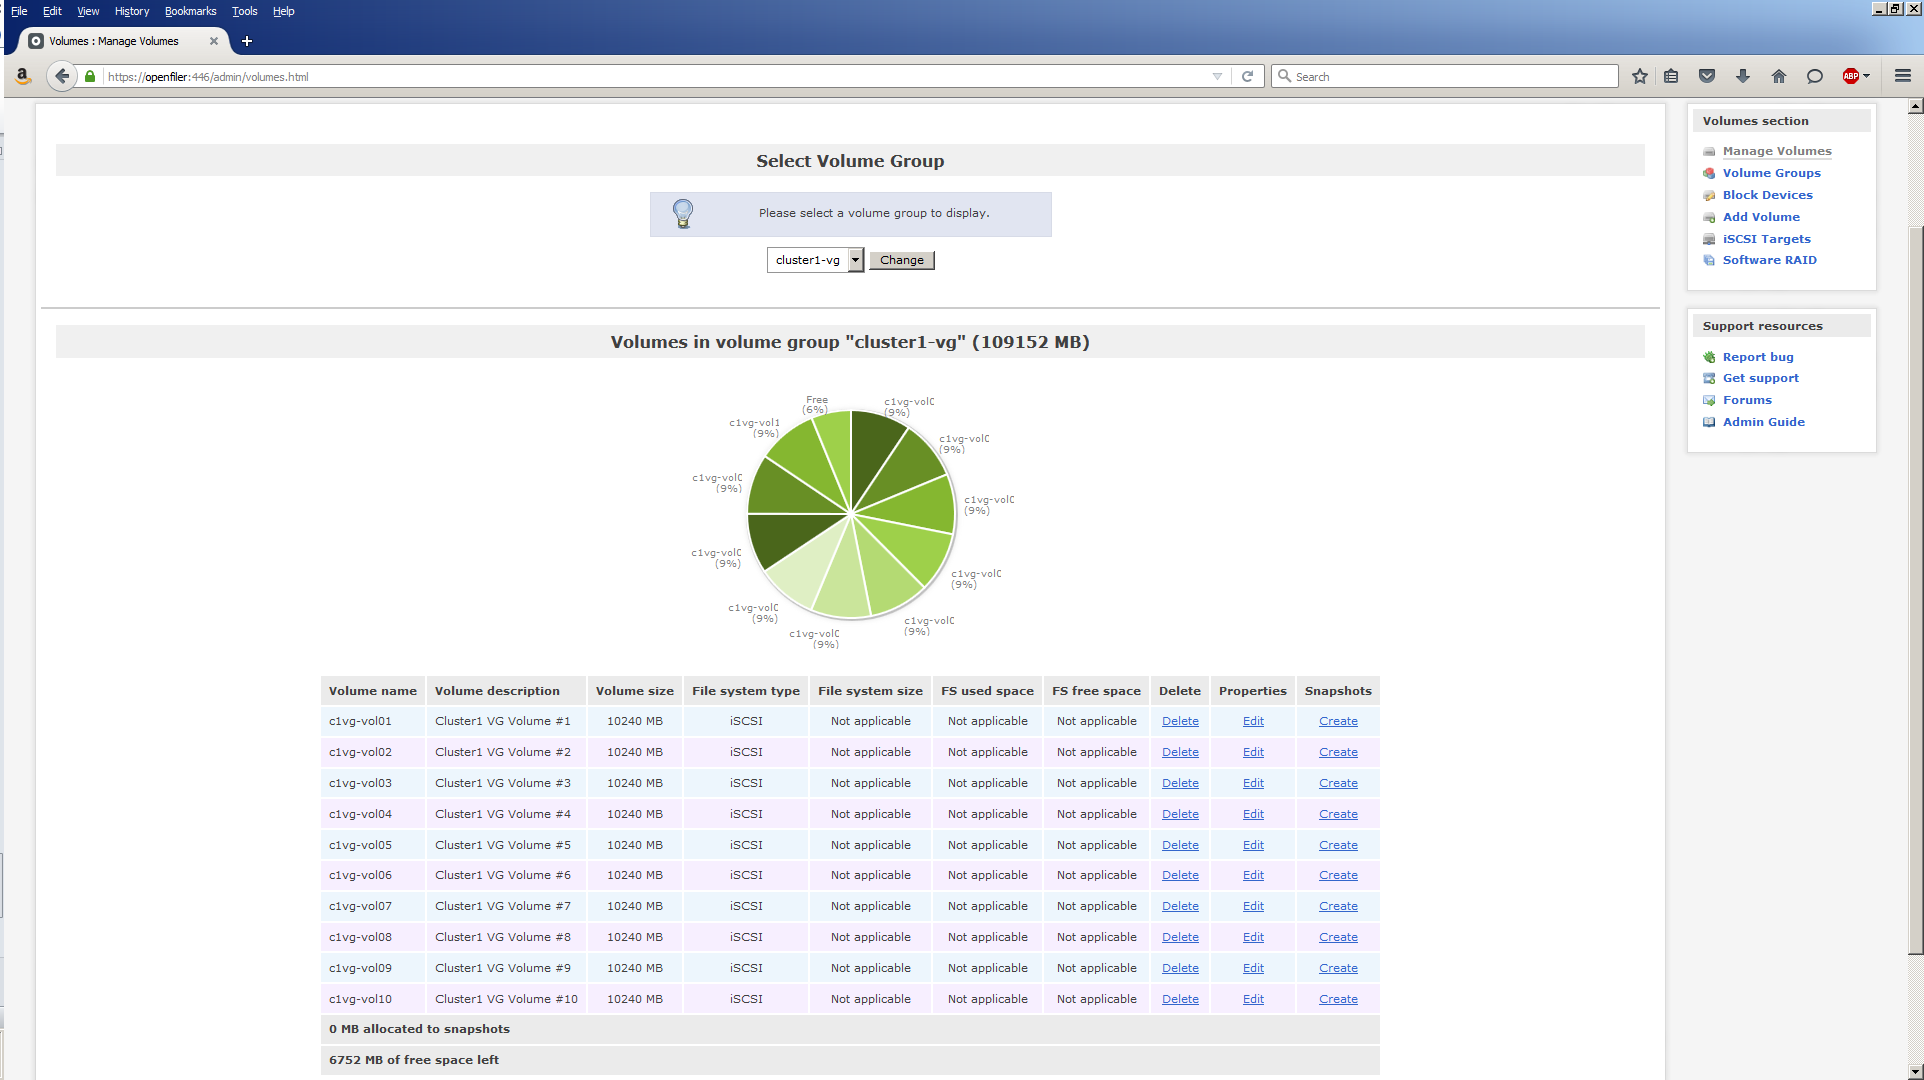
When you’re done, your screen should look similar to this:

Task #2g: Create iSCSI Targets for Logical Volumes.

An iSCSI target is a way of identifying the logical volumes. Since we have 10 logical volumes, we’ll have 10 iSCSI targets. An iSCSI target is actually identified by a Target IQN or iSCSI Qualified Name. The following procedure will need to be repeated for each of the 10 logical volumes.

Click Volumes, then iSCSI Targets.

The default Target IQNs are not very meaningful, so we’ll add some meaning by changing their names according to the values below:

Logical Volume Name Target IQN
c1vg-vol01 iqn.2006-01.com.openfiler:c1vg-vol01
c1vg-vol02 iqn.2006-01.com.openfiler:c1vg-vol02
c1vg-vol03 iqn.2006-01.com.openfiler:c1vg-vol03
c1vg-vol04 iqn.2006-01.com.openfiler:c1vg-vol04
c1vg-vol05 iqn.2006-01.com.openfiler:c1vg-vol05
c1vg-vol06 iqn.2006-01.com.openfiler:c1vg-vol06
c1vg-vol07 iqn.2006-01.com.openfiler:c1vg-vol07
c1vg-vol08 iqn.2006-01.com.openfiler:c1vg-vol08
c1vg-vol09 iqn.2006-01.com.openfiler:c1vg-vol09
c1vg-vol10 iqn.2006-01.com.openfiler:c1vg-vol10

After changing the Target IQN, click the Add button. The screen display changes to this:

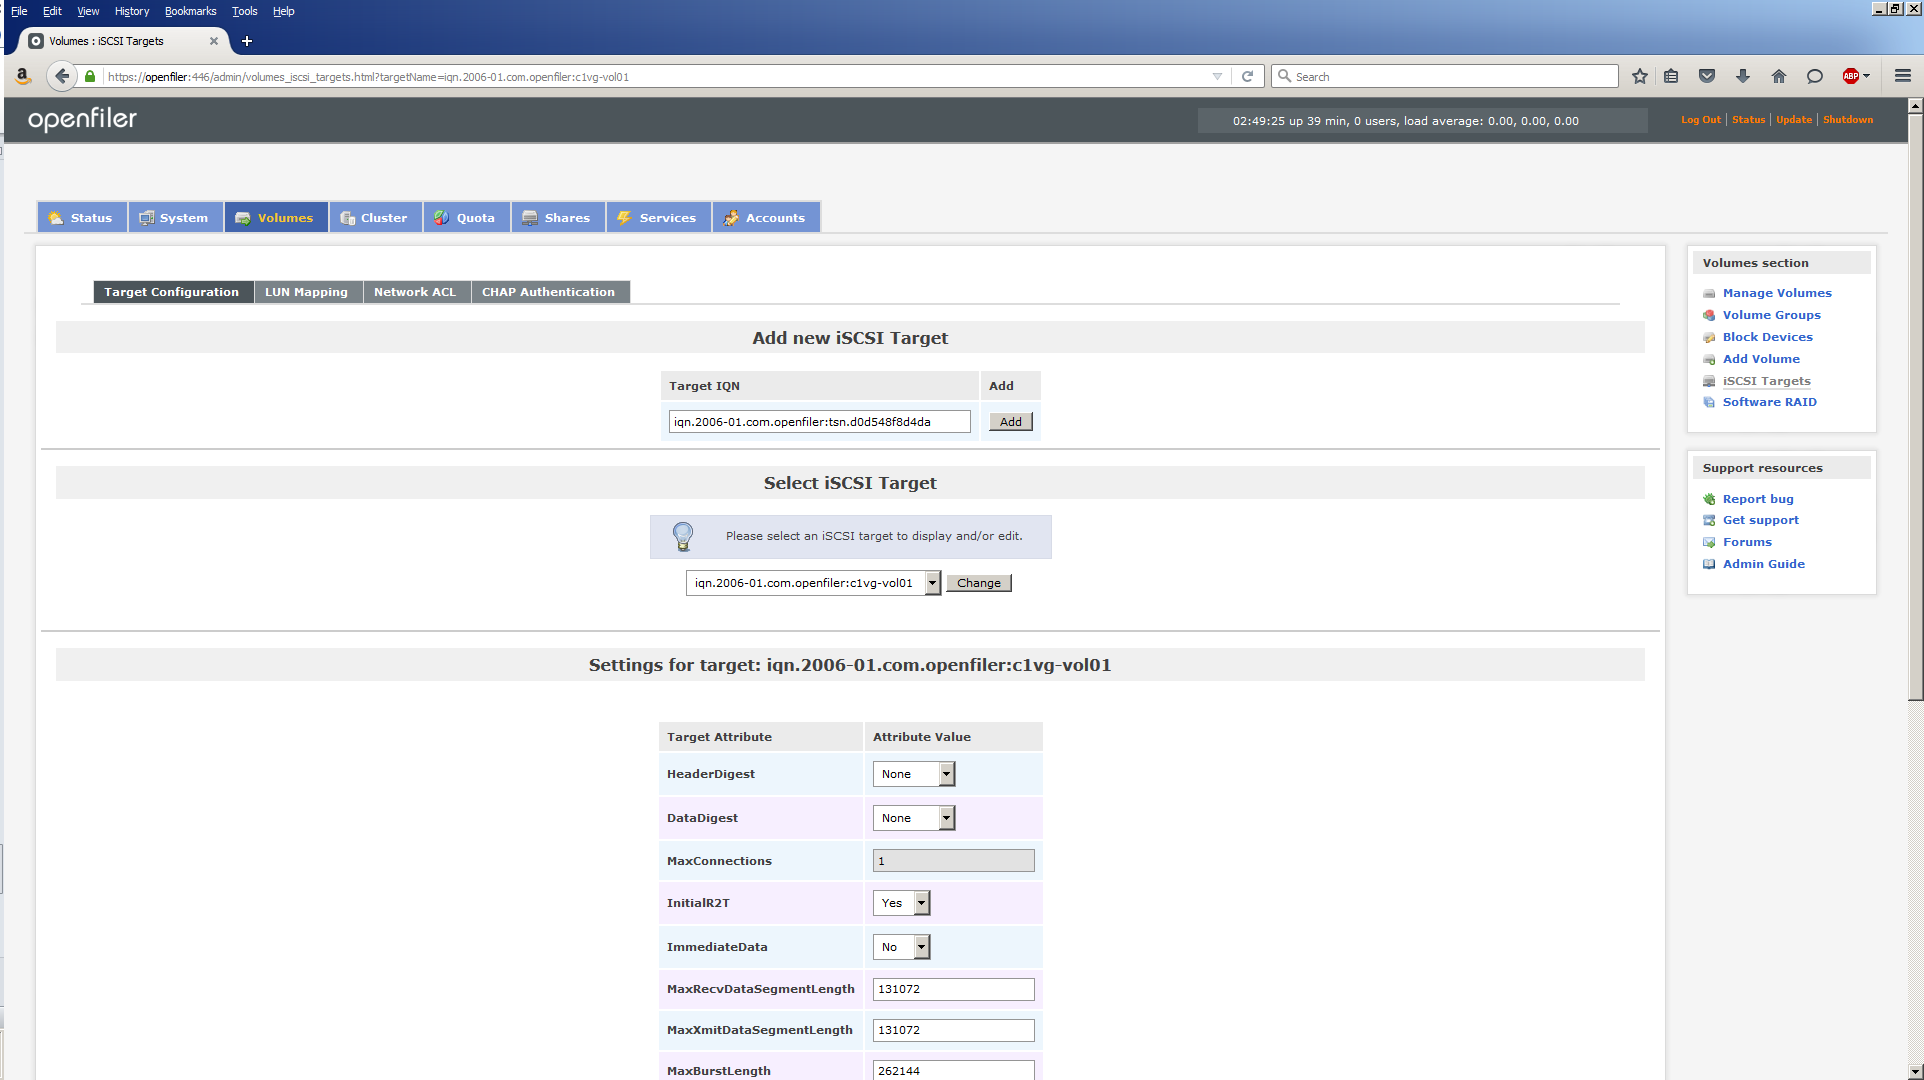
Ignore the Settings section as we won’t be changing any of those values.

Context is extremely important at this stage and you need to make sure your focus is on the correct object. Therefore, make sure you select the Target IQN you just created from the Select iSCSI Target menu. If it isn’t, as will be the case after you create the first one, select the Target IQN you need, then click the Change button. Selecting the Target IQN from the menu isn’t sufficient. You MUST click the Change button to make it the ‘active’ Target IQN.

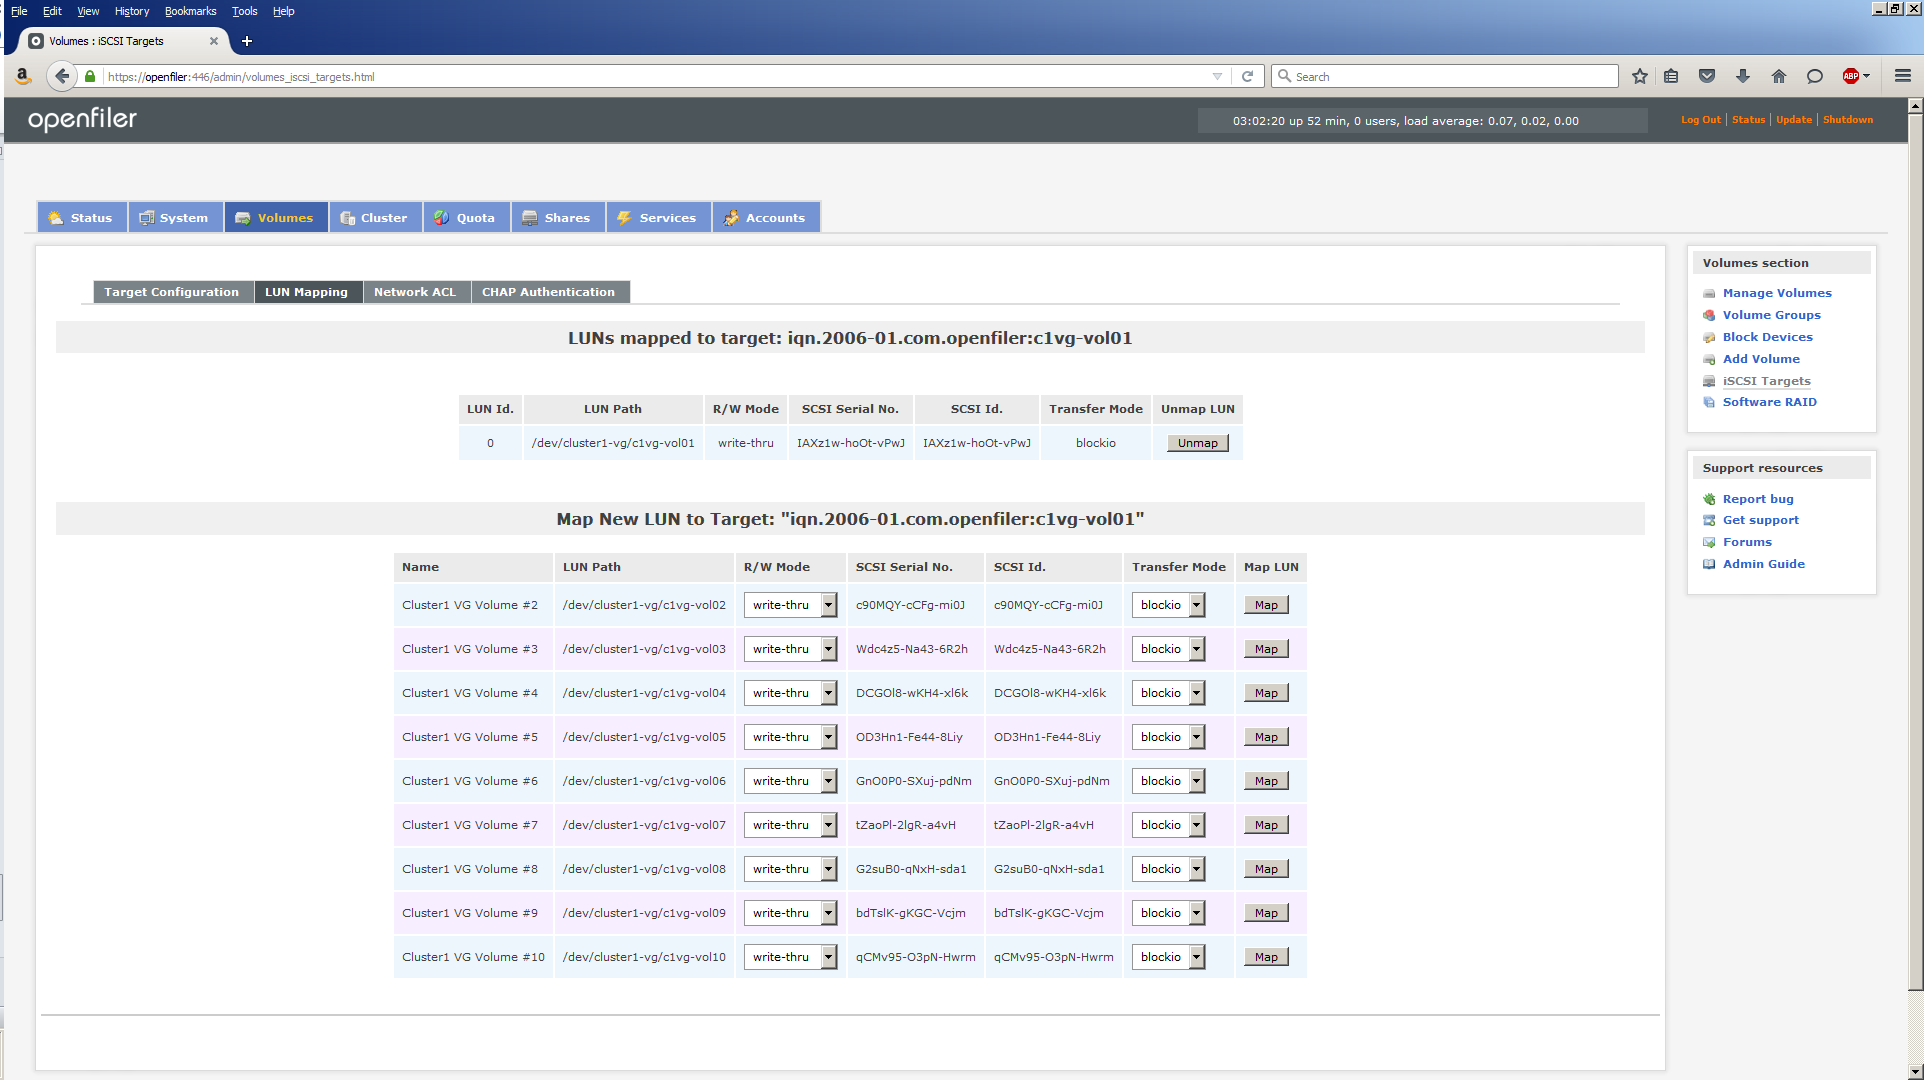
Click LUN Mapping. The screen changes to this:

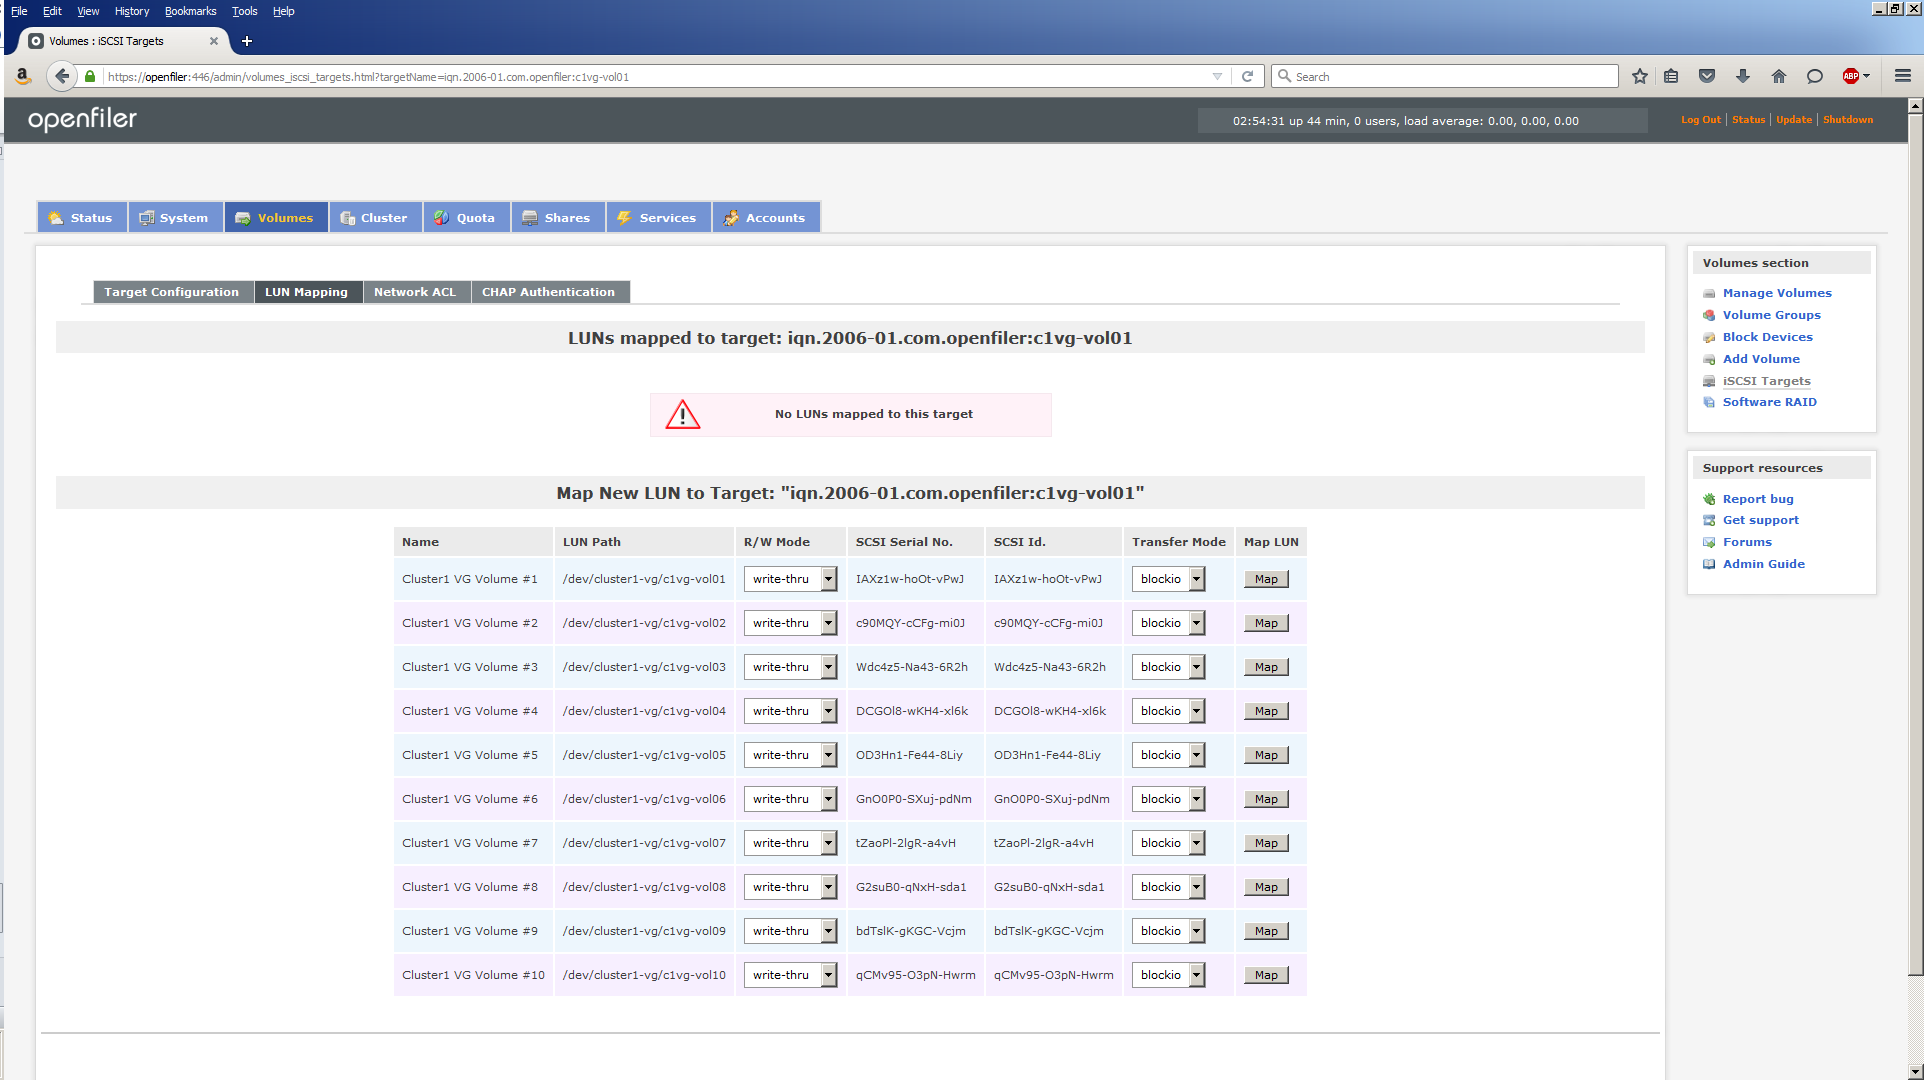
Click the Map button next to the Logical Volume you wish to map the currently active Target IQN to. First time through, the Map New LUN to Target will show “iqn.2006-01.com.openfiler:c1vg-vol01” and click the Map button on the line beginning, Cluster 1 VG Volume #1. The screen changes to this:

Next, click Network ACL (Access Control List). Here you define which hosts (Oracle RAC nodes) can have access to this Target IQN. Since Openfiler only knows about two nodes on the storage network (200.200.20.x), racnode1-storage and racnode2-storage are listed.

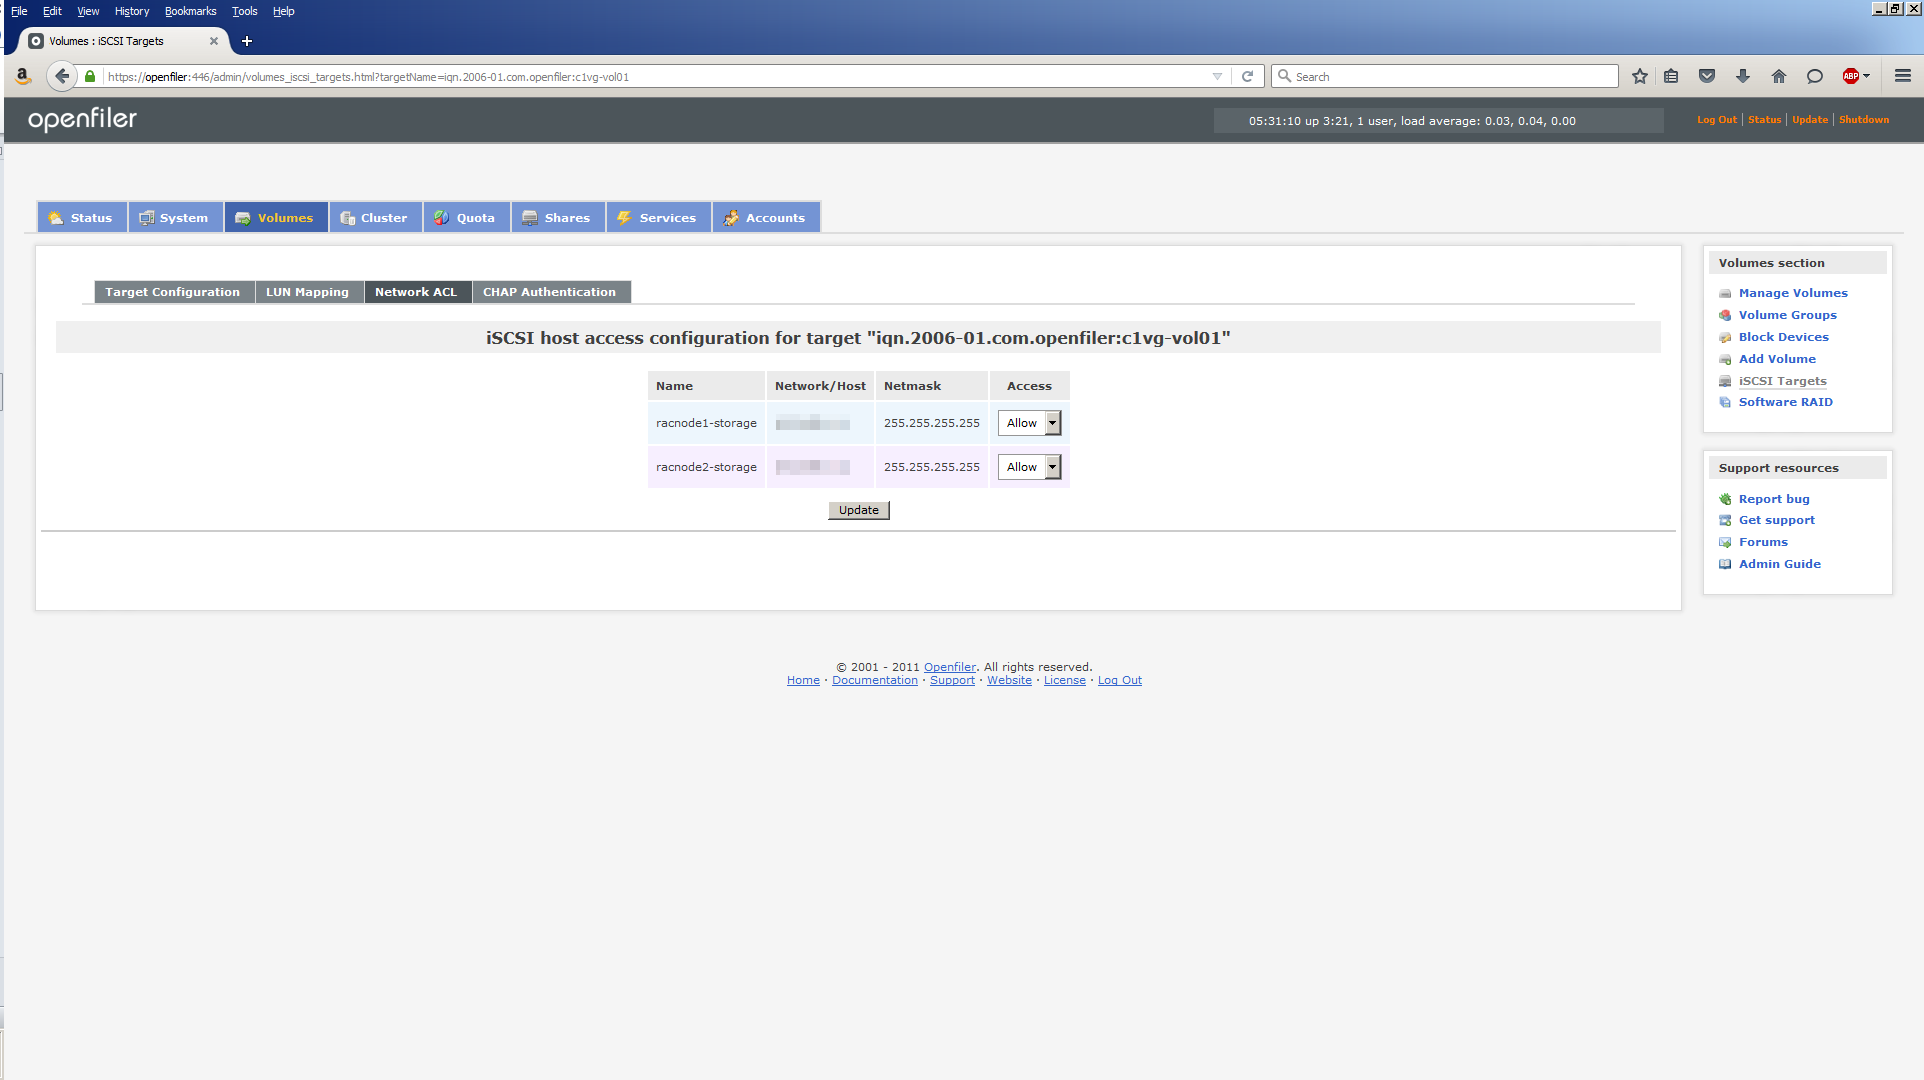
Use the Access menu to change Deny to Allow. Click Update. The screen will refresh but nothing else happens which can be a little deceiving. As long as you hit Update and the screen refreshes (don’t blink or you’ll miss it), you’re fine. Click Target Configuration to go back to this screen and repeat the procedure for c1vg-vol02 through c1vg-vol10.

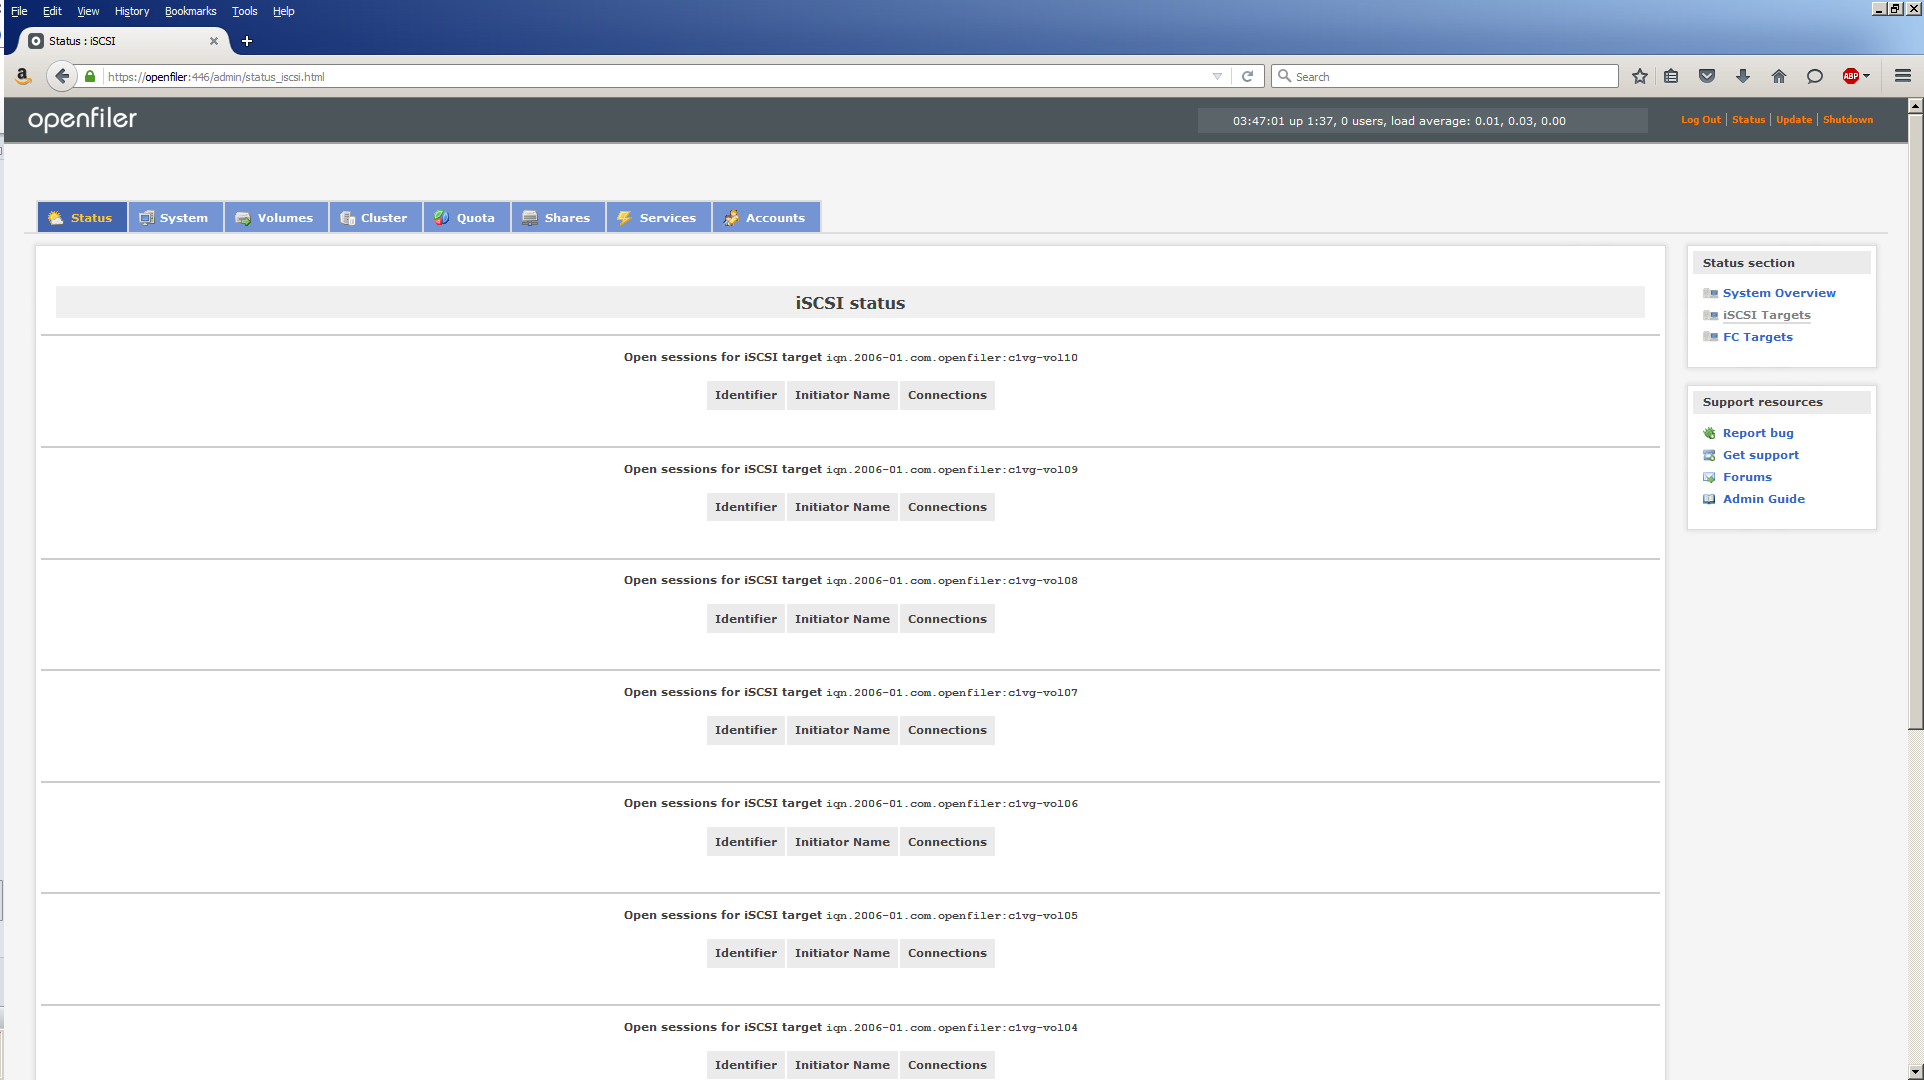
Task #2h: Review iSCSI targets.

Once you’re done creating a Target IQN, LUN Mapping and Network ACL for all 10 logical volumes, you can check your handiwork. Return to the home page by clicking Status, then click iSCSI Targets:

Task #3: Configure iSCSI Targets in Oracle Linux.

Our attention now turns to making the iSCSI targets visible and usable on the Oracle RAC node servers. To do that, we use the iSCSI initiator client which we installed back in Part 7. There are 6 steps in all, so here we go.

Task #3a: Verify iSCSI client (ALL nodes).

Verify the iSCSI client is installed on both Oracle RAC nodes:

[root@racnode1 ~]# rpm -qa | grep iscsi
iscsi-initiator-utils-6.2.0.873-14.0.1.el6.x86_64
[root@racnode2 ~]# rpm -qa | grep iscsi
iscsi-initiator-utils-6.2.0.873-14.0.1.el6.x86_64

Then configure the iSCSI client to start on boot up on both Oracle RAC nodes:

[root@racnode1 ~]# chkconfig iscsid on
[root@racnode1 ~]# chkconfig iscsi on
[root@racnode2 ~]# chkconfig iscsid on
[root@racnode2 ~]# chkconfig iscsi on

Trying to start the services has little effect at this stage, but running the iscsiadm discovery command makes everything spring into life. You’ll see.

Perform this step on all nodes in the cluster.

Task #3b: Discover iSCSI targets (ALL nodes).

The iscsiadm discovery command starts the iscsid service and then discovers the iSCSI targets coming from Openfiler.

[root@racnode1 ~]# iscsiadm -m discovery -t sendtargets -p openfiler-storage
Starting iscsid:                                          [ OK ]
200.200.20.6:3260,1 iqn.2006-01.com.openfiler:c1vg-vol10
200.200.10.6:3260,1 iqn.2006-01.com.openfiler:c1vg-vol10
200.200.20.6:3260,1 iqn.2006-01.com.openfiler:c1vg-vol09
200.200.10.6:3260,1 iqn.2006-01.com.openfiler:c1vg-vol09
200.200.20.6:3260,1 iqn.2006-01.com.openfiler:c1vg-vol08
200.200.10.6:3260,1 iqn.2006-01.com.openfiler:c1vg-vol08
200.200.20.6:3260,1 iqn.2006-01.com.openfiler:c1vg-vol07
200.200.10.6:3260,1 iqn.2006-01.com.openfiler:c1vg-vol07
200.200.20.6:3260,1 iqn.2006-01.com.openfiler:c1vg-vol06
200.200.10.6:3260,1 iqn.2006-01.com.openfiler:c1vg-vol06
200.200.20.6:3260,1 iqn.2006-01.com.openfiler:c1vg-vol05
200.200.10.6:3260,1 iqn.2006-01.com.openfiler:c1vg-vol05
200.200.20.6:3260,1 iqn.2006-01.com.openfiler:c1vg-vol04
200.200.10.6:3260,1 iqn.2006-01.com.openfiler:c1vg-vol04
200.200.20.6:3260,1 iqn.2006-01.com.openfiler:c1vg-vol03
200.200.10.6:3260,1 iqn.2006-01.com.openfiler:c1vg-vol03
200.200.20.6:3260,1 iqn.2006-01.com.openfiler:c1vg-vol02
200.200.10.6:3260,1 iqn.2006-01.com.openfiler:c1vg-vol02
200.200.20.6:3260,1 iqn.2006-01.com.openfiler:c1vg-vol01
200.200.10.6:3260,1 iqn.2006-01.com.openfiler:c1vg-vol01

Note, we’re using the portal openfiler-storage (the -p option) which is on the storage network (200.200.20.x). However, the discovery output lists targets on the storage network AND the public network (200.200.10.x). I think this is an Openfiler quirk/bug. Needless to say, we’re only interested in the targets on the storage network.

Repeat this step on ALL nodes in the cluster.

Task #3c: Login to iSCSI targets (ALL nodes).

Using the iSCSI target name returned by the discovery command, use the iscsiadm command to log into each iSCSI target, making sure you reference the storage network IP addresses (200.200.20.x):

[root@racnode1 scripts]# iscsiadm -m node -T iqn.2006-01.com.openfiler:c1vg-vol01 -p 200.200.20.6 -l
Logging in to [iface: default, target: iqn.2006-01.com.openfiler:c1vg-vol01, portal: 200.200.20.6,3260] (multiple)
Login to [iface: default, target: iqn.2006-01.com.openfiler:c1vg-vol01, portal: 200.200.20.6,3260] successful.

[root@racnode1 scripts]# iscsiadm -m node -T iqn.2006-01.com.openfiler:c1vg-vol02 -p 200.200.20.6 -l
Logging in to [iface: default, target: iqn.2006-01.com.openfiler:c1vg-vol02, portal: 200.200.20.6,3260] (multiple)
Login to [iface: default, target: iqn.2006-01.com.openfiler:c1vg-vol02, portal: 200.200.20.6,3260] successful.

[root@racnode1 scripts]# iscsiadm -m node -T iqn.2006-01.com.openfiler:c1vg-vol03 -p 200.200.20.6 -l
Logging in to [iface: default, target: iqn.2006-01.com.openfiler:c1vg-vol03, portal: 200.200.20.6,3260] (multiple)
Login to [iface: default, target: iqn.2006-01.com.openfiler:c1vg-vol03, portal: 200.200.20.6,3260] successful.

[root@racnode1 scripts]# iscsiadm -m node -T iqn.2006-01.com.openfiler:c1vg-vol04 -p 200.200.20.6 -l
Logging in to [iface: default, target: iqn.2006-01.com.openfiler:c1vg-vol04, portal: 200.200.20.6,3260] (multiple)
Login to [iface: default, target: iqn.2006-01.com.openfiler:c1vg-vol04, portal: 200.200.20.6,3260] successful.

[root@racnode1 scripts]# iscsiadm -m node -T iqn.2006-01.com.openfiler:c1vg-vol05 -p 200.200.20.6 -l
Logging in to [iface: default, target: iqn.2006-01.com.openfiler:c1vg-vol05, portal: 200.200.20.6,3260] (multiple)
Login to [iface: default, target: iqn.2006-01.com.openfiler:c1vg-vol05, portal: 200.200.20.6,3260] successful.

[root@racnode1 scripts]# iscsiadm -m node -T iqn.2006-01.com.openfiler:c1vg-vol06 -p 200.200.20.6 -l
Logging in to [iface: default, target: iqn.2006-01.com.openfiler:c1vg-vol06, portal: 200.200.20.6,3260] (multiple)
Login to [iface: default, target: iqn.2006-01.com.openfiler:c1vg-vol06, portal: 200.200.20.6,3260] successful.

[root@racnode1 scripts]# iscsiadm -m node -T iqn.2006-01.com.openfiler:c1vg-vol07 -p 200.200.20.6 -l
Logging in to [iface: default, target: iqn.2006-01.com.openfiler:c1vg-vol07, portal: 200.200.20.6,3260] (multiple)
Login to [iface: default, target: iqn.2006-01.com.openfiler:c1vg-vol07, portal: 200.200.20.6,3260] successful.

[root@racnode1 scripts]# iscsiadm -m node -T iqn.2006-01.com.openfiler:c1vg-vol08 -p 200.200.20.6 -l
Logging in to [iface: default, target: iqn.2006-01.com.openfiler:c1vg-vol08, portal: 200.200.20.6,3260] (multiple)
Login to [iface: default, target: iqn.2006-01.com.openfiler:c1vg-vol08, portal: 200.200.20.6,3260] successful.

[root@racnode1 scripts]# iscsiadm -m node -T iqn.2006-01.com.openfiler:c1vg-vol09 -p 200.200.20.6 -l
Logging in to [iface: default, target: iqn.2006-01.com.openfiler:c1vg-vol09, portal: 200.200.20.6,3260] (multiple)
Login to [iface: default, target: iqn.2006-01.com.openfiler:c1vg-vol09, portal: 200.200.20.6,3260] successful.

[root@racnode1 scripts]# iscsiadm -m node -T iqn.2006-01.com.openfiler:c1vg-vol10 -p 200.200.20.6 -l
Logging in to [iface: default, target: iqn.2006-01.com.openfiler:c1vg-vol10, portal: 200.200.20.6,3260] (multiple)
Login to [iface: default, target: iqn.2006-01.com.openfiler:c1vg-vol10, portal: 200.200.20.6,3260] successful.

This has the effect of Oracle Linux recognizing the iSCSI targets as disk devices and assigns them a device name to each one. A partial fdisk -l listing confirms what has happened:

Disk /dev/sda: 10.7 GB, 10737418240 bytes
64 heads, 32 sectors/track, 10240 cylinders
Units = cylinders of 2048 * 512 = 1048576 bytes
Sector size (logical/physical): 512 bytes / 512 bytes
I/O size (minimum/optimal): 512 bytes / 512 bytes
Disk identifier: 0x00000000

Disk /dev/sdb: 10.7 GB, 10737418240 bytes
64 heads, 32 sectors/track, 10240 cylinders
Units = cylinders of 2048 * 512 = 1048576 bytes
Sector size (logical/physical): 512 bytes / 512 bytes
I/O size (minimum/optimal): 512 bytes / 512 bytes
Disk identifier: 0x00000000

Disk /dev/sdc: 10.7 GB, 10737418240 bytes
64 heads, 32 sectors/track, 10240 cylinders
Units = cylinders of 2048 * 512 = 1048576 bytes
Sector size (logical/physical): 512 bytes / 512 bytes
I/O size (minimum/optimal): 512 bytes / 512 bytes
Disk identifier: 0x00000000

Disk /dev/sdd: 10.7 GB, 10737418240 bytes
64 heads, 32 sectors/track, 10240 cylinders
Units = cylinders of 2048 * 512 = 1048576 bytes
Sector size (logical/physical): 512 bytes / 512 bytes
I/O size (minimum/optimal): 512 bytes / 512 bytes
Disk identifier: 0x00000000

Disk /dev/sde: 10.7 GB, 10737418240 bytes
64 heads, 32 sectors/track, 10240 cylinders
Units = cylinders of 2048 * 512 = 1048576 bytes
Sector size (logical/physical): 512 bytes / 512 bytes
I/O size (minimum/optimal): 512 bytes / 512 bytes
Disk identifier: 0x00000000

Disk /dev/sdf: 10.7 GB, 10737418240 bytes
64 heads, 32 sectors/track, 10240 cylinders
Units = cylinders of 2048 * 512 = 1048576 bytes
Sector size (logical/physical): 512 bytes / 512 bytes
I/O size (minimum/optimal): 512 bytes / 512 bytes
Disk identifier: 0x00000000

Disk /dev/sdg: 10.7 GB, 10737418240 bytes
64 heads, 32 sectors/track, 10240 cylinders
Units = cylinders of 2048 * 512 = 1048576 bytes
Sector size (logical/physical): 512 bytes / 512 bytes
I/O size (minimum/optimal): 512 bytes / 512 bytes
Disk identifier: 0x00000000

Disk /dev/sdh: 10.7 GB, 10737418240 bytes
64 heads, 32 sectors/track, 10240 cylinders
Units = cylinders of 2048 * 512 = 1048576 bytes
Sector size (logical/physical): 512 bytes / 512 bytes
I/O size (minimum/optimal): 512 bytes / 512 bytes
Disk identifier: 0x00000000

Disk /dev/sdi: 10.7 GB, 10737418240 bytes
64 heads, 32 sectors/track, 10240 cylinders
Units = cylinders of 2048 * 512 = 1048576 bytes
Sector size (logical/physical): 512 bytes / 512 bytes
I/O size (minimum/optimal): 512 bytes / 512 bytes
Disk identifier: 0x00000000

Disk /dev/sdj: 10.7 GB, 10737418240 bytes
64 heads, 32 sectors/track, 10240 cylinders
Units = cylinders of 2048 * 512 = 1048576 bytes
Sector size (logical/physical): 512 bytes / 512 bytes
I/O size (minimum/optimal): 512 bytes / 512 bytes
Disk identifier: 0x00000000

By checking the entries in /dev/disk/by-path, we can determine the mapping between the iSCSI target and the local disk device:

[root@racnode1 by-path]# pwd
/dev/disk/by-path

[root@racnode1 by-path]# ls -l | grep iscsi
lrwxrwxrwx 1 root root 9 Dec 16 15:33 ip-200.200.20.6:3260-iscsi-iqn.2006-01.com.openfiler:c1vg-vol01-lun-0 -> ../../sda
lrwxrwxrwx 1 root root 9 Dec 16 15:33 ip-200.200.20.6:3260-iscsi-iqn.2006-01.com.openfiler:c1vg-vol02-lun-0 -> ../../sdb
lrwxrwxrwx 1 root root 9 Dec 16 15:33 ip-200.200.20.6:3260-iscsi-iqn.2006-01.com.openfiler:c1vg-vol03-lun-0 -> ../../sdc
lrwxrwxrwx 1 root root 9 Dec 16 15:33 ip-200.200.20.6:3260-iscsi-iqn.2006-01.com.openfiler:c1vg-vol04-lun-0 -> ../../sdd
lrwxrwxrwx 1 root root 9 Dec 16 15:34 ip-200.200.20.6:3260-iscsi-iqn.2006-01.com.openfiler:c1vg-vol05-lun-0 -> ../../sde
lrwxrwxrwx 1 root root 9 Dec 16 15:34 ip-200.200.20.6:3260-iscsi-iqn.2006-01.com.openfiler:c1vg-vol06-lun-0 -> ../../sdf
lrwxrwxrwx 1 root root 9 Dec 16 15:34 ip-200.200.20.6:3260-iscsi-iqn.2006-01.com.openfiler:c1vg-vol07-lun-0 -> ../../sdg
lrwxrwxrwx 1 root root 9 Dec 16 15:35 ip-200.200.20.6:3260-iscsi-iqn.2006-01.com.openfiler:c1vg-vol08-lun-0 -> ../../sdh
lrwxrwxrwx 1 root root 9 Dec 16 15:35 ip-200.200.20.6:3260-iscsi-iqn.2006-01.com.openfiler:c1vg-vol09-lun-0 -> ../../sdi
lrwxrwxrwx 1 root root 9 Dec 16 15:35 ip-200.200.20.6:3260-iscsi-iqn.2006-01.com.openfiler:c1vg-vol10-lun-0 -> ../../sdj

Repeat this step on ALL nodes in the cluster.

Task #3d: Configure automatic iscsi client login (ALL nodes).

To ensure the iscsi client on each node logs into the iSCSI targets each time the system is booted or the iscsid service is restarted, automatic login must be configured. To do that, run these commands, again making sure you reference the storage network IP addresses (200.200.20.x):

[root@racnode1 scripts]# iscsiadm -m node -T iqn.2006-01.com.openfiler:c1vg-vol01 -p 200.200.20.6 --op update -n node.startup -v automatic
[root@racnode1 scripts]# iscsiadm -m node -T iqn.2006-01.com.openfiler:c1vg-vol02 -p 200.200.20.6 --op update -n node.startup -v automatic
[root@racnode1 scripts]# iscsiadm -m node -T iqn.2006-01.com.openfiler:c1vg-vol03 -p 200.200.20.6 --op update -n node.startup -v automatic
[root@racnode1 scripts]# iscsiadm -m node -T iqn.2006-01.com.openfiler:c1vg-vol04 -p 200.200.20.6 --op update -n node.startup -v automatic
[root@racnode1 scripts]# iscsiadm -m node -T iqn.2006-01.com.openfiler:c1vg-vol05 -p 200.200.20.6 --op update -n node.startup -v automatic
[root@racnode1 scripts]# iscsiadm -m node -T iqn.2006-01.com.openfiler:c1vg-vol06 -p 200.200.20.6 --op update -n node.startup -v automatic
[root@racnode1 scripts]# iscsiadm -m node -T iqn.2006-01.com.openfiler:c1vg-vol07 -p 200.200.20.6 --op update -n node.startup -v automatic
[root@racnode1 scripts]# iscsiadm -m node -T iqn.2006-01.com.openfiler:c1vg-vol08 -p 200.200.20.6 --op update -n node.startup -v automatic
[root@racnode1 scripts]# iscsiadm -m node -T iqn.2006-01.com.openfiler:c1vg-vol09 -p 200.200.20.6 --op update -n node.startup -v automatic
[root@racnode1 scripts]# iscsiadm -m node -T iqn.2006-01.com.openfiler:c1vg-vol10 -p 200.200.20.6 --op update -n node.startup -v automatic

Note, these commands do not produce any output. Which is a little unfriendly, but don’t be scared!

Repeat this step on ALL nodes in the cluster.

Task #3e: Partition the disks (ONE node only).

Now that the iSCSI targets coming from the Openfiler shared storage server are visible as disk devices, we need to partition them. Each drive will have a single partition. Repeat the following command for /dev/sda through /dev/sdj:

[root@racnode1 scripts]# fdisk /dev/sda
Device contains neither a valid DOS partition table, nor Sun, SGI or OSF disklabel
Building a new DOS disklabel with disk identifier 0xdce55f18.
Changes will remain in memory only, until you decide to write them.
After that, of course, the previous content won't be recoverable.

Warning: invalid flag 0x0000 of partition table 4 will be corrected by w(rite)

WARNING: DOS-compatible mode is deprecated. It's strongly recommended to
         switch off the mode (command 'c') and change display units to
         sectors (command 'u').

Command (m for help): n
Command action
   e   extended
   p   primary partition (1-4)
p

Partition number (1-4): 1
First cylinder (1-10240, default 1):
Using default value 1
Last cylinder, +cylinders or +size{K,M,G} (1-10240, default 10240):
Using default value 10240

Command (m for help): w
The partition table has been altered!
Calling ioctl() to re-read partition table.
Syncing disks.

Note, partitioning the disk devices is only done from ONE node.

Task #3f: Configure persistent device names for iSCSI targets (ALL nodes).

The discovery of the iSCSI targets by Oracle Linux just happened to map c1vg-vol01-lun-0 to /dev/sda, c1vg-vol02-lun-0 to /dev/sdb and so on. After the next reboot, these mappings may change. We need to avoid that and instead have a consistent iSCSI target to disk device mapping each time the server starts. This is achieved using an Oracle Linux device mapping utility called udev.

Note, using Oracle’s ASM library driver (Task #4 Steps #1 & #2)  can also achieve the same thing udev does, i.e. a consistent mapping between iSCSI targets and disk devices.

Thus, configuring udev is, strictly speaking, unnecessary.

That said, you can use udev or ASMlib or both if you want to. This procedure uses both, just to demonstrate both ways of doing the same thing, one with Oracle’s help (ASMlib) and one without (udev).

Fortunately, each iSCSI target has a unique ID which remains consistent across reboots. So we need to find out what that is. Repeat the following command for /dev/sda through /dev/sdj, making a note of the output for each disk device:

[root@racnode1 ~]# scsi_id -g -u -d /dev/sda
14f504e46494c45524941587a31772d686f4f742d7650774a

Next, create a udev rules script called 99-oracle-iscsi.rules and place it in the /etc/udev/rules.d directory where udev can find it.

Note, the 99 signifies the order in which the script will run. Lower numbered scripts run first. The “oracle-iscsi” part is just our way of identifying the script as being related to Oracle. The “.rules” part makes it a rules script.

The rules script will contain 10 lines, one for each disk device. Each line will look like this:

KERNEL=="sd?1", BUS=="scsi", PROGRAM=="/sbin/scsi_id -g -u -d /dev/$parent",
RESULT=="14f504e46494c45524941587a31772d686f4f742d7650774a", NAME="iscsi/asm-disk01", 
OWNER="root", GROUP="disk", MODE="0660"

Only two entries need to be changed for each disk device. The RESULT parameter needs to be set to the ID output by the scsi_id command for each disk device. The NAME parameter needs to be set to the naming convention you wish to follow. In the above example, I’m using iscsi/asm-disk01 for /dev/sda. The NAME parameter for /dev/sdb will therefore be, iscsi/asm-disk02 and so on.

Once the file is saved, it should have this ownership and permissions:

[root@racnode1 rules.d]# pwd
/etc/udev/rules.d

[root@racnode1 rules.d]# ls -l | grep oracle
-rw-r--r-- 1 root root 2030 Dec 16 17:06 99-oracle-iscsi.rules

To test the udev rules script, run this command for each disk device (/block/sda/sda1 through /block/sdj/sdj1):

[root@racnode1 ~]# udevadm test /block/sda/sda1

Then check the /dev/iscsi directory and the persistent iscsi disk devices should be listed:

[root@racnode1 iscsi]# pwd
/dev/iscsi

[root@racnode1 iscsi]# ls -l
brw-rw---- 1 root disk 8,   1 Dec 16 17:12 asm-disk01
brw-rw---- 1 root disk 8,  17 Dec 16 17:16 asm-disk02
brw-rw---- 1 root disk 8,  33 Dec 16 17:19 asm-disk03
brw-rw---- 1 root disk 8,  49 Dec 16 17:20 asm-disk04
brw-rw---- 1 root disk 8,  65 Dec 16 17:20 asm-disk05
brw-rw---- 1 root disk 8,  81 Dec 16 17:20 asm-disk06
brw-rw---- 1 root disk 8,  97 Dec 16 17:20 asm-disk07
brw-rw---- 1 root disk 8, 113 Dec 16 17:21 asm-disk08
brw-rw---- 1 root disk 8, 129 Dec 16 17:21 asm-disk09
brw-rw---- 1 root disk 8, 145 Dec 16 17:21 asm-disk10

Repeat this step for ALL nodes in the cluster.

Now reboot ALL nodes.

Task #4: Configure Oracle ASMlib.

Only a couple of steps to follow here to configure ASMLib.

Task #4a: Configure Oracle ASM library driver (ALL nodes).

Verify the oracleasm packages are installed:

[root@racnode1 scripts]# rpm -qa | grep oracleasm
oracleasmlib-2.0.12-1.el6.x86_64
oracleasm-support-2.1.8-1.el6.x86_64

Then, as the root user, run these commands:

[root@racnode1 ~]# oracleasm configure -i
Configuring the Oracle ASM library driver.
This will configure the on-boot properties of the Oracle ASM library
driver. The following questions will determine whether the driver is
loaded on boot and what permissions it will have. The current values
will be shown in brackets ('[]'). Hitting <ENTER> without typing an
answer will keep that current value. Ctrl-C will abort.

Default user to own the driver interface []: grid
Default group to own the driver interface []: asmadmin
Start Oracle ASM library driver on boot (y/n) [n]: y
Scan for Oracle ASM disks on boot (y/n) [y]: y

Writing Oracle ASM library driver configuration: done

[root@racnode1 ~]# oracleasm init
Creating /dev/oracleasm mount point: /dev/oracleasm
Loading module "oracleasm": oracleasm
Configuring "oracleasm" to use device physical block size
Mounting ASMlib driver filesystem: /dev/oracleasm

Repeat this step for ALL nodes in the cluster.

Task #4b: Create ASM disks (ONE node only).

Using the oracleasm createdisk command, create an ASM disk for each iSCSI device created in Task #3 Step #6 (/dev/iscsi/asm-disk01 through /dev/iscsi/asm-disk10):

[root@racnode1 disks]# oracleasm createdisk ASMDISK01 /dev/iscsi/asm-disk01
Writing disk header: done
Instantiating disk: done

Note, if you chose not to use udev, then the command to create an ASM disk using a block device would be:

[root@racnode1 disks]# oracleasm createdisk ASMDISK01 /dev/sda1

Note, the remnants of ASM disk headers can be left behind even when a drive has been re-partitioned. This can prevent the new ASM disk from being instantiated. You will see this when that happens:

[root@racnode1 disks]# oracleasm createdisk ASMDISK01 /dev/iscsi/asm-disk01
Device "/dev/iscsi/asm-disk01" is already labeled for ASM disk "ASMDISK01"

If you see this, you need to destroy the old disk header. A simple way to do that is documented here. Once the header is wiped, the oracleasm createdisk command can create a new one. Once all the ASM disks have been created, they can be listed using this command:

[root@racnode1 disks]# oracleasm listdisks
ASMDISK01
ASMDISK02
ASMDISK03
ASMDISK04
ASMDISK05
ASMDISK06
ASMDISK07
ASMDISK08
ASMDISK09
ASMDISK10

They can also be seen at the OS level.

Note, the user and group ownership is grid:asmadmin:

[root@racnode1 disks]# pwd
/dev/oracleasm/disks

[root@racnode1 disks]# ls -l
brw-rw---- 1 grid asmadmin 8,   1 Dec 16 18:31 ASMDISK01
brw-rw---- 1 grid asmadmin 8,  17 Dec 16 18:23 ASMDISK02
brw-rw---- 1 grid asmadmin 8,  33 Dec 16 18:23 ASMDISK03
brw-rw---- 1 grid asmadmin 8,  49 Dec 16 18:23 ASMDISK04
brw-rw---- 1 grid asmadmin 8,  65 Dec 16 18:24 ASMDISK05
brw-rw---- 1 grid asmadmin 8,  81 Dec 16 18:26 ASMDISK06
brw-rw---- 1 grid asmadmin 8,  97 Dec 16 18:26 ASMDISK07
brw-rw---- 1 grid asmadmin 8, 113 Dec 16 18:26 ASMDISK08
brw-rw---- 1 grid asmadmin 8, 129 Dec 16 18:26 ASMDISK09
brw-rw---- 1 grid asmadmin 8, 145 Dec 16 18:26 ASMDISK10

Note, you can determine the mapping between the ASM disks and the block devices by examining the major and minor device numbers. For example, the major number of ASMDISK01 is 8 and its minor number is 1. Similarly, the major number for ASMDISK02 is also 8 and its minor number is 17. Compare the major and minor numbers with a directory listing of the block devices:

[root@racnode1 disks]# ls -l /dev/sd*1
brw-rw---- 1 root disk 8,   1 Jan 26 13:55 /dev/sda1
brw-rw---- 1 root disk 8,  17 Jan 26 13:55 /dev/sdb1
brw-rw---- 1 root disk 8,  33 Jan 26 13:55 /dev/sdc1
brw-rw---- 1 root disk 8,  49 Jan 26 13:55 /dev/sdd1
brw-rw---- 1 root disk 8,  65 Jan 26 13:55 /dev/sde1
brw-rw---- 1 root disk 8,  81 Jan 26 13:55 /dev/sdf1
brw-rw---- 1 root disk 8,  97 Jan 26 13:55 /dev/sdg1
brw-rw---- 1 root disk 8, 113 Jan 26 13:55 /dev/sdh1
brw-rw---- 1 root disk 8, 129 Jan 31 14:05 /dev/sdi1
brw-rw---- 1 root disk 8, 145 Jan 26 13:55 /dev/sdj1

So we can see that ASMDISK01 maps to /dev/sda1, ASMDISK02 maps to /dev/sdb1 and so on.

The other node will not see the ASM disks immediately. Use this command to instantiate the disks on racnode2:

[root@racnode2 ~]# oracleasm scandisks
Reloading disk partitions: done
Cleaning any stale ASM disks...
Scanning system for ASM disks...
Instantiating disk "ASMDISK08"
Instantiating disk "ASMDISK10"
Instantiating disk "ASMDISK05"
Instantiating disk "ASMDISK09"
Instantiating disk "ASMDISK07"
Instantiating disk "ASMDISK01"
Instantiating disk "ASMDISK04"
Instantiating disk "ASMDISK02"
Instantiating disk "ASMDISK03"
Instantiating disk "ASMDISK06"

Note, for Oracle Database 12c there is a new mechanism called the ASM Filter Driver. Obviously we haven’t used that here. Maybe when we re-visit this section in the future we can migrate to using that.

So there you have it. Shared storage configured and ready to go. Everything is now in place for a successful install of the Grid Infrastructure and database software. See you in Part 10 for that.

If you have any comments or questions about this post, please use the Contact form here.

Build Your Own Oracle Infrastructure: Part 8 – SSH, DNS & CVU.

2

It’s acronym time boys and girls! Before we get to the fun part of configuring the shared storage in Part 9, we need setup a few more slightly less fun items.

Secure Shell or SSH and Domain Name System or DNS.

After that we take the thrill ride of running the Cluster Verification Utility or CVU for the first time. This stuff is pretty simple, so let’s crack on.

Quick links to all the tasks:

Task #1: Setup SSH.

The RAC node from where you install the Grid Infrastructure and Oracle Database software effectively becomes the node from which you perform ALL subsequent installs. Hence, the software only needs to reside on that one server and is copied from that server to all the other nodes in the cluster as part of the installation process. Consequently, this node needs remote access to the same user account on all the other nodes without being prompted for a password.

User equivalency is effectively the setup of identical user accounts on all nodes. Identical means the same username, UID, GIDs and password. The accounts which require user equivalency are oracle and grid.

The installation of the Grid Infrastructure and database software can setup SSH for you, but you’ll need SSH configured before you get to that stage in order for the CVU to weave its magic on remote nodes. That’s why we’re setting it up ahead of the software installs. There are 8 steps in total.

Task #1a: Login as oracle and create an ssh directory (all nodes).

[root@racnode1 ~]# su - oracle
[oracle@racnode1 ~]$ pwd
/home/oracle

[oracle@racnode1 ~]$ mkdir .ssh
[oracle@racnode1 ~]$ chmod 700 .ssh

[oracle@racnode1 ~]$ ls -la | grep ssh 
drwx------ 2 oracle oinstall 4096 Dec 13 15:41 .ssh  

*** Repeat for all nodes in the cluster. ***

Task #1b: Generate RSA Keys (all nodes).

[oracle@racnode1 ~]$ ssh-keygen -t rsa
Generating public/private rsa key pair.
Enter file in which to save the key (/home/oracle/.ssh/id_rsa):
Enter passphrase (empty for no passphrase): <just press the Enter key>
Enter same passphrase again: <just press the Enter key>
Your identification has been saved in /home/oracle/.ssh/id_rsa.
Your public key has been saved in /home/oracle/.ssh/id_rsa.pub.
The key fingerprint is:
3a:46:e5:58:c8:c1:f9:de:63:4f:d7:e4:29:d9:aa:b7 oracle@racnode1.mynet.com
The key's randomart image is:
<snipped>

*** Repeat for all nodes in the cluster. ***

Task #1c: Generate DSA Keys (all nodes).

[oracle@racnode1 ~]$ ssh-keygen -t dsa
Generating public/private dsa key pair.
Enter file in which to save the key (/home/oracle/.ssh/id_dsa):
Enter passphrase (empty for no passphrase): <just press the Enter key>
Enter same passphrase again: <just press the Enter key>
Your identification has been saved in /home/oracle/.ssh/id_dsa.
Your public key has been saved in /home/oracle/.ssh/id_dsa.pub.
The key fingerprint is:
32:40:a2:1f:e6:85:23:2f:80:e6:a0:15:9f:5e:01:9e oracle@racnode1.mynet.com
The key's randomart image is:
<snipped>

*** Repeat for all nodes in the cluster. ***

Task #1d: Create the authorized_keys file (all nodes).

[oracle@racnode1 ~]$ touch ~/.ssh/authorized_keys

[oracle@racnode1 ~]$ ls -l .ssh 
-rw-r--r-- 1 oracle oinstall    0 Dec 13 15:55  authorized_keys 
-rw------- 1 oracle oinstall  668 Dec 13 15:47 id_dsa  
-rw-r--r-- 1 oracle oinstall  617 Dec 13 15:47 id_dsa.pub 
-rw------- 1  oracle oinstall 1675 Dec 13 15:46 id_rsa 
-rw-r--r-- 1 oracle oinstall   409 Dec 13 15:46 id_rsa.pub  

*** Repeat for all nodes in the cluster. ***

Task #1e: Capture Key Fingerprints to the authorized_keys file (first node).

First, ssh into the node you’re logged into and capture the output to authorized_keys.

[oracle@racnode1 ~]$ cd .ssh

[oracle@racnode1 .ssh]$ ssh racnode1 cat /home/oracle/.ssh/id_rsa.pub >> authorized_keys  
The authenticity of host 'racnode1 (200.200.10.11)' can't be  established. 
RSA key fingerprint is  35:a5:78:68:36:c3:c2:42:f5:df:da:5f:2c:56:2b:a7. 
Are you sure you want  to continue connecting (yes/no)? yes 
Warning: Permanently added 'racnode1,200.200.10.11' (RSA) to the list of known hosts. 
oracle@racnode1's password: <enter the oracle password>

[oracle@racnode1 .ssh]$ ssh racnode1 cat /home/oracle/.ssh/id_dsa.pub >> authorized_keys 

*** Repeat these steps by using ssh to connect to every other node in the cluster, again capturing the output into authorized_keys. ***

Task #1f: Copy the authorized_keys file to every node.

The authorized_keys file on the first node now contains all the data which all the other nodes need. Use scp to copy it to the other nodes.

[oracle@racnode1 .ssh]$ scp authorized_keys racnode2:/home/oracle/.ssh
oracle@racnode2's password: <enter the oracle password>
authorized_keys                          100% 2052     2.0KB/s   00:00

*** Repeat the scp to each node in the cluster. ***

Task #1g: Secure the authorized_keys file (all nodes).

[oracle@racnode1 .ssh]$ chmod 600 authorized_keys

*** Repeat for all nodes in the cluster. ***

Task #1h: Test passwordless connectivity both ways between all nodes.

[oracle@racnode1 .ssh]$ ssh racnode2 date
Sun Dec 13 16:30:13 CST 2015
[oracle@racnode2 .ssh]$ ssh racnode1 date
The authenticity of host 'racnode1 (200.200.10.11)' can't be established.
RSA key fingerprint is 35:a5:78:68:36:c3:c2:42:f5:df:da:5f:2c:56:2b:a7.
Are you sure you want to continue connecting (yes/no)? yes
Warning: Permanently added 'racnode1,200.200.10.11' (RSA) to the list of known hosts.
Sun Dec 13 16:30:32 CST 2015

[oracle@racnode2 .ssh]$ ssh racnode1 date
Sun Dec 13 16:30:35 CST 2015

Once you have SSH setup (also known as “user equivalency”) for the oracle user, repeat the same 8 steps for the grid user.

Task #2: Configure DNS.

For the most part you can get away with using /etc/hosts files to resolve hostnames. However, with the introduction of Single Client Access Name (SCAN) in Oracle Database 11g Release 2, things got a little more complicated. A cluster SCAN must now resolve to 3 IP addresses, so a /etc/hosts files won’t help.

There is a ‘smoke and mirrors’ way to get a tweaked nslookup script to return 3 IP addresses, but why not just configure DNS properly? In a production environment, there would already be a dedicated DNS server, but in our environment using a whole VM just for DNS would be excessive to say the least. The smart way to go would be to use a server that’s used for something else and is always on. Top of the list is our Oracle Enterprise Manager Cloud Control server, oraemcc.mynet.com (IP: 200.200.10.16). It won’t mind and DNS won’t interfere with its other duties.

Whenever I’ve asked a production Network Administrator to set this up for me, I’ve sometimes (not always) got the eye roll and look of exasperation. Like I’m asking them to split the atom or something. In truth, setting up DNS isn’t that difficult, but it is fiddly. One semi colon, bracket or period out of place and the whole thing doesn’t work and more infuriatingly, won’t tell you why. So, with your keenest eye on the prize, let’s configure DNS using these 7 steps.

Task #2a: Install the bind package.

DNS functionality is provided by installing the bind package. This can be done using yum:

[root@oraemcc ~]# yum install bind-libs bind bind-utils

Task #2b: Edit /etc/named.conf.

The installation of bind will create the file /etc/named.conf. It will contain multiple lines, most of which you will not need to edit. Before you start to edit this file, take a copy of it in case you need to start over. You will also need to have several pieces of information to hand to correctly edit this and subsequent files. They are:

Information Value
Hostname of your DNS Server oraemcc.mynet.com
IP Address of your DNS Server 200.200.10.16
IP Address of your ISP’s DNS Servers 8.8.8.8 & 8.8.4.4
Internal network domain name mynet.com

The items which need to be edited are shown in red in this example /etc/named.conf file. Copy this file to your own system and make any necessary changes. When you edit your file be VERY CAREFUL with the double quotes and periods. Missing something seemingly so innocent will make you wish you hadn’t. Three important points about this file.

  1. The forwarders line is there so server names which are not on your internal network can still be resolved. These servers would likely be on the internet, so your ISP’s DNS servers handle those lookups instead.
  2. The zone “10.200.200.in-addr.arpa.” line is there to facilitate reverse lookups. The 10.200.200 part describes the first three octets of the IP address your DNS server is on, but in reverse order. Our DNS server has the IP address 200.200.10.16, hence 10.200.200.
  3. The ownership and file permissions are crucial. Get these wrong and DNS won’t startup.
[root@oraemcc ~]# ls -l /etc/named.conf
-rw-r----- 1 root named 1114 Aug 19 17:15 /etc/named.conf

Notice the file is owned by root, with named as the group. The file permissions are 640. If your file does not match this, then run these commands:

[root@oraemcc ~]# chgrp named /etc/named.conf
[root@orasemcc ~]# chmod 640 /etc/named.conf

Task #2c: Create /var/named/mynet.com.zone file.

The next step is to create your /var/named/mynet.com.zone file which will resolve hostnames on your domain, mynet.com.

The items which need to be edited are shown in red in this example /var/named/mynet.com.zone file. Copy this file to your own system and make any necessary changes. Ensure this file has the correct group ownership and file permissions:

[root@oraemcc ~]# chgrp named /var/named/mynet.com.zone
[root@oraemcc ~]# chmod 640 /var/named/mynet.com.zone

[root@oraemcc ~]# ls -l /var/named/mynet.com.zone
-rw-r----- 1 root named 1133 Dec 21 12:44 /var/named/mynet.com.zone

Task #2d: Create /var/named/10.200.200.in-addr.arpa file.

This step creates the /var/named/10.200.200.in-addr.arpa file which does reverse lookups for addresses on the 200.200.10.x network. It’s not strictly necessary to implement reverse lookups, but since we’re in the neighborhood we may as well.

The items which need to be edited are shown in red in this example /var/named/10.200.200.in-addr.arpa file. Copy this file to your own system and make any necessary changes. Again, ensure the file has the correct group and file permissions.

[root@oraemcc ~]# chgrp named /var/named/10.200.200.in-addr.arpa
[root@oraemcc ~]# chmod 640 /var/named/10.200.200.in-addr.arpa

[root@oraemcc ~]# ls -l /var/named/10.200.200.in-addr.arpa 
-rw-r----- 1 root  named  916 Dec 21 12:26 10.200.200.in-addr.arpa  

Task #2e: Edit /etc/resolv.conf.

Create or edit a /etc/resolv.conf file on each server which will use your DNS setup. These are the only lines which should be in this file:

search mynet.com
nameserver 200.200.10.16

It is important that is file be identical across all the RAC server nodes as it’s one of the things the CVU checks for. This is the file which Network Manager trashes each time networking starts up on a server. So it’s important that this file remain intact and consistent.

Task #2f: Start the DNS service.

[root@oraemcc ~]# service named start
Starting named:                                            [  OK  ]

Checking the status of DNS generates some interesting output:

[root@oraemcc ~]# service named status
version: 9.8.2rc1-RedHat-9.8.2-0.37.rc1.el6_7.5
CPUs found: 2
worker threads: 2
number of zones: 21
debug level: 0
xfers running: 0
xfers deferred: 0
soa queries in progress: 0
query logging is OFF
recursive clients: 0/0/1000
tcp clients: 0/100
server is up and running
named (pid  9931) is running...

Task #2g: Test DNS is working.

We have configured DNS and have started the service, so now’s the time to make sure it actually works.

First, test a hostname lookup:

[root@racnode1 ~]# nslookup racnode2
Server:         200.200.10.16
Address:        200.200.10.16#53

Name:   racnode2.mynet.com
Address: 200.200.10.12

Next, test the lookup of the cluster SCAN:

[root@racnode1 ~]# nslookup cluster1-scan
Server:        200.200.10.16
Address:       200.200.10.16#53

Name:   cluster1-scan.mynet.com
Address: 200.200.10.122
Name:   cluster1-scan.mynet.com
Address: 200.200.10.120
Name:   cluster1-scan.mynet.com
Address: 200.200.10.121

Finally, test a reverse lookup on an IP address:

[root@racnode1 ~]# nslookup 200.200.10.120
Server:        200.200.10.16
Address:       200.200.10.16#53
120.10.200.200.in-addr.arpa     name = cluster1-scan.mynet.com.

Bingo! It works! ?

Task #3: Run the CVU.

The Cluster Verification Utility (CVU) script, runcluvfy.sh, is included with the 12c Grid Infrastructure software. You should have already downloaded and unzipped these files. If not, refer to this prior step.

Login to racnode1 as the grid user, locate the CVU script, then run the script with the parameters shown:

[grid@racnode1 ~]$ cd ./media/gi_12102/grid
[grid@racnode1 grid]$ ./runcluvfy.sh stage -pre crsinst -n racnode1,racnode2 -verbose 2>&1|tee cvu.out

This will run the CVU, echo its output to the screen and copy the output to a file called cvu.out.

The vast majority of the checks passed. Therefore, it only really makes sense to highlight the three which failed and more importantly what to do about them.

Failure #1: IPv6 Addressing.

The first error has to do with IPv6 addressing. Since we’re not using IPv6 (one day perhaps), we could ignore this error. However, IPv6 interface information will come up in the Grid Infrastructure installation which only serves to confuse matters. I therefore prefer to remove the IPv6 references. These are the errors:

Check: TCP connectivity of subnet "2002:4b49:1933::"

Source                          Destination                     Connected?
------------------------------ ------------------------------ ----------------
racnode1 : 2002:4b49:1933:0:221:f6ff:fe04:4298 racnode1 : 2002:4b49:1933:0:221:f6ff:fe04:4298 passed
racnode2 : 2002:4b49:1933:0:221:f6ff:fed2:45a0 racnode1 : 2002:4b49:1933:0:221:f6ff:fe04:4298 failed 
ERROR:
PRVG-11850 : The system call "connect" failed with error "13" while executing exectask on node 
"racnode2" Permission denied
racnode1 : 2002:4b49:1933:0:221:f6ff:fe04:4298 racnode2 : 2002:4b49:1933:0:221:f6ff:fed2:45a0 failed
ERROR:
PRVG-11850 : The system call "connect" failed with error "13" while executing exectask on node 
"racnode1" Permission denied
racnode2 : 2002:4b49:1933:0:221:f6ff:fed2:45a0 racnode2 : 2002:4b49:1933:0:221:f6ff:fed2:45a0 passed
Result: TCP connectivity check failed for subnet "2002:4b49:1933::"

You can confirm the presence of IPv6 addressing by checking the output of the ifconfig command. For example:

[root@racnode1 ~]# ifconfig eth0
eth0     Link encap:Ethernet HWaddr 00:21:F6:04:42:98
         inet addr:200.200.10.11 Bcast:200.200.10.255 Mask:255.255.255.0
         inet6 addr: fe80::221:f6ff:fe04:4298/64 Scope:Link
         inet6 addr: 2002:4b49:1933:0:221:f6ff:fe04:4298/64 Scope:Global
         UP BROADCAST RUNNING MULTICAST MTU:1500 Metric:1
         RX packets:529808 errors:0 dropped:46361 overruns:0 frame:0
         TX packets:43797 errors:0 dropped:0 overruns:0 carrier:0
         collisions:0 txqueuelen:1000
         RX bytes:79241367 (75.5 MiB) TX bytes:18208947 (17.3 MiB)

The clues are the lines beginning with “inet6”. To disable IPv6 across the board, add the following line to the /etc/sysctl.conf file:

[root@racnode1 ~]# vi /etc/sysctl.conf

# disable IPv6 support on all network interfaces:
net.ipv6.conf.all.disable_ipv6 = 1

If you only wanted to disable IPv6 support for a specific interface, for example eth0, then the entry in /etc/sysctl.conf would look like this:

# disable IPv6 support on the eth0 network interfaces:
net.ipv6.conf.eth0.disable_ipv6 = 1

To have this change take effect, either reboot or run this command:

[root@racnode1 ~]# sysctl -p /etc/sysctl.conf

To confirm the change has taken effect, re-run the ipconfig command:

[root@racnode1 ~]# ifconfig eth0
eth0     Link encap:Ethernet HWaddr 00:21:F6:04:42:98
         inet addr:200.200.10.11 Bcast:200.200.10.255 Mask:255.255.255.0
         UP BROADCAST RUNNING MULTICAST MTU:1500 Metric:1
         RX packets:6481 errors:0 dropped:456 overruns:0 frame:0
         TX packets:464 errors:0 dropped:0 overruns:0 carrier:0
         collisions:0 txqueuelen:1000
         RX bytes:1277621 (1.2 MiB) TX bytes:92893 (90.7 KiB)

Failure #2: Network Time Protocol (NTP).

The second failure reported in the CVU output had to do with Network Time Protocol (NTP). You will recall from the installation of Oracle Linux on racnode1, we chose not to synchronize the date and time over the network. That’s because I prefer to use Oracle’s Cluster Time Synchronization Service instead. These are the NTP errors reported by the CVU:

Starting Clock synchronization checks using Network Time Protocol(NTP)...
Checking existence of NTP configuration file "/etc/ntp.conf" across nodes
Node Name                             File exists?
------------------------------------ ------------------------
racnode2                             yes
racnode1                             yes

The NTP configuration file "/etc/ntp.conf" is available on all nodes
NTP configuration file "/etc/ntp.conf" existence check passed
No NTP Daemons or Services were found to be running
PRVF-5507 : NTP daemon or service is not running on any node but NTP 
configuration file exists on the following node(s):
racnode2,racnode1
Result: Clock synchronization check using Network Time Protocol(NTP) failed

When Grid Infrastructure is installed, it will detect if NTP is running. If it is, then Cluster Time Synchronization Service is started in “observer mode”. If NTP is not running, then Cluster Time Synchronization Service is started in “active mode” and that’s what we want. However, if NTP is down but the installer sees the NTP configuration file /etc/ntp.conf, then it assumes NTP will spontaneously start by itself and the world will end as we know it. To avoid that from happening, we need to ensure NTP is down, stays down and can’t find its configuration file. We do that by renaming it:

[root@racnode1 ~]# service ntpd status
ntpd is stopped

[root@racnode1 ~]# chkconfig ntpd off

[root@racnode1 ~]# mv /etc/ntp.conf /etc/ntp.conf.ORIG

Thus the world is saved. Hurrah! ☑

Failure #3: Insufficient Swap Space.

I originally built the racnodes with 4 GB of RAM, but things ran a bit slow so I upped the RAM to 6 GB. One of the great things about virtualization is the ability to add more resource to a VM through software. Assuming the resources are physically present and available.

Note, Oracle VM cannot over allocate physical server memory. You can only allocate what you physically have available in the Oracle VM Server.

Since I originally had 4 GB of RAM allocated, I also configured 4 GB of swap space. Increasing the amount of RAM means you should also increase the amount of swap space. Here’s the official Oracle sizing table:

RAM Swap Space
Between 1 GB & 2 GB 1.5x RAM
Between 2 GB & 16 GB Same size as RAM
Greater than 16 GB 16 GB

Here is what the CVU reported regarding memory and swap space:

Check: Total memory
Node Name     Available                 Required                 Status  
------------ ------------------------ ------------------------ ----------
racnode2     5.8369GB (6120432.0KB)   4GB (4194304.0KB)         passed  
racnode1     5.8369GB (6120432.0KB)   4GB (4194304.0KB)         passed  
Result: Total memory check passed

Check: Swap space
Node Name     Available                 Required                 Status  
------------ ------------------------ ------------------------ ----------
racnode2     4GB (4194300.0KB)         5.8369GB (6120432.0KB)   failed  
racnode1     4GB (4194300.0KB)         5.8369GB (6120432.0KB)   failed  
Result: Swap space check failed

There are a few ways to increase the amount of swap space on a Linux server. If you have sufficient free disk you can add an additional swap partition. If the current swap space is in a logical volume, you could potentially re-size it to increase the amount of swap space. The quickest and simplest way to increase the available swap space is to add a swap file. The commands to do that are here. Since this is a non-production system, swapping won’t be a problem so we can safely ignore this failure. If it were a production system, we’d obviously do the right thing….blame the Systems Administrator! ?

Well, that about wraps it up for SSH, DNS and CVU.

See you next time for all things shared storage in Part 9.

If you have any comments or questions about this post, please use the Contact form here.

Build Your Own Oracle Infrastructure: Part 7 – Build Oracle RAC Servers.

Now it’s time to start the process of building our first Oracle RAC system. 
To do that, we will need two Oracle Database 12c server nodes running Oracle Linux.
This installment shows how to build that rather efficiently using a cool capability of Oracle VM.

Quick links to all the tasks:

Task #1: Install Oracle Linux on RACNODE1_VM.

In Oracle VM Manager, click on the Servers and VMs tab, highlight RACNODE1_VM, then click on the green arrow head Start icon to start the VM:

This will start the Oracle Linux 6 installation because this VM has the V52218-01.iso file loaded in its virtual CD/DVD drive and that device is listed first in the Boot Order. With the Install or Upgrade and existing system option highlighted, press Enter:

Skip the media test:

Click Next:

Choose your language, then click Next:

Choose your keyboard layout, then click Next:

Choose Basic Storage Devices, then click Next:

Click the ‘Yes, discard any data’ button, then click Next:

Enter the hostname “racnode1.mynet.com”, then click Configure Network:

If you’re following this series, then you should be getting good at configuring the network settings. So just use these values to configure the 3 network interfaces:

Field eth0 (Public) eth1 (Storage) eth2 (Private)
IP Address 200.200.10.11 200.200.20.11 200.200.30.11
Netmask (auto-populates) 24 24 24
Gateway 200.200.10.1 200.200.20.1 N/A
Primary DNS 200.200.10.1 N/A N/A
Secondary DNS 8.8.8.8 N/A N/A

With the network configured, choose your timezone then click Next:

Choose a root password, then click Next:

Choose Use All Space, check Review and modify partitioning layout, then click Next:

Using the right pointing arrow key, move the Xen Virtual Block Device (40960 MB) over to the Install Target Devices pane, then click Next:

Edit the following screen using these values, then click Next:

Logical Volume Size (MB)
lv_root 34312
lv_swap 6144

Click Format:

Click Write changes to disk:

Check Install boot loader on /dev/xvdb. Select Oracle Linux Server 6 (Label) and /dev/mapper/vg_racnode1-lv_root (Device). Click Next:

Select Database Server and Customize now, then click Next:

Use the following to complete the next screen, then click Next:

Category Option
Base System Leave the default options
Servers Leave the default options
Web Services Leave the defaults options
Databases Uncheck everything
System Management Leave the default options
Virtualization Leave the default options
Desktops Check everything
Applications Check Internet Browser
Development Leave the default options
UEK3 kernel repo Leave the default options
Lanugages Leave the default options

The Oracle Linux installation will start installing 1249 packages:

Eventually the installation will complete and you’ll see a rather splendid congratulations screen. Do NOT click Reboot yet:

Go back to Oracle VM Manager. Click on the Servers and VMs tab, highlight RACNODE1_VM, then click on the pencil icon to edit RACNODE1_VM. Click on the Disks tab. Click on the Eject a CDROM icon:

This will remove the V52218-01.iso from the CD/DVD drive, so when you reboot the Oracle Linux installation won’t start over. Click OK. Then return to the ‘congratulations’ screen and click Reboot. You may need to close the console session and open a new one. When the system comes back up, you’ll see this ‘welcome’ screen. Click Forward:

Accept the License Agreement and click Forward:

Choose the option to register at a later time and click Forward:

Click the ‘No thanks’ button, then click Forward:

Rather annoyingly, the harassment continues. Ignore the scaremongering and click Forward:

Don’t create a user here. We’ll be doing that later. Click Forward:

Set the system date and time if necessary. Uncheck the option to synchronize date and time over the network. We’ll be using Oracle’s Cluster Time Synchronization Service later on. If the time is wrong, then it’ll be Oracle’s fault not NTP’s fault. See what I did there? 🙂 Click Forward:

Uncheck Enable kdump, then click Finish:

Click the Yes to agree to a reboot:

Click OK to start the system reboot:

When the system comes back up, you’ll see the familiar login screen:

That’s Oracle Linux 6.6 installed. Time to configure it for Oracle Database 12c RAC duties.

Task #2: Configure Oracle Linux on racnode1.

For reference, the official Oracle Database 12c Release 1 RAC installation guide can be found here.
Our installation has been simplified into the following 12 steps. That’s right, our very own 12 step programme. ?

Task #2a: Update Oracle Linux.

Let’s grab the latest and greatest packages and update the Linux kernel. To do that we need to run a yum update. To do that, we need to create a yum repository first. With the yum repository in place, run the update:

[root@racnode1 ~]# yum update

This will take a while. It will ask you to confirm progress in a couple of places, so don’t go to lunch or it’ll be waiting for you when you get back.

Note, this update will upgrade the version of Oracle Linux from 6.6 to 6.7.

Task #2b: Install the Oracle 12c Release 1 Pre-Installation Package.

This package makes a number of changes to Linux which aids in setting things up the way you want them. It’s actually on the Oracle Linux 6 DVD in /server/Packages and can be installed using this command:

[root@racnode1 Packages]# rpm -i oracle-rdbms-server-12cR1-preinstall-1.0-12.el6.x86_64.rpm

Alternatively, you could install it using yum with this command:

[root@racnode1 ~]# yum install oracle-rdbms-server-12cR1-preinstall.x86_64

Either way, check it’s installed using this:

[root@racnode1 ~]# rpm -qa | grep oracle-rdbms-server
oracle-rdbms-server-12cR1-preinstall-1.0-14.el6.x86_64

A number of changes are made to the /etc/password and /etc/group files. The UIDs and GIDs it creates may not be what you want. After you have installed the package, you can use this script to correct the setup and add the additional users and groups you’ll need later.

As a final post package installation step, add these entries to the /etc/security/limits.conf file:

####################################
# for oracle user
####################################
oracle   soft   nofile    8192
oracle   hard   nofile    65536
oracle   soft   nproc     2048
oracle   hard   nproc     16384
oracle   soft   stack     10240
oracle   hard   stack     32768
oracle   soft   core      unlimited
oracle   hard   core      unlimited
oracle   hard   memlock   5500631
####################################
# for grid user
####################################
grid    soft    nofile    8192
grid    hard    nofile    65536
grid    soft    nproc     2048
grid    hard    nproc     16384
grid    soft    stack     10240
grid    hard    stack     32768
grid    soft    core      unlimited
grid    hard    core      unlimited

Now that the oracle and grid users exist, change their passwords.

Task #2c: Edit User Profiles.

Add this line to the .bash_profile for both oracle and grid:

umask 022

This next change is a personal preference thing, but I always unalias the ls and vi commands. I don’t need vim in my life and I find the different colors for different types of file completely unnecessary. Sanity can be returned to your default bash shell by adding the following lines to the .bash_profile for both oracle and grid:

unalias ls
unalias vi

Task #2d: Disable SELinux.

SELinux can cause havoc when trying to instantiate ASM disks and it needs to be disabled. Instructions for doing so can be found here.

Task #2e: Disable the Linux Firewall.

Generally speaking, firewalls are a good thing.

In a production environment, you’d want to work with your Network Administrator and have them open up the ports necessary for everything to work.

However, in our environment we can trust that we won’t hack ourselves and we’ll go ahead and disable the Linux firewall.

Task #2f: Disable Network Manager.

Network Manager has an annoying habit of jumping all over your /etc/resolv.conf file. Thus destroying your neatly crafted configuration. You need to disable Network Manager to prevent this from happening.

Task #2g: Install the iSCSI Initiator.

This can be selected as an installation option or you can add it now using this yum command:

[root@racnode1 ~]# yum install iscsi-initiator-utils

[root@racnode1 ~]# rpm -qa | grep iscsi
iscsi-initiator-utils-6.2.0.873-14.0.1.el6.x86_64

Task #2h: Install ASM Support.

Installing ASM support is done in two stages. First, install the ASMLib package referenced here. Second, use yum to install ASM Support:

[root@racnode1 ~]# rpm -i oracleasmlib-2.0.12-1.el6.x86_64.rpm
[root@racnode1 ~]# yum install oracleasm-support

[root@racnode1 ~]# rpm -qa | grep oracleasm
oracleasmlib-2.0.12-1.el6.x86_64
oracleasm-support-2.1.8-1.el6.x86_64

Task #2i: Install cvuqdisk.

Installing cvuqdisk will enable the Cluster Verification Utility to detect shared storage. Allegedly. It’s included in the 12c Grid Infrastructure downloads referenced here.

You’ll need to copy the two Grid Infrastructure zip files to racnode1. FileZilla does the job. I located these files within the home directory of the grid user:

[root@racnode1 ~]# cd ~grid/media/gi_12102

[root@racnode1 gi_12102]# ls -l
drwxr-xr-x 7 grid oinstall       4096 Dec 16 22:10 grid
-rw-r--r-- 1 grid oinstall 1747043545 Dec 12 15:33 linuxamd64_12102_grid_1of2.zip
-rw-r--r-- 1 grid oinstall  646972897 Dec 12 15:32 linuxamd64_12102_grid_2of2.zip

Unzipping these files created the grid directory. Within the grid directory is an rpm directory and that’s where you’ll find the cvuqdisk rpm:

[root@racnode1 gi_12102]# cd grid/rpm

[root@racnode1 rpm]# ls -l
-rwxr-xr-x 1 grid oinstall 8976 Jun 30  2014 cvuqdisk-1.0.9-1.rpm

Install the rpm using these commands:

[root@racnode1 rpm]# CVUQDISK_GRP=oinstall; export CVUQDISK_GRP

[root@racnode1 rpm]# rpm -iv cvuqdisk-1.0.9-1.rpm
Preparing packages for installation...
cvuqdisk-1.0.9-1

Task #2j: Build the /u01 file system.

RACNODE1_VM had 2 virtual disks allocated to it. The /dev/xvdb disk was used for the installation of Oracle Linux. The /dev/xvdc disk will be used to build the /u01 file system. That’s where all the Oracle software will be installed. The following series of commands will partition the /dev/xvdc disk, build and mount the /u01 file system:

[root@racnode1 ~]# fdisk /dev/xvdc

WARNING: DOS-compatible mode is deprecated. It's strongly recommended to
         switch off the mode (command 'c') and change display units to
         sectors (command 'u').

Command (m for help): n
Command action
   e   extended
   p   primary partition (1-4)
p

Partition number (1-4): 1
First cylinder (1-3916, default 1):
Using default value 1
Last cylinder, +cylinders or +size{K,M,G} (1-3916, default 3916):
Using default value 3916

Command (m for help): w
The partition table has been altered!
Calling ioctl() to re-read partition table.
Syncing disks.

[root@racnode1 ~]# mkfs -t ext4 -m 0 /dev/xvdc1

[root@racnode1 ~]# cd /
[root@racnode1 /]# mkdir /u01
[root@racnode1 /]# mount /dev/xvdc1 /u01

[root@racnode1 /]# df -h
Filesystem            Size  Used  Avail  Use% Mounted on
/dev/mapper/vg_racnode1-lv_root
                       35G   11G    23G   31% /

tmpfs                 2.0G   72K   2.0G    1% /dev/shm
/dev/xvdb1            477M  132M   316M   30% /boot
/dev/xvdc1             30G   44M    30G    1% /u01

Finally, edit the /etc/fstab file so the /u01 file system will be mounted each time the system restarts:

[root@racnode1 ~]# vi /etc/fstab

Add this line:

/dev/xvdc1              /u01                    ext4    defaults        0 0

Task #2k: Add Oracle software directories.

Now the /u01 file system is mounted, we can create the directories we’ll use to install the 12c Grid Infrastructure and Oracle Database 12c software:

[root@racnode1 ~]# mkdir -p /u01/app/12.1.0/grid
[root@racnode1 ~]# mkdir -p /u01/app/grid
[root@racnode1 ~]# mkdir -p /u01/app/oracle
[root@racnode1 ~]# chown -R grid:oinstall /u01
[root@racnode1 ~]# chown oracle:oinstall /u01/app/oracle
[root@racnode1 ~]# chmod -R 775 /u01/

Task #2l: Edit the /etc/hosts file.

Although we will be using DNS to resolve most things within our various networks, it’s very helpful to have all the addressing documented in each RAC node’s /etc/hosts file. All the entries required for every server’s /etc/hosts file can be found here.

Task #3: Clone RACNODE1_VM.

Now that we have the racnode1 server fully configured, we need a second server configured in a similar way. The hard way would be to create another VM then repeat all the steps up to this point to configure a second server. The easy way would be to clone RACNODE1_VM. Let’s go that route!

In Oracle VM Manager, click on the Servers and VMs tab, highlight RACNODE1_VM, then click the Stop icon (the red square). This will shutdown racnode1 and stop the VM.

Highlight RACNODE1_VM, right click then select the Clone or Move option:

Select Create a clone of this VM, then click Next:

Use the following values to complete the next screen, then click OK:

Field Value
Clone to a Virtual Machine
Clone Count 4
Name Index 2
Clone Name RACNODE_VM
Target Server Pool ServerPool1

This has the effect of creating 4 more VMs starting with RACNODE_VM.2 and ending with RACNODE_VM.5, all identical to RACNODE1_VM:

Note, the screen shows a 4096 MB memory allocation. This was increased to 6144 MB on a subsequent re-build Click here for further details.

Highlight RACNODE_VM.2 and click the pencil icon to edit the VM. Change the Name to RACNODE2_VM:

Click the Disks tab and change the names of the 2 virtual disks to RACNODE2_OS and RACNODE2_u01, then click OK:

Click the arrow head to the left of RACNODE2_VM to display its properties:

Task #4: Modify racnode2.

At this point, it’s time to start the VMs. In Oracle VM Manager, click on the Servers and VMs tab, highlight RACNODE1_VM, then click on the green arrow head Start icon to start the VM. Once RACNODE1_VM is up and running, repeat this procedure to start RACNODE2_VM. Connect to the console of RACNODE2_VM by clicking on the Launch Console icon.

Note, you may run into problems starting VMs. Click here for potential solutions/workarounds if you see an error similar to this:

Error: Device 1 (vif) could not be connected. Hotplug scripts not working

After RACNODE2_VM has started up, the first thing you’ll notice is the login screen announces you’re looking at racnode1.mynet.com. RACNODE2_VM is an identical clone of RACNODE1_VM, so it’s hardly surprising the server running inside RACNODE2_VM thinks it’s racnode1. Fortunately this is easy to fix by following the next couple of steps.

Task #4a: Fix the networking.

When cloning RACNODE1_VM, Oracle VM Manager was smart enough to allocate 3 new MAC addresses to the 3 vNICs allocated to each clone. However, the NIC configuration files in Linux don’t know that and will have to be edited manually.

Login to the ‘fake’ racnode1 and locate the NIC configuration files:

[root@racnode1 ~]# cd /etc/sysconfig/network-scripts

[root@racnode1 network-scripts]# ls -l ifcfg-eth*
-rw-r--r--. 3 root root 320 Dec 11 17:36 ifcfg-eth0
-rw-r--r--  3 root root 269 Dec 13 16:13 ifcfg-eth1
-rw-r--r--  3 root root 248 Dec 13 16:13 ifcfg-eth2
  • ifcfg-eth0 is the configuration file for the public network interface.
  • ifcfg-eth1 is the configuration file for the storage network interface.
  • ifcfg-eth2 is the configuration file for the private interconnect network interface.

Each file contains the exact same entries as the equivalent file on the real racnode1. Some of these parameters are consistent across all the servers (e.g. gateways and DNS) and some are specific to an individual server. We need to change the ones which are specific to an individual server. Those parameters are UUID, IPADDR and HWADDR.

The UUID is a Universal Unique IDentifier. It’s a number that Linux gives to each NIC. The entry in the ifcfg-eth* files looks like this:

UUID=eaba99ea-c88e-4cf2-b990-bee55e752e91

To get a new UUID, use this command:

[root@racnode1 ~]# uuidgen eth0

Substitute eth0 for eth1 and eth2 to generate new UUIDs for those interfaces. Once you have 3 new UUIDs, one for each NIC, update the UUID entry in the ifcfg-eth* files.

The IPADDR is the IP address assigned to a given NIC. The entry in the ifcfg-eth* files looks like this:

IPADDR=200.200.10.11

You can get the correct IP addresses for racnode2’s eth0, eth1 and eth2 interfaces from the /etc/hosts file. If clicking the link is too challenging, here’s the cheat sheet:

Server NIC IP Address
racnode2 eth0 200.200.10.12
racnode2 eth1 200.200.20.12
racnode2 eth2 200.200.30.12

Using these IP addresses, update the IPADDR entry in the ifcfg-eth* files.

The HWADDR is basically the MAC address which Oracle VM Manager allocates to the VM’s vNICs. You can see the MAC addresses allocated to RACNODE2_VM in a few different ways.

The vm.cfg contains the MAC addresses for each vNIC in eth0, eth1 and eth2 order. The location of the vm.cfg file is referenced here.

Alternatively, go back to this screen in Oracle VM Manager and click on the Networks tab:

Once again, the Ethernet Network name maps to vNICs like this:

Ethernet Network Linux NIC MAC Address
Management_Public eth0 00:21:F6:D2:45:A0
Shared_Storage_Public eth1 00:21:F6:E6:F6:71
GI_Interconnect_Private eth2 00:21:F6:2F:DE:C5

Using the MAC addresses you obtain from your environment, update the HWADDR entry in the ifcfg-eth* files.

To bring up the network interfaces using the updated and correct values for UUID, IPADDR and HWADDR, each interface must be stopped and re-started. Using eth0 as an example, stopping and re-starting the interface is done with these commands:

[root@racnode1 ~]# ifdown eth0
[root@racnode1 ~]# ifup eth0

Once all 3 interfaces have been re-started, you can view their status using this command:

[root@racnode1 ~]# ifconfig -a

Task #4b: Change the hostname.

The method for changing an Oracle Linux hostname is documented here.

Once the networking and hostname issues have been fixed, I strongly recommend a reboot. If the system comes back up with the correct name (racnode2.mynet.com) and the correct network configuration, you’re ready to move onto the dark arts discussed in Part 8 – SSH, DNS and CVU. See you there!

If you have any comments or questions about this post, please use the Contact form here.

Oracle Data Pump Parameters

Sometimes you just need a list of the Data Pump parameters in one place.
You’re welcome.

Quick links to the versions:

Oracle Database 12c Data Pump Export
Oracle Database 12c Data Pump Import

Oracle Database 12c Data Pump Export:

PARAMETER PARAMETER PARAMETER
ACCESS_METHOD EXCLUDE PARFILE
ATTACH FILESIZE QUERY
CLUSTER FLASHBACK_SCN REMAP_DATA
COMPRESSION FLASHBACK_TIME REUSE_DUMPFILES
COMPRESSION_ALGORITHM FULL SAMPLE
CONTENT HELP SCHEMAS
DATA_OPTIONS INCLUDE STATUS
DIRECTORY JOB_NAME TABLES
DUMPFILE KEEP_MASTER TABLESPACES
ENCRYPTION LOGFILE TRANSPORT_FULL_CHECK
ENCRYPTION_ALGORITHM LOGTIME TRANSPORT_TABLESPACES
ENCRYPTION_MODE METRICS TRANSPORTABLE
ENCRYPTION_PASSWORD NETWORK_LINK VERSION
ESTIMATE NOLOGFILE
ESTIMATE_ONLY PARALLEL

Oracle Database 12c Data Pump Import:

PARAMETER PARAMETER PARAMETER
ACCESS_METHOD KEEP_MASTER SCHEMAS
ATTACH LOGFILE SKIP_UNUSABLE_INDEXES
CLUSTER LOGTIME SQLFILE
CONTENT METRICS STATUS
DATA_OPTIONS NETWORK_LINK STREAMS_CONFIGURATION
DIRECTORY NOLOGFILE TABLE_EXISTS_ACTION
DUMPFILE PARALLEL TABLES
ENCRYPTION_PASSWORD PARFILE TABLESPACES
ESTIMATE PARTITION_OPTIONS TRANSFORM
EXCLUDE QUERY TRANSPORT_DATAFILES
FLASHBACK_SCN REMAP_DATA TRANSPORT_FULL_CHECK
FLASHBACK_TIME REMAP_DATAFILE TRANSPORT_TABLESPACES
FULL REMAP_SCHEMA TRANSPORTABLE
HELP REMAP_TABLE VERSION
INCLUDE REMAP_TABLESPACE VIEWS_AS_TABLES
JOB_NAME REUSE_DATAFILES

Build Your Own Oracle Infrastructure: Part 6 – Build OEM Cloud Control Server.

OEM-12c

Now that the basic building blocks of the Oracle Database infrastructure are in place, it’s time to start building out the servers themselves.

A management console helps enormously with the administration and maintenance of servers and that’s what we’re going to build first.

Although hardly the last word in ease of use, intuitive interface design or economical deployment, Oracle Enterprise Manager (OEM) Cloud Control is, nonetheless, the standard Oracle management interface. So that’s what we’re going to use.

OEM installation and configuration has got progressively more complicated over the years. However, there is a simple installation option available which will get us up and running. The steps to get us from here to a shiny new OEM Cloud Control login screen require that we complete these 6 tasks.

Quick links to all the tasks:

Task #1: Install Oracle Linux.

There are 4 steps to complete this task.

Task #1a: Start ORAEMCC_VM.

Log into OVM Manager and navigate to the list of VMs. Highlight ORAEMCC_VM by clicking on it, then click the green arrow head icon to start the VM. The CDROM is first in the VM’s Boot Order. It contains the Oracle Linux 6 ISO image, so starting the VM has the effect of booting from the ISO. Hence we can start the installation of Oracle Linux. The screen should look similar to this:

Once the VM’s status shows Running, click on the Launch Console icon.

Task #1b: Follow the Oracle Linux Installation Screens.

Press Enter to Install or Upgrade an existing system:

Skip the media test:

Click Next.

Choose your preferred language. Click Next.

Choose your preferred keyboard layout. Click Next.

Select Basic Storage Devices. Click Next. Note the warm and fuzzy we’re all in this together phrase, “If you’re not sure which option is right for you, this is probably it”. Ahhh. I wish this person would write more of Oracle’s documentation.

Click Yes, discard any data. Click Next.

Enter the hostname, oraemcc.mynet.com. Your screen should look similar to this:

Click Configure Network. Highlight System eth0, then click Edit.

Change the Connection name to just eth0 (i.e. remove the word “System” – it’s not needed). Check both boxes for Connect automatically and Available to all users. Click the IPv4 Settings tab.

Use these values to populate this screen:

Field Value
Method Manual
Address 200.200.10.16
Netmask 24 (this auto-populates)
Gateway 200.200.10.1
DNS servers 200.200.10.1,8.8.8.8,8.8.4.4

Your screen should look similar to this:

Click Apply. Click Close. Click Next. Choose your timezone. Click Next.

Choose a root password. Click Next.

Choose Use All Space. Check Review and modify partitioning layout. Click Next.

Using the right pointing arrow key, move the Xen Virtual Block Device (51200 MB) over to the Install Target Devices pane. Leave the two 30 GB disk devices where they are. We’ll use those later. Click Next.

Click to highlight the lv_root logical volume, then click Edit to reduce its size to 34312 MB. Click to highlight the lv_swap logical volume, then click Edit to increase its size to 16384 MB (16 GB). Click Next.

Click Format.

Click Write changes to disk.

Check Install boot loader on /dev/xvdb. Select Oracle Linux Server 6 (Label) and /dev/mapper/vg_oraemcc-lv_root (Device). Click Next.

Select Database Server and Customize now. Click Next.

Use the following to complete this next screen:

Category Option
Base System Leave the default options
Servers Leave the default options
Web Services Leave the defaults options
Databases Uncheck everything
System Management Leave the default options
Virtualization Leave the default options
Desktops Check everything
Applications Check Internet Browser
Development Leave the default options
UEK3 kernel repo Leave the default options
Lanugages Leave the default options

The installation will progress, installing 1249 packages in total.

After a while, the package installation will complete and you’ll see this screen:

Task #1c: Eject the Oracle Linux 6 ISO.

Log into OVM Manager and navigate to the list of VMs. Highlight ORAEMCC_VM then click the pencil icon to edit the VM. Click the Disks tab. The screen should now look similar to this:

For the CD/DVD (Slot 0), click the Eject a CDROM icon. The screen should now look similar to this:

Task #1d: Complete Post Oracle Linux Installation.

Return to the ORAEMCC_VM console session. Click Reboot.

You may need to close the console session and open a new one. Review Task 1a for opening a console session from OVM Manager.

Select Boot from local drive and press Enter.

The system boots up and displays a Welcome screen. Click Forward.

Select Yes, I agree to the License Agreement. Click Forward.

Select No, I prefer to register at a later time. Get ready for an argument which you’ll win.

Click No thanks, I’ll connect later. Click Forward.

Ignore the chastisement about your system not being setup for software updates and click Forward.

We will not be creating a user account at this time, so ignore this screen and click Forward.

Check Synchronize date and time over the network. Click Forward.

Uncheck Enable kdump? Click Finish.

Kdump tells you it needs to reboot. Click Yes. The system reboots and you may have to close and re-open a console screen from OVM Manager.

Once the system comes back up, you should see a login screen similar to this:

Task #2: Configure Oracle Linux.

Once Oracle Linux is installed, it needs to be configured to ensure the installation of Oracle Database 12c and OEM Cloud Control 12c Release 5 succeed. The OEM Cloud Control documentation is verbose to say the least, so the following 8 steps will guide you through the bare essentials.

Task #2a: Check Package Requirements for Oracle Management Service.

This step is more informational than anything. According to the Oracle Enterprise Manager Cloud Control Basic Installation Guide, you are warned to install only these package versions to support the Oracle Management Service (OMS):

Oracle Linux Version Package Version
Oracle Linux 6.x make-3.81
Oracle Linux 6.x binutils-2.20.51.0.2-5.11
Oracle Linux 6.x gcc-4.4.4
Oracle Linux 6.x libaio-0.3.107
Oracle Linux 6.x glibc-common-2.12-1
Oracle Linux 6.x libstdc++-4.4.4
Oracle Linux 6.x libXtst-1.0.99.2-3.el6.x86_64.rpm
Oracle Linux 6.x sysstat-9.0.4
Oracle Linux 6.x glibc-devel-2.12-1.7.el6.i686 (This is a 32-bit package)
Oracle Linux 6.x glibc-devel-2.12-1.7.el6.x86_64 (This is a 64-bit package)
Oracle Linux 6.2 glibc-2.12-1.47.0.2

A vanilla install of Oracle Linux 6.6 does not create all these packages at these versions. For example, the binutils package is installed at binutils-2.20.51.0.2-5.42.el6.x86_64 which is different from the required version. It’s tempting to remove the installed version and replace it with the exact version listed in the table. However, doing that will remove hundreds of dependent packages, so I wouldn’t recommend it.

The warning in the installation guide says having different versions of these packages, “might cause the installation to fail”. Trust me on this, it won’t as you’ll see later on.

Task #2b: Check Package Requirements for Oracle Management Agent.

Again, this step is informational and is taken from the Oracle Enterprise Manager Cloud Control Basic Installation Guide:

Oracle Linux Version Package Version
Oracle Linux 6.x make-3.81
Oracle Linux 6.x binutils-2.20.51.0.2-5.11
Oracle Linux 6.x gcc-4.4.4
Oracle Linux 6.x libaio-0.3.107
Oracle Linux 6.x glibc-common-2.12-1.7
Oracle Linux 6.x libstdc++-4.4.4
Oracle Linux 6.x sysstat-9.0.4

It is a supported configuration to have a single server run the full OEM Cloud Control 12c Release 5 software stack, including a Management Agent for the Cloud Control server itself. That being the case, you’d think the package requirements for the OMS and Management Agent would be identical, but according to Oracle’s own documentation, they’re not! It’s either a documentation typo, which seems unlikely given the documentation’s longevity, or it doesn’t matter. Guess which one I’m going with. ?

Task #2c: Update Oracle Linux.

Let’s grab the latest and greatest packages and update the Linux kernel. To do that we need to run a yum update. To do that, we need to create a yum repository first. With the yum repository in place, run the update:

[root@oraemcc ~]# yum update

This will take a while. It will ask you to confirm progress in a couple of places, so don’t go to lunch or it’ll be waiting for you when you get back.

Note, this update will upgrade the version of Oracle Linux from 6.6 to 6.7.

Since we’re using a 64 bit version of Oracle Linux, we don’t get the 32 bit version of the glibc-devel package required for the OMS. To install that, run this command:

[root@oraemcc ~]# yum install glibc-devel.i686

Task #2d: Install the Oracle 12c Release 1 Pre-Installation Package.

Since we’re using a single server for the entire OEM software stack, the server will also need to run an Oracle 12c database. Consequently, the operating system needs to be configured to support that as well as the OEM components. The easiest way to introduce multiple configuration changes which benefit an Oracle Database 12c installation is to install Oracle’s 12cR1 pre-installation package. This can be done in a couple of ways.

The package is on the Oracle Linux 6 Update 6 DVD you created with ImgBurn. It’s located in /Server/Packages and is called oracle-rdbms-server-12cR1-preinstall-1.0-12.el6.x86_64.rpm. To install it, run this command:

[root@oraemcc Packages]# rpm -i oracle-rdbms-server-12cR1-preinstall-1.0-12.el6.x86_64.rpm

Or you could just run a yum install command which is easier:

[root@oraemcc ~]# yum install oracle-rdbms-server-12cR1-preinstall.x86_64

The installation of this package makes a number of changes to /etc/password and /etc/group. The UIDs and GIDs it creates may not be what you want. You can use a script to correct them and add some additional standard users and groups. Using the Oracle pre-install rpm followed by this script will guarantee UID and GID consistency across the entire server infrastructure. There will be much rejoicing and the Oracle gods will smile upon thee. ?

Add these entries to the end of the /etc/security/limits.conf file:

oracle   soft   nofile   8192
oracle   hard   nofile   65536
oracle   soft   nproc    2048
oracle   hard   nproc    16384
oracle   soft   stack    10240
oracle   hard   stack    32768
oracle   soft   core     unlimited
oracle   hard   core     unlimited

Despite the correct changes having been made to the system file /etc/security/limits.conf, I had to add the following line to the oracle user’s .bash_profile. Without it, the OEM installer failed a prerequisite check!

ulimit -n 4096

Now that the oracle user exists, set a password:

[root@oraemcc ~]# passwd oracle

Task #2e: Disable SELinux.

SELinux is enabled by default when you install Oracle Linux 6.6. It can have the nasty side effect of causing ASM disk instantiation failures. Hence, I always disable SELinux.

Task #2f: Disable Linux Firewall.

Generally speaking, firewalls are a good thing.

In a production environment, you’d want to work with your Network Administrator and have them open up the ports necessary for OEM Cloud Control to work. Information on those ports can be found here.

However, in our environment we can trust that we won’t hack ourselves and we’ll go ahead and disable the Linux firewall.

Task #2g: Create Additional File Systems.

The ORAEMCC_VM had 3 disk resources allocated to it. That means 3 disk devices should have shown up after we installed Oracle Linux. We already used /dev/xvdb for the Oracle Linux installation, so we need to use the other two disks to create the /u01 and /u02 filesystems.

This is the selective output from the fdisk command showing the other 2 disk devices:

[root@oraemcc ~]# fdisk -l

Disk /dev/xvdc: 32.2 GB, 32212254720 bytes
255 heads, 63 sectors/track, 3916 cylinders
Units = cylinders of 16065 * 512 = 8225280 bytes
Sector size (logical/physical): 512 bytes / 512 bytes
I/O size (minimum/optimal): 512 bytes / 512 bytes
Disk identifier: 0x0005a6bc

Disk /dev/xvdd: 32.2 GB, 32212254720 bytes
255 heads, 63 sectors/track, 3916 cylinders
Units = cylinders of 16065 * 512 = 8225280 bytes
Sector size (logical/physical): 512 bytes / 512 bytes
I/O size (minimum/optimal): 512 bytes / 512 bytes
Disk identifier: 0x00083a9b

First, let’s partition /dev/xvdc:

[root@oraemcc ~]# fdisk /dev/xvdc

WARNING: DOS-compatible mode is deprecated. It's strongly recommended to
         switch off the mode (command 'c') and change display units to
         sectors (command 'u').


Command (m for help): n
Command action
   e   extended
   p   primary partition (1-4)
p

Partition number (1-4): 1

First cylinder (1-3916, default 1):
Using default value 1
Last cylinder, +cylinders or +size{K,M,G} (1-3916, default 3916):
Using default value 3916

Command (m for help): w

The partition table has been altered!
Calling ioctl() to re-read partition table.
Syncing disks.

Perform the same operation for disk device, /dev/xvdd.

Next, create an ext4 filesystem in the primary partition of each disk:

[root@oraemcc ~]# mkfs -t ext4 -m 0 /dev/xvdc1

mke2fs 1.43-WIP (20-Jun-2013)
Discarding device blocks: done
Filesystem label=
OS type: Linux
Block size=4096 (log=2)
Fragment size=4096 (log=2)
Stride=0 blocks, Stripe width=0 blocks
1966080 inodes, 7863809 blocks
0 blocks (0.00%) reserved for the super user
First data block=0
Maximum filesystem blocks=4294967296
240 block groups
32768 blocks per group, 32768 fragments per group
8192 inodes per group
Superblock backups stored on blocks:
       32768, 98304, 163840, 229376, 294912, 819200, 884736, 1605632, 2654208,
       4096000
Allocating group tables: done
Writing inode tables: done
Creating journal (32768 blocks): done
Writing superblocks and filesystem accounting information: done

Perform the same operation for disk partition, /dev/xvdd1.

Next create the file system mount points and mount the file systems:

[root@oraemcc /]# cd /
[root@oraemcc /]# mkdir /u01 /u02
[root@oraemcc /]# mount /dev/xvdc1 /u01
[root@oraemcc /]# mount /dev/xvdd1 /u02

[root@oraemcc /]# df -h

Filesystem           Size Used  Avail Use% Mounted on
/dev/mapper/vg_oraemcc-lv_root
                      33G   15G   17G  46% /
tmpfs                7.9G   72K  7.9G   1% /dev/shm
/dev/xvdb1           477M  123M  325M  28% /boot
/dev/xvdc1            30G   44M   30G   1% /u01
/dev/xvdd1            30G   44M   30G   1% /u02

Next, add the following entries to the /etc/fstab file so the mounted filesystems survive system restarts:

/dev/xvdc1             /u01                 ext4   defaults       0 0
/dev/xvdd1             /u02                 ext4    defaults      0 0

Finally, create the directories which we’ll need later for the software installation and database files:

[root@oraemcc /]# cd /u01

[root@oraemcc u01]# mkdir app
[root@oraemcc u01]# chmod 755 app
[root@oraemcc u01]# chown oracle:oinstall app

[root@oraemcc u01]# cd /u02
[root@oraemcc u02]# mkdir oradata
[root@oraemcc u02]# chmod 755 oradata
[root@oraemcc u02]# chown oracle:oinstall oradata

[root@oraemcc u02]# mkdir FRA
[root@oraemcc u02]# chmod 755 FRA
[root@oraemcc u02]# chown oracle:oinstall FRA

Task #2h: Edit /etc/hosts file.

Add this line to the local /etc/hosts file. If you don’t the OEM installer has a hissy fit and you don’t want that:

200.200.10.16   oraemcc.mynet.com     oraemcc

Task #3: Install Oracle Database 12c.

OEM Cloud Control uses its own repository which happens to be an Oracle Database. In order to have an Oracle Database up and running on this server, we need to install the Oracle Database 12c Release 1 (12.1.0.2) software. This is nice and easy. Nice and easy does it every time. (Sinatra reference ? )

With X-Win32 installed and up and running on your workstation, fire up an X term connected to oraemcc.mynet.com as the oracle user and point your DISPLAY variable back to your workstation’s IP address:

[oracle@oraemcc ~]# export DISPLAY=<your-workstation-IP>:0.0

Locate the Oracle Database software you copied to the server and ensure it’s unzipped. Then simply run the installer script as the oracle user:

[oracle@oraemcc ~]$ pwd
/home/oracle

[oracle@oraemcc ~]$ cd media/rdbms_12cR1_12.1.0.2/database
[oracle@oraemcc database]$ ./runInstaller

The Oracle Database 12c Release 1 Installer opens up. Simply follow the screens.

Uncheck the option, I wish to receive security updates via My Oracle Support, then click Next:

Click Yes to confirm that you wish to remain uninformed. Love the wording. Condescending much?

Select the option, Install database software only, then click Next:

Select the option, Single instance database installation, then click Next:

Select your preferred language, then click Next:

Select the option, Enterprise Edition (6.4 GB), then click Next:

Choose the standard locations for Oracle base and Software location, then click Next:

Field Value
Oracle base /u01/app/oracle
Software location /u01/app/oracle/product/12.1.0/dbhome_1

Choose the standard Inventory Directory (/u01/app/oraInventory) and the standard oraInventory Group Name (oinstall), then click Next:

Choose the standard OS groups then click Next:

Field Value
Database Administrator (OSDBA) group dba
Database Operator (OSOPER) group (Optional) oper
Database backup and Recovery (OSBACKUPDBA) group backupdba
Data Guard administrative (OSDGDBA) group dgdba
Encryption Key Management administrative (OSKMDBA) group kmdba

The installer then runs its prerequisite checks which should all pass without incident. You should then see this summary screen. Click Install to start the installation.

You’ll be looking at this screen for a little while:

After several minutes you’ll be prompted to run some scripts as the root user:

Running the scripts looks like this:

[root@oraemcc ~]# cd /u01/app/oraInventory

[root@oraemcc oraInventory]# ./orainstRoot.sh
Changing permissions of /u01/app/oraInventory.
Adding read,write permissions for group.
Removing read,write,execute permissions for world.
Changing groupname of /u01/app/oraInventory to oinstall.
The execution of the script is complete.
[root@oraemcc oraInventory]# cd /u01/app/oracle/product/12.1.0/dbhome_1

[root@oraemcc dbhome_1]# ./root.sh
Performing root user operation.

The following environment variables are set as:
   ORACLE_OWNER= oracle
   ORACLE_HOME= /u01/app/oracle/product/12.1.0/dbhome_1

Enter the full pathname of the local bin directory: [/usr/local/bin]:
   Copying dbhome to /usr/local/bin ...
   Copying oraenv to /usr/local/bin ...
   Copying coraenv to /usr/local/bin ...

Creating /etc/oratab file...
Entries will be added to the /etc/oratab file as needed by
Database Configuration Assistant when a database is created

Finished running generic part of root script.
Now product-specific root actions will be performed.

After the scripts have been run, return to the Execute Configuration Scripts dialog and click OK. You’ll then see this final screen and your work here is done. For now.

Task #4: Create a Repository Database.

In the good old days, you could create an empty database and have the installation of OEM populate it with all the necessary repository objects. Seems that’s beyond our capabilities now as Oracle wants you to use a pre-configured database template instead. Hopefully you have downloaded the Oracle Enterprise Manager Repository Database Template referenced in Part 2 of this series.

Note, this template is highly version specific. It is designed to work with Oracle Database 12c Release 1 (12.1.0.2) and Oracle Enterprise Manager Cloud Control 12c Release 5.

This is how you use it in 3 easy steps:

Task #4a: Unzip the Template.

Copy the template to $ORACLE_HOME/assistants/dbca/templates:

[oracle@oraemcc ~]$ cd /u01/app/oracle/product/12.1.0/dbhome_1/assistants/dbca/templates
[oracle@oraemcc templates]$ cp ~/media/oemcc_12cR5/12.1.0.2.0_Database_Template_for_EM12_1_0_5_0_Linux_x64.zip .

Unzip the template zip file to the templates directory:

[oracle@oraemcc templates]$ unzip 12.1.0.2.0_Database_Template_for_EM12_1_0_5_0_Linux_x64.zip

Task #4b: Set the Oracle Environment.

Add the following line to the /etc/oratab file:

dummy:/u01/app/oracle/product/12.1.0/dbhome_1:N

Then run the oraenv script to set the Oracle environment variables:

[oracle@oraemcc templates]$ . oraenv
ORACLE_SID = [oracle] ? dummy
The Oracle base has been set to /u01/app/oracle

Then unset the ORACLE_SID environment variable since we won’t be needing that:

[oracle@oraemcc templates]$ unset ORACLE_SID

Task #4c: Run the Database Configuration Assistant.

With your oracle environment set, invoke the Database Configuration Assistant:

[oracle@oraemcc templates]$ dbca

Select the option, Create Database, then click Next:

Select the option, Advanced Mode, then click Next:

Select the option, 12.1.0.2.0_Database_Template_for_EM12_1_0_5_0_Small_deployment.dbc, then click Next:

Use EMCC.mynet.com for the Global Database Name. The SID defaults to EMCC and your screen should look similar to this:

Uncheck the option, Configure Enterprise Manager (EM) Database Express. The option, Register with Enterprise Manager (EM) Cloud Control, should also be unchecked. Click Next:

Select the option, Use the Same Administrative Password for All Accounts. Enter a password twice (write it down somewhere safe – do it now – seriously!), then click Next:

Check the box for Create a New Listener. Don’t be one of those people who uses the default name of LISTENER for the name of the listener. If you have to use the default port (1521) I won’t tell anyone. Click Next:

Complete this next screen with these values, then click Next:

Field Value
Database files Storage Type File System
Use Common Location for All Database Files /u02/oradata
Recovery files Storage Type File System
Fast Recovery Area /u02/FRA
Fast Recovery Area Size 5 GB

Ignore the next Pythonesque retort, “should at least be thrice the database size”. It’ll be telling you to fetch it a shrubbery next. ? Click Yes to move on.

This next screen requires some help. The Oracle documentation says:

When you run Oracle Database Configuration Assistant to create the database, on the Database Content screen, by default the Run the following scripts option is selected to run the shpool script. The script sets the shared pool in the database. Make sure you RETAIN THE SELECTION. Do not deselect it.

There is no “Database Content” screen. Strike #1! ?

There is no script called “shpool”. Strike #2! ⚡

It’s not selected anywhere, so you can’t deselect it. Strike #3! ?

Here’s what you do. Click the Browse button and locate a file called:

shpool_12.1.0.2.0_Database_SQL_for_EM12_1_0_5_0.sql

You’ll find it in the same place you unzipped the template file:

/u01/app/oracle/product/12.1.0/dbhome_1/assistants/dbca/templates

Your screen should end up looking like this. Click Next:

Leave the Memory settings at their pre-determined values unless you have a need to change anything. Click the Character Sets tab:

On the Character Sets tab select the option, Use Unicode (AL32UTF8). Click Next:

Ensure the option, Create Database, is selected and click Next:

DBCA goes through its validation checks which should all be fine. Click Next:

On the Create Database – Summary screen, click Finish:

You’ll be looking at the Progress Page for a while. Make yourself a cup of coffee.

Eventually you’ll see the completion screen and all will be well with the world. Click Close.

Don’t forget to remove the dummy line from /etc/oratab:

dummy:/u01/app/oracle/product/12.1.0/dbhome_1:N

Task #5: Install OEM Cloud Control.

Locate the Oracle Enterprise Manager Cloud Control 12c Release 5 software you copied to the server and ensure it’s unzipped. Then, as the oracle user, simply run the installer script:

[oracle@oraemcc ~]$ cd /home/oracle/media/oemcc_12cR5
[oracle@oraemcc oemcc_12cR5]$ ./runInstaller

Uncheck the option, I wish to receive security updates via My Oracle Support. Click Next.

Click Yes to move past the security issue notification warning. Then select the option, Skip, to skip over software updates. Click Next:

The installer will run a series of prerequisite checks to verify everything is in order prior to installing the software. Notice how everything succeeded despite the versions of the installed packages not matching the requirements in Oracle’s documentation. Told you! 😉 Click Next:

Select the option, Create a new Enterprise Manager System, along with the Simple option. Click Next:

Use the following values to populate this next screen, then click Next:

Field Value
Middleware Home Location /u01/app/oracle/product/middleware
Agent Base directory /u01/app/oracle/product/agent
Host Name oraemcc.mynet.com

Part of the basic installation of OEM includes simplified password management. A single Administrator password covers several important accounts. As the screen says, the passwords for these accounts can be changed later if required.

For the Database Connection Details, use these values:

Field Value
Database Host Name oraemcc.mynet.com
Port 1521 (referenced here)
Service/SID emcc (referenced here)
SYS Password (referenced here)

Check the option, Configure Oracle Software Library and leave the location as the default (/u01/app/oracle/product/swlib). Click Next:

The installer will then display a Review screen. Click Install:

The next screen, Installation Progress Details, ticks along for quite some time. Go to lunch, seriously. Nothing much of interest happens other than things hopefully succeeding:

Eventually you’ll be presented with this dialog requesting you run the allroot.sh script as the root user:

[root@oraemcc ~]# cd /u01/app/oracle/product/middleware/oms

[root@oraemcc oms]# ./allroot.sh
Starting to execute allroot.sh .........
Starting to execute /u01/app/oracle/product/middleware/oms/root.sh ......
Running Oracle 11g root.sh script...

The following environment variables are set as:
   ORACLE_OWNER= oracle
   ORACLE_HOME= /u01/app/oracle/product/middleware/oms

Enter the full pathname of the local bin directory: [/usr/local/bin]:
The file "dbhome" already exists in /usr/local/bin. Overwrite it? (y/n)
[n]: n
The file "oraenv" already exists in /usr/local/bin. Overwrite it? (y/n)
[n]: n
The file "coraenv" already exists in /usr/local/bin. Overwrite it? (y/n)
[n]: n

Entries will be added to the /etc/oratab file as needed by
Database Configuration Assistant when a database is created
Finished running generic part of root.sh script.


Now product-specific root actions will be performed.
/etc exist

Creating /etc/oragchomelist file...
/u01/app/oracle/product/middleware/oms
Finished execution of /u01/app/oracle/product/middleware/oms/root.sh ......

Starting to execute /u01/app/oracle/product/agent/core/12.1.0.5.0/root.sh ......
Finished product-specific root actions.
/etc exist

Finished execution of /u01/app/oracle/product/agent/core/12.1.0.5.0/root.sh ......

Return to the previous dialog box and click OK. A Finish screen will be displayed and you’re done!

Accessing the URL, https://oraemcc.mynet.com:7802/em, brings up the Cloud Control login screen (after your browser complains about security certificates):

You can use the User Name SYSMAN with the Administrator Password you chose earlier. The first time you login you’ll have to choose some screen preferences and accept the displayed agreement. After that, you’re off to the races:

Task #6: Start and Stop Cloud Control.

Now that we have everything installed, up and running this is a useful little reminder of how to start and stop the Cloud Control infrastructure.

Click the link you need:

Task 6-1: Start Cloud Control.

There are 4 steps to starting the Cloud Control infrastructure:

Task 6-1a: Start the database listener.

[oracle@oraemcc ~]$ . oraenv
ORACLE_SID = [oracle] ? EMCC
The Oracle base has been set to /u01/app/oracle

[oracle@oraemcc bin]$ lsnrctl start LISTENER_EMCC

Task 6-1b: Start the Repository database.

[oracle@oraemcc bin]$ sqlplus / as sysdba
SQL*Plus: Release 12.1.0.2.0 Production on Tue Jan 26 13:43:41 2016
Copyright (c) 1982, 2014, Oracle. All rights reserved.
Connected to an idle instance.

SQL> startup

Task 6-1c: Start the Oracle Management Server.

[oracle@oraemcc bin]$ pwd
/u01/app/oracle/product/middleware/oms/bin

[oracle@oraemcc bin]$ ./emctl start oms
Oracle Enterprise Manager Cloud Control 12c Release 5
Copyright (c) 1996, 2015 Oracle Corporation. All rights reserved.
Starting Oracle Management Server...
Starting WebTier...
WebTier Successfully Started
Oracle Management Server Already Started
Oracle Management Server is Up

[oracle@oraemcc bin]$ ./emctl status oms
Oracle Enterprise Manager Cloud Control 12c Release 5
Copyright (c) 1996, 2015 Oracle Corporation. All rights reserved.
WebTier is Up
Oracle Management Server is Up

Task 6-1d: Start the Management Agent.

[oracle@oraemcc bin]$ pwd
/u01/app/oracle/product/agent/core/12.1.0.5.0/bin

[oracle@oraemcc bin]$ ./emctl start agent
Oracle Enterprise Manager Cloud Control 12c Release 5
Copyright (c) 1996, 2015 Oracle Corporation. All rights reserved.
Agent is already running

[oracle@oraemcc bin]$ ./emctl status agent
Oracle Enterprise Manager Cloud Control 12c Release 5
Copyright (c) 1996, 2015 Oracle Corporation. All rights reserved.
---------------------------------------------------------------
Agent Version          : 12.1.0.5.0
OMS Version            : 12.1.0.5.0
Protocol Version       : 12.1.0.1.0
Agent Home             : /u01/app/oracle/product/agent/agent_inst
Agent Log Directory    : /u01/app/oracle/product/agent/agent_inst/sysman/log
Agent Binaries         : /u01/app/oracle/product/agent/core/12.1.0.5.0
Agent Process ID       : 4074
Parent Process ID      : 3936
Agent URL              : https://oraemcc.mynet.com:3872/emd/main/
Local Agent URL in NAT : https://oraemcc.mynet.com:3872/emd/main/
Repository URL         : https://oraemcc.mynet.com:4903/empbs/upload
Started at             : 2016-01-26 13:07:57
Started by user        : oracle
Operating System       : Linux version 3.8.13-118.2.1.el6uek.x86_64 (amd64)
Last Reload            : (none)
Last successful upload                       : 2016-01-26 13:50:29
Last attempted upload                        : 2016-01-26 13:50:29
Total Megabytes of XML files uploaded so far : 0.16
Number of XML files pending upload           : 0
Size of XML files pending upload(MB)         : 0
Available disk space on upload filesystem    : 21.13%
Collection Status                            : Collections enabled
Heartbeat Status                             : Ok
Last attempted heartbeat to OMS              : 2016-01-26 13:49:56
Last successful heartbeat to OMS             : 2016-01-26 13:49:56
Next scheduled heartbeat to OMS              : 2016-01-26 13:50:56
---------------------------------------------------------------
Agent is Running and Ready

Task 6-2: Stop Cloud Control.

There are 4 steps to stopping the Cloud Control infrastructure.

Task 6-2a: Stop the Oracle Management Server.

[oracle@oraemcc bin]$ pwd
/u01/app/oracle/product/middleware/oms/bin

[oracle@oraemcc bin]$ ./emctl stop oms -all
Oracle Enterprise Manager Cloud Control 12c Release 5  
Copyright (c) 1996, 2015 Oracle Corporation.  All rights reserved.
Stopping WebTier...
WebTier Successfully Stopped
Stopping Oracle Management Server...
Oracle Management Server Successfully Stopped
AdminServer Successfully Stopped
Oracle Management Server is Down

Task 6-2b: Stop the Management Agent.

[oracle@oraemcc bin]$ pwd
/u01/app/oracle/product/agent/core/12.1.0.5.0/bin

[oracle@oraemcc bin]$ ./emctl stop agent
Oracle Enterprise Manager Cloud Control 12c Release 5  
Copyright (c) 1996, 2015 Oracle Corporation.  All rights reserved.
Stopping agent ..... stopped.

Task 6-2c: Stop the Repository database.

[oracle@oraemcc ~]$ sqlplus / as sysdba
SQL*Plus: Release 12.1.0.2.0 Production on Tue Jan 26 15:25:33 2016
Copyright (c) 1982, 2014, Oracle.  All rights reserved.
Connected to:
Oracle Database 12c Enterprise Edition Release 12.1.0.2.0 - 64bit Production
With the Partitioning, OLAP, Advanced Analytics and Real Application Testing options

SQL> shutdown immediate
Database closed.
Database dismounted.
ORACLE instance shut down.

Task 6-2d: Stop the database listener.

[oracle@oraemcc ~]$ lsnrctl stop LISTENER_EMCC
LSNRCTL for Linux: Version 12.1.0.2.0 - Production on 26-JAN-2016 15:26:16
Copyright (c) 1991, 2014, Oracle.  All rights reserved.
Connecting to (DESCRIPTION=(ADDRESS=(PROTOCOL=TCP)(HOST=oraemcc.mynet.com)(PORT=1521)))
The command completed successfully

Wow! That was quite the marathon. Many steps and not an insignificant amount of time has hopefully got Cloud Control up and running. In Part 7, we’ll build out the Oracle RAC server nodes. Stay tuned for updates.

If you have any comments or questions about this post, please use the Contact form here.

Build Your Own Oracle Infrastructure: Part 5 – Create VMs.

Create-VMs-2

With the hard work of configuring the OVM Server behind us, we can move onto the relatively simple task of creating VMs.

Just as with a physical computer, a virtual computer is made up of various resources. These include CPU, memory, disk, network interfaces and an operating system.

The trick here is to decide how to distribute the available physical resources across the multiple VMs. Let’s start by reviewing what those physical resources are. The OVM Server, ovmsvr.mynet.com, running on the HP ProLiant DL380 has the following hardware resources:

Resource Quantity
CPU 2 x Quad Core Intel Xeon E5640 (16 cores total)
RAM 72 GB (now 144 GB)
Disk 838 GB (VM_Filesystems_Repo)
NIC 2 x Dual Port, 4 total (eth0, eth1, eth2, eth3)

Allowing some resources for the OVM Server itself, we will distribute the following hardware across a total of 8 Virtual Machines:

VM# VM Name CPU Cores RAM Total Disk Usage
1 ORAEMCC_VM 2 16 GB 110 GB Oracle EM Cloud Control Server
2 ORASVR01_VM 2 8 GB 100 GB Oracle Database Server
3 ORASVR02_VM 2 8 GB 100 GB Oracle Database Server
4 RACNODE1_VM 1 6 GB 70 GB Oracle RAC Node Server
5 RACNODE2_VM 1 6 GB 70 GB Oracle RAC Node Server
6 RACNODE3_VM 1 6 GB 70 GB Oracle RAC Node Server
7 RACNODE4_VM 1 6 GB 70 GB Oracle RAC Node Server
8 RACNODE5_VM 1 6 GB 70 GB Oracle RAC Node Server
TOTAL 11 62 GB 660 GB

This resource allocation still gives us some wiggle room in case we need another server or two. Not likely, but when was the last time you thought you had everything you’ll ever need? That said, 8 VMs is quite a few so what are they all for?

The ORAEMCC_VM will be used to run the complete stack of Oracle Enterprise Manager Cloud Control 12c and an RMAN Catalog database.

ORASVR01_VM and ORASVR02_VM will be used for some Data Guard and GoldenGate data replication testing.

RACNODE1, RACNODE2, RACNODE4 and RACNODE5 will be used to build two Oracle RAC clusters with 2 nodes each. These will be used to test cluster to cluster data replication and failover. RACNODE3 will be used to test adding and removing an additional node from a running cluster.

Quick links to all the tasks:

Task #1: Create ORAEMCC_VM.

Creating the ORAEMCC_VM is a 4 step process.

Task #1a: Add CPU and Memory.

Open up Oracle VM Manager. Use the arrow head icon to expand Server Pools. Then expand ServerPool1, then right click on ovmsvr.mynet.com and select the option, Create Virtual Machine. You could also click on the Create Virtual Machine icon:

Create-VM-icon

Your screen should look similar to this:

Click Next. Use the following field values to populate this next screen:

Field Value
Repository VM_Filesystems_Repo
Name ORAEMCC_VM
Description VM for the Oracle Enterprise Manager Cloud Control Server
Operating System Oracle Linux 6
Mouse Device Type OS Default (default)
Keymap en-us (English, United States) (default)
Domain Type XEN_HVM
Start Policy Best Server (default)
Max. Memory (MB) 16384
Memory (MB) 16384
Max. Processors 2
Processors 2
Priority 50 (default)
Processor Cap % 100 (default)

The screen should look similar to this:

Click Next.

Task #1b: Add Networks.

Use the Network pull down menu and the Add VNIC button to add the Management_Public network to the VM. You can leave the option, Dynamically Assign MAC, selected unless you want to provide your own MAC address. In which case, select the option, Specify MAC Address and enter your own value. ORAEMCC_VM only needs one network since it won’t be using shared storage or the private interconnect. Your screen should now look similar to this:

Click Next.

Note, in case you were wondering where a dynamically assigned MAC address comes from, there is a predefined range which OVM Manager uses. You can see and change this range from this screen:

Task #1c: Add Storage.

Since we chose a Domain Type of XEN_HVM, we only get 4 slots to add disk storage to this VM. That’s OK because we only need 4. If you had chosen a Domain Type of XEN_PVM, then you could add up to 103 pieces of disk storage. For this VM, we only need to add a CD/DVD drive and storage for 3 filesystems.

First, we’ll add the CD/DVD drive. This device will be used to store the Oracle Linux ISO which we’ll boot from later. For Slot 0, use the Disk Type pull down menu and select CD/DVD. Your screen should now look similar to this:

Click the magnifying glass icon. This will open up the Select an ISO dialog box. Select the Oracle Linux 6 Update 6 ISO file, V52218-01.iso. Notice the name of the repository it’s coming from, OL6_Repo. Hopefully you’re beginning to see how things are connected in OVM. Isn’t it fun? Your screen should look similar to this:

Click OK to return to the Arrange Disks dialog. For Slot 1, use the Disk Type pull down menu and select Virtual Disk. Your screen should look similar to this:

Click the green + sign to open up the Create Virtual Disk dialog. Use these values:

Field Value
Repository VM_Filesystems_Repo
Virtual Disk Name ORAEMCC_OS
Size (GiB) 50.0
Description Disk for ORAEMCC_VM operating system.
Shareable Leave unchecked (default)
Allocation Type Sparse Allocation (default)

The disk space allocated for the operating system includes space for the OS itself, swap and /home. The Oracle Enterprise Manager Cloud Control installation binaries will be copied here too, hence the generous 50 GB size. Notice that this 50 GB will be allocated from the VM_Filesystems_Repo Storage Repository we created earlier. Your screen should look similar to this:

Click OK to return to the Arrange Disks dialog. Repeat this process to add 2 more Virtual Disks.

For slots 2 and 3 use these values:

Slot# Field Value
Slot 2 Repository VM_Filesystems_Repo
Virtual Disk Name ORAEMCC_u01
Size (GiB) 30.0
Description Disk for ORAEMCC_VM /u01 filesystem.
Shareable Leave unchecked (default)
Allocation Type Sparse Allocation (default)
Slot 3 Repository VM_Filesystems_Repo
Virtual Disk Name ORAEMCC_u02
Size (GiB) 30.0
Description Disk for ORAEMCC_VM /u02 filesystem.
Shareable Leave unchecked (default)
Allocation Type Sparse Allocation (default)

Note, the Oracle software will be installed into the /u01 filesystem. The data files for the Cloud Control repository database will be stored in the /u02 filesystem.

When you have completed adding Virtual Disks for Slots 2 and 3, your screen should look similar to this:

Click Next.

Task #1d: Add Boot Order.

Using the arrow icons, move the boot options from the left pane to the right pane in the order shown in this screen:

It’s important that CDROM is first in the list. When we start the VM for the very first time, it needs to boot from this device so we can install Oracle Linux.

Click Finish and your screen should look similar to this:

That’s all there is to creating a VM. At this point, the VM is effectively just metadata. It’s not a running server just yet. That comes later when we start the VM, boot from the ISO in the virtual CD/DVD drive and install the Oracle Linux operating system. Next we’ll create the first Oracle database server.

Task #2: Create ORASVR01_VM.

Creating an Oracle database server VM follows the same 4 steps.

Task #2a: Add CPU and Memory.

Click the Create Virtual Machine icon:

Create-VM-icon

Your screen should look similar to this:

Click Next and complete this next screen with these values:

Field Value
Repository VM_Filesystems_Repo
Name ORASVR01_VM
Description VM for Oracle Database Server #1.
Operating System Oracle Linux 6
Mouse Device Type OS Default (default)
Keymap en-us (English, United States) (default)
Domain Type XEN_HVM
Start Policy Best Server (default)
Max. Memory (MB) 8192
Memory (MB) 8192
Max. Processors 2
Processors 2
Priority 50 (default)
Processor Cap % 100 (default)

The screen should look similar to this:

Click Next.

Task #2b: Add Networks.

Use the Network pull down menu and the Add VNIC button to add the Management_Public network to the VM. You can leave the option, Dynamically Assign MAC, selected unless you want to provide your own MAC address. In which case, select the option, Specify MAC Address and enter your own value. ORASVR01_VM only needs one network since it won’t be using shared storage or the private interconnect. Your screen should now look similar to this:

Click Next.

Task #2c: Add Storage.

Using the previous Add Storage step as a guide, complete the addition of storage to ORASVR01_VM using these values:

Slot# Disk Type Name Size (GiB)
0 CD/DVD V52218-01.iso 3.59
1 Virtual Disk ORASVR01_OS 40.0
2 Virtual Disk ORASVR01_u01 30.0
3 Virtual Disk ORASVR01_u02 30.0

The /u01 filesystem will be used to install the Oracle Database software. The /u02 filesystem will be used to store the actual database data files.

Your screen should now look similar to this:

Click Next.

Task #2d: Add Boot Order.

Using the arrow icons, move the boot options from the left pane to the right pane in the order shown in this screen:

Click Finish and your screen should look similar to this:

That’s the first Oracle Database server VM created. Next we’ll create the first Oracle RAC node server.

Task #3: Create RACNODE1_VM.

You know the drill by now.

Task #3a: Add CPU and Memory.

Click the Create Virtual Machine icon:

Create-VM-icon

Your screen should look similar to this:

Click Next and complete this next screen with these values:

Field Value
Repository VM_Filesystems_Repo
Name RACNODE1_VM
Description VM for the Oracle Database RAC Node Server #1.
Operating System Oracle Linux 6
Mouse Device Type OS Default (default)
Keymap en-us (English, United States) (default)
Domain Type XEN_HVM
Start Policy Best Server (default)
Max. Memory (MB) 6144
Memory (MB) 6144
Max. Processors 1
Processors 1
Priority 50 (default)
Processor Cap % 100 (default)

The screen should look similar to this:

Click Next.

A few notes about memory allocation with Oracle VM.

  1. When you allocate X MB of RAM to a VM, by the time Linux sees it, it’s actually X – Y MB.
  2. To get a Linux VM to see exactly X MB of RAM is virtually impossible because Y is not consistent across identical VMs nor across reboots. I have no idea why, but that’s been my consistent experience.
  3. For example, a 4096 MB (4 GB) RAM allocation produces about 3.86 GB of RAM visible to Linux. 4224 MB produces about 3.98 GB. 4352 MB produces about 4.11 GB and 16,384 MB  produces about 15.67 GB.
  4. I upped the original memory allocation from 4096 MB (4 GB) to 6144 MB (6 GB) for 3 main reasons:
    1. 4096 MB only yielded 3.86 GB of visible RAM and that’s less than the 4 GB required by Oracle Grid Infrastructure 12c.
    2. With less than the 4 GB required, the Oracle Grid Infrastructure 12c installation (see Part 10) still succeeded, but took an excessively long time.
    3. Knowing the impact < 4 GB had on the Oracle Grid Infrastructure 12c installation, more memory would be needed to run an Oracle RAC database instance.
  5. Oracle VM cannot over allocate physical server memory. Therefore,  the total RAM allocated to all the VMs must be within the physical RAM configured on the server.

Task #3b: Add Networks.

The Oracle RAC node servers will need to operate on 3 different networks.The public network which you’ll use to login to the server. The private interconnect network for inter-node traffic and finally the shared storage network connected to the Openfiler shared storage server. Using a previous Add Networks step as a guide, complete the Set up Networks screen using these values:

Slot# Network
0 Management_Public
1 Shared_Storage_Public
2 GI_Interconnect_Private

Your screen should now look similar to this:

Click Next.

Task #3c: Add Storage.

Using a previous Add Storage step as a guide, complete the addition of storage to RACNODE1_VM using these values:

Slot# Disk Type Name Size (GiB)
0 CD/DVD V52218-01.iso 3.59
1 Virtual Disk RACNODE1_OS 40.0
2 Virtual Disk RACNODE1_u01 30.0

The /u01 filesystem will be used to install the Oracle Grid Infrastructure and Database software. The database data files will be stored in shared storage on the Openfiler server and accessed via the storage network. Hence, no need for a /u02 filesystem.

Your screen should now look similar to this:

Click Next.

Task #3d: Add Boot Order.

Using the arrow icons, move the boot options from the left pane to the right pane in the order shown in this screen:

Click Finish and your screen should look similar to this:

That’s the last of the 3 VMs created. Nicely done. “What about the other 5 VMs?” I hear you say. You don’t miss a trick do you? We could continue to create more VMs using the procedures described above. However, there’s a smarter, more efficient way to get that job done. All will be revealed in Part 7. I bet you can’t wait!

Next up is building out the OEM Cloud Control Server in Part 6. See you there!

If you have any comments or questions about this post, please use the Contact form here.

Build Your Own Oracle Infrastructure: Part 4 – Configure Oracle VM Server.

Config-OVM


Configuring Oracle VM Server using Oracle VM Manager can be a little tricky.

However, once you know just a handful of concepts and some terminology, you’ll wonder what the fuss was all about.

In Part 4, we’ll show you the steps to configure OVM Server in readiness to create VMs.

Part of the reason Oracle VM is tricky is due to a lack of decent resources explaining it. The official Getting Started guide is OK, but it doesn’t do a great job of explaining what you’re doing or why. It can also be misleading. For example, the Discover Storage section says this:

Your storage can be any of the following:

  • iSCSI: Abstracted LUNs or raw disks accessible over existing Ethernet infrastructure (SAN Servers).
  • FCP: Abstracted LUNs or raw disks accessible over Fibre Channel host bus adapters (SAN Servers).
  • NFS: File-based storage over existing Ethernet infrastructure (NAS or File Servers).

On that basis you’d be forgiven for thinking you need some form of network storage with which to create your VMs. Not true. We’ll be using internal OVM Server storage for the VMs as you’ll see shortly. Hopefully this installment of the Build Your Own Oracle Infrastructure series will set you straight.

Before we launch into OVM Manager, just a cautionary note to pay close attention to the Job Summary section at the foot of the OVM Manager console screen.

When working with OVM Manager it is advisable to do one thing at a time and let it run to completion before starting the next task.


If you allow multiple tasks to overlap, bad things happen. So have patience, Grasshopper!

Quick links to all the tasks:

Task #1: Discover the OVM Server.

The OVM Server is already up and runnning as a result of following the steps to install OVM Server. To make it easier for the OVM Manager to discover the OVM Server, add the appropriate entry to the local /etc/hosts file on the OVM Manager server:

200.200.10.7     ovmsvr.mynet.com     ovmsvr         # Oracle VM Server

Login to OVM Manager and ensure you are on the Servers and VMs tab. From here, right click Server Pools and select the option, Discover Servers. You could also click the Discover Servers icon. In the Discover Servers dialog box, enter the Oracle VM Agent Password and the name of the Oracle VM Server, which in our example is ovmsvr. The screen should now look similar to this:

Click OK to discover the server. Once the server is discovered, the screen should look similar to this:

ovmsvr.mynet.com should be listed underneath Unassigned Servers. It is unassigned because it does not yet belong to a Server Pool. Also, note the Job Summary section. The Discover Server job completed with a status of Success. Keep an eye on this section and make sure each task completes successfully.

Task #2: Create a Server Pool.

Every OVM Server must belong to a Server Pool. A Server Pool can contain one or more OVM Servers. So the next task is to create a Server Pool and allocate ovmsvr.mynet.com to that Server Pool.

In the Server and VMs tab, right click Server Pools and select the option, Create Server Pool. You could also click the Create Server Pool icon. The Create a Server Pool dialog box will appear. Use the following values:

Field Value
Server Pool Name ServerPool1
Virtual IP Address for the Pool 200.200.10.19
VM Console Keymap Leave the default
VM Start Policy Leave the default
Secure VM Migrate Leave blank
Clustered Server Pool Leave blank
Timeout for Cluster Leave the default
Storage for Server Pool Leave blank
Storage Location Leave blank
Description Default server pool

The screen should look similar to this:

Click Next to continue. Then move the ovmsvr.mynet.com server from the Available Server(s) pane to the Selected Server(s) pane using the arrow icons. The screen should now look similar to this:

Click the Finish button and you’re done. ServerPool1 is now created and contains the server, ovmsvr.mynet.com. The screen should look similar to this:

Task #3: Create Storage Repositories.

Oracle VM Storage Repositories are simply disk resources used by VMs and they need to be created before a VM can reference them. We’ll create two different Storage Repositories. The first will be used to store the Oracle Linux 6 Update 6 ISO which will be used to boot a VM and install the operating system. The second Storage Repository will be used to provide actual disk storage for VM filesystems.

In OVM Manager, click on the Repositories tab, then click the green + sign to open the Create a Repository dialog box. Use these values:

Field Value
Repository Name OL6_Repo
Repository Location Physical Disk
Server Pool ServerPool1
Description Repository to hold the Oracle Linux 6.6 ISO image

The screen should look similar to this:

Click the magnifying glass icon next to the Physical Disk field. The screen should now look similar to this:

Select the physical disk OVM_SYS_REPO_PART_360… and click OK. This piece of disk is the unused 4th partition of the OVM Server installation drive we previously referred to here. The screen should now look similar to this:

Click Next. OVM Manager takes a moment or several to create the repository. You are then presented with a 2 pane dialog box with Available Server(s) on the left and Present to Server(s) on the right. Use the arrow icons to move ovmsvr.mynet.com over to the Present to Server(s) pane. The screen should then look similar to this:

Click Finish to complete the creation of OL6_Repo Storage Repository which will be visible to the ovmsvr.mynet.com OVM Server.

Next, we’ll create the VM_Filesystems_Repo Storage Repository. Still within the Repositories tab in OVM Manager, click the green + sign to open the Create a Repository dialog box. Use these values:

Field Value
Repository Name VM_Filesystems_Repo
Repository Location Physical Disk
Server Pool ServerPool1
Description Repository for VM filesystems

The screen should look similar to this:

Click the magnifying glass icon next to the Physical Disk field. The screen should now look similar to this:

Select the physical disk starting with 3600… and click OK. The name you see will be slightly different. The screen should now look similar to this:

Just as we did with the OL6_Repo Storage Repository, click Next and use the arrow icons to move ovmsvr.mynet.com from the Available Server(s) pane on the left to the Present to Server(s) pane on the right. Click Finish. The screen should now show both Storage Repositories similar to this:

In the left most pane underneath Repositories, click on OL6_Repo. The screen should look similar to this:

Note the ID of the OL6_Repo Storage Repository. In my case, it is 0004fb0000030000cc1495b85b9bd08a. YMMV. Open up a Putty session on the Oracle VM Server and run these commands:

[root@ovmsvr /]# cd /OVS/Repositories
[root@ovmsvr Repositories]# ls -l
drwxr-xr-x 8 root root 3896 Nov 26 14:37 0004fb000003000059416081b6e25e36
drwxr-xr-x 8 root root 3896 Nov 26 14:33 0004fb0000030000cc1495b85b9bd08a

Note the second directory has the same name as the ID of the OL6_Repo Storage Repository. Oracle VM tends to use these very long numbers to uniquely identify everything. Get used to seeing that convention. Now run these commands:

[root@ovmsvr Repositories]# cd 0004fb0000030000cc1495b85b9bd08a
[root@ovmsvr 0004fb0000030000cc1495b85b9bd08a]# ls -l
drwx------ 2 root root 3896 Nov 26 14:33 Assemblies
drwx------ 2 root root 3896 Nov 26 15:18 ISOs
drwxr-xr-x 2 root root 3896 Nov 26 14:33 lost+found
drwx------ 2 root root 3896 Nov 26 14:33 Templates
drwx------ 2 root root 3896 Nov 26 14:33 VirtualDisks
drwx------ 2 root root 3896 Nov 26 14:33 VirtualMachines

At this point the ISOs directory is empty, but we need to populate it with the Oracle Linux 6 Update 6 ISO we downloaded from Oracle earlier (V52218-01.iso). The simplest way to do that is to use FileZilla.

Fire up FileZilla, login to ovmsvr.mynet.com and navigate to /OVS/Repositories/0004fb0000030000cc1495b85b9bd08a/ISOs. Then locate your copy of V52218-01.iso and copy it to the ISOs directory on ovmsvr.mynet.com. The screen should look similar to this:

When the copy is complete, you can verify it’s there using these commands:

[root@ovmsvr 0004fb0000030000cc1495b85b9bd08a]# cd ISOs
[root@ovmsvr ISOs]# ls -l
-rw-r--r-- 1 root root 3853516800 Nov 26 15:21 V52218-01.iso

You can also verify using OVM Manager. Expand the OL6_Repo Storage Repository in the left pane, then click on the ISOs folder. The right pane will show the OL6.6 ISO is now present.

Et voila! ?

Task #4: Create VM Networks.

This is a little misleading in the sense we’re not actually creating networks per se. It’s more akin to creating a network resource which may be allocated to a VM, after which it becomes a network interface. Allocating a network resource to a VM just means that VM will be created with a virtual NIC which could be active on a specific network. In the Linux world, if you allocate 2 VM Networks to a VM, the VM will be created with 2 network interfaces, eth0 and eth1. This makes more sense when you create the VM Networks and then allocate them to VMs which we’ll do in Part 5. Bear with me.

By installing OVM Server, you get a VM Network created by default. Its name defaults to an IP address made up of the first two octets of the network it’s on, followed by 0.0. In our case, the default name is 200.200.0.0. You can see this VM Network by clicking on the Networking tab in OVM Manager, then by clicking Networks. The screen should look similar to this:

Note, this VM Network has 3 default uses or Channels. Server Management, Cluster Heartbeat and Live Migrate. Click on the pencil icon so we can change the name of this network to something more meaningful and give it another channel. Change the Name to Management_Public and check the box for Virtual Machine. The screen should look similar to this:

Click on the Ports tab. This is where things get a little weird. If you’re following along using the network addressing described in this series, you should see these values on a screen similar to this:

Parameter Value
Port Name bond0 on ovmsvr.mynet.com
Server ovmsvr.mynet.com
IP Address 200.200.10.7
Bonding Yes

When we installed OVM Server, we picked the HP ProLiant DL380’s eth0 for the network interface and assigned it the IP address 200.200.10.7. Rather miraculously, OVM Server has created a network interface bond (bond0) with a single network interface. Hence the reason you see bond0 as the port for the default network. So, addresses on the public network will be of the form, 200.200.10.x.

We need to create two more VM Networks. One for the shared storage which will be coming from the Openfiler server. Another for the private interconnect so the Oracle RAC nodes can chat.

Click OK to return to the Networking tab, then click the green + sign to start the Create Nework dialog. Select the option, Create a Network with Ports/Bond Ports/VLAN interfaces. The screen should look similar to this:

Click Next. In the Name field, enter Shared_Storage_Public and check the box next to Virtual Machine. This signifies that this network will be used as a regular network by a VM. We happen to know it’ll be for the shared storage, but OVM Server doesn’t know that and doesn’t need to care. The screen should now look similar to this:

Note, as tempting as it might seem to check Storage instead, don’t do it. Even the Oracle VM documentation tells you to stay away from it. This from the Create New Network documentation:

Storage: Reserved for future use and currently has no practical function or application.”

Now, we could have a debate at this point about why this option is even here, but my coffee’s getting cold so let’s move on.

Click Next. This shows the Add Ports to Network dialog. There are 3 more network interfaces available on the DL380 running ovmsvr.mynet.com. Select eth1. The screen should now look similar to this:

Click OK. Then click the green + sign to open the Create Network dialog again. This time select the option, Create a Local Network on a single server. Instead of mapping this VM Network to a physical network interface on the DL380, we will create a virtual network resource that doesn’t use any additional networking hardware. Spooky! We still have 2 spare network interfaces on the DL380 (eth2 & eth3), but we’re not going to use them for now. The great thing about this virtual network resource is that it operates at bus speed which is pretty handy for the interconnect. The screen should now look similar to this:

Click Next. Give the network the name, GI_Interconnect_Private and add a suitable description. The screen now looks similar to this:

Click Next. Select ovmsvr.mynet.com for the Server. The screen should look similar to this:

Click Finish. Your screen should look similar to this:

Just one more change to make. We need to add an IP address to the eth1 network interface on the OVM Server. Click the Shared_Storage_Public network, then click the pencil icon to open the Edit Network dialog:

Click the Ports tab, highlight the eth1 entry then click the pencil icon to open the Edit Port(s) dialog. Use these values to complete this screen:

Field Value
Addressing Static
IP Address 200.200.20.7
Mask 255.255.255.0

The screen should look like this:

Click OK and your work is done!

OVM Server is now configured and ready for you to create VMs.
See you in Part 5 for that. We having fun yet? ?

If you have any comments or questions about this post, please use the Contact form here.

Build Your Own Oracle Infrastructure: Part 3 – Install Oracle VM Software.

icon-oraclevm

The Oracle VM software provides the fundamentals for building the entire Oracle infrastructure.

The good news is, it’s really quite easy to install it.

In other news, the configuration can be a little challenging if you don’t know a handful of concepts, some terminology and the order in which to do things. Fear not, that’s covered in Part 4.

Quick links to all the tasks:

Task #1: Install Oracle VM Server.

The Oracle VM Server software will be installed on the Oracle VM Server Computer which in my case is an HP ProLiant DL380 G7. Before installing any software you will need to configure the server’s storage. The DL380 originally had 8 x 72 GB internal SAS drives (HP Part# 375861-B21). The scope of this project has expanded a little since I started so I replaced six of the 72 GB drives with six 300 GB drives (HP Part# 507127-B21). The 72 GB drives would have worked, but the extra capacity will give us a little more wiggle room when creating Oracle database server VMs. The 300 GB drives are a little more expensive than the 72 GB drives. They range from $25 to $40 depending upon where you get them from. I buy most of my drives from sellers on eBay. For a complete list of supported drives, check the HP Smart Array P410i Controller documentation here.

So, the DL380 now has 2 x 72 GB internal SAS drives and 6 x 300 GB internal SAS drives. I used the P410i Controller RAID configuration utility to configure 2 logical drives. Logical drive #1 consists of the two 72 GB drives in a RAID 1+0 configuration. This is where Oracle VM Server will be installed. Logical drive #2 consists of the six 300 GB drives also in a RAID 1+0 configuration. This will be used later on as an Oracle VM Storage Repository.

Note, in a production environment, this storage repository is more likely to come via a dedicated network storage filer rather than internal server drives.

With the server storage configured, we can proceed with installing Oracle VM Server. Oracle has done a pretty nice job of making this simple and well documented. However, the order in which I was prompted to do things was different to the order in the official installation guide. It shouldn’t make any difference in the grand scheme of things as you end up in the same place regardless. The official installation guide can be found here.

What follows are the 20 steps I used to install from DVD. I had previously used ImgBurn to create a bootable Oracle VM Server DVD. The installer runs in text only mode. There is no GUI as such.

Step #1: Boot The Server From DVD.

This may require you to change some BIOS settings so that the server can boot from a DVD or CD-ROM device. With the DVD in the DVD drive, simply reboot the server and wait for the first prompt.

Step #2: Start The Installation.

After the server has booted from the DVD you will see a prompt telling you to press the Enter key to begin the installation. Guess what you have to do!

Step #3: Disc Found.

Amazingly the DVD is detected. Here you have the option of testing the installation media or skipping the test. The media test does take a while. If you downloaded Oracle VM Server without any issues and ImgBurn created an ISO image on a blank DVD without any errors, you’re probably OK. In which case, select Skip to avoid the media test.

Step #4: Oracle VM Server.

Here you’ll see a little welcome notice. Select OK and move on.

Step #5: Language Selection.

You’ll probably want English, but if you fancy a challenge pick something else.

Step #6: Keyboard Selection.

Choose what seems most appropriate. US for example.

Step #7: License Agreement.

Simply Accept the license agreement and move on.

Step #8: Partition Type.

The server has two logical drives (8 physical). The smaller of the two logical drives is where we’ll install Oracle VM Server. I selected the options, “Use entire drive” and “sda 69974 MB (HP LOGICAL VOLUME)”. It’s cool that the installer recognizes the drive as an HP logical volume. YMMV.

Step #9: Writing Storage Configuration To disk.

Select the option, “Write changes to disk”.

Step #10: Boot Loader Configuration.

Select the option, “/dev/sda Master Boot Record (MBR)”.

Step #11: Oracle VM Management Interface.

At this point you need to select the network interface to use to connect to the OVM Server. The DL380 has 4 network interfaces, eth0 through eth3. I picked eth0. I’m creative that way.

Step #12: IPv4 Configuration For eth0.

I selected, “Manual address configuration” and used these values:

IP Address: 200.200.10.7
Prefix (Netmask): 255.255.255.0

Step #13: Miscellaneous Network Setup.

I used these values:

Gateway: 200.200.10.1
Primary DNS: 200.200.10.1
Secondary DNS: 8.8.8.8

Note, in a production environment, you would likely need to get the networking information from your Network Administrator. If you can find them. ?

Step #14: Hostname Configuration.

I selected the manual option and used this value:

ovmsvr.mynet.com

Step #15: Time Zone Selection.

Select the appropriate value from the menu displayed.

Step #16: Oracle VM Agent Password.

This password is extremely important. Write it down and keep it somewhere safe. You’ll need it a little later. You’re prompted to enter the password twice.

Step #17: Root Password.

This password is also extremely important. Write it down and keep it somewhere safe. You’re prompted to enter the password twice.

Step #18: Package Installation.

At this point the Oracle VM Server installation kicks off. A left to right progress bar is displayed as the various packages are installed. For Oracle VM Server version 3.3.2 there are 429 packages to install. This takes several minutes, but eventually the progress bar will show 100% and the screen displays the message, “Packages Complete: 429 of 429”. After this there’s a lengthy pause. Don’t worry, the installation hasn’t died. Probably.

Step #19: Post Installation.

This step displays the message, “Performing post-installation configuration”. Again, there’s a pause during this step.

Step #20: Installation Complete.

A congratulations message is displayed and the DVD is ejected. Remove the DVD and press Enter to reboot the server. After the server comes back up, you’ll see the console display the following information:

Oracle VM Server 3.3.2 Console [Alt-F2 for login console]

Local hostname             : ovmsvr.mynet.com
Manager UUID               : Unowned
Hostname                   : None
Server IP                  : None
Server Pool                : None
Clustered                  : No
Server Pool Virtual IP     : None
Cluster State              : Offline
Master Server              : No
Cluster Type               : None
Cluster storage            : None

At the foot of the screen you’ll see information relating to the status of the server:

OVS Agent                  : Running
VMs running                : 0
System memory              : 73717
Free memory                : 70636
Uptime                     : x days, y hours, z minutes

As the screen shows, if you need to login to the OS, hit Alt-F2. This will clear the screen and show a login prompt. To get back to the above console display, hit Alt-F1.

The installation writes a couple of log files to /root:

-rw-r--r--. 1 root root 18708 Nov 1 16:32 install.log
-rw-r--r--. 1 root root  6310 Nov 1 16:29 install.log.syslog

The install.log.syslog file records the additions the installer makes to OS users and groups. The install.log file records the installation of all the Linux packages. Check these files for errors.

The installer writes several system start-up and monitoring scripts to /etc/init.d, including:

ocfs2
ovm-consoled
ovmwatch
ovs-agent
ovs-devmon

The default fdisk output for /dev/sda looks like this:

[root@ovmsvr ~]# fdisk -l
Disk /dev/sda: 73.4 GB, 73372631040 bytes
255 heads, 63 sectors/track, 8920 cylinders
Units = cylinders of 16065 * 512 = 8225280 bytes
Sector size (logical/physical): 512 bytes / 512 bytes
I/O size (minimum/optimal): 512 bytes / 512 bytes
Disk identifier: 0x000782ce

   Device Boot     Start         End     Blocks   Id System
/dev/sda1   *           1         64     512000   83 Linux
Partition 1 does not end on cylinder boundary.
/dev/sda2              64       6591   52428800   83 Linux
/dev/sda3            6591       7114    4194304   82 Linux swap / Solaris
/dev/sda4            7114       8921   14516224   83 Linux

 Disk /dev/mapper/OVM_SYS_REPO_PART_3600508b1001c1cf46029dbf4c8e1f13a: 14.9 GB, 
14864613376 bytes
255 heads, 63 sectors/track, 1807 cylinders
Units = cylinders of 16065 * 512 = 8225280 bytes
Sector size (logical/physical): 512 bytes / 512 bytes
I/O size (minimum/optimal): 512 bytes / 512 bytes
Disk identifier: 0x00000000

The default file system layout should look like this:

[root@ovmsvr ~]# df -h
Filesystem     Size  Used  Avail Use%  Mounted on
/dev/sda2       50G  1.2G    46G   3%  /
tmpfs          1.1G     0   1.1G   0%  /dev/shm
/dev/sda1      477M   47M   401M  11%  /boot
none           1.1G   40K   1.1G   1%  /var/lib/xenstored

Note, the /dev/sda drive has 4 partitions but only 3 of them are being used. The /dev/sda1 partition is mounted on /boot. The /dev/sda2 partition is mounted on / (the root filesystem) and the /dev/sda3 partition is used for swap space. The partition /dev/sda4 is unused. The size of this partition is 14,516,224 1K blocks, which equals 14,176 MB, which equals 13.84 GB. The significance and usefulness of this unused 13.84 GB partition will become clear when we create storage repositories later.

That’s it!. Pretty simple, huh?

Task #2: Install Oracle VM Manager.

Oracle VM Manager is a GUI application which runs on top of Linux. Since we’ll be using a dedicated physical computer to run Oracle VM Manager, installing it requires 3 steps. Clink the link you need:

Step #1: Install Oracle Linux.

You may already have a Linux computer ready to install Oracle VM Manager onto. However, be aware there are some hardware and software requirements which must be met in order for the Oracle VM Manager software installation to succeed. The hardware requirements can be found here and the software requirements can be found here.

Basically, the hardware and software requirements boil down to this:

Category Resource Value
Hardware RAM 8.00 GB or better
Hardware CPU 64 bit 1.83 GHz or better
Hardware Swap Space 2.10+ GB
Hardware /u01 5.50+ GB free
Hardware /tmp 2.00+ GB free
Hardware /var 500+ MB free
Hardware /usr 500+ MB free
Software OS Oracle Linux / RHEL 5.5 64 bit or later
Software OS Oracle Linux / RHEL 6 64 bit or later

The installation and configuration of Oracle Linux 6 Update 6 is covered in detail with screen shots in         Part 7 – Build Oracle RAC Servers. For now, we’ll assume we have a running Oracle Linux 6.6 server.

Step #2: Configure Oracle Linux for Oracle VM Manager.

Configuring Oracle Linux for Oracle VM Manager is done in 3 steps:

Step #2a: Install Required Packages.

The type of Oracle Linux installation I normally perform for Oracle database servers ensures most if not all required packages are installed. Oracle VM Manager does require the unzip, libaio and perl packages. You can check if they are present using these commands:

[root@oramgt ~]# rpm -qa | grep unzip
unzip-6.0-2.el6_6.x86_64

[root@oramgt ~]# rpm -qa | grep libaio
libaio-0.3.107-10.el6.x86_64

[root@oramgt ~]# rpm -qa | grep perl
perl-5.10.1-136.el6_6.1.x86_64
perl-ExtUtils-MakeMaker-6.55-136.el6_6.1.x86_64
perl-IO-Zlib-1.09-136.el6_6.1.x86_64
perl-Module-CoreList-2.18-136.el6_6.1.x86_64
perl-parent-0.221-136.el6_6.1.x86_64
perl-DBD-SQLite-1.27-3.el6.x86_64
perl-HTML-Tagset-3.20-4.el6.noarch
perl-Pod-Escapes-1.04-136.el6_6.1.x86_64
perl-Module-Load-0.16-136.el6_6.1.x86_64
perl-IPC-Cmd-0.56-136.el6_6.1.x86_64
perl-Archive-Extract-0.38-136.el6_6.1.x86_64
perl-Crypt-SSLeay-0.57-17.el6.x86_64
perl-CPAN-1.9402-136.el6_6.1.x86_64
perl-CPANPLUS-0.88-136.el6_6.1.x86_64
perl-DBI-1.609-4.el6.x86_64
perl-XML-Parser-2.36-7.el6.x86_64
perl-URI-1.40-2.el6.noarch
perl-libwww-perl-5.833-2.el6.noarch
perl-libs-5.10.1-136.el6_6.1.x86_64
perl-Params-Check-0.26-136.el6_6.1.x86_64
perl-IO-Compress-Base-2.021-136.el6_6.1.x86_64
perl-ExtUtils-ParseXS-2.2003.0-136.el6_6.1.x86_64
perl-IO-Compress-Zlib-2.021-136.el6_6.1.x86_64
perl-File-Fetch-0.26-136.el6_6.1.x86_64
perl-Term-UI-0.20-136.el6_6.1.x86_64
perl-Digest-SHA-5.47-136.el6_6.1.x86_64
perl-Test-Simple-0.92-136.el6_6.1.x86_64
perl-Parse-CPAN-Meta-1.40-136.el6_6.1.x86_64
perl-core-5.10.1-136.el6_6.1.x86_64
perl-XML-Grove-0.46alpha-40.el6.noarch
perl-Compress-Raw-Bzip2-2.021-136.el6.x86_64
perl-HTML-Parser-3.64-2.el6.x86_64
perl-Pod-Simple-3.13-136.el6_6.1.x86_64
perl-Locale-Maketext-Simple-0.18-136.el6_6.1.x86_64
perl-Log-Message-0.02-136.el6_6.1.x86_64
perl-devel-5.10.1-136.el6_6.1.x86_64
perl-Compress-Raw-Zlib-2.021-136.el6_6.1.x86_64
perl-Archive-Tar-1.58-136.el6_6.1.x86_64
perl-Log-Message-Simple-0.04-136.el6_6.1.x86_64
perl-Module-Loaded-0.02-136.el6_6.1.x86_64
perl-ExtUtils-Embed-1.28-136.el6_6.1.x86_64
perl-CGI-3.51-136.el6_6.1.x86_64
perl-Time-HiRes-1.9721-136.el6_6.1.x86_64
perl-XML-Twig-3.34-1.el6.noarch
perl-Module-Pluggable-3.90-136.el6_6.1.x86_64
perl-Module-Load-Conditional-0.30-136.el6_6.1.x86_64
perl-Package-Constants-0.02-136.el6_6.1.x86_64
perl-ExtUtils-CBuilder-0.27-136.el6_6.1.x86_64
perl-Module-Build-0.3500-136.el6_6.1.x86_64
perl-Time-Piece-1.15-136.el6_6.1.x86_64
perl-XML-Dumper-0.81-8.el6.noarch
perl-libxml-perl-0.08-10.el6.noarch
perl-version-0.77-136.el6_6.1.x86_64
perl-Test-Harness-3.17-136.el6_6.1.x86_64
perl-Compress-Zlib-2.021-136.el6_6.1.x86_64
perl-Object-Accessor-0.34-136.el6_6.1.x86_64
perl-IO-Compress-Bzip2-2.021-136.el6_6.1.x86_64
perl-DBIx-Simple-1.32-3.el6.noarch

If you are missing any of these packages, you can install them using this yum command:

[root@oramgt ~]# yum install zip unzip libaio perl

This assumes you have already setup a yum repository. If you have not, check out Creating a Public Oracle Yum Repository for Oracle Linux 6.

You will also need to install the ovmcore-console package in order to gain access to the console of VMs. You can check if you have it installed using this command:

[root@ovmmgr rpm]# rpm -qa | grep ovmcore
ovmcore-console-1.0-42.el6.noarch

If it’s not installed, install it using this command:

[root@ovmmgr rpm]# rpm -Uvh ovmcore-console-1.0-42.el6.noarch.rpm
Preparing...                ########################################### [100%]
   1:ovmcore-console        ########################################### [100%]

Step #2b: Edit the /etc/hosts File.

Ensure you have the correct entry in the local /etc/hosts file. I used this entry:

200.200.10.5  ovmmgr.mynet.com     ovmmgr

Step #2c: Add an OS User and Group, Configure the Firewall and Check for /u01.

The oracle user and dba group need to be added to the system. In addition, some security limits need to be set for the oracle user. To ensure proper communication between Oracle VM Server and Oracle VM Manager, the settings for some Linux firewall ports need to be modified. Finally, the existence of /u01 is checked. /u01 can be either a directory within the root file system or the mount point for its own file system. Either way, a minimum of 2.4 GB is needed to install Oracle VM Manager within /u01.

The simplest way to make all the required changes is to run a script provided by Oracle called createOracle.sh. It can be found in the root directory of the Oracle VM Manager DVD. To make the changes, simply mount the DVD and run the script:

[root@ovmmgr /]# mount -t iso9660 /dev/sr0 /media
[root@ovmmgr /]# cd /media

[root@ovmmgr media]# ls -l create*
-r-xr-x---. 1 root root 10794 Jan 14 2015 createOracle.sh

[root@ovmmgr media]# ./createOracle.sh

It’s a best practice to ensure the oracle user UID and dba group GID are the same across your entire server infrastructure. Doing so avoids weirdness when copying oracle owned files from one server to another. By default, the script creates the oracle user with a UID of 54321 and the dba group with a GID of 54321. These values are unlikely to be compatible with your own standards, so to change them use these commands:

[root@ovmmgr /]# groupmod -g <your_preferred_GID> dba
[root@ovmmgr /]# usermod -u <your_preferred_UID> oracle

The security changes for the oracle user are made to the file, /etc/security/limits.conf. The Linux firewall changes are made to the file, /etc/sysconfig/iptables. It’s not required to have the Linux firewall up and running. To check its status, use this command:

[root@ovmmgr ~]# service iptables status
iptables: Firewall is not running.

If the firewall is running, the output will look something like this:

[root@ovmmgr ~]# service iptables status
Table: filter
Chain INPUT (policy ACCEPT)
num target     prot opt source      destination
1   ACCEPT     all  --  0.0.0.0/0   0.0.0.0/0   state RELATED,ESTABLISHED
2   ACCEPT     icmp --  0.0.0.0/0   0.0.0.0/0
3   ACCEPT     all  --  0.0.0.0/0   0.0.0.0/0
4   ACCEPT     tcp  --  0.0.0.0/0   0.0.0.0/0   state NEW tcp dpt:22
5   REJECT     all  --  0.0.0.0/0   0.0.0.0/0   reject-with icmp-host-prohibited

Chain FORWARD (policy ACCEPT)
num target     prot opt source      destination
1   REJECT     all  --  0.0.0.0/0   0.0.0.0/0   reject-with icmp-host-prohibited

Chain OUTPUT (policy ACCEPT)
num target     prot opt source      destination

To turn the Linux firewall off, see the relevant commands here.

Step #3: Run the Oracle VM Manager installer.

If not already mounted, mount the Oracle VM Manager DVD then run the installer script, runInstaller.sh:

[root@ovmmgr /]# mount -t iso9660 /dev/sr0 /media
[root@ovmmgr /]# cd /media
[root@ovmmgr media]# ./runInstaller.sh
Oracle VM Manager Release 3.3.2 Installer

Oracle VM Manager Installer log file:
/var/log/ovmm/ovm-manager-3-install-2015-11-25-165414.log

Please select an installation type:
   1: Install
   2: Upgrade
   3: Uninstall
   4: Help

   Select Number (1-4): 1

Starting production with local database installation ...

Verifying installation prerequisites ...

One password is used for all users created and used during the installation.
Enter a password for all logins used during the installation: <enter password>
Enter a password for all logins used during the installation (confirm): <enter password>

Please enter your fully qualified domain name, e.g. ovs123.us.oracle.com,
(or IP address) of your management server for SSL certification generation,
more than one IP address are detected:
200.200.10.5 200.200.30.5 [ovmmgr.mynet.com]: <press enter>

Note, two IP addresses were reported during my installation because my Oracle VM Manager server has two NICs configured. YMMV.

Verifying configuration ...

Start installing Oracle VM Manager:
  1: Continue
  2: Abort

  Select Number (1-2): 1

Step 1 of 9 : Database Software...
Installing Database Software...
Retrieving MySQL Database 5.6 ...
Unzipping MySQL RPM File ...
Installing MySQL 5.6 RPM package ...
Configuring MySQL Database 5.6 ...
Installing MySQL backup RPM package ...
Step 2 of 9 : Java ...
Installing Java ...

Step 3 of 9 : Database schema ...
Creating database 'ovs' ...
Creating database 'appfw'
Creating user 'ovs' for database 'ovs'...
Creating user 'appfw' for database 'appfw'

Step 4 of 9 : WebLogic and ADF...
Retrieving Oracle WebLogic Server 12c and ADF ...
Installing Oracle WebLogic Server 12c and ADF ...
Applying patches to Weblogic ...

Step 5 of 9 : Oracle VM ...
Installing Oracle VM Manager Core ...
Retrieving Oracle VM Manager Application ...
Extracting Oracle VM Manager Application ...
Retrieving Oracle VM Manager Upgrade tool ...
Extracting Oracle VM Manager Upgrade tool ...
Installing Oracle VM Manager Upgrade tool ...

Step 6 of 9 : Domain creation ...
Creating Oracle WebLogic Server domain ...
Starting Oracle WebLogic Server 12c ...
Creating Oracle VM Manager user 'admin' ...
Retrieving Oracle VM Manager CLI tool ...
Extracting Oracle VM Manager CLI tool...
Installing Oracle VM Manager CLI tool ...

Step 7 of 9 : Deploy ...
Configuring Https Identity and Trust...
Deploying Oracle VM Manager Core container ...
Configuring Client Cert Login...
Deploying Oracle VM Manager UI Console ...
Deploying Oracle VM Manager Help ...
Disabling HTTP access ...

Step 8 of 9 : Oracle VM Tools ...
Retrieving Oracle VM Manager Shell & API ...
Extracting Oracle VM Manager Shell & API ...
Installing Oracle VM Manager Shell & API ...

Retrieving Oracle VM Manager Wsh tool ...
Extracting Oracle VM Manager Wsh tool ...
Installing Oracle VM Manager Wsh tool ...

Retrieving Oracle VM Manager Tools ...
Extracting Oracle VM Manager Tools ...
Installing Oracle VM Manager Tools ...
Copying Oracle VM Manager shell to '/usr/bin/ovm_shell.sh' ...
Installing ovm_admin.sh in '/u01/app/oracle/ovm-manager-3/bin' ...
Installing ovm_upgrade.sh in '/u01/app/oracle/ovm-manager-3/bin' ...


Step 9 of 9 : Start OVM Manager ...
Enabling Oracle VM Manager service ...
Shutting down Oracle VM Manager instance ...
Starting Oracle VM Manager instance ...
Waiting for the application to initialize ...
Oracle VM Manager is running ...

Please wait while WebLogic configures the applications...
Oracle VM Manager installed.

Installation Summary
--------------------
Database configuration:
Database type              : MySQL
Database host name         : localhost
Database name              : ovs
Database listener port     : 49500
Database user              : ovs

Weblogic Server configuration:
Administration username    : weblogic
 
Oracle VM Manager configuration:
Username                   : admin
Core management port       : 54321
UUID                       : 0004fb0000010000965afbe809a1a7cb

Passwords:
There are no default passwords for any users. The passwords to use for 
Oracle VM Manager, Database, and Oracle WebLogic Server have been set by 
you during this installation. In the case of a default install, all 
passwords are the same.

Oracle VM Manager UI:
https://ovmmgr.mynet.com:7002/ovm/console
Log in with the user 'admin', and the password you set during the installation.

Note that you must install the latest ovmcore-console package for your 
Oracle Linux distribution to gain VNC and serial console access to your 
Virtual Machines (VMs). Please refer to the documentation for more 
information about this package.
For more information about Oracle Virtualization, please visit: http://www.oracle.com/virtualization/

Oracle VM Manager installation complete. 

Please remove configuration file /tmp/ovm_configw74jWS.

That’s it! How easy is that? Nice.

Using a web browser, you can now login to the Oracle VM Manager console using these credentials:

URL                : https://ovmmgr.mynet.com:7002/ovm/console
Username           : admin
Password           : <password you provided earlier>

I use Firefox to log into Oracle VM Manager. Chrome works just fine too. Internet Explorer goes off into la-la land trying to display the login box for some reason. I have better things to do than sort out IE’s issues with life. You will have to deal with your browser’s paranoia about connecting to a site which it considers verboten, but once you give it a stiff talking to, you should see an Oracle VM Manager console screen similar to this:

The tricky bit is next. See you in Part 4 – Configure OVM Server.

If you have any comments or questions about this post, please use the Contact form here.

Build Your Own Oracle Infrastructure: Part 2 – Software.

Here’s the matrix of software I used for this project. Almost all of it is available as free downloads.
Some items are interchangeable with alternatives and I’ve noted them where appropriate.
Here’s the list:

Link To Software Approximate Cost
Oracle VM Free Download
Oracle Linux Free Download
Oracle VM Console Free Download
Oracle Database 12c Free Download
Oracle Enterprise Manager Cloud Control Free Download
Oracle Enterprise Manager Repository Database Template Free Download
Oracle ASMlib rpm Free Download
Oracle GoldenGate Free Download
Openfiler Free Download
FileZilla Free Download
Putty Free Download
ImgBurn Free Download
X-Win32 $120

Software Summary.

Oracle VM.

Oracle VM is the virtualization software which allows you to create virtual Oracle database servers. It does pretty much the same job as the more popular VMware. VMware aficionados will tell you it’s by far the better product compared to Oracle VM. However, what the VMware aficionados are less likely to tell you are the issues surrounding Oracle certification, licensing and support on VMware. Simply put, Oracle has not certified any of its products on VMware virtualized environments. If you only use a few CPU cores of a VMware ESX server for Oracle, you must license ALL the cores for Oracle, whether you use them for Oracle or not. Finally, if your VMware virtual Oracle database server runs into a problem, you have to reproduce the problem in a non-virtualized environment before Oracle Support will help. They take the view than until you’ve done that, the problem might be VMware related and that, by definition, is not Oracle’s problem. Don’t believe me? Check out Doc ID 249212.1 on the My Oracle Support web portal. So which virtualization software is the better option now? Click here to start the process of downloading Oracle VM. Note, you will need a login account to download Oracle software which can be created for free here.

Oracle Linux.

Oracle Linux is basically Red Hat Linux under the covers, but it is optimized for running Oracle products. Which makes it better. If you pay for Oracle Linux support, then you have the potential benefit of dealing with the same company for operating system issues and database issues. That can help avoid finger pointing and can help get you to a resolution faster than dealing with separate support organizations. You can start the Oracle Linux download process here.

Oracle VM Console.

When you create a virtual machine it obviously won’t have a physical console you can connect to. Accessing the console is done using software. The Oracle VM Console software comes in the form of a Linux rpm called  ovmcore-console and can be downloaded here.

Oracle Database 12c.

To create Oracle 12c databases you’re going to need the Oracle Database 12c software. You can start your downloads here. Note, you’ll need to download 2 zipped files for the database, 2 zipped files for Grid Infrastructure and if the mood takes you, either the 32 bit or 64 bit 12c client. Here’s a list of the files you’ll need:

File Type File Name
Oracle Database 12c Release 1 file #1 linuxamd64_12c_database_1of2.zip
Oracle Database 12c Release 1 file #2 linuxamd64_12c_database_2of2.zip
Oracle Database 12c Release 1 Grid Infrastructure file #1 linuxamd64_12c_grid_1of2.zip
Oracle Database 12c Release 1 Grid Infrastructure file #2 linuxamd64_12c_grid_2of2.zip
Oracle Database 12c Release 1 Client (32 bit) linux_12c_client32.zip
Oracle Database 12c Release 1 Client (64 bit) linuxamd64_12c_client.zip

Oracle Enterprise Manager Cloud Control.

Oracle Enterprise Manager Cloud Control provides a comprehensive management console with which to manage and maintain your Oracle infrastructure. There are 3 files which constitute Cloud Control 12c Release 5. They can be downloaded here.

File Type File Name
Oracle Enterprise Manager Cloud Control 12c Release 5 em12105_linux64_disk1.zip
Oracle Enterprise Manager Cloud Control 12c Release 5 em12105_linux64_disk2.zip
Oracle Enterprise Manager Cloud Control 12c Release 5 em12105_linux64_disk3.zip

Oracle Enterprise Manager Repository Database Template.

Oracle Enterprise Manager Cloud Control needs a repository in which to store information about the Oracle infrastructure. Wouldn’t you know it, the repository happens to be an Oracle Database. Who knew? A decent short cut to creating the repository database is to use a template. The template which works with Cloud Control 12c Release 5 and Oracle Database 12c Release 1 (12.1.0.2) can be downloaded here.

Oracle ASMlib rpm.

An easier and more convenient way to configure ASM disks on Linux is to use Oracle’s ASM library and support packages. The support package can be installed directly from the public Yum repository. The ASMlib package can be downloaded from here.

Oracle GoldenGate.

Oracle GoldenGate is data replication software which effectively replaces Oracle’s Advanced Replication and Streams technologies. It is a very flexible data replication tool offering one to one and one to many source to target data distribution models. It can also handle bi-directional data changes and data filtering at a very granular level. The best part is it can replicate data between different databases none of which have to be Oracle! Oracle GoldenGate can be downloaded here.

Openfiler.

You already know that it’s shared storage which effectively makes Oracle RAC work. Unless you want to drop $10K+ on your very own storage filer, you’re going to need an economic alternative to EMC, NetApp, etc. This is where Openfiler comes in. It can turn ordinary PC SATA drives into SAN or NAS storage. It runs on the shared storage filer computer and presents iSCSI targets to the Oracle Linux VMs which will ultimately become clustered ASM disks. Much more on that later in this series. Openfiler is totally awesome, but some people prefer FreeNAS. Personally I’ve never used it, so can’t vouch for it either way. I do know Openfiler works well in an Oracle RAC environment because I’ve used it many times before. You can download Openfiler here.

FileZilla.

I assume you’ll be storing all this downloaded software on your desktop or laptop workstation. If so, you’ll need to copy these files to other servers in your infrastructure. FileZilla is the way to do that.  I used to be a WinSCP fan until I discovered how much faster FileZilla is and haven’t looked back. You can download FileZilla here.

Putty.

Most of the time you’ll be able to use an X Windows terminal (xterm) to connect to the various servers in your infrastructure. However, a couple of servers in the infrastructure don’t run X Windows, so you’ll need an alternative way to login to them over the network. Those servers are the shared storage Openfiler machine and the Oracle VM Server machine. Connecting to servers without X Windows is what Putty is used for. It’s a bit primitive and basic, but it works. You can download Putty here.

ImgBurn.

Once you have downloaded all the ISO software images from Oracle, you’ll need to burn them to DVD. There are many ISO image writers to choose from. The one I use is called ImgBurn. It’s simple to use, reasonably fast and best of all, it’s free. Plus you get a witty one-liner at the bottom of the window each time you run it. You can download ImgBurn here.

X-Win32.

X-Win32 is an X Windows server for Windows. You’ll need it to run the Oracle Universal Installer on Linux from your Windows workstation. It’s the best X11 emulator for Windows because it is simple to install and setup and is much cheaper than its main competitors like Reflection X and Exceed. For non-commercial personal use, the license is around $120 with paid maintenance being around $20 per year after that. There is a 30 day free trial available if you just want to check it out.

If you don’t want to spend the money, there is an alternative option called Cygwin which is free. To install it and get it working properly seems to require super human patience, luck and some ancient ritual similar to voodoo. Trust me, it’s a pain. I was also recently reminded about another free X Windows option in the form of Xming. I remember using this in the dim and distant past, so figured I’d give it another go. After messing with Putty, X11 forwarding, tunneling and the DISPLAY variable for what felt like a week, I got rather tired of fighting with it. More recently, another option has emerged called VcXsrv which seems half decent. YMMV.

The relatively small amount of money you’ll pay for X-Win32 makes it totally worth it. You can get X-Win32 here. There are some who prefer to use VNC to access server consoles directly over the network. Don’t get me started on why that’s not a good idea!

So there you have it. All the software you’ll need to build out your Oracle infrastructure. In Part 3, we’ll take a look at installing the Oracle VM software. Stay tuned for updates.

If you have any comments or questions about this post, please use the Contact form here.

Build Your Own Oracle Infrastructure: Part 1 – Hardware.

If you are interested in setting up your own Oracle infrastructure, this series is for you!

Over the course of 14 installments I will describe what I did and how I did it, along with some useful tips and tricks to help get things done.This is for educational purposes only, but much of what is presented readily translates to real world production systems.

Before we get into the details, let’s cover some basic terms of reference in the form of 3 questions.

Q1. What do I mean by an Oracle infrastructure?

Well, aside from knowing and understanding the Oracle DBA role in a general sense, for me there are 9 Oracle technologies/configurations which Senior Oracle DBAs like myself should aspire to know and know well. They cover the essentials of the operating system, administration, backup/restore, High Availability (HA), Disaster Recovery (DR), data replication, networking, storage, virtualization and of course, the database itself. Those 9 technologies/configurations are:

  • Oracle VM
  • Data Guard
  • GoldenGate
  • Oracle Linux
  • Oracle Database
  • Recovery Manager
  • Grid Infrastructure
  • Real Application Clusters
  • Oracle Enterprise Manager

In this series I will cover all of these from an installation, setup and configuration point of view. For some of them, I’ll also perform some functionality testing to make sure they do what they’re supposed to do. This will be useful when writing test plans for the real world.

Q2. Why bother?

Why bother doing anything? For me, being an Oracle DBA is not just my job. It’s what I do. I strive to be the best DBA I can be and that means research and practice. Some people, particularly IT Managers with those elusive training budgets, seem to think DBAs acquire skills and knowledge through osmosis. It’s true that DBAs do have super powers, but osmosis is not one of them! Unfortunately, understanding something and getting good at it takes practice and Oracle is no different. This series serves as my way of researching and practicing some of the most important Oracle technologies and configurations. It has already helped me pass the Oracle Certified Professional Database Administrator for Oracle Database 12c upgrade exam. I may even push on and take other OCP exams using what I learned here. My point is, be your own expert. Don’t rely upon or hang on every word of the self-appointed ‘experts’ and ‘know-it-alls’ of the Oracle industry. As Nike say, “Just do it”!

Q3. Why do it this way?

There are cheaper and easier ways to achieve the same things I set out to do. Things like Oracle VM templates and Oracle VM Virtualbox provide a quicker point-and-click way to get something done fairly rapidly. If speed is your thing, those resources are great. If understanding is your thing, then you’ll need to do things the old fashioned way by getting your hands dirty. You’ll emerge on the other side knowing and understanding way more than if you simply used the short cuts from the beginning. Once you actually understand what is going on under the covers, by all means transition to using those short cuts. One of my goals was to understand these technologies better and you can only really do that effectively by actually doing it. Not by reading about it. Not by attending presentations. Not by taking short cuts and not through osmosis!

Hardware Summary.

Here’s a summary of the hardware I used for this series. Some of this hardware I already had and some I had to buy. You won’t need to use exactly what I used and you may find cheaper alternatives which will work just as well. Other items you may choose not to use at all. Your choice. With that said, I think it’s often interesting to know exactly what someone else used and more importantly, why they used it.

Link To Component Condition Approximate Cost
Oracle VM Server Used $1,500
Oracle Database 12c & Oracle VM Manager Server New $260
Shared Storage Server New $220
Gigabit Network Switch #1 New $70
Gigabit Network Switch #2 Used $20
4 Port USB/PS2 KVM Used $30
LCD Screen Used $20
PS/2 Keyboard Used $5
USB Mouse with PS/2 adapter Used $5
UPS #1 New $380
UPS #2 New $200
Cat 6 Network Patch Cables New $20
Shelving Unit New $250
Box Fan New $20
TOTAL (Approximate) $3,000

Oracle VM Server.

  • Product : HP ProLiant DL380 G7
  • CPU : Dual 2.66 GHz Quad Core Xeon E5640
  • RAM : 72 GB (2019 upgrade to 144 GB for $250)
  • Networking : HP NC382i Dual Port Gb Server Adapters (4 Ethernet ports total)
  • Storage : HP Smart Array P410i RAID Controller, 2 x 72 GB + 6 x 300 GB SAS 10K HDs (8 HDs total)
DL380-1

This is the heart of the system, so it was important to get this right. When I first started working with Oracle Database 12c, I quickly realized it’s not available for 32 bit Linux. That rendered several of my older PCs redundant. My other PCs which could run 64 bit software did not fare much better. Let’s just say, a 2.66 GHz Pentium D CPU with 3 GB RAM and a 7.2K SATA desktop drive doesn’t get the job done. At least not very quickly. For example, I ran the DBUA to upgrade an 11.2 database to 12.1 and it took over 6 hours to complete. Who has that kind of time? Not me!

I could have bought new motherboards, CPUs and memory for these aging PCs and rebuilt my physical Oracle Database 11g RAC system with Oracle Database 12c. However, that wouldn’t have given me the opportunity to work with Oracle VM again. Plus I’d still have way too many PCs at home which all need cooling, all need a UPS outlet and all need to be stored somewhere. I also considered buying a customized super PC with lots of drives, lots of memory and lots of CPU. Something capable of running up to the 8 Linux VMs I had in mind for this project. However, that option quickly became very expensive. Some quotes I got were over $3,000!

Then I had the brilliant idea of tapping into the refurbished server market. Ever wondered what happens to servers when they go out of warranty and are replaced by a newer generation of server? No, neither did I, but it turns out companies buy them, refurbish them and sell them on. Who knew? Makes sense since solid state technology doesn’t wear out that quickly and there’s basically nothing wrong with the hardware other than the OEM won’t warranty it. The parts which do wear out, the hard drives, are easily replaced. HP branded hard drives can be purchased from a variety of sources including eBay and Amazon. The 72 GB drives I use cost between $10 and $20 per drive. Not bad. The 300 GB drives are slightly more expensive at between $25 and $40. Still, not bad.  Note, if you intend to configure more than one LUN using the internal drives and trust me you will, make sure you buy additional memory for the HP P410i RAID controller. Without its own memory, the P410i only supports one LUN.

My research turned up a fantastic company called Orange Computers. Using their website’s system builder feature, I was able to put together a customized specification for an HP ProLiant DL380 G7 for around $1,500. That’s still a lot of money, but consider what you’re getting. Server class hardware, multiple built in redundancies, designed to run 24x7x365 and guaranteed compatibility. This last point is extremely important. Oracle VM and Oracle Linux isn’t guaranteed to support every single combination of CPU, motherboard, NIC, storage array, etc. If you’re going to sink some serious cash into a system to run Oracle VM and Oracle Linux, wouldn’t you want to know for sure it’ll work rather than just hoping it will?

Oracle has an Oracle Linux and Oracle VM Hardware Certification List. It’ll tell you if your name brand system will fly. For me, the HP ProLiant DL380 G7 checked all the right boxes. Orange Computers can also sell you an extended warranty and have their own in house technical support. They are super easy to deal with and go the extra mile to ensure you get what you need. I highly recommend them.

As of 2019, depending upon the hardware configuration you want, you can acquire DL380 G7s for less than $1,000.

Oracle Database 12c & Oracle VM Manager Server.

acer_powers285

I gutted one of my older PCs and bought a new motherboard, CPU, RAM and an SSD. The CPU is pretty decent for what I need it for and the motherboard provides hardware RAID configuration options.The 16 GB of RAM is more than what is required for Oracle VM Manager, but this server will also double as a regular database server when the Oracle VM Server is not in use. Since I had plenty of spare HDs, I used the SSD drive as the boot/OS drive and the 2 HDs configured as a RAID 1 array. I’ve had good performance and reliability from the Samsung 840 and now the 850 EVO series of SSDs. I got them from Amazon for $49.99. They seem to have lightening sales on things like this every now and then. Look out for them. I’ve read about Linux compatibility issues with some PCI NICs, but Intel seem to be well supported, so I stick with them. I got the rest of the components from my local Micro Center. Their customer service has improved to the point of actually being useful. I always like to my purchases verified for compatibility. Newegg.com can do this too, but they want to charge you for the advice. Seriously! Note, you will most likely need a 2.5” to 3.5” mounting bracket for the SSD.

Shared Storage Server.

acer_powers285

I gutted another one of my older PCs and bought a new motherboard, CPU, RAM and two SSDs. The CPU is pretty decent for what I need it for and the motherboard provides hardware RAID configuration options. I already had the 2 Western Digital HDs, so configured them as a RAID 1 array. These were the basis of the shared storage for my previous Oracle Database 11g RAC setup and were purchased at a time before SSDs were affordable. Speed is important for these drives, hence the 10K rpm specification. For your own setup, disk capacity is probably not the issue but speed will be. I used one of the SSDs for the boot/OS drive and the other is used for database storage. I did want to try an SSD RAID 1 array, but when I went back to Amazon to snag more Samsung 850 EVO SSDs for $49.99 a piece, they’d sold out! I guess plenty of other people realized what a steal that was. Lesson learned – buy more next time you see them heavily discounted. They really are excellent drives. In truth, this system needs little memory and I’ve run it previously with 4 GB and it worked fine. It has 8 GB now because I initially bought a 1 x 4GB DIMM, not 2 x 2 GB DIMMs. Duh! It was less hassle just to buy an additional 4 GB DIMM. For best performance, DIMMs should be used in pairs of equal size.

Gigabit Network Switch #1.

Product : D-Link 16-Port Gigabit Switch (DGS-1016A)

DLink-16-port

I already had this switch. It is used for public and VM management traffic. You can still buy this new for around $70, almost half what I paid for it just a couple of years ago. Sixteen ports is overkill for this project. An 8 port switch will  suffice and will typically be about half the cost. D-Link make a decent looking 8 port switch which I don’t have as does TRENDnet which I do have. It has a metal case too. Nice.

Gigabit Network Switch #2.

Product : D-Link DGS-2208 8-Port 10/100/1000 Desktop Switch

DLink-8-port

I already had this switch. It will be used for the shared  storage traffic. This is an old switch, but is still going strong. The 8 ports are more than enough and you can pick up a used one for around $20. If you’re going to buy new switches for this project, you may as well get a couple of the newer D-Link 8 port switches and save yourself between $20 and $30 on my estimate for network switches.

4 Port USB/PS2 KVM.

Product : Cables To Go 4 Port USB PS2 KVM, model #35555

KVM

I already had this KVM. It is used to access the console of the HP DL380, the Oracle VM Manager computer and the shared storage filer computer. It’s an old KVM which you can buy used for around $30. I bought an updated version of this KVM a couple of years ago, but it’s not as well behaved as this one. For this project you will need to get into the BIOS of all 3 computers. To do that you typically need to press a specific key as the computer boots up. While connected to a computer’s console via the newer KVM, it routinely ignored my key stroke during boot up. Tres annoying. The older KVM didn’t have that problem so I stuck with that one. Your mileage may vary.

LCD Screen.

Product : ViewSonic VA503b

viewsonic

I already had this screen. It doesn’t really matter what screen you use as long as it has a VGA connection and plays nicely with your KVM. It doesn’t have to be that fancy either since you won’t be spending that much time working with this screen. It makes me cringe to think I paid $150 for this screen back in 2006. I found a refurbished one on eBay for $20. It is a nice screen though. ViewSonic make decent gear.

PS/2 Keyboard.

Product : Gateway KB0532

gateway-kbd

I already had this keyboard left over from an old Gateway PC I used to have.

The important point about this keyboard is it has a PS/2 style connector which plugs directly into the back of the KVM. That’s important because it guarantees your boot up key stroke will be recognized when you’re trying to get into the computer BIOS.

USB keyboard key strokes can be ignored if the USB drivers are not loaded early enough in the boot up sequence. That can prevent you from getting into the BIOS and will ultimately lead to expletives and threats of physical violence against an inanimate object. Any PC keyboard with a PS/2 style connector should do the trick, but you can pick one of these up pretty cheaply.

USB Mouse.

Product : HP USB Mouse P/N: 505062-001 Rev.A

hp-mouse

I already had this mouse left over from my HP desktop. It is the cheapest and nastiest mouse ever. The sort of thing you might expect to find in a Christmas cracker, but hey it works.

I have this connected to a USB port on the front of the KVM. I have a USB/PS2 adapter for it, but when I use that to connect it to the KVM, it doesn’t work. Weird. Literally any USB mouse should work.

UPS #1.

Product : Tripp Lite SMART1500SLT 1500VA 900W

tripp-lite_smart1500slt_front

I already had this UPS. It provides 8 outlets all of which are protected and have battery backup. I use it for the HP DL380 and the network switches. I am a little paranoid about noise, heat and dirty power. This unit scores high on only two of those since it is a little noisy due to the rear panel fan. It is also quite heavy. That said, all 8 outlets provide the same functionality so you don’t have to choose between just surge protection or surge and battery protection. Personally I wouldn’t buy another one. Instead I’d buy another CyberPower.


In 2018, I replaced this with another CyberPower CP1500PFC LCD which was only slightly more expensive than replacing the failed battery in this Tripp Lite unit.

UPS #2.

Product : CyberPower CP1500PFCLCD Sinewave USP 1500VA 900W

cyberpower-ups

I bought this additional UPS because I didn’t want to overload the Tripp Lite unit. I really like these CyberPower units and have several of them. They are much smaller and lighter than the Tripp Lite. They also clean the power, are completely silent and have a small LCD screen which displays the voltage and battery load.

Only half of the 10 outlets provide battery backup as well as surge protection, but that’s enough for the OVM Manager and shared storage filer computers plus the KVM and LCD screen.

Cat 6 Network Patch Cables.

Products : Cable Matters 5-Pack of 3 feet Cat6 Patch Cables, Cable Matters 5-Pack of 5 Feet Cat6 Patch Cables

cat6

I already had plenty of patch cables and a total of 6 are needed for this system. These come in packs of 5 and are very reasonably priced. You may as well get 2 packs of different lengths. That way you can choose the appropriate length for each connection and have some cables left over which you’re bound to use at some point.

Shelving Unit.

Products : 3 x InterMetro 18”x48” Solid Shelf, 2 x InterMetro 18”x48” Wire Shelf, 4 x InterMetro 62.5” Post, 1 x InterMetro Swivel Caster Set

shelving

I get this stuff from The Container Store and it is totally awesome. I already had most of it, but bought an additional wire shelf so I could position the HP DL380 at the right height for the box fan.

The HP DL380 is obviously a rack mount server and since I don’t have a purpose built server rack, these shelves are a perfect alternative.

Box Fan.

Product : Lasko 20” 3 Speed Box Fan

boxfan

I already had this fan. Did I mention my paranoia about heating and cooling? You can often pick up these types of fan from your local grocery store or favorite DIY outlet for very little money. They’re not silent even on the lowest setting, but they do provide great air flow over quite a large area. They’re also incredibly cheap to run.

Depending upon your system’s location and proximity to air conditioning, you may not even need it.

So there you have it, all the hardware you’ll need to build your own Oracle infrastructure.

As I mentioned earlier, you won’t necessarily have to use all the equipment I used as specified. Cheaper and reduced specification options are available, but hopefully this gives you some idea of what you’ll need to make everything work successfully.

It was a lot of fun putting this equipment together. Click on the thumbnail right to see what it all looks like when assembled. Nice!

In Part 2, we’ll cover all the software you’ll need to build your own Oracle infrastructure. Stay tuned for updates.

If you have any comments or questions about this post, please use the Contact form here.