

With the recent release of Oracle Enterprise Manager Cloud Control 13c Release 2 Plug-in Update 1, I felt it was time to finally say goodbye to 12c Release 5.
The Oracle documentation does a pretty decent job of explaining how to uninstall Oracle Enterprise Manager (OEM) Cloud Control (CC) 12c Release 5 which can be accessed here.
The only weirdness I encountered was while uninstalling the Oracle Management Agents. Everything worked successfully, but the final output of the AgentDeinstall.pl script was this:
Can't locate Carp.pm in @INC (@INC contains:
/u01/oracle/agent/core/12.1.0.5.0/perl/lib/5.10.0/x86_64-linux-thread-multi
/u01/oracle/agent/core/12.1.0.5.0/perl/lib/5.10.0
/u01/oracle/agent/core/12.1.0.5.0/perl/lib/site_perl/5.10.0/x86_64-linux-thread-multi
/u01/oracle/agent/core/12.1.0.5.0/perl/lib/site_perl/5.10.0
/u01/oracle/agent/core/12.1.0.5.0/perl/lib/5.10.0/x86_64-linux-thread-multi
/u01/oracle/agent/core/12.1.0.5.0/perl/lib/5.10.0/x86_64-linux-thread-multi
/u01/oracle/agent/core/12.1.0.5.0/perl/lib/5.10.0
/u01/oracle/agent/core/12.1.0.5.0/perl/lib/site_perl/5.10.0/x86_64-linux-thread-multi
/u01/oracle/agent/core/12.1.0.5.0/perl/lib/site_perl/5.10.0
/u01/oracle/agent/core/12.1.0.5.0/perl/lib/site_perl .) at
/u01/oracle/agent/core/12.1.0.5.0/perl/lib/5.10.0/File/Path.pm line 32.
The uninstall worked OK, so I’m guessing this message is just a ‘special feature’ which we can ignore. ?
To install OEM CC 13c R2, we will need a server. I’m going to use the same server (oraemcc) to run the Oracle Management Service (OMS) and the Management Repository Database (MRDB). Since we’ll need a little more space than we did for the OEM CC 12c R5 installation, I increased the size of the /u01 and /u02 file systems on oraemcc accordingly:
| File System | Old Size | New Size | Usage |
|---|---|---|---|
| /u01 | 30 GB | 50 GB | Oracle Software Installations |
| /u02 | 30 GB | 80 GB | Oracle Database Files |
There are 4 main tasks we need to complete to get OEM CC 13c R2 up and running. Click the link you need:
Task #1: Download the Software.
Task #2: Install the Oracle Database Software (12.1.0.2).
Task #3: Create the Respository Database.
Task #4: Install OEM CC 13c R2.
Task #1: Download the Software.
You will need to download 3 different pieces of software. The database software, the database template and the OEM software:
| Software | Location |
|---|---|
| Oracle Database 12c Release 1 (12.1.0.2) Enterprise Edition for Linux x86-64 | Download Page |
| 12.1.0.2 DB Template with CDB PDB for EM 13.2.0.0 on Linux x86-64 | Download Page |
| OEM CC 13c R2 Plug-in Update 1 for Linux x86-64 (64 bit) | Download Page |
We will be using a CDB with a PDB containing the Management Repository. You don’t have to set it up this way, but I’m going to use another PDB within the same CDB to host an RMAN Catalog. See Part 12 of my Build Your Own Oracle Infrastructure series for more details.
Task #2: Install the Oracle Database Software (12.1.0.2).
This particular task is covered here so I won’t dwell on it again. Once the database software is installed, copy the template zip file to $ORACLE_HOME/assistants/dbca/templates and unzip it:
[oracle@oraemcc]$ pwd
/u01/app/oracle/product/12.1.0/dbhome_1/assistants/dbca/templates

[oracle@oraemcc]$ unzip 12.1.0.2.0_Database_Template_with_cdbpdb_for_EM13_2_0_0_0_Linux_x64.zip
Archive:  12.1.0.2.0_Database_Template_with_cdbpdb_for_EM13_2_0_0_0_Linux_x64.zip
  inflating: set_repo_param_12.1.0.2.0_Database_SQL_for_EM13_2_0_0_0_Large_deployment.sql
  inflating: set_repo_param_12.1.0.2.0_Database_SQL_for_EM13_2_0_0_0_Medium_deployment.sql
  inflating: set_repo_param_12.1.0.2.0_Database_SQL_for_EM13_2_0_0_0_Small_deployment.sql
  inflating: shpool_12.1.0.2.0_Database_SQL_for_EM13_2_0_0_0.sql
  inflating: 12.1.0.2.0_Database_Template_with_cdbpdb_for_EM13_2_0_0_0_Large_deployment.dbc
  inflating: 12.1.0.2.0_Database_Template_with_cdbpdb_for_EM13_2_0_0_0_Medium_deployment.dbc
  inflating: 12.1.0.2.0_Database_Template_with_cdbpdb_for_EM13_2_0_0_0_Small_deployment.dbc
  inflating: 12.1.0.2.0_Database_Template_with_cdbpdb_for_EM13_2_0_0_0.dfb1
  inflating: 12.1.0.2.0_Database_Template_with_cdbpdb_for_EM13_2_0_0_0.dfb2
  inflating: 12.1.0.2.0_Database_Template_with_cdbpdb_for_EM13_2_0_0_0.dfb3
  inflating: 12.1.0.2.0_Database_Template_with_cdbpdb_for_EM13_2_0_0_0.ctl
Task #3: Create the Repository Database.
Again, I have already covered this task here for 12c Release 5. It’s essentially the same process and is reasonably documented by Oracle here. However, a few things are worth noting.
Note #1: Pick the Correct Template.
The names of the templates are so long now that they extend beyond the width of Template field as shown in the screen shot. That’s fine except you can’t increase the width of the field to see which template is which. I could increase the size of the window, but not the width of the field. Genius!
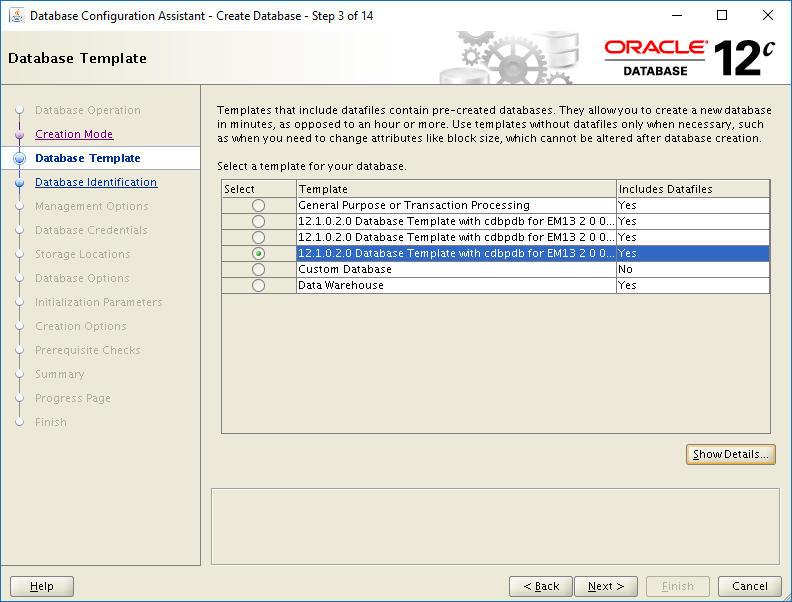
Click to Open Full Size
The template selected in the screen shot is the one for a small repository. Clicking any of the radio buttons in the Select column and then clicking the Show Details button will show you more information about that template. How about putting “small”, “medium” or “large” at the beginning of the template name? Thanks Captain Obvious! ?
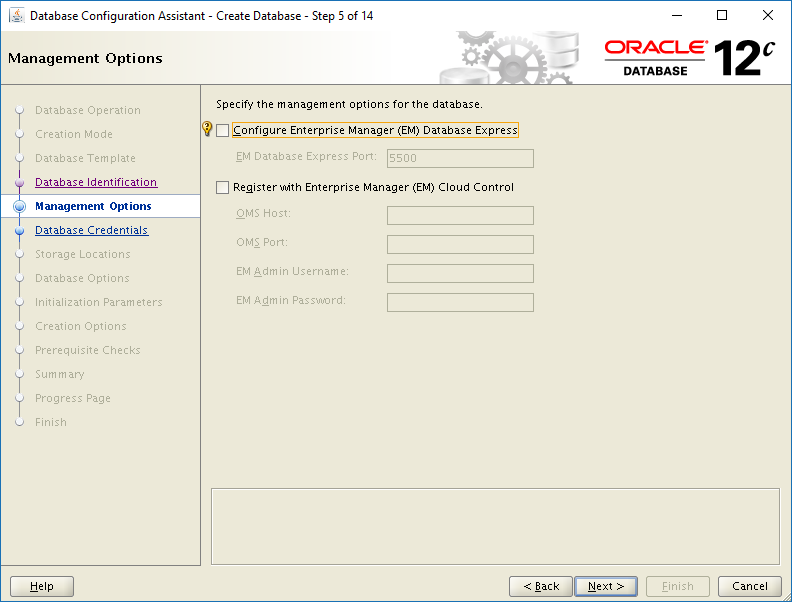
Note #2: Do Not Configure Enterprise Manager.
The documentation does mention this, but it’s worth repeating because not following this instruction will lead to bad things happening. When you get to Step #5 in the dbca dialogue, make sure both Enterprise Manager options are UNCHECKED, as shown in the screen shot below.
Click to Open Full Size
Note #3: Run the shpool SQL Script.
The documentation still includes this warning:
“When you run Oracle Database Configuration Assistant to create the database, on the Database Content screen, by default the Run the following scripts option is selected to run the shpool script. The script sets the shared pool in the database. Make sure you RETAIN THE SELECTION. Do not deselect it.”
There is no Database Content screen as the left panel of the screen shots above clearly show. The script still isn’t called “shpool” either. It’s actually called:
shpool_12.1.0.2.0_Database_SQL_for_EM13_2_0_0_0.sql
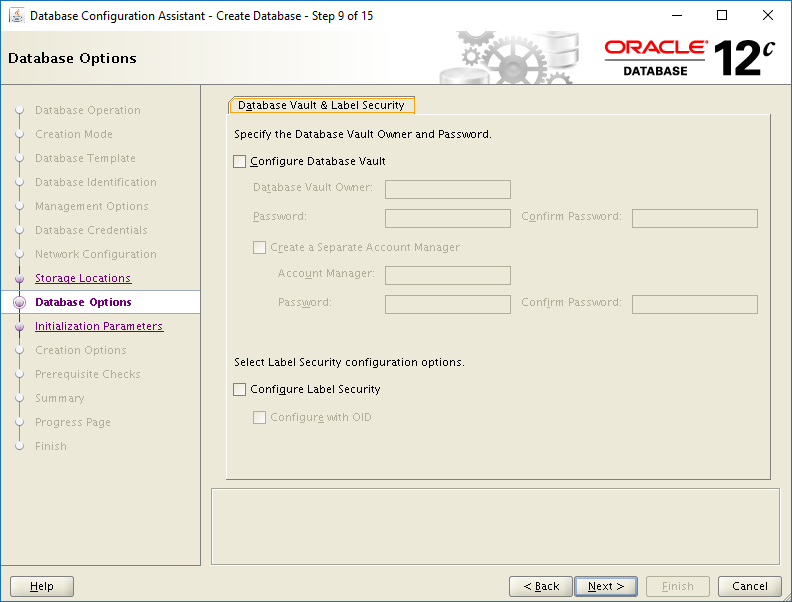
Unlike with the 12c Release 5 procedure, there is no option to specify a custom script on the Step 9 screen. This is what the Step 9 screen looks like when using the 13c Release 2 database template:
Click to Open Full Size
As you can see, no option to specify the shpool SQL script. Instead, I let the dbca run to completion, then ran the shpool SQL script from a SQL*Plus session once the database had been created:
[oracle@oraemcc templates]$ pwd
/u01/app/oracle/product/12.1.0/dbhome_1/assistants/dbca/templates

[oracle@oraemcc templates]$ . oraenv
ORACLE_SID = [oracle] ? PADMIN
The Oracle base remains unchanged with value /u01/app/oracle

[oracle@oraemcc templates]$ sqlplus / as sysdba
SQL*Plus: Release 12.1.0.2.0 Production on Mon Feb 26 13:59:34 2018
Copyright (c) 1982, 2014, Oracle. All rights reserved.

Connected to:
Oracle Database 12c Enterprise Edition Release 12.1.0.2.0 - 64bit Production
With the Partitioning, OLAP, Advanced Analytics and Real Application Testing options

SQL> @shpool_12.1.0.2.0_Database_SQL_for_EM13_2_0_0_0.sql
System altered.
System altered.
System altered.
I did a little research on this and it would appear not having the option to specify a SQL script on on the Step 9 screen may have something to do with the template I used. YMMV.
Note #4: The PDB Containing the Management Repository.
Using this template creates a CDB (called PADMIN in my case) and a PDB called EMPDBREPOS. You can call the CDB what you like, but the name of the PDB is fixed. You can tell the PDB contains the Management Repository tablespaces by using these queries:
SQL> show con_name

CON_NAME
------------------------------
CDB$ROOT

SQL> select file_name from dba_data_files;

FILE_NAME
--------------------------------------------------------------------------------
/u02/oradata/PADMIN/datafile/o1_mf_users_f96sgg98_.dbf
/u02/oradata/PADMIN/datafile/o1_mf_undotbs1_f96sghfp_.dbf
/u02/oradata/PADMIN/datafile/o1_mf_system_f96sbzxo_.dbf
/u02/oradata/PADMIN/datafile/o1_mf_sysaux_f96s8dcb_.dbf

SQL> alter session set container=EMPDBREPOS;
Session altered.

SQL> show con_name

CON_NAME
------------------------------
EMPDBREPOS

SQL> select file_name from dba_data_files;

FILE_NAME
--------------------------------------------------------------------------------
/u02/oradata/PADMIN/datafile/o1_mf_users_f96slktd_.dbf
/u02/oradata/PADMIN/datafile/o1_mf_system_f96sfc35_.dbf
/u02/oradata/PADMIN/datafile/o1_mf_sysaux_f96sllyg_.dbf
/u02/oradata/PADMIN/datafile/o1_mf_mgmt_tab_f96smp4m_.dbf
/u02/oradata/PADMIN/datafile/o1_mf_mgmt_ecm_f96sbwrj_.dbf
/u02/oradata/PADMIN/datafile/o1_mf_mgmt_ad4_f96so3by_.dbf
Task #4: Install OEM CC 13.2.
There are different hardware and software requirements for installing Release 13.2 depending upon the size and complexity of your infrastructure. We will be performing the simple/small installation. Here are the links to the relevant sections of Oracle’s documentation:
- OEM CC 13.2 Hardware Requirements
- OEM CC 13.2 Operating System Requirements
- OEM CC 13.2 Operating System Group & User Requirements
Task #4, Step #1/2: Pre-Installation Check List.
Despite performing a simple/small installation, it makes sense to go through the main items in the pre-installation/prerequisite check list. These are documented in full here, but here are a selection of just 9 to keep you amused:
Check #1: White Space.
Ensure there is no white space in the name of the directory from which you will run the installer:
[oracle@oraemcc ~]$ cd /u01/MEDIA/oem_13cr2p1

[oracle@oraemcc oem_13cr2p1]$ ls -l
-rwxr-xr-x 1 oracle oinstall 2123211088 Feb 24 18:45 em13200p1_linux64-2.zip
-rwxr-xr-x 1 oracle oinstall 741526563 Feb 24 18:45 em13200p1_linux64-3.zip
-rwxr-xr-x 1 oracle oinstall 2084231936 Feb 24 18:46 em13200p1_linux64-4.zip
-rwxr-xr-x 1 oracle oinstall 109191154 Feb 24 18:45 em13200p1_linux64-5.zip
-rwxr-xr-x 1 oracle oinstall 2146696423 Feb 24 18:47 em13200p1_linux64-6.zip
-rwxr-xr-x 1 oracle oinstall 771426157 Feb 24 18:47 em13200p1_linux64-7.zip
-rwxr-xr-x 1 oracle oinstall 554606940 Feb 24 18:47 em13200p1_linux64.bin
Check #2: DISPLAY Variable.
Ensure your DISPLAY environment variable is set accordingly (i.e. to the hostname or IP address of the server from where you’ll run the installation):
[oracle@oraemcc ~]$ export DISPLAY=200.200.10.16:0.0
Check #3: Disable the Optimizer Adaptive Feature.
If you used the database template, then this should have been taken care of already, but let’s check:
SQL> show con_name

CON_NAME
------------------------------
CDB$ROOT

SQL> show parameter optimizer_adaptive_features

NAME TYPE VALUE
------------------------------------ ----------- ------------------------------
optimizer_adaptive_features boolean FALSE

SQL> alter session set container=empdbrepos;
Session altered.

SQL> show con_name

CON_NAME
------------------------------
EMPDBREPOS

SQL> show parameter optimizer_adaptive_features

NAME TYPE VALUE
------------------------------------ ----------- ------------------------------
optimizer_adaptive_features boolean FALSE
Check #4: Middleware Home Path.
Ensure the full path to the Middleware home directory does not exceed 70 characters:
[oracle@oraemcc middleware]$ pwd
/u01/app/oracle/product/middleware

[oracle@oraemcc middleware]$ pwd | wc -c
35
Check #5: Unique Hostname & Static IP.
Ensure the installation server resolves to a unique hostname and that it uses a static IP address. Note, my DNS server happens to be oraemcc:
[oracle@oraemcc middleware]$ nslookup oraemcc
Server: 200.200.10.16
Address: 200.200.10.16#53

Name: oraemcc.mynet.com
Address: 200.200.10.16
Check #6: Temp Space.
Ensure there is at least 10 GB of temp space. In my case, temporary files will be written to the root (/) file system:
[oracle@oraemcc ~]$ df -h
Filesystem   Size Used Avail  Use% Mounted on
/dev/mapper/vg_oraemcc-lv_root
              33G 6.0G   26G   20%  /
tmpfs        7.9G  72K  7.9G    1% /dev/shm
/dev/xvdb1   477M 123M  325M   28% /boot
/dev/xvdc1    50G  39G   11G   79% /u01
/dev/xvdd1    79G  11G   69G   14% /u02
Check #7: Installation User umask.
Ensure the installation user (oracle) has umask set to 022 in the shell profile file:
[oracle@oraemcc ~]$ umask
0022
Check #8: Unset Environment Variables.
Ensure these environment variables are not set:
[oracle@oraemcc ~]$ echo $CLASSPATH

[oracle@oraemcc ~]$ echo $ORACLE_SID

[oracle@oraemcc ~]$ echo $ORACLE_HOME
Check #9: Network Ports.
In a production environment, I have come across situations where the required ports are being blocked by the corporate firewall. This provides an excellent opportunity to makes friends with the Network Administrator. If you’re really lucky and work in a bureaucratic nightmare, you’ll get to fill out lots and lots of forms to ask really nicely if your ports can be opened up, pretty please. ?
The port requirements are fully documented here, but essentially boil down to these (YMMV):
| Usage | Port# |
|---|---|
| Enterprise Manager Upload HTTP Port | 4889 |
| Enterprise Manager Upload HTTP SSL Port | 4903 |
| OHS HTTP Port | 9788 |
| OHS HTTP SSL Port | 9851 |
| Oracle BI Publisher HTTP Port | 9701 |
| Oracle BI Publisher HTTP SSL Port | 9803 |
| OEM Central Console HTTP Port | 7788 |
| OEM Central Console HTTP SSL Port | 7802 |
| Node Manager HTTP SSL Port | 7403 |
| Managed Server HTTP Port | 7202 |
| Managed Server HTTP SSL Port | 7301 |
| Management Agent Port | 3872 |
| Admin Server HTTP SSL Port | 7102 |
Use the netstat command to figure out if a port is being used. If the command returns no output, then it’s free. Let’s use port #1521 as an example because we know the TNS Listener process is using that port:
[oracle@oraemcc ~]$ netstat -an | grep 1521
tcp 0 0 200.200.10.16:64321 200.200.10.16:1521 ESTABLISHED
tcp 0 0 :::1521 :::* LISTEN
tcp 0 0 ::ffff:200.200.10.16:1521 ::ffff:200.200.10.16:64321 ESTABLISHED
unix 2 [ ACC ] STREAM LISTENING 70836 /var/tmp/.oracle/sEXTPROC1521
Now let’s try port #3872 which will be the Management Agent port (not currently being used):
[oracle@oraemcc ~]$ netstat -an | grep 3872
[oracle@oraemcc ~]$
Step #2: Run the Installation Wizard.
Gone are the days when we’d invoke the runInstaller installer. Now it’s called a Wizard. Coloring books and crayons are optional. A couple of things to note here. First, you’ll be executing the .bin file and second, you don’t unzip any of the other files. The ‘wizard’ will do that for us since we can’t be trusted, apparently:
[oracle@oraemcc ~]$ cd /u01/MEDIA/oem_13cr2p1

[oracle@oraemcc oem_13cr2p1]$ ls -l
-rw-r--r-- 1 oracle oinstall 2123211088 Feb 24 18:45 em13200p1_linux64-2.zip
-rw-r--r-- 1 oracle oinstall 741526563 Feb 24 18:45 em13200p1_linux64-3.zip
-rw-r--r-- 1 oracle oinstall 2084231936 Feb 24 18:46 em13200p1_linux64-4.zip
-rw-r--r-- 1 oracle oinstall 109191154 Feb 24 18:45 em13200p1_linux64-5.zip
-rw-r--r-- 1 oracle oinstall 2146696423 Feb 24 18:47 em13200p1_linux64-6.zip
-rw-r--r-- 1 oracle oinstall 771426157 Feb 24 18:47 em13200p1_linux64-7.zip
-rw-r--r-- 1 oracle oinstall 554606940 Feb 24 18:47 em13200p1_linux64.bin
I had to add execute permissions before the .bin file would run:
[oracle@oraemcc oem_13cr2p1]$ chmod 755 *
[oracle@oraemcc oem_13cr2p1]$ ./em13200p1_linux64.bin
Invoking the wizard generates this screen output:
0%...............................................................................100%
Launcher log file is /tmp/OraInstall2018-02-26_07-08-06PM/launcher2018-02-26_07-08-06PM.log.
Starting Oracle Universal Installer

Checking if CPU speed is above 300 MHz. Actual 2665.986 MHz Passed
Checking monitor: must be configured to display at least 256 colors. Actual 16777216 Passed
Checking swap space: must be greater than 512 MB. Actual 16383 MB Passed
Checking if this platform requires a 64-bit JVM. Actual 64 Passed (64-bit not required)

Preparing to launch the Oracle Universal Installer from /tmp/OraInstall2018-02-26_07-08-06PM
====Prereq Config Location main===
/tmp/OraInstall2018-02-26_07-08-06PM/stage/prereq
EMGCInstaller args -scratchPath
EMGCInstaller args /tmp/OraInstall2018-02-26_07-08-06PM
EMGCInstaller args -sourceType
EMGCInstaller args network
EMGCInstaller args -timestamp
EMGCInstaller args 2018-02-26_07-08-06PM
EMGCInstaller args -paramFile
EMGCInstaller args /tmp/sfx_ArNIXh/Disk1/install/linux64/oraparam.ini
EMGCInstaller args -nocleanUpOnExit
DiskLoc inside SourceLoc/u01/MEDIA/oem_13cr2p1
EMFileLoc:/tmp/OraInstall2018-02-26_07-08-06PM/oui/em/
ScratchPathValue :/tmp/OraInstall2018-02-26_07-08-06PM
Then what looks suspiciously like an installer screen appears and we’re off to the races. Uncheck the option to receive security updates and click Next:
Click to Open Full Size
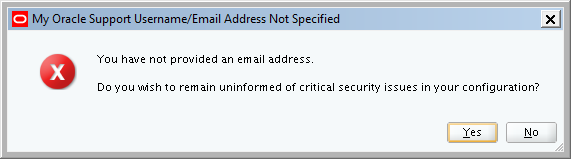
Ignore the patronizing warning message by clicking Yes:
Click to Open Full Size
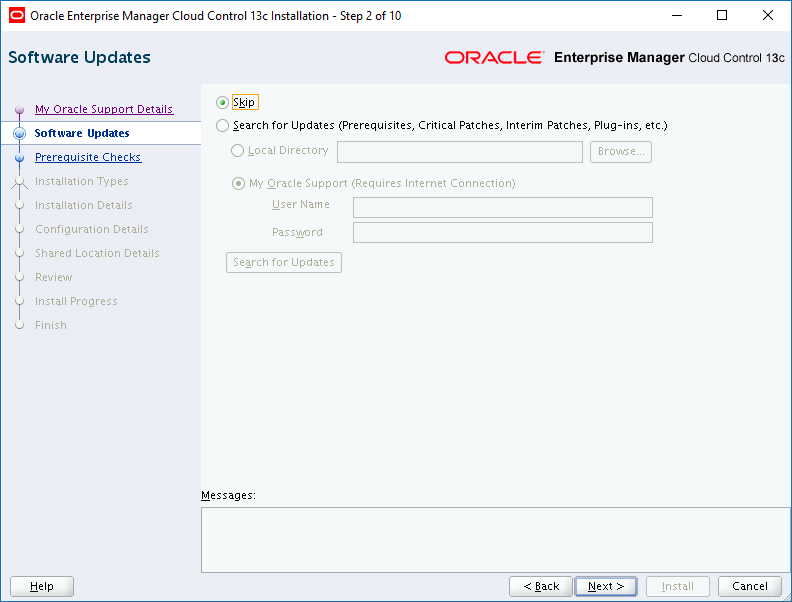
Select the Skip radio button and click Next:
Click to Open Full Size
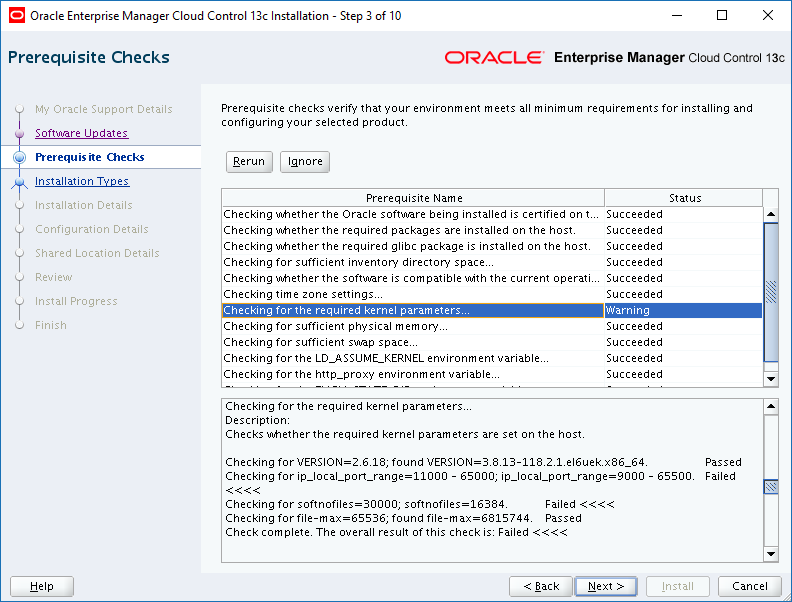
So here we have a couple of prereq check failures. I left these in to drawn your attention to a ‘gotcha’.
Click to Open Full Size
We’re using the same server to run both the OMS and the MRDB. Consequently, we needed to install the Database 12c Release 1 database and before that, we installed the Oracle Database 12c Release 1 pre-install package into the OS. That installation is documented here.
Check if it’s installed:
[root@oraemcc ~]# rpm -qa | grep rdbms
oracle-rdbms-server-12cR1-preinstall-1.0-14.el6.x86_64
Installing this package has the effect of setting the local port range to a range the OEM 13.2 installer doesn’t like. Changing it is simple enough:
[root@oraemcc ~]# vi /etc/sysctl.conf
...
# oracle-rdbms-server-12cR1-preinstall setting for net.ipv4.ip_local_port_range is 9000 65500
net.ipv4.ip_local_port_range = 9000 65500
Change the entry to this:
# oracle-rdbms-server-12cR1-preinstall setting for net.ipv4.ip_local_port_range is 9000 65500
#net.ipv4.ip_local_port_range = 9000 65500
net.ipv4.ip_local_port_range = 11000 65000
Activate the change:
[root@oraemcc ~]# sysctl -p
net.ipv4.ip_forward = 0
net.ipv4.conf.default.rp_filter = 1
net.ipv4.conf.default.accept_source_route = 0
kernel.sysrq = 0
kernel.core_uses_pid = 1
net.ipv4.tcp_syncookies = 1
kernel.msgmnb = 65536
kernel.msgmax = 65536
kernel.shmall = 4294967296
fs.file-max = 6815744
kernel.sem = 250 32000 100 128
kernel.shmmni = 4096
kernel.shmmax = 4398046511104
kernel.panic_on_oops = 1
net.core.rmem_default = 262144
net.core.rmem_max = 4194304
net.core.wmem_default = 262144
net.core.wmem_max = 1048576
fs.aio-max-nr = 1048576
net.ipv4.ip_local_port_range = 11000 65000
The softnofiles issue is slightly more devious. The soft and hard limits for the number of files a process can have open is (usually) set in the file, /etc/security/limits.conf:
[root@oraemcc ~]# vi /etc/security/limits.conf

...
oracle   soft   nofile  8192
oracle   hard   nofile  65536
...
However, the error is reporting the soft limit is currently set to 16384 which, according to the value in /etc/security/limits.conf, is NOT the current soft limit. Trust me, setting either the hard or soft limit in this file will have no effect on the error the OEM 13.2 installer is reporting. So what’s going on?
Installing the pre-install RDBMS package creates a configuration file which overrides the limits.conf file:
[root@oraemcc ~]# cd /etc/security/limits.d
[root@oraemcc limits.d]# ls -l

-rw-r--r--. 1 root root  191 Aug 18  2015 90-nproc.conf
-rw-r--r--  1 root root 1093 Feb 26 21:52 oracle-rdbms-server-12cR1-preinstall.conf

[root@oraemcc limits.d]# view oracle-rdbms-server-12cR1-preinstall.conf

# oracle-rdbms-server-12cR1-preinstall setting for nofile soft limit is 1024
oracle   soft   nofile    1024
# oracle-rdbms-server-12cR1-preinstall setting for nofile hard limit is 65536
oracle   hard   nofile    16384
...
This is where the OEM 13.2 installer is getting its information from and is actually using the hard limit, not the soft limit. Editing this file will fix the problem, but you will need to reboot afterwards, re-start the MRDB and start the OEM 13.2 installation again.
[root@oraemcc limits.d]# vi oracle-rdbms-server-12cR1-preinstall.conf

# oracle-rdbms-server-12cR1-preinstall setting for nofile soft limit is 1024
oracle   soft   nofile    30000
# oracle-rdbms-server-12cR1-preinstall setting for nofile hard limit is 65536
oracle   hard   nofile    65536
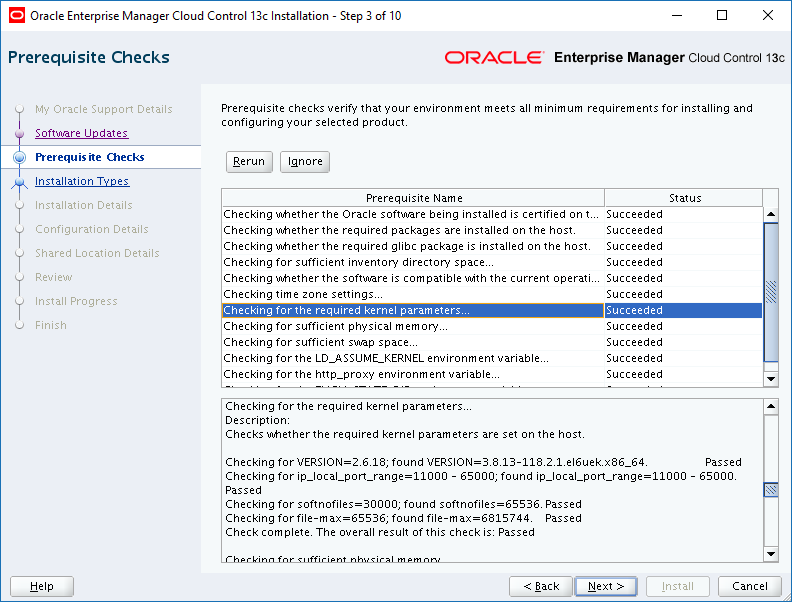
Notice it’s the hard limit value the OEM 13.2 installer references. With all the prereq checks successfully completed, click Next:
Click to Open Full Size
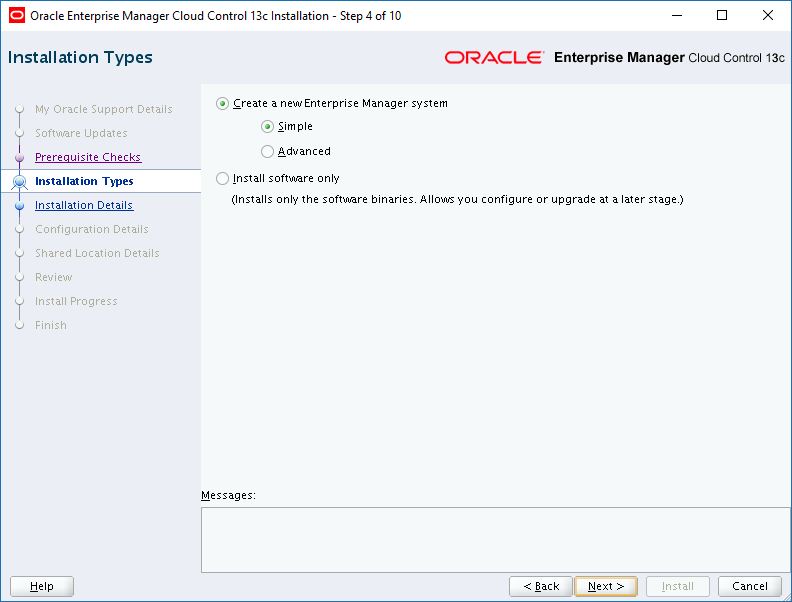
Select the Simple option of Create a new Enterprise Manager system, then click Next:
Click to Open Full Size
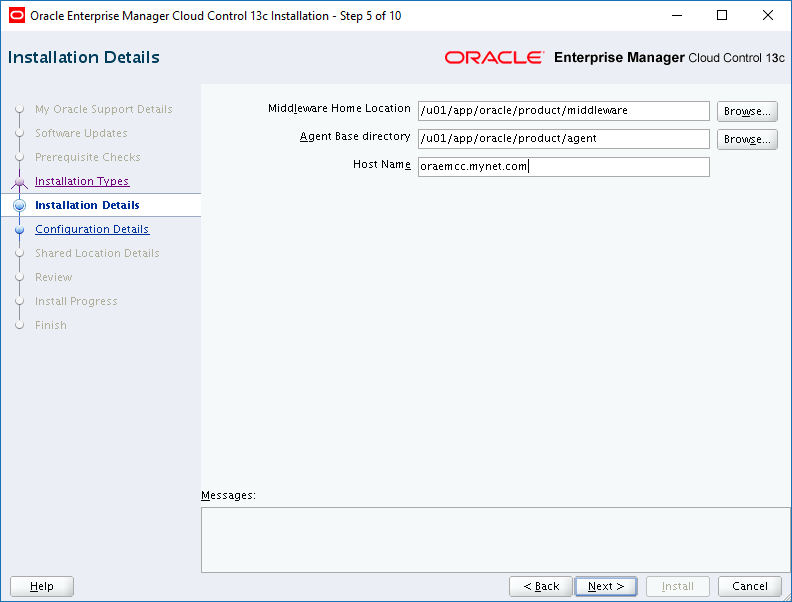
Use these values to populate this next screen, then click Next:
| Field | Value |
|---|---|
| Middleware Home Location | /u01/app/oracle/product/middleware |
| Agent Base Directory | /u01/app/oracle/product/agent |
| Home Name | oraemcc.mynet.com |
Click to Open Full Size
Dream up a suitable password for all the accounts mentioned in the next screen. Write it down now. You will need it shortly. Also, use these values to populate this next screen, then click Next:
| Field | Value |
|---|---|
| Database Host Name | oraemcc.mynet.com |
| Port | 1521 |
| Service/SID | emdbrepos.mynet.com |
| SYS Password | The SYS password you used to create the MRDB |

Click to Open Full Size
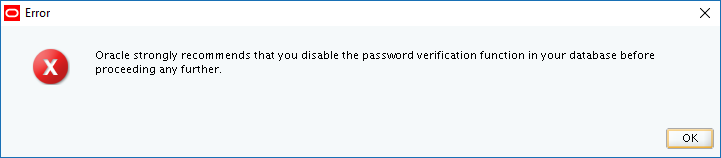
Now we hit another little gotcha. Clicking Next on the previous screen attempted to make a connection to the PDB containing the Management Repository. However, when we rebooted earlier, the CDB probably came back up, but the PDB probably did not. If that was the case, you see this rather misleading error message:
Click to Open Full SIze
Let’s login to the CDB and find out what’s going on:
SQL> select name, open_mode from v$pdbs;

NAME                           OPEN_MODE
------------------------------ ----------
PDB$SEED                       READ ONLY
EMPDBREPOS                     MOUNTED

SQL> alter pluggable database EMPDBREPOS open;
Pluggable database altered.

SQL> select name, open_mode from v$pdbs;

NAME                           OPEN_MODE
------------------------------ ----------
PDB$SEED                       READ ONLY
EMPDBREPOS                     READ WRITE
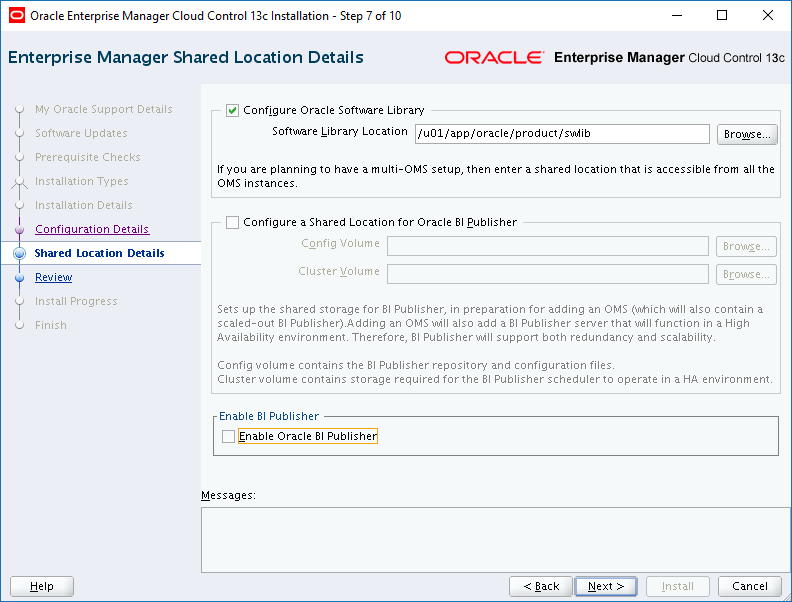
Click the OK button on the error window, then click Next again. That will land you on this next screen. I’m not interested in Oracle BI Publisher, so I unchecked those options and left the Software Library Location at its default value (/u01/app/oracle/product/swlib):
Click to Open Full Size
Click Next and we end up on a summary screen. Here’s the top half:
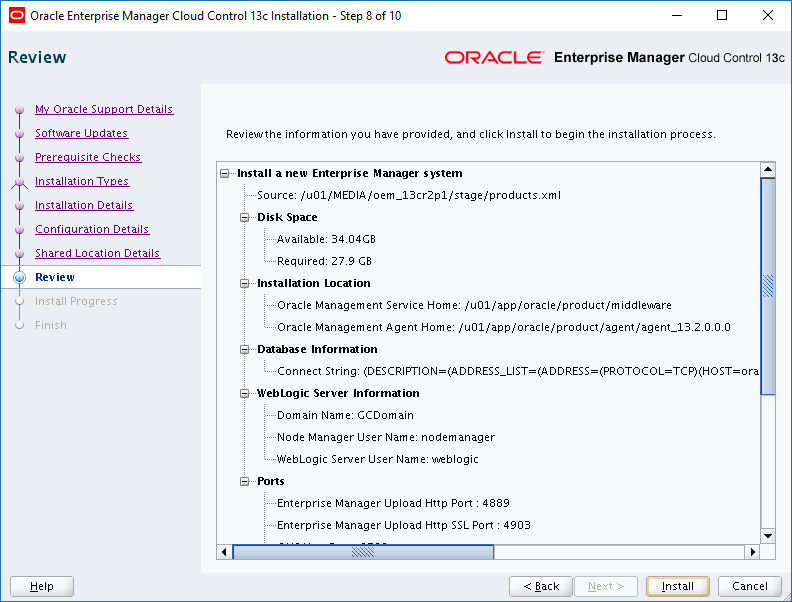
Click to Open Full Size
Here’s the bottom half showing all the default ports:
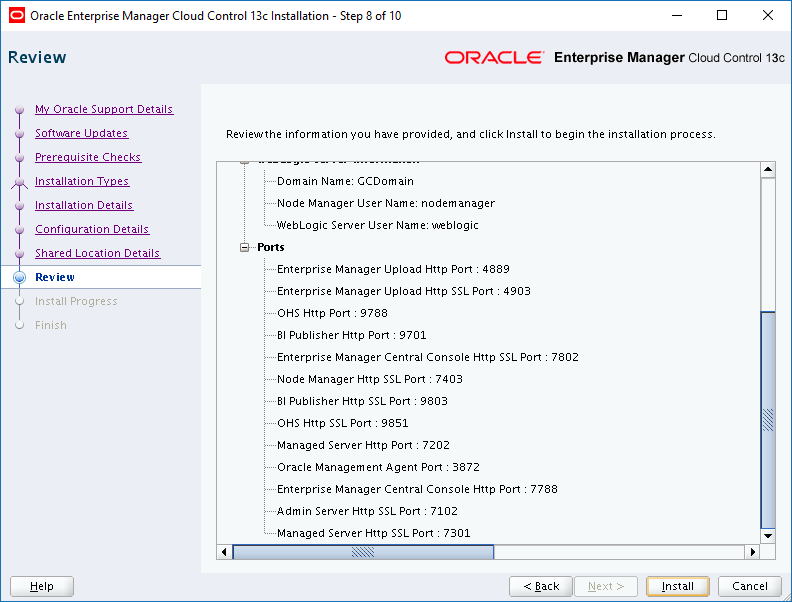
Click to Open Full Size
Click the Install button and then wait. Your next task will be to run a root script. It took close to 2 hours to reach that stage on my system. YMMV:
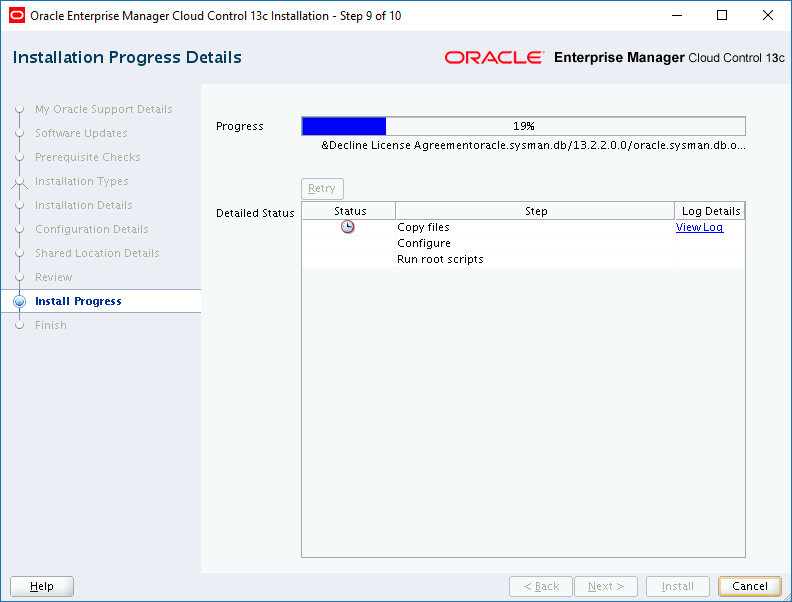
Click to Open Full Size
Time passes:
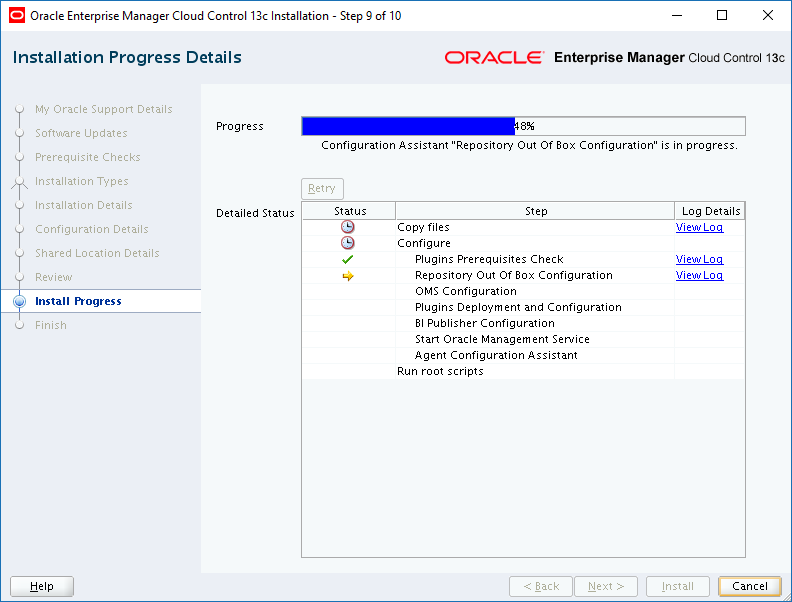
Click to Open Full Size
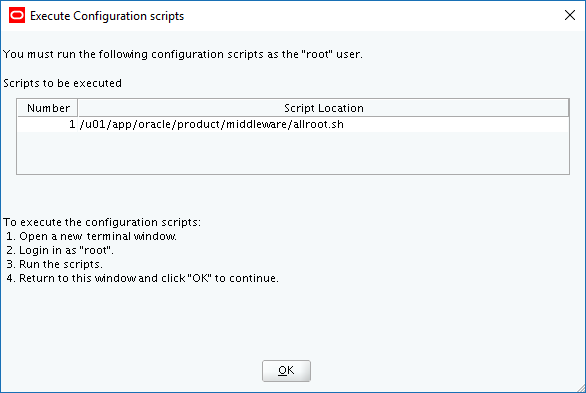
Eventually you’ll see this window appear:
Click to Open Full Size
In a separate root shell session, run the allroot.sh script then click the OK button:
[root@oraemcc middleware]# ./allroot.sh

Starting to execute allroot.sh .........
Starting to execute /u01/app/oracle/product/middleware/root.sh ......
/etc exist
/u01/app/oracle/product/middleware
Finished product-specific root actions.
/etc exist
Finished execution of  /u01/app/oracle/product/middleware/root.sh ......

Starting to execute /u01/app/oracle/product/agent/agent_13.2.0.0.0/root.sh ......
Finished product-specific root actions.
/etc exist

Finished execution of  /u01/app/oracle/product/agent/agent_13.2.0.0.0/root.sh ......
Finally, you’ll see an installation summary screen. Click Close and you’re done!

Click to Open Full Size
All that remains is to scoot over to your OEM CC 13.2 URL and login as SYSMAN:
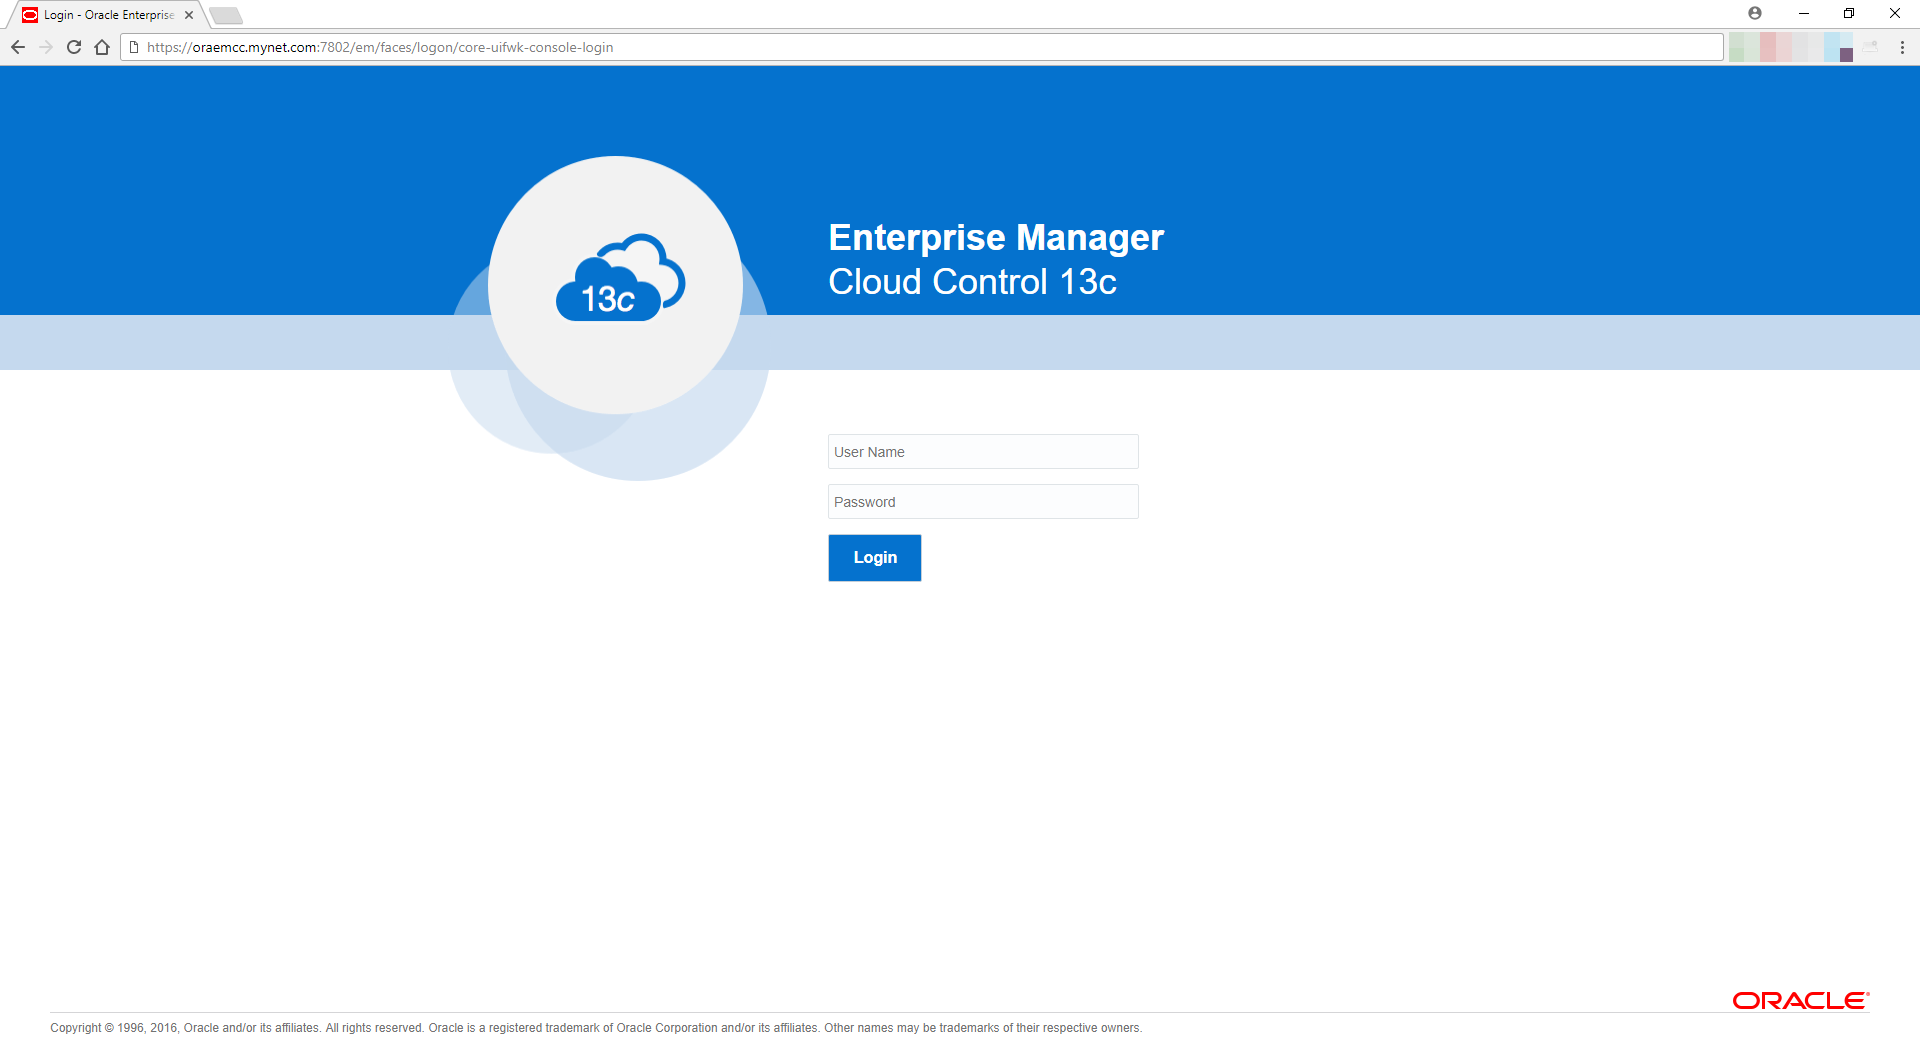
Click to Open Full Size
If you have any comments or questions about this post, please use the Contact form here.